2018 NISSAN 370Z ignition
[x] Cancel search: ignitionPage 302 of 453
5-10Starting and driving
EMERGENCY ENGINE SHUT OFF
To shut off the engine in an emergency
situation while driving perform the follow-
ing procedure:
.Rapidly push the push-button ignition
switch 3 consecutive times in less
than 1.5 seconds, or
. Push and hold the push-button igni-
tion switch for more than 2 seconds.
CAUTION
Do not leave the vehicle with the
push-button ignition switch in ACC or
ON positions when the engine is not
running for an extended period. This
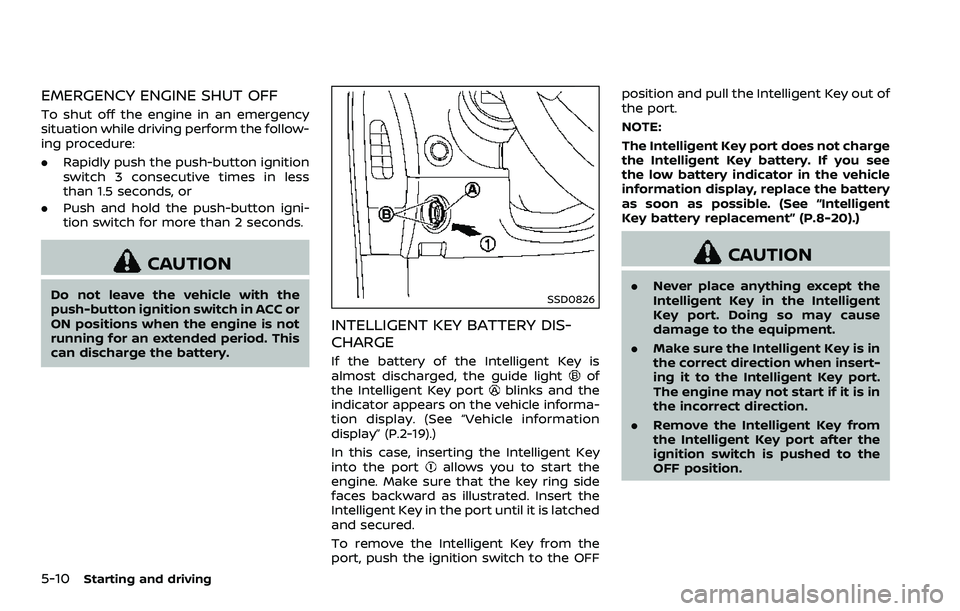
can discharge the battery.SSD0826
INTELLIGENT KEY BATTERY DIS-
CHARGE
If the battery of the Intelligent Key is
almost discharged, the guide lightof
the Intelligent Key portblinks and the
indicator appears on the vehicle informa-
tion display. (See “Vehicle information
display” (P.2-19).)
In this case, inserting the Intelligent Key
into the port
allows you to start the
engine. Make sure that the key ring side
faces backward as illustrated. Insert the
Intelligent Key in the port until it is latched
and secured.
To remove the Intelligent Key from the
port, push the ignition switch to the OFF position and pull the Intelligent Key out of
the port.
NOTE:
The Intelligent Key port does not charge
the Intelligent Key battery. If you see
the low battery indicator in the vehicle
information display, replace the battery
as soon as possible. (See “Intelligent
Key battery replacement” (P.8-20).)
CAUTION
.
Never place anything except the
Intelligent Key in the Intelligent
Key port. Doing so may cause
damage to the equipment.
. Make sure the Intelligent Key is in
the correct direction when insert-
ing it to the Intelligent Key port.
The engine may not start if it is in
the incorrect direction.
. Remove the Intelligent Key from
the Intelligent Key port after the
ignition switch is pushed to the
OFF position.
Page 303 of 453
.Make sure the area around the vehicle
is clear.
. Check fluid levels such as engine oil,
coolant, brake fluid and window
washer fluid as frequently as possible,
or at least whenever you refuel.
. Check that all windows and lights are
clean.
. Visually inspect tires for their appear-
ance and condition. Also check tires
for proper inflation.
. Lock all doors.
. Position seat and adjust head re-
straints.
. Adjust inside and outside mirrors.
. Fasten seat belts and ask all passen-
gers to do likewise.
. Check the operation of warning lights
when the ignition switch is pushed to
the ON position. (See “Warning lights,
indicator lights and audible remin-
ders” (P.2-10).)1. Apply the parking brake.
2.Automatic Transmission (AT) model:
Move the shift lever to the P (Park) or N
(Neutral) position. (P is recommended.)
The starter is designed not to operate
unless the shift lever is in either of the
above positions.
Manual Transmission (MT) model:
Move the shift lever to the N (Neutral)
position. Depress the clutch pedal fully
to the floor.
The starter is designed not to operate
unless the clutch pedal is fully de-
pressed.
The Intelligent Key must be carried
when operating the ignition switch.
3. Push the ignition switch to the ON position. Depress the brake pedal (AT
model) or the clutch pedal (MT model)
and push the ignition switch to start
the engine.
To start the engine immediately, push
and release the ignition switch while
depressing the brake pedal or the
clutch pedal with the ignition switch
in any position.
.If the engine is very hard to start inextremely cold weather or when
restarting, depress the accelerator
pedal a little (approximately 1/3 to the floor) and while holding, crank
the engine. Release the accelerator
pedal when the engine starts.
.If the engine is very hard to start
because it is flooded, depress the
accelerator pedal all the way to the
floor and hold it. Push the ignition
switch to the ON position to start
cranking the engine. After 5 or 6
seconds, stop cranking by pushing
the ignition switch to OFF. After
cranking the engine, release the
accelerator pedal. Crank the engine
with your foot off the accelerator
pedal by depressing the brake
pedal and pushing the push-button
ignition switch to start the engine.
If the engine starts, but fails to run,
repeat the above procedure.
CAUTION
Do not operate the starter for more
than 15 seconds at a time. If the
engine does not start, push the
ignition switch to OFF and wait 10
seconds before cranking again,
otherwise the starter could be da-
maged.
Starting and driving5-11
BEFORE STARTING THE ENGINE STARTING THE ENGINE
Page 304 of 453
5-12Starting and driving
4.Warm-up
Allow the engine to idle for at least 30
seconds after starting. Do not race the
engine while warming it up. Drive at
moderate speed for a short distance
first, especially in cold weather. In cold
weather, keep the engine running for
a minimum of 2 - 3 minutes before
shutting it off. Starting and stopping
the engine over a short period of time
may make the vehicle more difficult to
start.
When racing the engine up to 4,500
rpm or more under no load condition,
the engine will enter the fuel cut
mode.
5. To stop the engine, shift the shift lever to the P (Park) position (AT model) or
move the shift lever to the N (Neutral)
position (MT model), and push the
ignition switch to the OFF position.
NOTE:
Care should be taken to avoid situations
that can lead to potential battery dis-
charge and potential no-start condi-
tions such as:
1. Installation or extended use of elec-
tronic accessories that consume
battery power when the engine is
not running (Phone chargers, GPS,
DVD players, etc.) 2.
Vehicle is not driven regularly and/
or only driven short distances.
In these cases, the battery may need to
be charged to maintain battery health.AUTOMATIC TRANSMISSION
7 speed automatic transmission
The automatic transmission in your vehi-
cle is electronically controlled by a trans-
mission control module to produce
maximum efficiency and smooth opera-
tion.
Shown on the following pages are the
recommended operating procedures for
this transmission. Follow these proce-
dures for maximum vehicle performance
and driving enjoyment.
Starting the vehicle
After starting the engine, fully depress the
foot brake pedal and push the shift lever
button before shifting the shift lever to
the R (Reverse), N (Neutral), D (Drive) or
Manual shift mode position. Be sure the
vehicle is fully stopped before attempting
to shift the shift lever.
This automatic transmission model is
designed so that the foot brake pedal
must be depressed before shifting from
P (Park) to any drive position while the
ignition switch position is ON.
The shift lever cannot be moved out of
the P (Park) position and into any of the
other gear positions if the ignition
switch is pushed to the LOCK, OFF or
ACC position.
DRIVING THE VEHICLE
Page 308 of 453
5-16Starting and driving
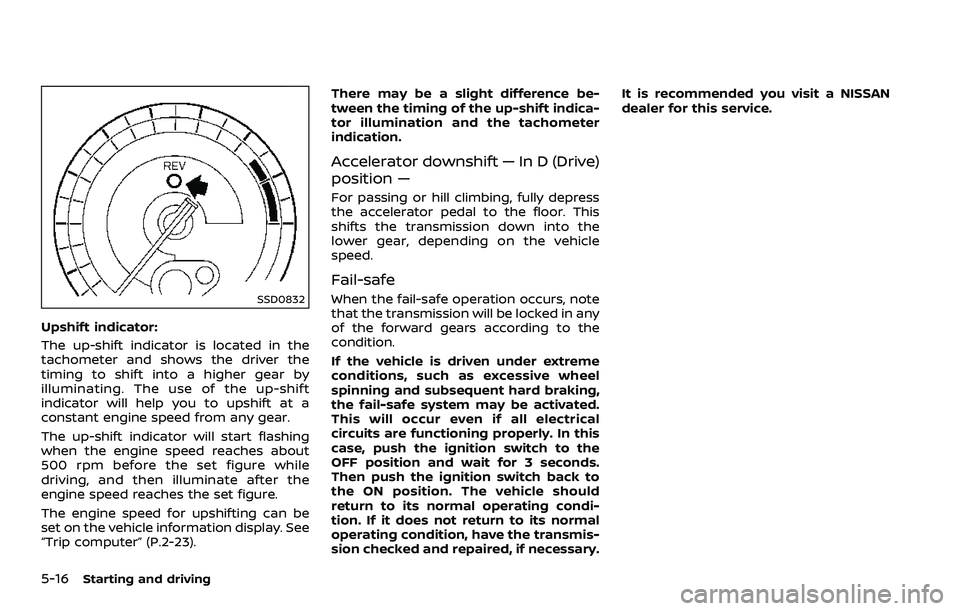
SSD0832
Upshift indicator:
The up-shift indicator is located in the
tachometer and shows the driver the
timing to shift into a higher gear by
illuminating. The use of the up-shift
indicator will help you to upshift at a
constant engine speed from any gear.
The up-shift indicator will start flashing
when the engine speed reaches about
500 rpm before the set figure while
driving, and then illuminate after the
engine speed reaches the set figure.
The engine speed for upshifting can be
set on the vehicle information display. See
“Trip computer” (P.2-23).There may be a slight difference be-
tween the timing of the up-shift indica-
tor illumination and the tachometer
indication.
Accelerator downshift — In D (Drive)
position —
For passing or hill climbing, fully depress
the accelerator pedal to the floor. This
shifts the transmission down into the
lower gear, depending on the vehicle
speed.
Fail-safe
When the fail-safe operation occurs, note
that the transmission will be locked in any
of the forward gears according to the
condition.
If the vehicle is driven under extreme
conditions, such as excessive wheel
spinning and subsequent hard braking,
the fail-safe system may be activated.
This will occur even if all electrical
circuits are functioning properly. In this
case, push the ignition switch to the
OFF position and wait for 3 seconds.
Then push the ignition switch back to
the ON position. The vehicle should
return to its normal operating condi-
tion. If it does not return to its normal
operating condition, have the transmis-
sion checked and repaired, if necessary.It is recommended you visit a NISSAN
dealer for this service.
Page 309 of 453
SSD0829
Shift lock release
If the battery charge is low or discharged,
the shift lever may not be moved from the
P (Park) position even with the brake
pedal depressed and the shift lever but-
ton pushed.
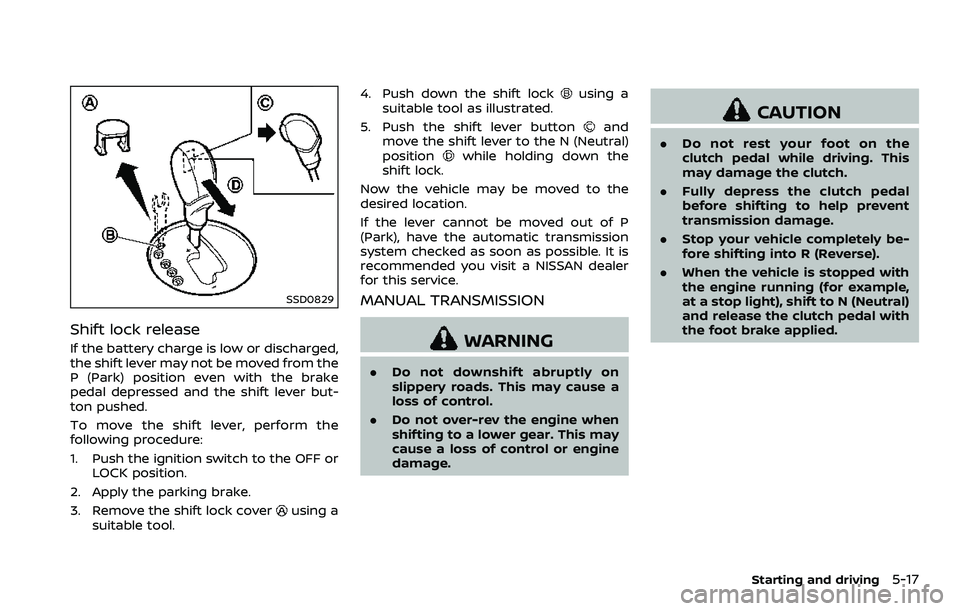
To move the shift lever, perform the
following procedure:
1. Push the ignition switch to the OFF orLOCK position.
2. Apply the parking brake.
3. Remove the shift lock cover
using a
suitable tool. 4. Push down the shift lock
using a
suitable tool as illustrated.
5. Push the shift lever button
and
move the shift lever to the N (Neutral)
position
while holding down the
shift lock.
Now the vehicle may be moved to the
desired location.
If the lever cannot be moved out of P
(Park), have the automatic transmission
system checked as soon as possible. It is
recommended you visit a NISSAN dealer
for this service.
MANUAL TRANSMISSION
WARNING
. Do not downshift abruptly on
slippery roads. This may cause a
loss of control.
. Do not over-rev the engine when
shifting to a lower gear. This may
cause a loss of control or engine
damage.
CAUTION
.Do not rest your foot on the
clutch pedal while driving. This
may damage the clutch.
. Fully depress the clutch pedal
before shifting to help prevent
transmission damage.
. Stop your vehicle completely be-
fore shifting into R (Reverse).
. When the vehicle is stopped with
the engine running (for example,
at a stop light), shift to N (Neutral)
and release the clutch pedal with
the foot brake applied.
Starting and driving5-17
Page 311 of 453
SSD0830
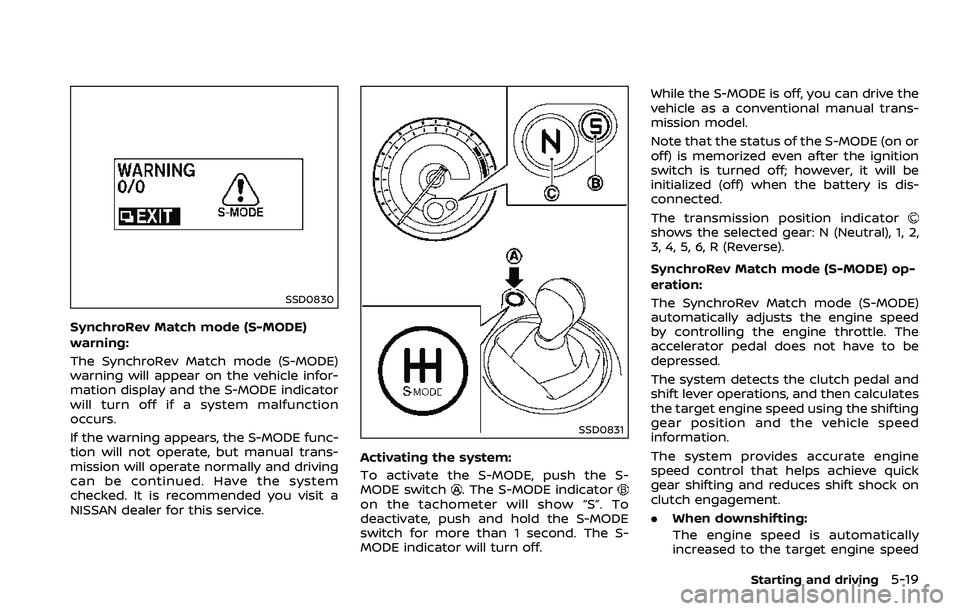
SynchroRev Match mode (S-MODE)
warning:
The SynchroRev Match mode (S-MODE)
warning will appear on the vehicle infor-
mation display and the S-MODE indicator
will turn off if a system malfunction
occurs.
If the warning appears, the S-MODE func-
tion will not operate, but manual trans-
mission will operate normally and driving
can be continued. Have the system
checked. It is recommended you visit a
NISSAN dealer for this service.
SSD0831
Activating the system:
To activate the S-MODE, push the S-
MODE switch
. The S-MODE indicatoron the tachometer will show “S”. To
deactivate, push and hold the S-MODE
switch for more than 1 second. The S-
MODE indicator will turn off.While the S-MODE is off, you can drive the
vehicle as a conventional manual trans-
mission model.
Note that the status of the S-MODE (on or
off) is memorized even after the ignition
switch is turned off; however, it will be
initialized (off) when the battery is dis-
connected.
The transmission position indicator
shows the selected gear: N (Neutral), 1, 2,
3, 4, 5, 6, R (Reverse).
SynchroRev Match mode (S-MODE) op-
eration:
The SynchroRev Match mode (S-MODE)
automatically adjusts the engine speed
by controlling the engine throttle. The
accelerator pedal does not have to be
depressed.
The system detects the clutch pedal and
shift lever operations, and then calculates
the target engine speed using the shifting
gear position and the vehicle speed
information.
The system provides accurate engine
speed control that helps achieve quick
gear shifting and reduces shift shock on
clutch engagement.
.
When downshifting:
The engine speed is automatically
increased to the target engine speed
Starting and driving5-19
Page 319 of 453
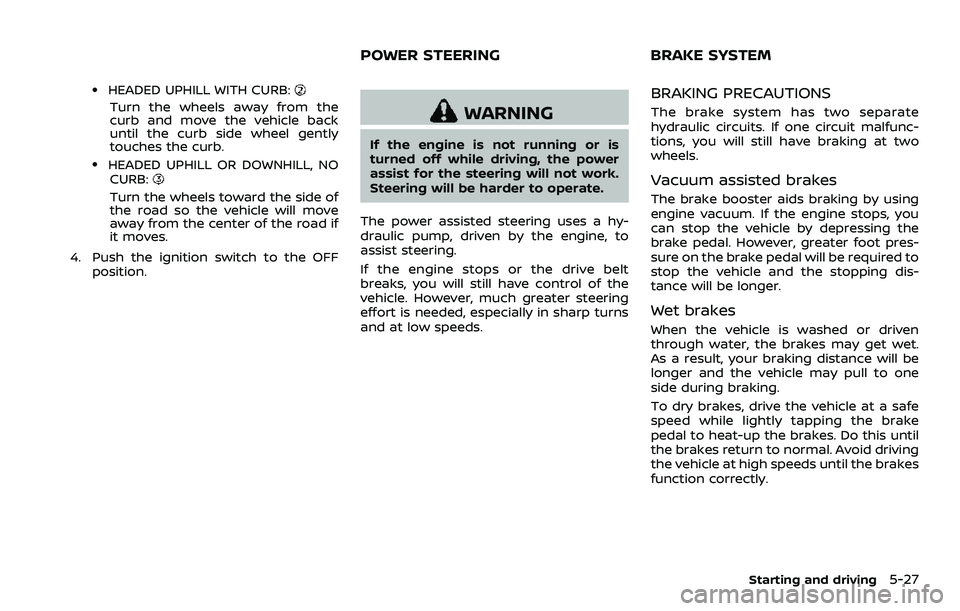
.HEADED UPHILL WITH CURB:
Turn the wheels away from the
curb and move the vehicle back
until the curb side wheel gently
touches the curb.
.HEADED UPHILL OR DOWNHILL, NOCURB:
Turn the wheels toward the side of
the road so the vehicle will move
away from the center of the road if
it moves.
4. Push the ignition switch to the OFF position.
WARNING
If the engine is not running or is
turned off while driving, the power
assist for the steering will not work.
Steering will be harder to operate.
The power assisted steering uses a hy-
draulic pump, driven by the engine, to
assist steering.
If the engine stops or the drive belt
breaks, you will still have control of the
vehicle. However, much greater steering
effort is needed, especially in sharp turns
and at low speeds.
BRAKING PRECAUTIONS
The brake system has two separate
hydraulic circuits. If one circuit malfunc-
tions, you will still have braking at two
wheels.
Vacuum assisted brakes
The brake booster aids braking by using
engine vacuum. If the engine stops, you
can stop the vehicle by depressing the
brake pedal. However, greater foot pres-
sure on the brake pedal will be required to
stop the vehicle and the stopping dis-
tance will be longer.
Wet brakes
When the vehicle is washed or driven
through water, the brakes may get wet.
As a result, your braking distance will be
longer and the vehicle may pull to one
side during braking.
To dry brakes, drive the vehicle at a safe
speed while lightly tapping the brake
pedal to heat-up the brakes. Do this until
the brakes return to normal. Avoid driving
the vehicle at high speeds until the brakes
function correctly.
Starting and driving5-27
POWER STEERING BRAKE SYSTEM
Page 322 of 453
5-30Starting and driving
The Vehicle Dynamic Control (VDC) sys-
tem uses various sensors to monitor
driver inputs and vehicle motion. Under
certain driving conditions, the VDC sys-
tem helps to perform the following func-
tions.
.Controls brake pressure to reduce
wheel slip on one slipping drive wheel
so power is transferred to a non
slipping drive wheel on the same axle.
. Controls brake pressure and engine
output to reduce drive wheel slip
based on vehicle speed (traction con-
trol function).
. Controls brake pressure at individual
wheels and engine output to help the
driver maintain control of the vehicle
in the following conditions:
— understeer (vehicle tends to not
follow the steered path despite
increased steering input)
— oversteer (vehicle tends to spin due to certain road or driving condi-
tions).
The VDC system can help the driver to
maintain control of the vehicle, but it
cannot prevent loss of vehicle control in
all driving situations.
When the VDC system operates, the VDC
warning light
in the instrument panel
flashes so note the following: .
The road may be slippery or the
system may determine some action
is required to help keep the vehicle on
the steered path.
. You may feel a pulsation in the brake
pedal and hear a noise or vibration
from under the hood. This is normal
and indicates that the VDC system is
working properly.
. Adjust your speed and driving to the
road conditions.
See “Vehicle Dynamic Control (VDC) warn-
ing light” (P.2-15).
If a malfunction occurs in the system, the
VDC warning light
illuminates in the
instrument panel. The VDC system auto-
matically turns off.
The VDC OFF switch is used to turn off the
VDC system. The VDC off indicator light
illuminates to indicate the VDC sys-
tem is off. When the VDC switch is used to
turn off the system, the VDC system still
operates to prevent one drive wheel from
slipping by transferring power to a non
slipping drive wheel. The VDC warning
light
flashes if this occurs. All other
VDC functions are off, and the VDC
warning light
will not flash. The VDC
system is automatically reset to on when
the ignition switch is placed in the off
position then back to the on position.
See “Vehicle Dynamic Control (VDC) warn- ing light” (P.2-15) and “Vehicle Dynamic
Control (VDC) off indicator light” (P.2-18).
The computer has a built-in diagnostic
feature that tests the system each time
you start the engine and move the vehicle
forward or in reverse at a slow speed.
When the self-test occurs, you may hear a
“clunk” noise and/or feel a pulsation in the
brake pedal. This is normal and is not an
indication of a malfunction.
WARNING
.
The VDC system is designed to
help the driver maintain stability
but does not prevent accidents
due to abrupt steering operation
at high speeds or by careless or
dangerous driving techniques.
Reduce vehicle speed and be
especially careful when driving
and cornering on slippery sur-
faces and always drive carefully.
. Do not modify the vehicle’s sus-
pension. If suspension parts such
as shock absorbers, struts,
springs, stabilizer bars, bushings
and wheels are not NISSAN re-
commended for your vehicle or
are extremely deteriorated, the
VDC system may not operate
VEHICLE DYNAMIC CONTROL (VDC) SYSTEM