2018 NISSAN 370Z window
[x] Cancel search: windowPage 194 of 453
4-26Center display, heater, air conditioner, audio, phone and voice recognition systems
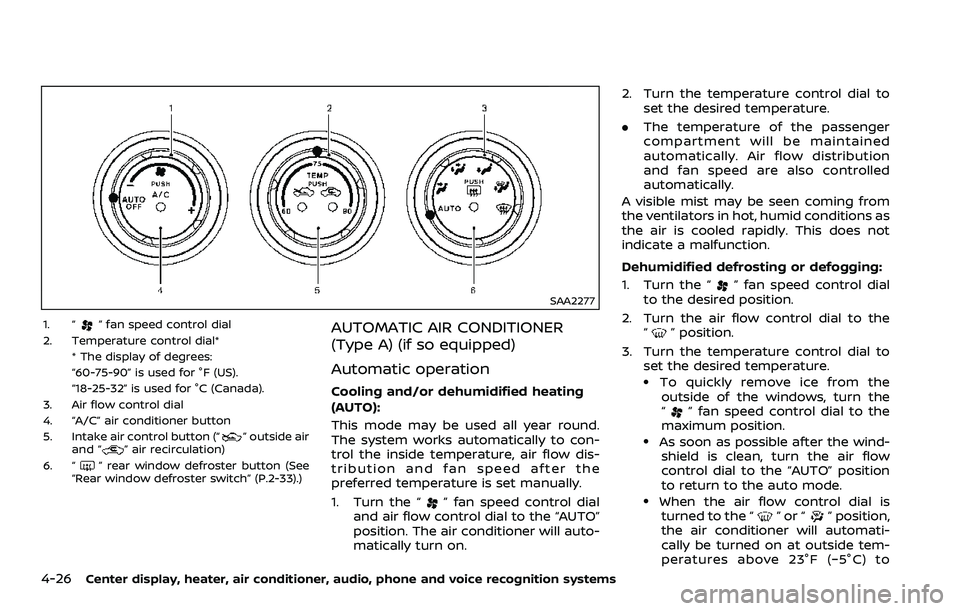
SAA2277
1. “” fan speed control dial
2. Temperature control dial* * The display of degrees:
“60-75-90” is used for °F (US).
“18-25-32” is used for °C (Canada).
3. Air flow control dial
4. “A/C” air conditioner button
5. Intake air control button (“
” outside air
and “” air recirculation)
6. “
” rear window defroster button (See
“Rear window defroster switch” (P.2-33).)
AUTOMATIC AIR CONDITIONER
(Type A) (if so equipped)
Automatic operation
Cooling and/or dehumidified heating
(AUTO):
This mode may be used all year round.
The system works automatically to con-
trol the inside temperature, air flow dis-
tribution and fan speed after the
preferred temperature is set manually.
1. Turn the “
” fan speed control dial
and air flow control dial to the “AUTO”
position. The air conditioner will auto-
matically turn on. 2. Turn the temperature control dial to
set the desired temperature.
. The temperature of the passenger
compartment will be maintained
automatically. Air flow distribution
and fan speed are also controlled
automatically.
A visible mist may be seen coming from
the ventilators in hot, humid conditions as
the air is cooled rapidly. This does not
indicate a malfunction.
Dehumidified defrosting or defogging:
1. Turn the “
” fan speed control dial
to the desired position.
2. Turn the air flow control dial to the “
” position.
3. Turn the temperature control dial to set the desired temperature.
.To quickly remove ice from theoutside of the windows, turn the
“
” fan speed control dial to the
maximum position.
.As soon as possible after the wind- shield is clean, turn the air flow
control dial to the “AUTO” position
to return to the auto mode.
.When the air flow control dial isturned to the “”or“” position,
the air conditioner will automati-
cally be turned on at outside tem-
peratures above 23°F (−5°C) to
Page 196 of 453
4-28Center display, heater, air conditioner, audio, phone and voice recognition systems
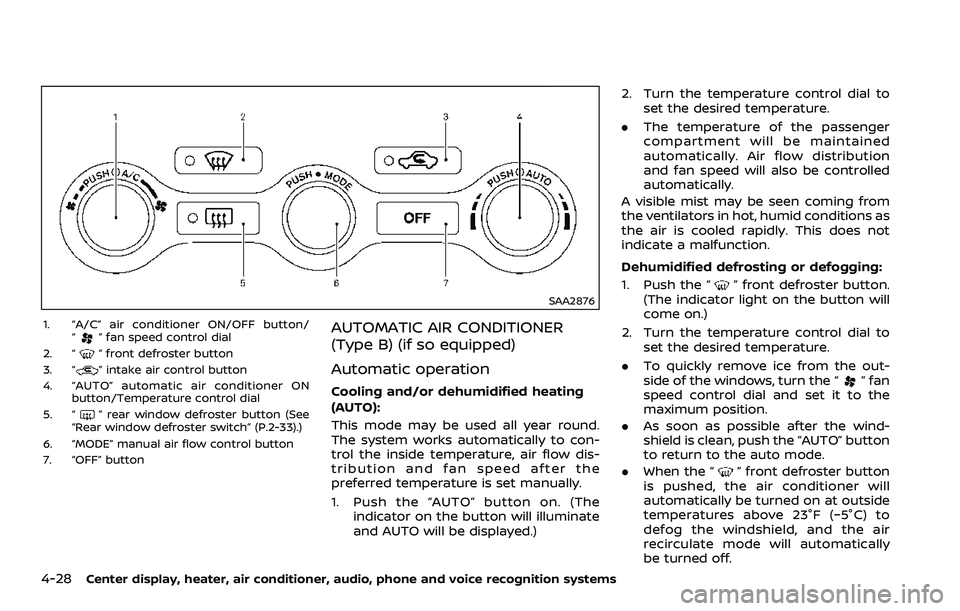
SAA2876
1. “A/C” air conditioner ON/OFF button/“” fan speed control dial
2. “
” front defroster button
3. “” intake air control button
4. “AUTO” automatic air conditioner ON button/Temperature control dial
5. “
” rear window defroster button (See
“Rear window defroster switch” (P.2-33).)
6. “MODE” manual air flow control button
7. “OFF” button
AUTOMATIC AIR CONDITIONER
(Type B) (if so equipped)
Automatic operation
Cooling and/or dehumidified heating
(AUTO):
This mode may be used all year round.
The system works automatically to con-
trol the inside temperature, air flow dis-
tribution and fan speed after the
preferred temperature is set manually.
1. Push the “AUTO” button on. (The indicator on the button will illuminate
and AUTO will be displayed.) 2. Turn the temperature control dial to
set the desired temperature.
. The temperature of the passenger
compartment will be maintained
automatically. Air flow distribution
and fan speed will also be controlled
automatically.
A visible mist may be seen coming from
the ventilators in hot, humid conditions as
the air is cooled rapidly. This does not
indicate a malfunction.
Dehumidified defrosting or defogging:
1. Push the “
” front defroster button.
(The indicator light on the button will
come on.)
2. Turn the temperature control dial to set the desired temperature.
. To quickly remove ice from the out-
side of the windows, turn the “
” fan
speed control dial and set it to the
maximum position.
. As soon as possible after the wind-
shield is clean, push the “AUTO” button
to return to the auto mode.
. When the “
” front defroster button
is pushed, the air conditioner will
automatically be turned on at outside
temperatures above 23°F (−5°C) to
defog the windshield, and the air
recirculate mode will automatically
be turned off.
Page 204 of 453

4-36Center display, heater, air conditioner, audio, phone and voice recognition systems
Compressed Audio Files (MP3/
WMA/AAC) (if so equipped)
Explanation of terms:
.MP3 — MP3 is short for Moving Pic-
tures Experts Group Audio Layer 3.
MP3 is the most well known com-
pressed digital audio file format. This
format allows for near “CD quality”
sound, but at a fraction of the size of
normal audio files. MP3 conversion of
an audio track can reduce the file size
by approximately a 10:1 ratio (Sam-
pling: 44.1 kHz, Bit rate: 128 kbps) with
virtually no perceptible loss in quality.
The compression reduces certain
parts of sound that seem inaudible
to most people.
. WMA — Windows Media Audio (WMA) is
a compressed audio format created
by Microsoft as an alternative to MP3.
The WMA codec offers greater file
compression than the MP3 codec,
enabling storage of more digital audio
tracks in the same amount of space
when compared to MP3s at the same
level of quality.
This product is protected by certain
intellectual property rights of Micro-
soft Corporation and third parties. Use
or distribution of such technology
outside of this product is prohibited
without a license from Microsoft or an authorized Microsoft subsidiary and
third parties.
. AAC/M4A — Advanced Audio Coding
(AAC) is a lossy audio compression
format. Audio files that have been
encoded with AAC are generally smal-
ler in size and deliver a higher quality
of sound than MP3.
. Bit rate — Bit rate denotes the number
of bits per second used by a digital
music file. The size and quality of a
compressed digital audio file is deter-
mined by the bit rate used when
encoding the file.
. Sampling frequency — Sampling fre-
quency is the rate at which the
samples of a signal are converted
from analog to digital (A/D conver-
sion) per second.
. Multisession — Multisession is one of
the methods for writing data to med-
ia. Writing data once to the media is
called a single session, and writing
more than once is called a multises-
sion.
. ID3/WMA Tag — The ID3/WMA tag is
the part of the encoded MP3 or WMA
file that contains information about
the digital music file such as song title,
artist, album title, encoding bit rate,
track time duration, etc. ID3 tag in-
formation is displayed on the Album/ Artist/Track title line on the display.
* Windows® and Windows Media® are
registered trademarks or trademarks of
Microsoft Corporation in the United
States of America and/or other countries.
Page 206 of 453
4-38Center display, heater, air conditioner, audio, phone and voice recognition systems
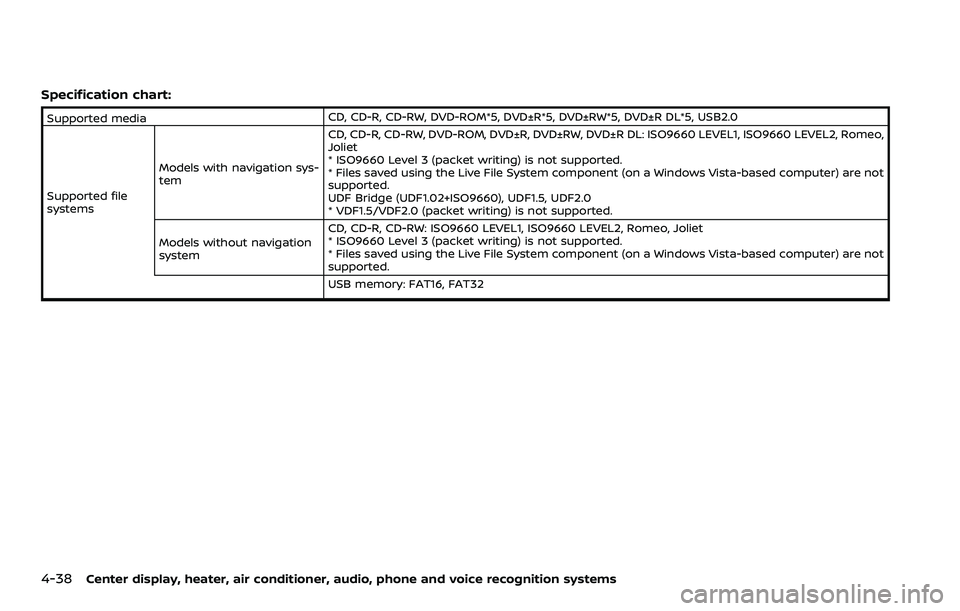
Specification chart:
Supported mediaCD, CD-R, CD-RW, DVD-ROM*5, DVD±R*5, DVD±RW*5, DVD±R DL*5, USB2.0
Supported file
systems Models with navigation sys-
tem CD, CD-R, CD-RW, DVD-ROM, DVD±R, DVD±RW, DVD±R DL: ISO9660 LEVEL1, ISO9660 LEVEL2, Romeo,
Joliet
* ISO9660 Level 3 (packet writing) is not supported.
* Files saved using the Live File System component (on a Windows Vista-based computer) are not
supported.
UDF Bridge (UDF1.02+ISO9660), UDF1.5, UDF2.0
* VDF1.5/VDF2.0 (packet writing) is not supported.
Models without navigation
system CD, CD-R, CD-RW: ISO9660 LEVEL1, ISO9660 LEVEL2, Romeo, Joliet
* ISO9660 Level 3 (packet writing) is not supported.
* Files saved using the Live File System component (on a Windows Vista-based computer) are not
supported.
USB memory: FAT16, FAT32
Page 209 of 453

Compressed Video Files (models
with navigation system)
Explanation of terms:
.DivX® - DivX® refers to the DivX® codec
owned by DivX, Inc. used for a lossy
compression of video based on MPEG-
4.
. AVI - AVI stands for Audio Video
Interleave. It is a standard file format
originated by Microsoft Corporation. A
“.divx” encoded file can be saved into
the “.avi” file format for playback on
this system if it meets the require-
ments stated in the table in this
section. However, not all the “.avi” files
are playable on this system since
different encodings can be used than
the DivX® codec.
. ASF - ASF stands for Advanced Sys-
tems Format. It is a file format owned
by Microsoft Corporation. Note: Only “.
asf” files that meet the requirements
stated in the table in this section can
be played.
. Bit rate — Bit rate denotes the number
of bits per second used by a digital
video file. The size and quality of a
compressed digital audio file is deter-
mined by the bit rate used when
encoding the file. Requirement for Supporting Video Playback:
Media CD, CD-R, CD-RW, DVD, DVD±R, DVD±RW, DVD±RW DL, USB 2.0 Memory
File Systems CD,
CD-R,
CD-RW,
DVD,
DVD±R,
DVD±RW,
DVD±RW DL ISO9660 LEVEL1, ISO9660 LEVEL2, Romeo, Joliet, UDF Bridge
(UDF1.02+ISO9660), UDF1.5, UDF2.0
- ISO9660 Level 3 (packet writing) is not supported.
- Files saved using the Live File System component (on a
Windows Vista-based computer) are not supported.
- VDF1.5/VDF2.0 (packet writing) is not supported.
USB Memory FAT16, FAT32
File Types .divx, .avi Video Codecs DivX3, DivX4, DivX5, DivX6
Audio Codecs MP3, MPEG2.5 Audio Layer3, Dolby
Digital, LPCM
.asf Video Codec ISO-MPEG4
Audio Codec G.726
Bit Rates .divx, .avi Maximum Average 4Mbps
Maximum Peak 8Mbps
Resolution .divx, .avi Minimum 32 × 32
Maximum 720 × 480
.asf Minimum 32 × 32
Maximum 720 × 576
Center display, heater, air conditioner, audio, phone and voice recognition systems4-41
Page 242 of 453
4-74Center display, heater, air conditioner, audio, phone and voice recognition systems
BACK switch (models with
navigation system)
Push this switch to go back to the
previous screen or cancel the selection if
it is not completed.
Volume control switches
Push the upper (+) or lower (−) side switch
to increase or decrease the volume.
Audio source switch
Push the audio source switch to change
the mode to available audio source.
ANTENNA
Window antenna (for Coupe mod-
els)
The antenna pattern is printed inside the
rear window.
CAUTION
. Do not place metalized film near
the rear window glass or attach
any metal parts to it. This may
cause poor reception or noise.
. When cleaning the inside of the
rear window, be careful not to
scratch or damage the rear win-
dow antenna. Lightly wipe along
the antenna with a dampened
soft cloth.
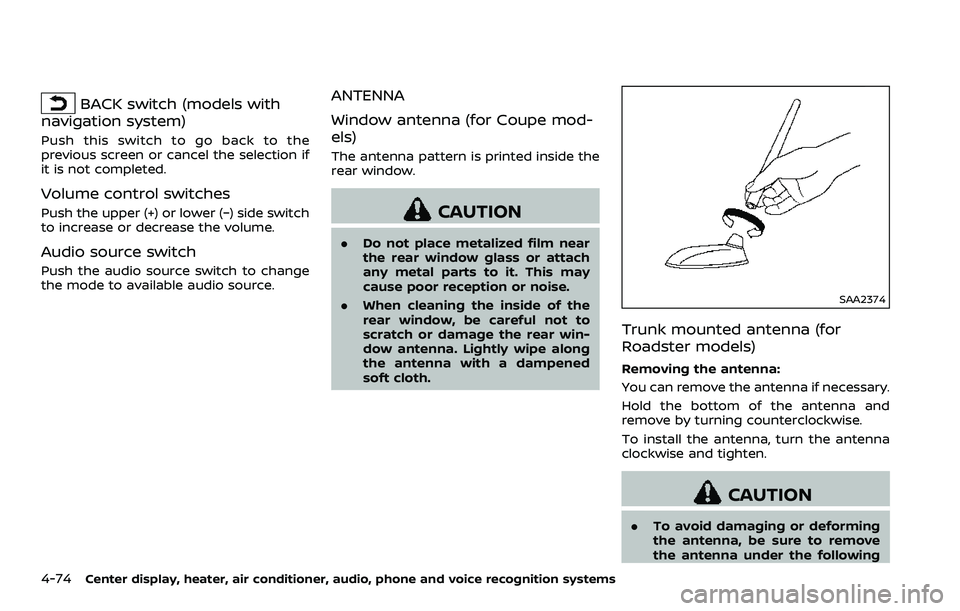
SAA2374
Trunk mounted antenna (for
Roadster models)
Removing the antenna:
You can remove the antenna if necessary.
Hold the bottom of the antenna and
remove by turning counterclockwise.
To install the antenna, turn the antenna
clockwise and tighten.
CAUTION
.To avoid damaging or deforming
the antenna, be sure to remove
the antenna under the following
Page 253 of 453
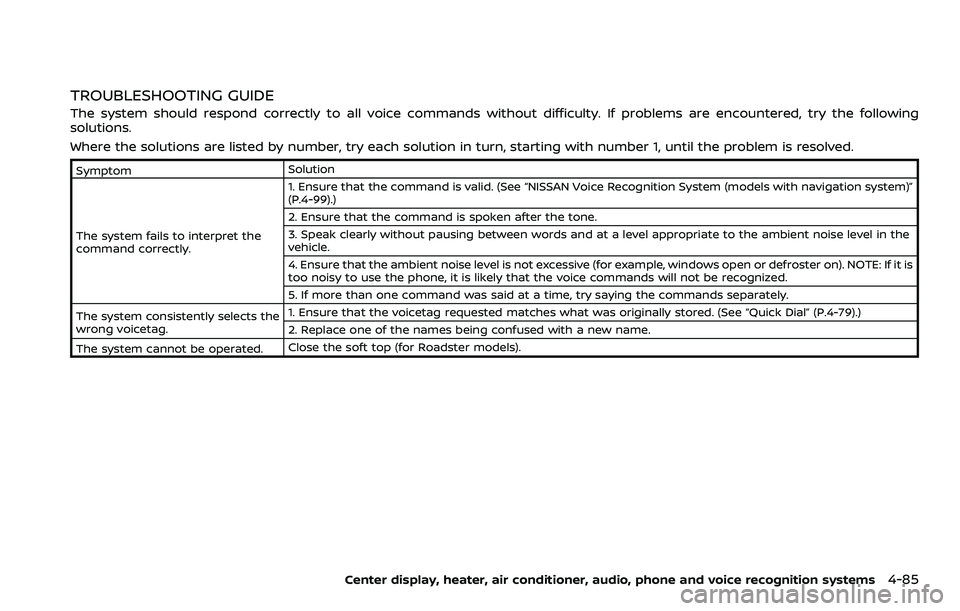
TROUBLESHOOTING GUIDE
The system should respond correctly to all voice commands without difficulty. If problems are encountered, try the following
solutions.
Where the solutions are listed by number, try each solution in turn, starting with number 1, until the problem is resolved.
SymptomSolution
The system fails to interpret the
command correctly. 1. Ensure that the command is valid. (See “NISSAN Voice Recognition System (models with navigation system)”
(P.4-99).)
2. Ensure that the command is spoken after the tone.
3. Speak clearly without pausing between words and at a level appropriate to the ambient noise level in the
vehicle.
4. Ensure that the ambient noise level is not excessive (for example, windows open or defroster on). NOTE: If it is
too noisy to use the phone, it is likely that the voice commands will not be recognized.
5. If more than one command was said at a time, try saying the commands separately.
The system consistently selects the
wrong voicetag. 1. Ensure that the voicetag requested matches what was originally stored. (See “Quick Dial” (P.4-79).)
2. Replace one of the names being confused with a new name.
The system cannot be operated. Close the soft top (for Roadster models).
Center display, heater, air conditioner, audio, phone and voice recognition systems4-85
Page 256 of 453
4-88Center display, heater, air conditioner, audio, phone and voice recognition systems
IC Regulatory information
.Operation is subject to the following
two conditions: (1) this device may not
cause interference, and (2) this device
must accept any interference, includ-
ing interference that may cause un-
desired operation of the device.
. This Class B digital apparatus meets
all requirements of the Canadian In-
terference-Causing Equipment Regu-
lations.
Bluetooth® trademark
Bluetooth® is a trademark
owned by Bluetooth SIG,
Inc., and licensed to Visteon
Corporation.
USING THE SYSTEM
The NISSAN Voice Recognition system
allows hands-free operation of the Blue-
tooth® Hands-Free Phone System.
If the vehicle is in motion, some com-
mands may not be available so full
attention may be given to vehicle opera-
tion.
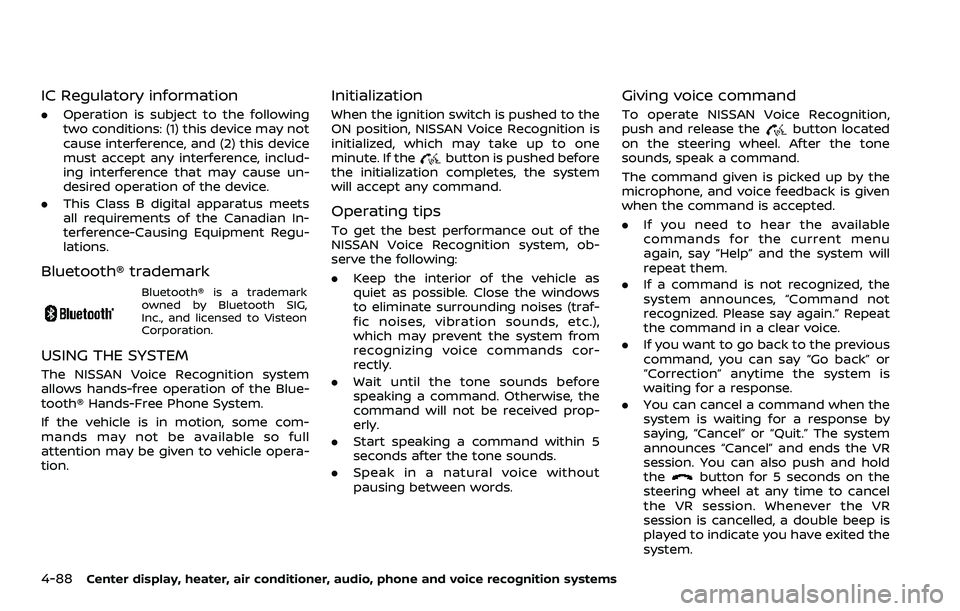
Initialization
When the ignition switch is pushed to the
ON position, NISSAN Voice Recognition is
initialized, which may take up to one
minute. If the
button is pushed before
the initialization completes, the system
will accept any command.
Operating tips
To get the best performance out of the
NISSAN Voice Recognition system, ob-
serve the following:
. Keep the interior of the vehicle as
quiet as possible. Close the windows
to eliminate surrounding noises (traf-
fic noises, vibration sounds, etc.),
which may prevent the system from
recognizing voice commands cor-
rectly.
. Wait until the tone sounds before
speaking a command. Otherwise, the
command will not be received prop-
erly.
. Start speaking a command within 5
seconds after the tone sounds.
. Speak in a natural voice without
pausing between words.
Giving voice command
To operate NISSAN Voice Recognition,
push and release thebutton located
on the steering wheel. After the tone
sounds, speak a command.
The command given is picked up by the
microphone, and voice feedback is given
when the command is accepted.
. If you need to hear the available
commands for the current menu
again, say “Help” and the system will
repeat them.
. If a command is not recognized, the
system announces, “Command not
recognized. Please say again.” Repeat
the command in a clear voice.
. If you want to go back to the previous
command, you can say “Go back” or
“Correction” anytime the system is
waiting for a response.
. You can cancel a command when the
system is waiting for a response by
saying, “Cancel” or “Quit.” The system
announces “Cancel” and ends the VR
session. You can also push and hold
the
button for 5 seconds on the
steering wheel at any time to cancel
the VR session. Whenever the VR
session is cancelled, a double beep is
played to indicate you have exited the
system.