Page 164 of 453
3-38Pre-driving checks and adjustments
WARNING
.Do not adjust the steering wheel
while driving. You could lose con-
trol of your vehicle and cause an
accident.
. Do not adjust the steering wheel
any closer to you than is neces-
sary for proper steering opera-
tion and comfort. The driver’s air
bag inflates with great force. If
you are unrestrained, leaning for-
ward, sitting sideways or out of
position in any way, you are at
greater risk of injury or death in a
crash. You may also receive ser-
ious or fatal injuries from the air
bag if you are up against it when
it inflates. Always sit back against
the seatback and as far away as
practical from the steering wheel.
Always use the seat belts.
SPA2583
MANUAL OPERATION
Tilt operation
Push the lock leverdown and adjust
the steering wheel up or down to the
desired position.
Pull the lock lever up securely to lock the
steering wheel in place.
SIC3451
TILT STEERING SUN VISORS
Page 165 of 453
CAUTION
.Do not store the main sun visor
before storing the extension sun
visor.
. Do not pull the extension sun
visor forcedly downwards.
1. To block out glare from the front, swing down the main sun visor
.
2. To block glare from the side, remove the main sun visor from the center
mount and swing it to the side
.
3. Draw out the extension sun visor
(if
so equipped) from the main sun visor
to block further glare.SPA2447
INSIDE MIRROR
Adjust the height and the angle of the
inside mirror to the desired position.
SPA2143
Manual anti-glare type
The night positionwill reduce glare
from the headlights of vehicles behind
you at night.
Use the day position
when driving in
daylight hours.
WARNING
Use the night position only when
necessary, because it reduces rear
view clarity.
Pre-driving checks and adjustments3-39
MIRRORS
Page 166 of 453

3-40Pre-driving checks and adjustments
SPA2450
Automatic anti-glare type
The inside mirror is designed so that it
automatically changes reflection accord-
ing to the intensity of the headlights of
the following vehicle.
The anti-glare system will be automati-
cally turned on when the ignition switch is
pushed to the ON position.
When the anti-glare system is turned on,
the indicator light
will illuminate and
excessive glare from the headlights of the
vehicle behind you will be reduced.
Push the “*” switch
to make the inside
rearview mirror operate normally. The
indicator light will turn off. Push the “I” switch
to turn the system on.
Do not allow any object to cover the
sensors
or apply glass cleaner on
them. Doing so will reduce the sensitiv-
ity of the sensor, resulting in improper
operation.
For the HomeLink® Universal Transceiver
operation, see “HomeLink® Universal
Transceiver” (P.2-52).
OUTSIDE MIRRORS
WARNING
Objects viewed in the outside mirror
on the passenger side are closer
than they appear. Be careful when
moving to the right. Using only this
mirror could cause an accident. Use
the inside mirror or glance over your
shoulder to properly judge distances
to other objects.SPA2319
Adjusting outside mirrors
The outside mirror control switch is
located on the armrest.
The outside mirror will operate only when
the ignition switch is in the ACC or ON
position.
Turn the switch right or left to select the
right or left side mirror
, then adjust
using the control switch.
Page 171 of 453

WARNING
.Do not disassemble or modify
this system. If you do, it may
result in accidents, fire, or electric
shock.
. Do not use this system if you
notice any abnormality, such as
a frozen screen or lack of sound.
Continued use of the system may
result in accident, fire or electric
shock.
. In case you notice any foreign
object in the system hardware,
spill liquid on it, or notice smoke
or smell coming from it, stop
using the system immediately. It
is recommended you visit a
NISSAN dealer for servicing.
Ignoring such conditions may
lead to accidents, fire, or electric
shock.
. Park the vehicle in a safe location
and apply the parking brake to
view the images on the front
center display screen. Do not attempt to operate the system in
extreme temperature conditions [below
−4°F (−20°C) and above 158°F (70°C)].
Operating this system under these con-
ditions may result in system malfunc-
tions.
Center display, heater, air conditioner, audio, phone and voice recognition systems4-3
SAFETY NOTE
Page 173 of 453

HOW TO USE TOUCH SCREEN
CAUTION
.The glass screen on the liquid
crystal display may break if it is
hit with a hard or sharp object. If
the glass screen breaks, do not
touch it. Doing so could result in
an injury.
. To clean the display, use a soft,
dry cloth. If additional cleaning is
necessary, use a small amount of
neutral detergent with a soft
cloth. Never use a rough cloth,
alcohol, benzine, thinner or any
kind of solvent or paper towel
with a chemical cleaning agent.
They will scratch or deteriorate
the panel.
. Do not splash any liquid such as
water or car fragrance on the
display. Contact with liquid will
cause the system to malfunction.
To ensure safe driving, some functions
cannot be operated while driving.
The on-screen functions that are not
available while driving will be “grayed
out” or muted. Park the vehicle in a safe location and
then operate the navigation system.
WARNING
.
ALWAYS give your full attention to
driving.
. Avoid using vehicle features that
could distract you. If distracted,
you could lose control of your
vehicle and cause an accident.
SAA2473
Touch screen operation
With this system, the same operations as
those for the multi-function controller are
possible using the touch screen opera-
tion.
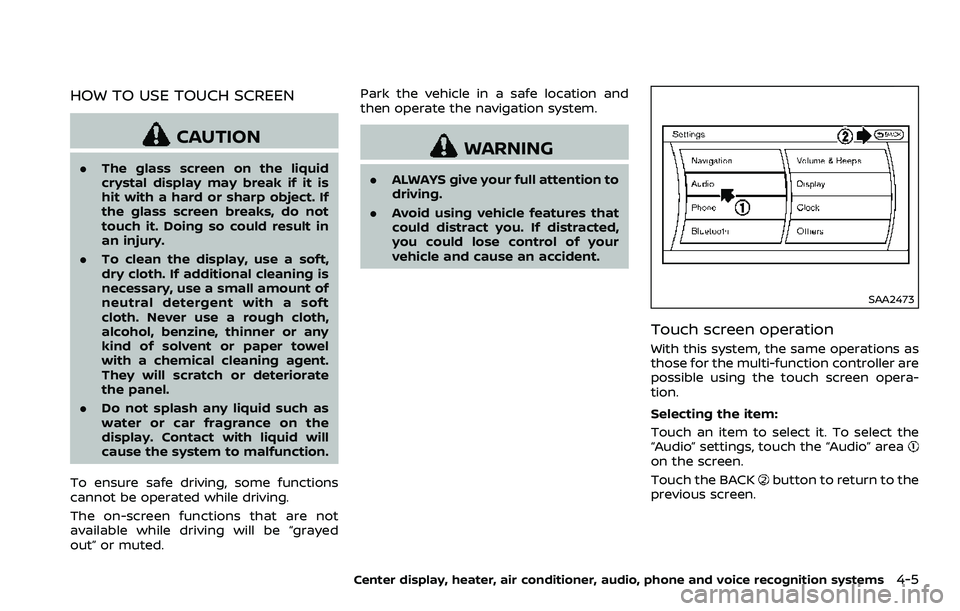
Selecting the item:
Touch an item to select it. To select the
“Audio” settings, touch the “Audio” area
on the screen.
Touch the BACK
button to return to the
previous screen.
Center display, heater, air conditioner, audio, phone and voice recognition systems4-5
Page 185 of 453

.(Previous)
Select the “
” key to display the
previous file.
Setting the Image Viewer:
The Image Viewer setting display will
appear when selecting the “Settings” key
on the full screen display. The following
settings are available for the full screen
display.
. Slideshow Speed
Select the “Slideshow Speed” key.
From the following display, select the
changing time from 5, 10, 30, 60
seconds or “No Auto Change”.
. Slideshow Order
Select the “Slideshow Order” key. From
the following display, select “Random”
or “Order List”. For “Order List”, the
image order is the order of the files as
stored on the USB memory.
Operating tips:
. Only files that meet the following
conditions will be displayed.
— Image type: JPEG
— File Extensions: *.jpg, *jpeg
— Maximum Resolution: 2048 × 1536
pixels
— Maximum Size: 2-MB — Colors: 32768 (15-bit)
— Maximum File Name lengths: 253-
Bytes
— Maximum Folders: 500
— Maximum Images per Folder: 1024
. If an electronic device (such as a
digital camera) is directly connected
to the vehicle using a USB cable, no
image will be displayed on the screen.
. If the file name is too long, some file
names may not be entirely displayed.
. When the total number of characters
in the file name exceeds 100 or if 1 file
name in a directory exceeds 100
characters, all files will show a shor-
tened 8-character version. The image
will still be displayed when selected.
WARNING
Failure to follow the warnings and
instructions for proper use of the
RearView Monitor system could re-
sult in serious injury or death.
.The RearView Monitor is a conve-
nience but it is not a substitute
for proper backing. Always turn
and look out the windows, and
check mirrors to be sure that it is
safe to move before operating
the vehicle. Always back up
slowly.
. The system is designed as an aid
to the driver in showing large
stationary objects directly behind
the vehicle, to help avoid dama-
ging the vehicle.
. The distance guide line and the
vehicle width line should be used
as a reference only when the
vehicle is on a level paved sur-
face. The distance viewed on the
monitor is for reference only and
may be different than the actual
distance between the vehicle and
displayed objects.
Center display, heater, air conditioner, audio, phone and voice recognition systems4-17
REARVIEW MONITOR (models with
navigation system)
Page 187 of 453

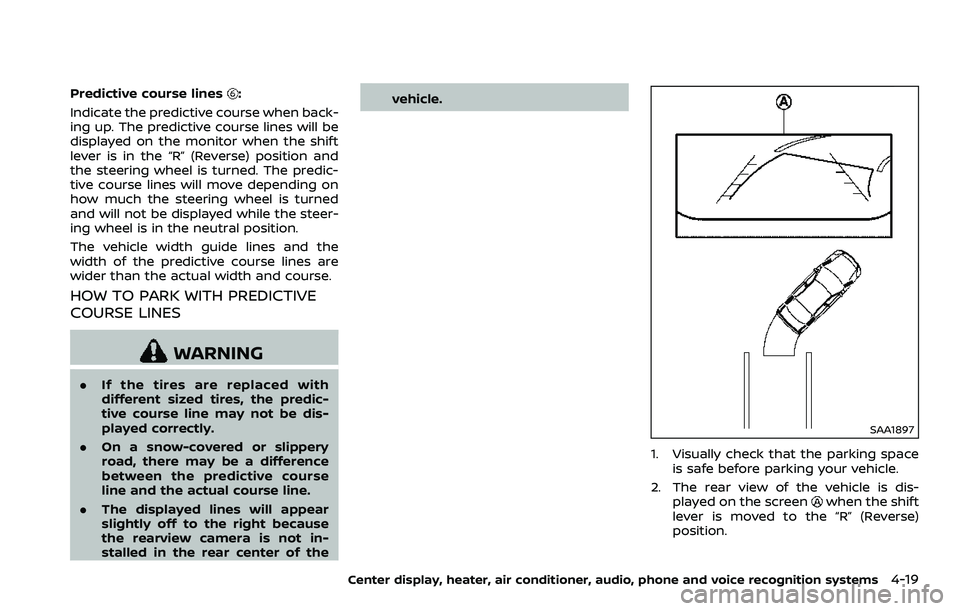
Predictive course lines:
Indicate the predictive course when back-
ing up. The predictive course lines will be
displayed on the monitor when the shift
lever is in the “R” (Reverse) position and
the steering wheel is turned. The predic-
tive course lines will move depending on
how much the steering wheel is turned
and will not be displayed while the steer-
ing wheel is in the neutral position.
The vehicle width guide lines and the
width of the predictive course lines are
wider than the actual width and course.
HOW TO PARK WITH PREDICTIVE
COURSE LINES
WARNING
. If the tires are replaced with
different sized tires, the predic-
tive course line may not be dis-
played correctly.
. On a snow-covered or slippery
road, there may be a difference
between the predictive course
line and the actual course line.
. The displayed lines will appear
slightly off to the right because
the rearview camera is not in-
stalled in the rear center of the vehicle.
SAA1897
1. Visually check that the parking space
is safe before parking your vehicle.
2. The rear view of the vehicle is dis- played on the screen
when the shift
lever is moved to the “R” (Reverse)
position.
Center display, heater, air conditioner, audio, phone and voice recognition systems4-19
Page 190 of 453

4-22Center display, heater, air conditioner, audio, phone and voice recognition systems
ADJUSTING THE SCREEN
To adjust the Display ON/OFF, Brightness,
Tint, Color, Contrast and Black Level of
the RearView Monitor, push the SETTING
button with the RearView Monitor on,
select the “Display” key on the screen
and select the item key and adjust the
level using the multifunction controller.
Do not adjust the Brightness, Tint, Color,
Contrast and Black Level of the Rear View
Monitor while the vehicle is moving. Make
sure the parking brake is firmly applied.
NOTE:
Do not adjust any of the display settings
of the RearView Monitor while the
vehicle is moving. Make sure the park-
ing brake is firmly applied.
SAA2404
PREDICTIVE COURSE LINE SET-
TINGS
To toggle on and off the predictive course
lines:
1. Push theSETTINGbutton.
2. Select “Others” key and push the ENTER button.
3. Select “Camera” key and push the ENTER button.
Predictive Course Lines:
When this item is turned on, the predictive
course lines will be displayed on the
monitor when the shift lever is in the “R”
(Reverse) position.
REARVIEW MONITOR SYSTEM LIM-
ITATIONS
WARNING
Listed below are the system limita-
tions for RearView Monitor. Failure to
operate the vehicle in accordance
with these system limitations could
result in serious injury or death.
. The system cannot completely
eliminate blind spots and may
not show every object.
. Underneath the bumper and the
corner areas of the bumper can-
not be viewed on the RearView
Monitor because of its monitoring
range limitation. The system will
not show small objects below the
bumper, and may not show ob-
jects close to the bumper or on
the ground.
. Objects viewed in the RearView
Monitor differ from actual dis-
tance because a wide-angle lens
is used.
. Objects in the RearView Monitor
will appear visually opposite
compared to when viewed in the
rear view and outside mirrors.