2018 NISSAN 370Z COUPE warning
[x] Cancel search: warningPage 193 of 453
WARNING
.The air conditioner cooling func-
tion operates only when the en-
gine is running.
. Do not leave children or adults
who would normally require the
support of others alone in your
vehicle. Pets should not be left
alone either. On hot, sunny days,
temperatures in a closed vehicle
could quickly become high en-
ough to cause severe or possibly
fatal injuries to people or animals.
. Do not use the recirculation mode
for long periods as it may cause
the interior air to become stale
and the windows to fog up.
Start the engine and operate the heater
and air conditioner system.
NOTE:
. Odors from inside and outside the
vehicle can build up in the air condi-
tioner unit. Odor can enter the pas-
senger compartment through the
vents.
. When parking, set the heater and air
conditioner controls to turn off air
recirculation to allow fresh air into the passenger compartment. This
should help reduce odors inside the
vehicle.
SAA2493
For the models with navigation system,
push the
“STATUS” button to display the
heater and air conditioner status screen.
(See “How to use STATUS button” (P.4-8).)
Center display, heater, air conditioner, audio, phone and voice recognition systems4-25
HEATER AND AIR CONDITIONER
Page 198 of 453
4-30Center display, heater, air conditioner, audio, phone and voice recognition systems
OPERATING TIPS
When the engine coolant temperature
and outside air temperature are low, the
air flow from the foot outlets may not
operate. This is not a malfunction. After
the coolant temperature warms up, air
will flow normally from the foot outlets.
The sensors
andon the instrument
panel helps maintain a constant tem-
perature. Do not put anything on or
around this sensor.
IN-CABIN MICROFILTER
The air conditioning system is equipped
with an in-cabin microfilter which collects
dirt, pollen, dust, etc. To make sure the air
conditioner heats, defogs, and ventilates
efficiently, replace the filter in accordance
with the specified maintenance intervals
listed in the “9. Maintenance and sche-
dules” section. It is recommended to see a
NISSAN dealer to replace the filter.
The filter should be replaced if air flow
is extremely decreased or when win-
dows fog up easily when operating
heater or air conditioning system.
SERVICING AIR CONDITIONER
The air conditioning system in your
NISSAN is charged with a refrigerant
designed with the environment in mind.
This refrigerant will not harm the
earth’s ozone layer. However, special
charging equipment and lubricant are
required when servicing your NISSAN air
conditioner. Using improper refrigerants
or lubricants will cause severe damage to
your air conditioning system. (See “Capa-
cities and recommended fluids/lubri-
cants” (P.10-2) for air conditioning
system refrigerant and lubricant recom-
mendations.)
Your NISSAN dealer will be able to service
your environmentally friendly air condi-
tioning system.
WARNING
The system contains refrigerant un-
der high pressure. To avoid personal
injury, any air conditioner service
should be done only by an experi-
enced technician with the proper
equipment.
AUDIO OPERATION PRECAUTIONS
Radio
Push the ignition switch to the ACC or ON
position and push the radio band select
button to turn on the radio. If you listen to
the radio with the engine not running, the
ignition switch should be pushed to the
ACC position.
Radio reception is affected by station
signal strength, distance from radio
transmitter, buildings, bridges, mountains
and other external influences. Intermit-
tent changes in reception quality nor-
mally are caused by these external
influences.
Using a cellular phone in or near the
vehicle may influence radio reception
quality.
Radio reception:
Your NISSAN radio system is equipped
with state-of-the-art electronic circuits to
enhance radio reception. These circuits
are designed to extend reception range,
and to enhance the quality of that recep-
tion.
However there are some general charac-
teristics of both FM and AM radio signals
that can affect radio reception quality in a
moving vehicle, even when the finest
equipment is used. These characteristics
AUDIO SYSTEM
Page 202 of 453
4-34Center display, heater, air conditioner, audio, phone and voice recognition systems
— 3.1 in (8 cm) discs
— CD/DVDs that are not round
— CD/DVDs with a paper label
— CD/DVDs that are warped,scratched or have abnormal edges
— This audio system can only play prerecorded CD/DVDs. It has no
capabilities to record or burn CD/
DVDs.
. If the CD/DVD cannot be played, one
of the following messages will be
displayed.
Disc Read Error:
— Confirm that the CD/DVD is in-
serted correctly (the label side is
facing up, etc.).
— Confirm that the CD/DVD is not bent or warped and it is free of
scratches.
Please Eject Disc:
— This may be an error due to the temperature inside the player being
too high. Remove the CD/DVD by
pushing the EJECT button, and
after a short time reinsert the CD/
DVD. The CD/DVD can be played
when the temperature of the player
returns to normal. If the error
persists, consult your local dealer. Unplayable File:
— The file may be copy protected.
— The file is not MP3, WMA, AAC, M4A
or DivX® type.
Region Invalid:
— The DVD is not for region 1 or all regions. Use DVDs with a region
code “1”, “ALL” or “1 included” for
your DVD entertainment system.
(The region code
is displayed as
a small symbol printed on the top
of the DVD
.) This vehicle-installed
DVD player cannot play DVDs with a
region code other than “1” or “ALL”.
Copyright and trademark:
. The technology protected by the U.S.
patent and other intellectual property
rights owned by Macrovision Corpora-
tion and other right holders is
adopted for this system.
. This copyright protected technology
cannot be used without a permit from
Macrovision Corporation. It is limited
to be personal use, etc., as long as the
permit from Macrovision Corporation
is not issued.
. Modifying or disassembling is prohib-
ited.
. Dolby digital is manufactured under
license from Dolby Laboratories, Inc. .
Dolby and the double D mark “
” are
trademarks of Dolby Laboratories, Inc.
. DTS and DTS 2.0 “
” are registered
trademarks of DTS, Inc.
Parental level (parental control):
DVDs with the parental control setting
can be played with this system. Please
use your own judgement to set the
parental control with the system.
Disc selection:
The following disc formats can be played
with the DVD drive.
. DVD-VIDEO
. VIDEO-CD
. CD-DA (Conventional Compact Disc)
. DTS-CD
USB (Universal Serial Bus) connec-
tion port
WARNING
Do not connect, disconnect or oper-
ate the USB device while driving.
Doing so can be a distraction. If
distracted you could lose control of
your vehicle and cause an accident
or serious injury.
Page 216 of 453
4-48Center display, heater, air conditioner, audio, phone and voice recognition systems
WARNING
Do not connect, disconnect or oper-
ate the USB device while driving.
Doing so can be a distraction. If
distracted you could lose control of
your vehicle and cause an accident
or serious injury.
CAUTION
.Do not force the USB device into
the USB connection port. Insert-
ing the USB device tilted or up-
side-down into the port may da-
mage the port. Make sure that
the USB device is connected cor-
rectly into the USB connection
port. (Some USB devices come
with a
mark as a guide. Make
sure that the mark is facing the
correct direction before inserting
the device.)
. Do not leave the USB cable in a
place where it can be pulled
unintentionally. Pulling the cable
may damage the port. Refer to your device manufacturer’s own-
er information regarding the proper use
and care of the device.
USB button:
When the USB button is pushed with the
system off and the USB memory device is
inserted, the system will turn on.
USB device main operation:
The following operations are identical to
the audio main operation of the Compact
Disc (CD) operation. For details, see “CD
player operation” (P.4-45).
. List view
. Quick search
.
. RDM (Random play)
. RPT (Repeat track)
. SCAN
. Folder browsing
DISP button:
While a track with recorded music infor-
mation tags (ID3-tags) is being played, the
title of the played track is displayed. If the
tags are not provided then a notification
message is displayed.
When the DISP button is pushed repeat-
edly, further information about the track
can be displayed along with the track title
as follows:
Track time ?Artist ?Album ?Folder
name ?Track time
Track details:
Pushing and holding the DISP button will
turn the display into a detailed overview
and after a few seconds it returns to the
main display, or push the DISP button
briefly.
Page 217 of 453
JVH0921X
iPod® player operation
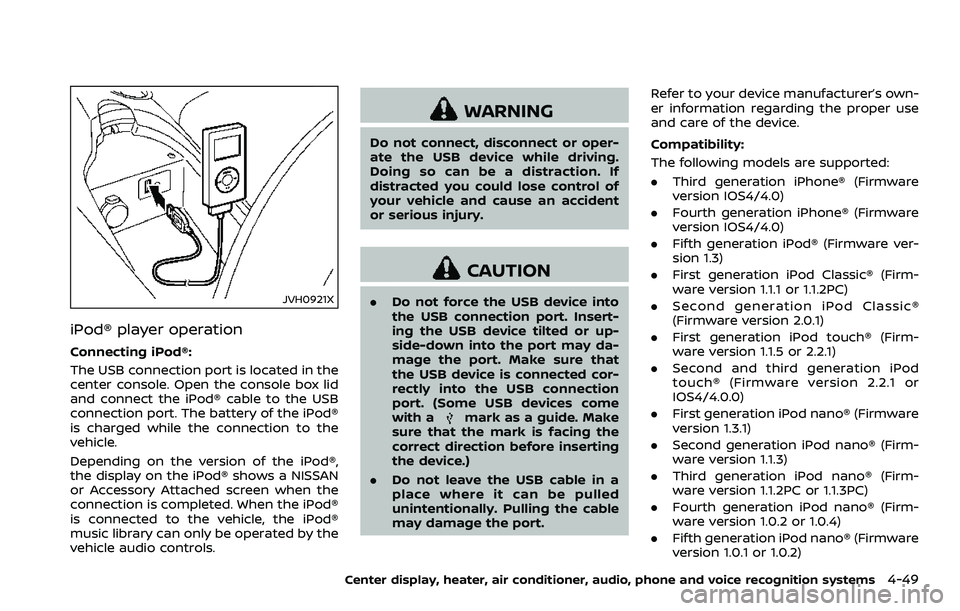
Connecting iPod®:
The USB connection port is located in the
center console. Open the console box lid
and connect the iPod® cable to the USB
connection port. The battery of the iPod®
is charged while the connection to the
vehicle.
Depending on the version of the iPod®,
the display on the iPod® shows a NISSAN
or Accessory Attached screen when the
connection is completed. When the iPod®
is connected to the vehicle, the iPod®
music library can only be operated by the
vehicle audio controls.
WARNING
Do not connect, disconnect or oper-
ate the USB device while driving.
Doing so can be a distraction. If
distracted you could lose control of
your vehicle and cause an accident
or serious injury.
CAUTION
.Do not force the USB device into
the USB connection port. Insert-
ing the USB device tilted or up-
side-down into the port may da-
mage the port. Make sure that
the USB device is connected cor-
rectly into the USB connection
port. (Some USB devices come
with a
mark as a guide. Make
sure that the mark is facing the
correct direction before inserting
the device.)
. Do not leave the USB cable in a
place where it can be pulled
unintentionally. Pulling the cable
may damage the port. Refer to your device manufacturer’s own-
er information regarding the proper use
and care of the device.
Compatibility:
The following models are supported:
.
Third generation iPhone® (Firmware
version IOS4/4.0)
. Fourth generation iPhone® (Firmware
version IOS4/4.0)
. Fifth generation iPod® (Firmware ver-
sion 1.3)
. First generation iPod Classic® (Firm-
ware version 1.1.1 or 1.1.2PC)
. Second generation iPod Classic®
(Firmware version 2.0.1)
. First generation iPod touch® (Firm-
ware version 1.1.5 or 2.2.1)
. Second and third generation iPod
touch® (Firmware version 2.2.1 or
IOS4/4.0.0)
. First generation iPod nano® (Firmware
version 1.3.1)
. Second generation iPod nano® (Firm-
ware version 1.1.3)
. Third generation iPod nano® (Firm-
ware version 1.1.2PC or 1.1.3PC)
. Fourth generation iPod nano® (Firm-
ware version 1.0.2 or 1.0.4)
. Fifth generation iPod nano® (Firmware
version 1.0.1 or 1.0.2)
Center display, heater, air conditioner, audio, phone and voice recognition systems4-49
Page 224 of 453
4-56Center display, heater, air conditioner, audio, phone and voice recognition systems
WARNING
.The driver must not attempt to
operate the DVD system or wear
the headphones while the vehicle
is in motion so that full attention
may be given to vehicle opera-
tion.
. Do not attempt to modify the
system to display a movie on the
front screen while the vehicle is
being driven. Doing so may dis-
tract the driver and may cause a
collision and serious personal in-
jury or death.
CAUTION
.Only operate the DVD while the
vehicle engine is running. Operat-
ing the DVD for extended periods
of time with the engine OFF can
discharge the vehicle battery.
. Do not allow the system to get
wet. Excessive moisture such as
spilled liquids may cause the
system to malfunction. .
While playing VIDEO-CD media,
this DVD player does not guaran-
tee complete functionality of all
VIDEO-CD formats.
Display settings
To adjust the front display mode, push
the SETTING button while the DVD is
being played, select the “Others” key and
then select the “Display” key.
To adjust the display ON/OFF, brightness,
tint, color and contrast, select the “Display
Adjustment” key and then select each key.
Then you can adjust each item using the
multi-function controller. After changes
have been made push the BACK button
to save the setting.
SAA2497
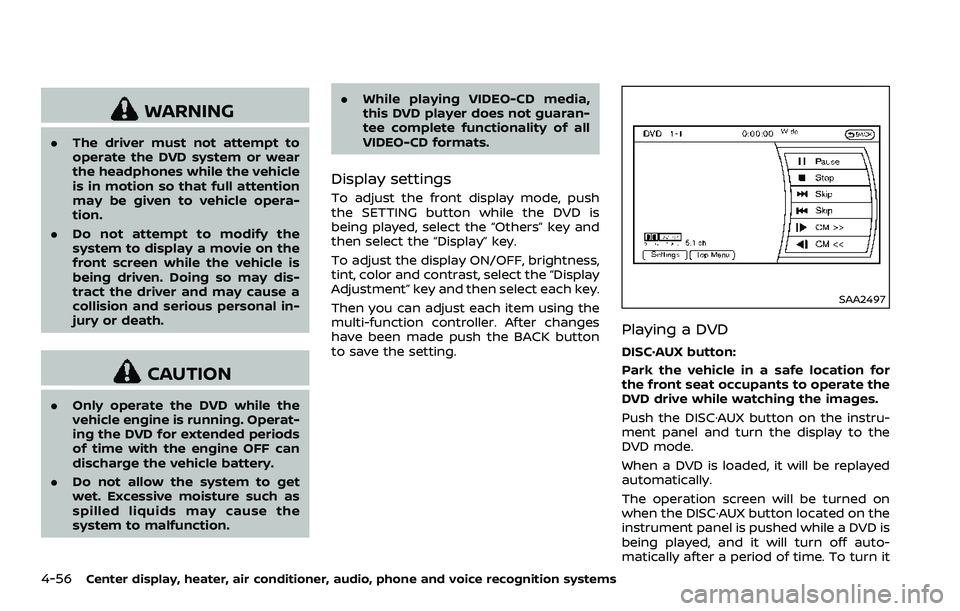
Playing a DVD
DISC·AUX button:
Park the vehicle in a safe location for
the front seat occupants to operate the
DVD drive while watching the images.
Push the DISC·AUX button on the instru-
ment panel and turn the display to the
DVD mode.
When a DVD is loaded, it will be replayed
automatically.
The operation screen will be turned on
when the DISC·AUX button located on the
instrument panel is pushed while a DVD is
being played, and it will turn off auto-
matically after a period of time. To turn it
Page 227 of 453
USB (Universal Serial Bus) CON-
NECTION PORT (models with navi-
gation system)
Audio main operation
WARNING
Do not connect, disconnect or oper-
ate the USB device while driving.
Doing so can be a distraction. If
distracted you could lose control of
your vehicle and cause an accident
or serious injury.
CAUTION
.Do not force the USB device into
the USB connection port. Insert-
ing the USB device tilted or up-
side-down into the port may da-
mage the port. Make sure that
the USB device is connected cor-
rectly into the USB connection
port.
. Do not grab the USB connection
port cover (if so equipped) when
pulling the USB device out of the
port. This could damage the port and the cover.
. Do not leave the USB cable in a
place where it can be pulled
unintentionally. Pulling the cable
may damage the port.
Refer to your device manufacturer’s own-
er information regarding the proper use
and care of the device.
SAA2499
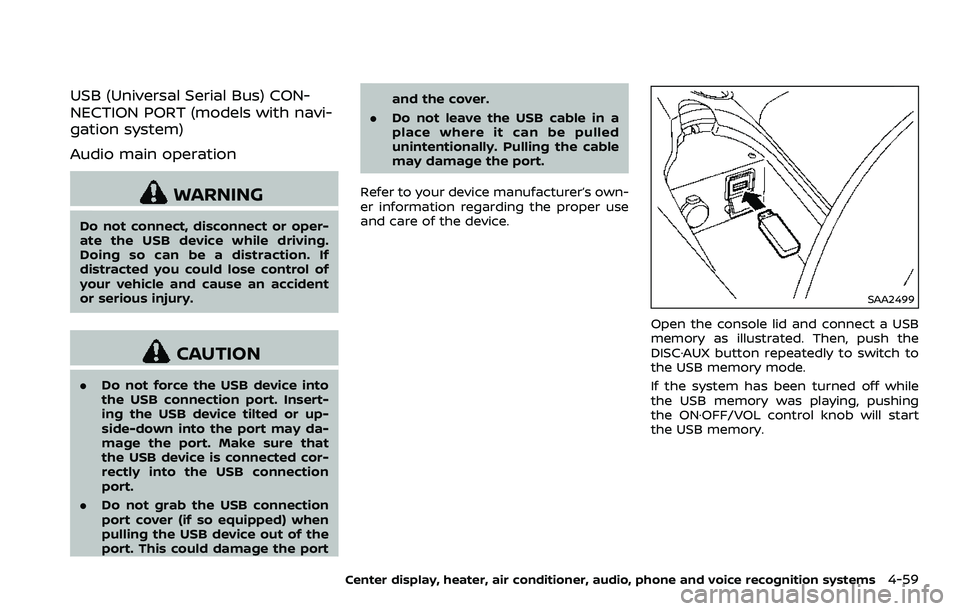
Open the console lid and connect a USB
memory as illustrated. Then, push the
DISC·AUX button repeatedly to switch to
the USB memory mode.
If the system has been turned off while
the USB memory was playing, pushing
the ON·OFF/VOL control knob will start
the USB memory.
Center display, heater, air conditioner, audio, phone and voice recognition systems4-59
Page 236 of 453
4-68Center display, heater, air conditioner, audio, phone and voice recognition systems
Connected Devices:
Registered devices are shown on the list.
Select a Bluetooth® device from the list,
the following options will be available.
.Select
Select “Select” to connect the selected
device to the vehicle. If there is a
different device currently connected,
the selected device will replace the
current device.
. Edit
Rename the selected Bluetooth® de-
vice using the keypad displayed on
the screen. (See “How to use touch
screen” (P.4-5).)
. Delete
Delete the selected Bluetooth® device.
Edit Bluetooth Info:
Change the name broadcasted by this
system over Bluetooth®. Change the PIN
code that is entered when connecting a
hands free device to this system.
Replace Connected Phone:
Replace the Bluetooth® connection with a
connected Bluetooth® cellular phone. For
details about Hands-Free Phone System,
see “Bluetooth® hands-free phone system
(models with navigation system)” (P.4-76).iPod® PLAYER OPERATION (models
with navigation system)
Connecting iPod®
WARNING
Do not connect, disconnect or oper-
ate the USB device while driving.
Doing so can be a distraction. If
distracted you could lose control of
your vehicle and cause an accident
or serious injury.
CAUTION
. Do not force the USB device into
the USB connection port. Insert-
ing the USB device tilted or up-
side-down into the port may da-
mage the port. Make sure that
the USB device is connected cor-
rectly into the USB connection
port.
. Do not grab the USB connection
port cover (if so equipped) when
pulling the USB device out of the
port. This could damage the port
and the cover. .
Do not leave the USB cable in a
place where it can be pulled
unintentionally. Pulling the cable
may damage the port.
Refer to your device manufacturer’s own-
er information regarding the proper use
and care of the device.