2018 MITSUBISHI OUTLANDER PHEV warning
[x] Cancel search: warningPage 58 of 538

WARNINGlAfter charging, be sure to close the inner
lid and charging lid completely.
Be careful that water or dust does not en-
ter in the normal charge port, inner lid and normal charge connector.
Entry of water or dust could cause an
electric leak, resulting in a fire or electric shock.NOTEl Make sure that the inner lid is completely
closed.
If the charging lid is forcibly closed without completely closing inner lid, the hinge on
the inner lid may be broken.
l While the charging lid is open, if the doors
and tailgate are locked with the central door
lock, the keyless entry system or the keyless operation system, the charging lid will lock
when the charging lid is closed.
l When the operation mode is switched to ON
while the charging lid is not completely
closed, a warning may be displayed on the information screen in the multi information
display.
Refer to “Warning display list” on page 6-23.
l If the charging lid is closed while the driv-
er’s door is locked, the charging lid will be locked.
11. Remove the charging cable plug from
the outlet.
12. Install the cap on the normal charge con-
nector.WARNINGl After charging, be sure to disconnect the
charge connector from the charge port.
If the charge connector is only partially
engaged and the connector latch is un-
locked, you could put the operation mode
of the power switch in ON and the vehicle could start moving. It could lead to an un- expected accident.NOTEl Make sure that the charging lid is complete-
ly closed before using an automatic car
wash. There is a possibility that the charging lid will be damaged if the lid is open.If the charging lid cannot be
unlocked
E08304400031
When the charging lid cannot be unlocked even if the driver’s door is unlocked, take the
following measure to open the charging lid. 1. Press the tab (A) of the lid located on the
right side of the luggage compartment to remove the lid.
2. Pull the rod (B) in the arrow direction to
unlock the charging lid.
NOTEl After taking the emergency measure, please
inspect at a MITSUBISHI MOTORS Au-
thorized Service Point immediately.
Normal charging (charging method with rated AC 220-240V outlet)
3-16OGGE18E1Charging3
Page 59 of 538

Quick charging (chargingmethod with quick charger) E08301401268WARNINGlBe sure to use the quick charger applica-
ble to CHAdeMO standard and certified by CHAdeMO association. Use of the oth-
er quick charger may cause the fire or malfunction.
l For operation of quick chargers, follow
the manual of each quick charger.
l If you use electro-medical apparatus such
as implantable cardiac pacemaker or im- plantable cardioverter-defibrillator, be careful the following precautions.
• Please do not use a quick charger.
• Keep away as much as possible from
the place where the quick charger is
stored. If you approach it carelessly, leave quickly without standing still.
• Please ask someone to perform the
quick charging if necessary.
l Before charging, make sure that there is
no foreign matter such as dust at the
quick charge port and the quick charge
connector.
At this time, do not touch the quick charge port.WARNINGl When the quick charge connector is con-
nected to the quick charge port, prevent foreign matter such as water or dust fromentering in the port.
Connection with foreign matter such as
water or dust may cause fire or an electric shock. Do not perform charging if there
might be strong exposure to water at the
connection.
l During charging, the cooling fans inside
the bonnet room may automatically be operated even if the operation mode of the
power switch is in OFF.
Keep your hands away from the cooling
fan during charging.NOTEl During quick charging, quick charging is
stopped by putting the operation mode of thepower switch in ON.
l If the charge connector is not easily connec-
ted to the charge port due to foreign material
entering, never force the connection. Doing so could damage the charging equipment or the vehicle. Contact a MITSUBISHI
MOTORS Authorized Service Point.
l The quick charger might be installed in the
public parking space, some chargers are not
suitable for this vehicle. Check the manual
of each quick charger when charging.NOTEl The charge connector and the EV charging
cable stick out of the vehicle body while charging, so be careful that your body does
not get stuck with them or they do not touch the next vehicle.
l The vehicle equipped with a quick charge
port is compatible with most CHAdeMO *1
connectors on charging stations.
l Make sure to lock the doors to prevent theft,
etc. during charging.
l When using a quick charger, make sure that
the time available is enough so that the quick
charging can be finished in the time availa- ble.
If the power supply of the quick charger is shut off during quick charging, it could leadto a vehicle failure.
1. Firmly apply the parking brake, press the
electrical parking switch to shift into the
“P” (PARK) position and put the opera-
tion mode of the power switch in the “OFF” position.
2. Unlock the driver’s door to unlock the
charging lid.
*1 CHAdeMO is a standard for quick charging of
electric vehicle originally started in Japan, andthe contents have also become an international
standard.
Quick charging (charging method with quick charger)
3-17OGGE18E1Charging3
Page 60 of 538
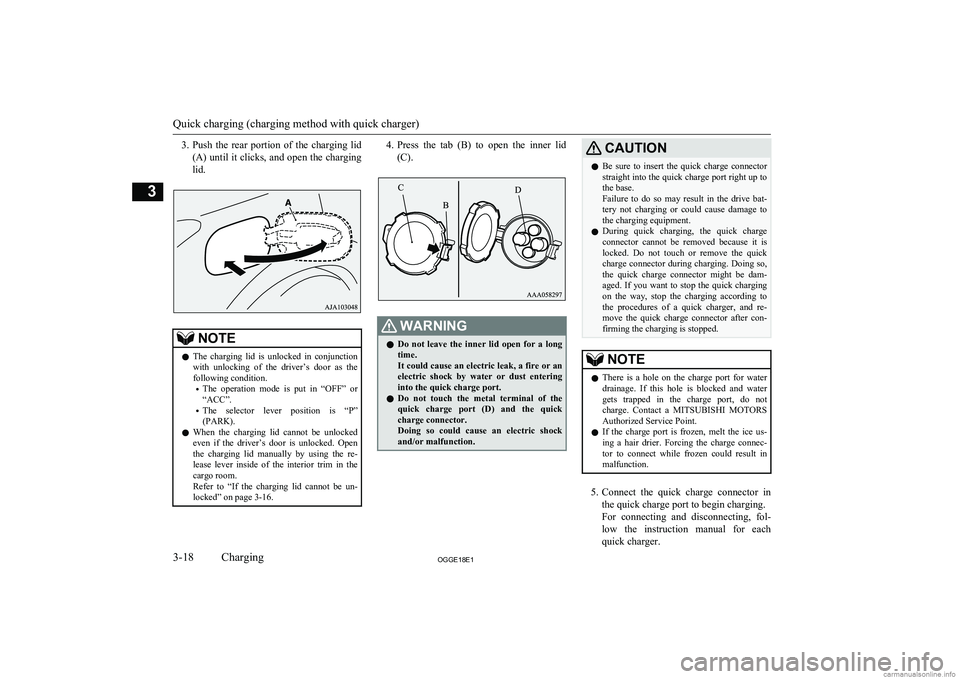
3.Push the rear portion of the charging lid
(A) until it clicks, and open the charging lid.NOTEl The charging lid is unlocked in conjunction
with unlocking of the driver’s door as thefollowing condition.
• The operation mode is put in “OFF” or
“ACC”.
• The selector lever position is “P”
(PARK).
l When the charging lid cannot be unlocked
even if the driver’s door is unlocked. Open
the charging lid manually by using the re- lease lever inside of the interior trim in thecargo room.
Refer to “If the charging lid cannot be un- locked” on page 3-16.4. Press the tab (B) to open the inner lid
(C).WARNINGl Do not leave the inner lid open for a long
time.
It could cause an electric leak, a fire or an electric shock by water or dust entering
into the quick charge port.
l Do not touch the metal terminal of the
quick charge port (D) and the quick
charge connector.
Doing so could cause an electric shock and/or malfunction.CAUTIONl Be sure to insert the quick charge connector
straight into the quick charge port right up to
the base.
Failure to do so may result in the drive bat- tery not charging or could cause damage to the charging equipment.
l During quick charging, the quick charge
connector cannot be removed because it is locked. Do not touch or remove the quick
charge connector during charging. Doing so, the quick charge connector might be dam-
aged. If you want to stop the quick charging
on the way, stop the charging according to
the procedures of a quick charger, and re- move the quick charge connector after con-
firming the charging is stopped.NOTEl There is a hole on the charge port for water
drainage. If this hole is blocked and watergets trapped in the charge port, do not
charge. Contact a MITSUBISHI MOTORS
Authorized Service Point.
l If the charge port is frozen, melt the ice us-
ing a hair drier. Forcing the charge connec-
tor to connect while frozen could result in malfunction.
5. Connect the quick charge connector in
the quick charge port to begin charging.
For connecting and disconnecting, fol- low the instruction manual for each
quick charger.
Quick charging (charging method with quick charger)
3-18OGGE18E1Charging3
Page 62 of 538

WARNINGlAfter charging, be sure to close the inner
lid and the quick charging lid completely.
Be careful that water or dust does not en-
ter in the quick charge port, inner lid and
quick charge connector.
Entry of water or dust could cause fire, electric shock or short circuit.
l After charging, be sure to disconnect the
charge connector from the charge port.If the charge connector is only partially
engaged and the connector latch is un-
locked, you could put the operation mode of the power switch in ON and the vehicle
could start moving. It could lead to an un- expected accident.NOTEl If the operation mode of the power switch is
put in ON with the quick charge connector
connected to the quick charge port, the plu-
gin hybrid EV system cannot be started.
Be sure to disconnect the quick charge con- nector before start.
l Charging may be completed before full
charge. This is a control for efficient charge
and not a malfunction.
To achieve full charge, repeat charging from
Step 5 again.NOTEl Make sure that the inner lid is completely
closed.
If the charging lid is forcibly closed without completely closing inner lid, the hinge on
the inner lid may be broken.
l While the charging lid is open, if the doors
and tailgate are locked with the central door
lock, the keyless entry system or the keyless operation system, the charging lid will lock
when the charging lid is closed.
l When the operation mode is switched to ON
while the charging lid is not completely
closed, a warning may be displayed on the information display of the multi information
display.
Refer to “Warning display list” on page
6-23.
Quick charging (charging method with quick charger)
3-20OGGE18E1Charging3
Page 63 of 538

Charging troubleshooting guideE08301501243SymptomPossible causePossible solutionCharging cannot be
started.The operation mode of the power
switch is in the “ON” position.Put the operation mode of the power switch in “OFF” before charging.The drive battery is already fully
charged.Charging cannot be performed if the drive battery is already fully charged. Charg- ing automatically turns off if the drive battery is fully charged.The temperature of the drive bat-
tery is too high or too low to
charge.Confirm the drive battery temperature.
Refer to “Cautions and actions to deal with intense heat” on page 2-10 and “Cau-
tions and actions to deal with intense cold” on page 2-10.The auxiliary battery is dis-
charged.The drive battery cannot be charged if the vehicle electrical systems cannot be
turned on. If the auxiliary battery is discharged, charge or emergency start the aux- iliary battery.
Refer to “Emergency starting” on page 9-02.The vehicle or the charging cable
has a malfunction.The vehicle or charging cable may have a malfunction. Confirm if the warning
lamp on the meter is illuminated. Confirm if the indicator on the control box is in-
dicating a malfunction. If a warning is displayed, stop charging and contact a
MITSUBISHI MOTORS Authorized Service Point.Normal charging can-
not be started.There is no electrical power com-
ing from the outlet.Confirm that there has not been a power failure. Make sure the breaker is on. If an
outlet with a timer device installed is used, power will only be available at the time
set by the timer.
Confirm if the POWER indicator on the control box is illuminated.The charge connector is not con-
nected correctly.Confirm the charge connector is connected correctly.The charge connector was connec-
ted and disconnected repeatedly in
a short time.Disconnect the charge connector, wait for a while, then start charging procedure again from the beginning.
Charging troubleshooting guide
3-21OGGE18E1Charging3
Page 67 of 538

lCharging timer
If you specify the charge start and/or stop time with the normal charge cable
connected, charging is started and/or
stopped at that time.
l Remote Climate Control
By setting the remote climate control to
operate at a predetermined time, cabin comfort can be improved or visibilitycan be ensured (defrosting/demisting)
before getting in the vehicle.
l Customize (function setting change)
The function setting of the keyless oper-
ation system, outside rear-view mirror,
operation mode of the power switch, air conditioning, lamps and windscreen
wipers can be changed by MITSUBISHI
Remote Control.NOTEl The electric heater is required to activate the
reservation functions of heater, defroster and
demister.
l In a vehicle equipped with the MITSUBISHI
Multi-Communication System (MMCS), it
is possible to change the setting by means of screen operations.
Refer to the separate owner’s manual for de-
tails.NOTEl If you want to cancel the charging timer in
cases of battery exhaustion or loss of a wire-
less LAN device, you can temporarily cancel the charging timer by pressing the switch
(A) of the keyless operation key twice with-
in 2 seconds. When the charging timer is cancelled, the hazard warning lamps will
blink four times.
l When using the charging timer, use the EV
charging cable. When using a home or pub- lic charging device (EVSE: Electric Vehi-
cles Supply Equipment), the charging timer
may not be started.
Devices that support wireless LAN are re-
quired to communicate with the vehicle using
the MITSUBISHI Remote Control. Also, an
SSID* (A) and password (B) are required to
connect a wireless LAN device to the vehi-
cle. The SSID and password are described in the registration information card (C) that is
attached to the key at the time of your pur- chase of the vehicle.
* The SSID is the identifier of an access point
for IEEE 802.11 series wireless LAN. It is
displayed on wireless LAN devices.
MITSUBISHI Remote Control*
3-25OGGE18E1Charging3
Page 68 of 538

For the operation method of theMITSUBISHI Remote Control, please visit
the MITSUBISHI MOTORS Web site:
http://www.mitsubishi-motors.com/en/prod-
ucts/outlander_phev2/app/remote/
l If you need further information, please
contact a MITSUBISHI MOTORS Au-
thorized Service Point.WARNINGl Do not use the
MITSUBISHI Remote
Control if children, persons in need of care, pets, etc. are in the vehicle. Even if the remote climate control is used, thecabin may become hot or cold due to somereasons such as automatic stop of the sys-
tem. The cabin temperature may quickly
rise in sunshine, which poses a risk of heat
stroke and dehydration. In cold weather, on the other hand, the cabin temperature
may quickly drop. Either of which could lead to death in the worst case.
In addition, children can activate switches and controls, resulting in injury or a fatal
accident.
l The cooling fan in the engine compart-
ment may operate automatically when
charging or when operating air condition- er. Do not bring your hand close to the
cooling fan during charging.CAUTIONl Do not use a car cover except for the
MITSUBISHI MOTORS GENUINE car
cover, when using the charging timer or the remote climate control.NOTEl Keep the following points in mind when us-
ing a wireless LAN device:
• Communication speed and range vary de-
pending on the wireless LAN devices and the surrounding conditions (radio environ-
ment, obstacles, parking area environ- ment, etc.).
• Due to the characteristics of radio waves,
communication speed tends to decrease as the communication distance increases.
Use your wireless LAN device at a short
distance from the vehicle for better re- sponse.
• When a microwave oven or ISM (indus-
trial, scientific and medical) equipment is being used, the communication speed andrange of wireless LAN devices may de-crease. Use your wireless LAN device
away from these appliances and equip-
ment.NOTE• If a wireless LAN device and Bluetooth
(registered trademark of Bluetooth SIG, Inc.) are used simultaneously, the com-
munication speed and range of each de- vice may decrease. Use your wireless
LAN device away from Bluetooth devi- ces.
l Wireless LAN devices may not communi-
cate with the vehicle, or may not operate
normally or stably in the following environ- ment or situations. Check that the device cancommunicate with your vehicle before use.
• There is an obstruction such as a concrete
or metal wall between the vehicle and
wireless LAN device.
• The vehicle is surrounded by tall vehicles
in a parking lot.
• There are facilities nearby that emit strong
radio waves, such as a TV tower, trans-
former substation, broadcasting station or airport.
• There is a communication device such as
a mobile phone or radio, or an electric de- vice such as a personal computer near thewireless LAN device.
• The wireless LAN device is in contact
with or covered by a metal object.
• The battery of the wireless LAN device
has run down.
l The
MITSUBISHI Remote Control cannot
be used under the following conditions:
• The wireless LAN device is turned off.
• The
MITSUBISHI Remote Control appli-
cation software is not installed.
MITSUBISHI Remote Control*
3-26OGGE18E1Charging3
Page 72 of 538

KeysE00300104175
The key fits all locks.
without MITSUBISHI Remote Control
with MITSUBISHI Remote Control
1- Keyless operation key
2- Keyless operation key (with electric tail-
gate switch)
3- Emergency keyWARNINGl When taking a key on flights, do not press
any switches on the key while on the plane. If a switch is pressed on the plane,
the key emits electromagnetic waves, which could adversely affect the plane’s flight operation.
When carrying a key in a bag, be careful that no switches on the key can be easily
pressed by mistake.NOTEl The key is a precision electronic device with
a built-in signal transmitter. Please observe
the following in order to prevent a malfunc- tion.
• Do not leave in a place that is exposed to
direct sunlight, for example on the dash- board.
• Do not disassemble or modify.
• Do not excessively bend the key or sub-
ject it to strong impacts.
• Do not expose to water.
• Keep away from magnetic key rings.
• Keep away from audio systems, personal
computers, TVs, and other equipment that generates a magnetic field.NOTE• Keep away from devices that emit strong
electromagnetic waves, such as cellular
phones, wireless devices and high fre- quency equipment (including medical de-
vices).
• Do not clean with ultrasonic cleaners or
similar equipment.
• Do not leave the key where it may be ex-
posed to high temperature or high humidi- ty.
l The plug-in hybrid EV system is designed so
that it will not start if the ID code registered
in the immobilizer computer and the key’s ID code do not match. Refer to the “Elec-
tronic immobilizer” section for details and key usage.
l [For vehicles equipped with the security
alarm system]
Pay attention to the following if the security
alarm is set to “Active”.
Refer to “Security alarm system” on page 4-27.
• If the security alarm is in the system
armed mode, the alarm will sound if the
doors are opened after being unlocked with the key, the inside lock knob or the
central door lock switch.
• Even if the security alarm is set to “Ac-
tive”, the system preparation mode is not entered if the keyless entry system or thekeyless operation function was not used to
lock the vehicle.
Keys
4-02OGGE18E1Locking and unlocking4