2018 MITSUBISHI OUTLANDER III change time
[x] Cancel search: change timePage 313 of 441
HomeLink® Wireless Control System (if so equipped)5-232 Features and controls
5
N00584700020
To program HomeLink
® to operate a garage
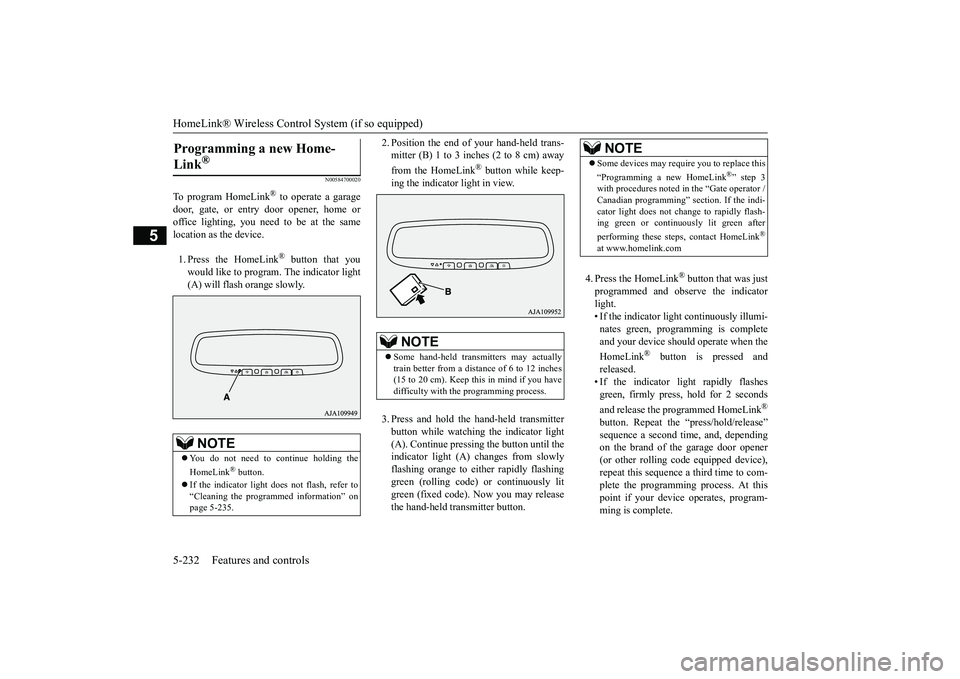
door, gate, or entry door opener, home oroffice lighting, you need to be at the samelocation as the device.1. Press the HomeLink
® button that you
would like to program. The indicator light(A) will flash
orange slowly.
2. Position the end of your hand-held trans-mitter (B) 1 to 3 inches (2 to 8 cm) awayfrom the HomeLink
® button while keep-
ing the indicator light in view.3. Press and hold the hand-held transmitterbutton while watching the indicator light(A). Continue pressing the button until theindicator light (A)
changes from slowly
flashing orange to e
ither rapidly flashing
green (rolling code) or continuously litgreen (fixed code). Now you may releasethe hand-held tr
ansmitter button.
4. Press the HomeLink
® button that was just
programmed and observe the indicatorlight.• If the indicator light continuously illumi-nates green, programming is completeand your device shoul
d operate when the
HomeLink
® button is pressed and
released.• If the indicator light rapidly flashesgreen, firmly press, hold for 2 secondsand release the programmed HomeLink
®
button. Repeat the “press/hold/release”sequence a second tim
e, and, depending
on the brand of the garage door opener(or other rolling code equipped device),repeat this sequence a third time to com-plete the programming
process. At this
point if your device operates, program-ming is complete.
Programming a new Home-Link
®
NOTE
You do not need to continue holding theHomeLink
® button.
If the indicator light doe
s not flash, refer to
“Cleaning the programmed information” onpage 5-235.
NOTE
Some hand-held transmitters may actuallytrain better from a distance of 6 to 12 inches(15 to 20 cm). Keep this in mind if you havedifficulty with the programming process.
NOTE
Some devices may requi
re you to replace this
“Programming a new HomeLink
®” step 3
with procedures noted
in the “Gate operator /
Canadian programming”
section. If the indi-
cator light does not ch
ange to rapidly flash-
ing green or continuously lit green afterperforming these step
s, contact HomeLink
®
at www.homelink.com
BK0249100US.book 232 ページ 2017年5月10日 水曜日 午前8時49分
Page 314 of 441
HomeLink® Wireless Control System (if so equipped)
Features and controls 5-233
5
• If the device does not operate, continuewith “Programming a new HomeLink
®”
steps 5 to 7 to complete the program-ming of a rolling code equipped device.
5. At the garage door opener receiver(motor-head unit) in the garage, locate the“Learn” or “Smart” but
ton. This can usu-
ally be found where the hanging antennawire is attached to the motor-head unit(see the garage
door opener manual to
identify the “Learn” button.)6. Firmly press and release the “Learn” or“Smart” button. (The name and color ofthe button may vary by manufacturer.)
seconds to initiate
step 7.7. Return to the vehi
cle and firmly press,
hold for 2 seconds and release the pro-grammed HomeLink
® button. Repeat the
“press/hold/release”
sequence a second
time, and, depending on the brand of thegarage door opener (or other rolling codeequipped device), repe
at this sequence a
third time to complete the programmingprocess.HomeLink
® should now activate your
rolling code equipped device.
N00584800021
Canadian radio-frequenc
y laws require trans-
mitter signals to “time-out” (or quit) afterseveral seconds of tr
ansmission - which may
not be long enough for HomeLink
® to pick
up the signal during programming. Similar tothis Canadian law, some U.S. gate operatorsare designed to “time-
out” in the same man-
ner.The indicator LED on the hand-held transmit-ter will go off when the device times out indi-cating that it has fi
nished transmitting.
If you live in Canada or you are having diffi-culties programming a gate operator orgarage door opener by using the “Program-ming” procedures, re
place “Programming a
new HomeLink
®” step 3 with the following:
3. Press and release - every 2 seconds(“cycle”) your hand-held transmitter until theHomeLink
® indicator light changes from
slowly flashing orange to either rapidly flash-ing green (rolling code
) or continuously lit
green (fixed code). Now you may release thehand-held transmitter button.Proceed with “Programming a new Home-Link
®” step 4 to complete.
N00584900022
The HomeLink
® has the capab
ility of receiv-
ing garage door status from compatiblegarage door opener systems. Check yourgarage door opener manual for the availablefeature and HomeLink
® compatibility. Also
for a listing of compatible systems contactHomeLink
® at: www.homelink.com
NOTE
In the event that there are still programmingdifficulties or questi
ons, additional Home-
Link
® information and programming videos
can be found online at www.homelink.com,www.youtube.com/HomeLinkGentex, or bycalling the HomeLink
® Hotline.
Gate operator/Canadian pro-gramming
NOTE
If programming a garage door opener or gateoperator, it is advise
d to unplug the device
during the “cycling” pr
ocess to prevent pos-
sible overheating.
Additional steps for program-ming a door system with feed-back
BK0249100US.book 233 ページ 2017年5月10日 水曜日 午前8時49分
Page 316 of 441
HomeLink® Wireless Control System (if so equipped)
Features and controls 5-235
5
The HomeLink
® has the capability of listen-
ing to these messages at a range up to 820.2feet (250 m) (open line
of sight), but range
may be reduced by obstacles such as housesor trees. You may have to slow your vehiclespeed to receive the CLOSED or OPENEDmessage feedback from the garage dooropener. If the unit is out of range beforereceiving either the UP or DOWN messagefrom the door opener, both the UP andDOWN indicators will fl
ash red followed by
a continuous lit orange
indicator in the direc-
tion the door was last moving.Recall of the door stat
e after initial feedback
is possible by simultane
ously pressing either
HomeLink
® buttons 1 and 2 or buttons 2 and
3 for 2 seconds. The la
st recorded message
will be displayed for 3
seconds, again follow-
ing the garage door st
atus indication of the
figure above.
N00585300023
To erase programming from the 3 buttons(individual buttons cannot
be erased but can
be “reprogrammed” as
outlined below), fol-
low the steps noted:
1. Press and hold the 2 outer HomeLink
®
buttons for at least
10 seconds. The indi-
cator will change
from continuous yellow
to rapidly flashing green.2. Release both buttons.3. HomeLink
® is now in the train (or learn-
ing) mode and can be programmed at anytime beginning with “Programming a newHomeLink
®” step 1.
N00585400024
To reprogram a HomeLink
® button, complete
the following.1. Press and hold the desired HomeLink
®
button. Do not release the button.2. The indicator light will begin to slowlyflash orange after 20
seconds. The Home-
Link
® button can be released at this point.
Proceed with “P
rogramming a new
HomeLink
®” step 2.
N00585600026
Your HomeLink
® system operates on a radio
frequency subject to
Federal Communica-
tions Commission (FCC)
Rules (For vehicles
sold in U.S.A.) and Industry Canada Rules(For vehicles sold in Canada). This devicecomplies with Part 15 of the FCC Rules andRSS- 210 of the Industry Canada Rules.Operation is subject to the following two con-ditions.This device may not
cause harmful inter-
ference.This device must ac
cept any interference
that may be received, including interfer-ence that may cause undesired operation.
Clearing the programmed information
NOTE
Do not hold for longer than 20 seconds.
Reprogramming a single HomeLink
® button
NOTE
If you do not complete the programming of anew device to the button,
it will revert to the
previously stored programming.For questions or
comments, visit
www.homelink.com,www.youtube.com/HomeLinkGentex, or bycalling the HomeLink
® Hotline.
General information
BK0249100US.book 235 ページ 2017年5月10日 水曜日 午前8時49分
Page 352 of 441
Dual-zone automatic climat
e control air conditionerComfort controls 7-7
7
N00737001448
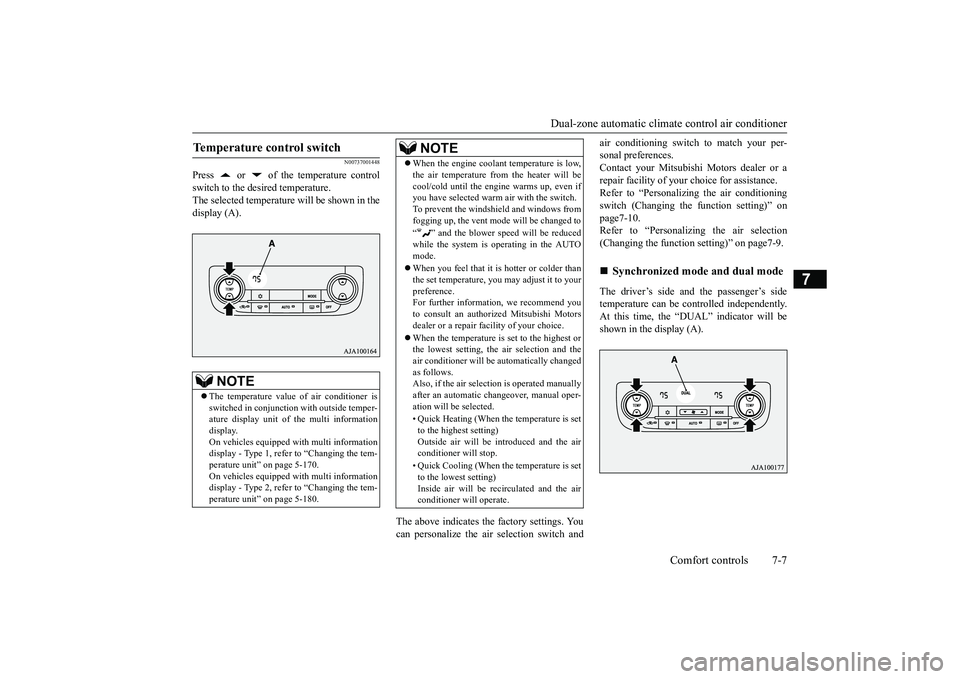
Press or of the temperature controlswitch to the desired temperature.The selected temperature will be shown in thedisplay (A).
The above indicates the
factory settings. You
can personalize the air
selection switch and
air conditioning switch to match your per-sonal preferences.Contact your Mitsubishi
Motors dealer or a
repair facility of your
choice for assistance.
Refer to “Personalizi
ng the air conditioning
switch (Changing the function setting)” onpage7-10.Refer to “Personalizing the air selection(Changing the function setting)” on page7-9.The driver’s side and the passenger’s sidetemperature can be controlled independently.At this time, the “
DUAL” indicato
r will be
shown in the display (A).
Temperature control switch
NOTE
The temperature value
of air conditioner is
switched in conjunction
with outside temper-
ature display unit of the multi informationdisplay.On vehicles equipped with multi informationdisplay - Type 1, refer to “Changing the tem-perature unit” on page 5-170.On vehicles equipped with multi informationdisplay - Type 2, refer to “Changing the tem-perature unit” on page 5-180.
When the engine coolan
t temperature is low,
the air temperature from the heater will becool/cold until the engi
ne warms up, even if
you have selected warm
air with the switch.
To prevent the windshield and windows fromfogging up, the vent mode will be changed to“ ” and the blower speed will be reducedwhile the system is operating in the AUTOmode.When you feel that it is hotter or colder thanthe set temperature, you may adjust it to yourpreference.For further information, we recommend youto consult an authorized Mitsubishi Motorsdealer or a repair fa
cility of your choice.
When the temperature is set to the highest orthe lowest setting, the air selection and theair conditioner will be automatically changedas follows.Also, if the air select
ion is operated manually
after an automatic ch
angeover, manual oper-
ation will be selected.• Quick Heating (When th
e temperature is set
to the highest setting)Outside air will be introduced and the airconditioner will stop.• Quick Cooling (When the temperature is setto the lowest setting)Inside air will be reci
rculated and the air
conditioner wi
ll operate.
NOTE
Synchronized mode and dual mode
BK0249100US.book 7 ページ 2017年5月10日 水曜日 午前8時49分
Page 353 of 441

Dual-zone automatic climate
control air conditioner
7-8 Comfort controls
7
Synchronized modeIf the driver’s side temperature controlswitch is pressed, the passenger’s sidetemperature will also be controlled to thesame setting temperature as the driver’sside.Dual modeIf the passenger’s side temperature con-trol switch is pressed under synchronizedmode, the system will switch to dualmode. In dual mode, the driver’s side andthe passenger’s side
temperature can be
set separately by usi
ng each temperature
control switch.Press the AUTO switch to return to syn-chronized mode.
N00737101234
To change the amount of air flowing from thevents, press the MODE switch. Each time theMODE switch is pressed, the mode changesto the next one in the following sequence:“”
“”
“”
“”
“”
“ ”. The selected mode is shown in the dis-play (A). Refer to “Ction” on page 7-3.
N00703401054
When this switch is pressed, the modechanges to the “ ”
mode and the blower
speed will be set at the maximum automati-cally. The indicator light (A) will come onand the “ ” mode is shown in the display(B).
Mode switch
Defogger switch
BK0249100US.book 8 ページ 2017年5月10日 水曜日 午前8時49分
Page 355 of 441

Dual-zone automatic climate
control air conditioner
7-10 Comfort controls
7
• When the setting has changed fromenabled to disabled,
the system will beep
three times and the indicator light willflash three times.• When the setting has changed from dis-abled to enabled, the system will beeptwo times and the i
ndicator light will
flash three times.On vehicles equipped with the Smart-phone Link Display Audi
o, screen opera-
tions can also be used to change thesetting. Refer to th
e separate owner’s
manual for details.
N00737301467
Push the switch, and the air conditioningcompressor will turn on. The “ ” indicatorwill be shown in the display (A).
Push the switch again and the air condition-ing compressor will st
op and the indicator
goes off.
N00712200048
You can change the following functions tomatch your preference.Enable automatic air conditioning control:When the AUTO switch is pressed, orwhen the temperature control switch hasbeen set to the minimum temperature, theair conditioning switch is automaticallycontrolled.Disable automatic air conditioning con-trol:The air conditioning switch is not auto-matically controlled,
unless the air condi-
tioning switch is used.Changing the settingsPress the air conditioning switch forapproximately 10
seconds or longer.
When the setting has changed, the systemwill beep and the indi
cator light will flash.
• When the setting has changed fromenabled to disabled, the system will beepthree times and the indicator light willflash three times.• When the setting has changed from dis-abled to enabled, the system will beeptwo times and the i
ndicator light will
flash three times.
NOTE
The factory setting is “Enable automatic airselection control”.When the defogger switch is pressed, the airselection will automatically change to theoutside air position, even if the system is setto “Disable automatic air selection control”,in order to prevent windows from foggingup.
Air conditioning switch
NOTE
If a problem is detect
ed in the air condition-
ing compressor, the “ ” indicator blinks.Press the air conditioni
ng switch once to turn
it off, then once more to turn it back on. Ifthe“ ” indicator does not blink, there is noproblem. If it does blink,
have it checked at
an authorized Mitsubish
i Motors dealer or a
repair facility of your choice.For example, sometimes after using a high-pressure car wash, the
condenser can get wet,
and the “ ” indicator blinks temporarily.Wait for a while, pres
s the air conditioning
switch once to turn the system off, then oncemore to turn it back on. Once the water evap-orates, the blinking will stop.
Personalizing the air conditioning switch (Changing the function set-ting)
BK0249100US.book 10 ページ 2017年5月10日 水曜日 午前8時49分
Page 368 of 441
How to change a tire
For emergencies 8-7
8
6. Get the jack, bar and wheel nut wrenchready.(Refer to “Jack and t
ools” on page 8-5.)
N00849600315
The compact spare tire is stowed below theluggage compartment fl
oor. It is designed to
save space in the luggage compartment. Itslighter weight makes it easier to use if a flattire occurs.
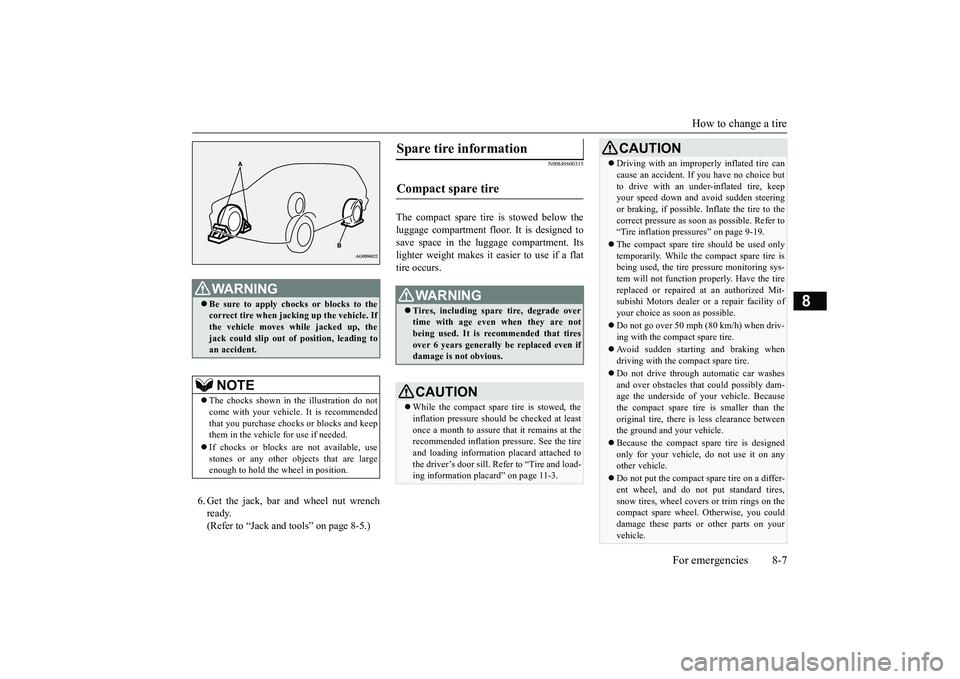
WA R N I N GBe sure to apply choc
ks or blocks to the
correct tire when jacking up the vehicle. Ifthe vehicle moves while jacked up, thejack could slip out of
position, leading to
an accident.NOTE
The chocks shown in the illustration do notcome with your vehicl
e. It is recommended
that you purchase chocks or blocks and keepthem in the vehicle for use if needed.If chocks or blocks
are not available, use
stones or any other obj
ects that are large
enough to hold the wheel in position.
Spare tire information Compact spare tire
WA R N I N GTires, including spar
e tire, degrade over
time with age even when they are notbeing used. It is recommended that tiresover 6 years generally
be replaced even if
damage is not obvious.CAUTIONWhile the compact spare tire is stowed, theinflation pressure shoul
d be checked at least
once a month to assure that it remains at therecommended inflation pressure. See the tireand loading informati
on placard attached to
the driver’s door sill. Refer to “Tire and load-ing information placard” on page 11-3.
Driving with an imprope
rly inflated tire can
cause an accident. If
you have no choice but
to drive with an under-inflated tire, keepyour speed down and avoid sudden steeringor braking, if possible. Inflate the tire to thecorrect pressure as s
oon as possible. Refer to
“Tire inflation pressures” on page 9-19.The compact spare tire should be used onlytemporarily. While the compact spare tire isbeing used, the tire pr
essure monitoring sys-
tem will not function pr
operly. Have the tire
replaced or repaired at an authorized Mit-subishi Motors dealer or
a repair facility of
your choice as soon as possible.Do not go over 50 mph (80 km/h) when driv-ing with the compact spare tire.Avoid sudden starting and braking whendriving with the compact spare tire.Do not drive through automatic car washesand over obstacles that
could possibly dam-
age the underside of your vehicle. Becausethe compact spare tire is smaller than theoriginal tire, there is less clearance betweenthe ground and your vehicle.Because the compact spare tire is designedonly for your vehicle, do not use it on anyother vehicle.Do not put the compact spare tire on a differ-ent wheel, and do not put standard tires,snow tires, wheel covers
or trim rings on the
compact spare wheel. Otherwise, you coulddamage these parts or other parts on yourvehicle.CAUTION
BK0249100US.book 7 ページ 2017年5月10日 水曜日 午前8時49分
Page 370 of 441
How to change a tire
For emergencies 8-9
8
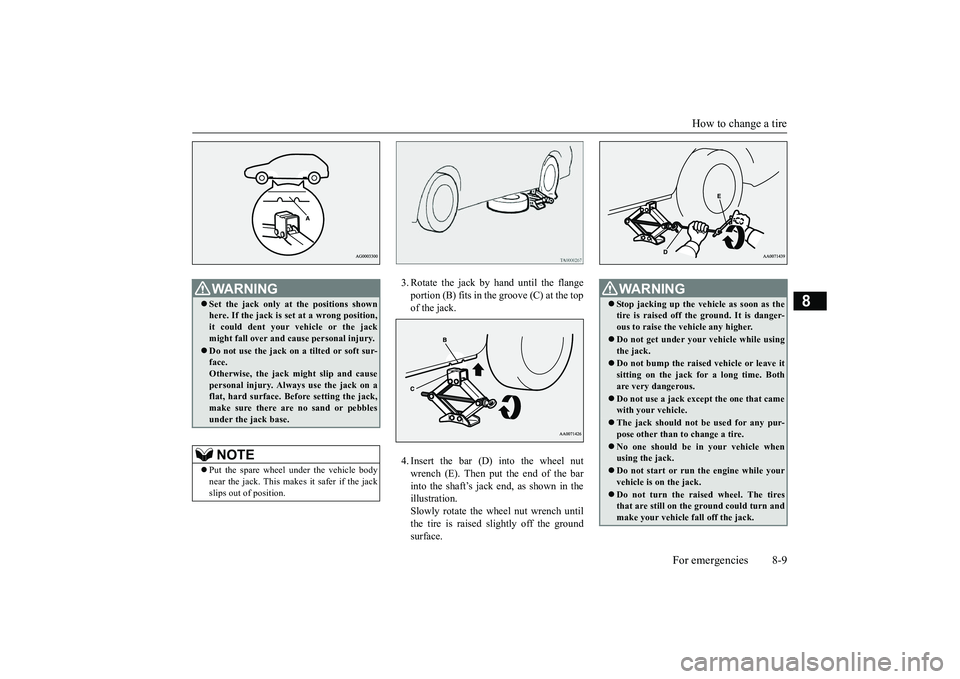
3. Rotate the jack by hand until the flangeportion (B) fits in the groove (C) at the topof the jack.4. Insert the bar (D) into the wheel nutwrench (E). Then put the end of the barinto the shaft’s jack end, as shown in theillustration.Slowly rotate the wheel nut wrench untilthe tire is raised slightly off the groundsurface.
WA R N I N GSet the jack only at
the positions shown
here. If the jack is se
t at a wrong position,
it could dent your vehicle or the jackmight fall over and ca
use personal injury.
Do not use the jack on a tilted or soft sur-face.Otherwise, the jack might slip and causepersonal injury. Always
use the jack on a
flat, hard surface. Before setting the jack,make sure there are no sand or pebblesunder the jack base.NOTE
Put the spare wheel under the vehicle bodynear the jack. This makes it safer if the jackslips out of position.
WA R N I N GStop jacking up the ve
hicle as soon as the
tire is raised off the ground. It is danger-ous to raise the ve
hicle any higher.
Do not get under your vehicle while usingthe jack.Do not bump the raised
vehicle or leave it
sitting on the jack for a long time. Bothare very dangerous.Do not use a jack except the one that camewith your vehicle.The jack should not
be used for any pur-
pose other than to change a tire.No one should be
in your vehicle when
using the jack.Do not start or run
the engine while your
vehicle is on the jack.Do not turn the raised wheel. The tiresthat are still on the ground could turn andmake your vehicle fall off the jack.
BK0249100US.book 9 ページ 2017年5月10日 水曜日 午前8時49分