2018 MITSUBISHI ASX page 5
[x] Cancel search: page 5Page 2 of 514
ForewordE09200107208
Thank you for selecting an ASX as your new vehicle.
This owner’s manual will add to your understanding and full enjoyment of
the many fine features of this vehicle.
It contains information prepared to acquaint you with the proper way to oper-
ate and maintain your vehicle for the utmost in driving pleasure.
MITSUBISHI MOTORS Europe B.V. reserves the right to make changes in
design and specifications and/or to make additions to or improvements in
this product without obligation to install them on products previously manu- factured.
It is an absolute requirement for the driver to strictly observe all laws and
regulations concerning vehicles.
This owner’s manual has been written in compliance with such laws and reg- ulations, but some of the contents may become contradictory with later amendment of the laws and regulations.
Please leave this owner’s manual in this vehicle at time of resale. The next
owner will appreciate having access to the information contained in this
owner’s manual.
Repairs to your vehicle:
Vehicles in the warranty period:
All warranty repairs must be carried out by a MITSUBISHI MOTORS Au-
thorized Service Point.
Vehicles outside the warranty period:
Where the vehicle is repaired is at the discretion of the owner.Throughout this owner’s manual the words WARNING and CAUTION
appear.
These serve as reminders to be especially careful. Failure to follow instruc-
tions could result in personal injury or damage to your vehicle.WARNING
Indicates a strong possibility of severe personal injury or death if in-
structions are not followed.
CAUTION
Means hazards or unsafe practices that could cause minor personal in-
jury or damage to your vehicle.
NOTE
Gives helpful information.
You will see another important symbol:
*: indicates optional equipment.
It may differ according to the sales classification; refer to the sales cata- logue.
Abbreviations used in this owner’s manual:
LHD: Left-Hand DriveM/T: Manual TransmissionRHD: Right-Hand DriveA/T: Automatic Transmission CVT: Continuously Variable Transmission
The symbol used on the vehicles:
: See owner’s manual
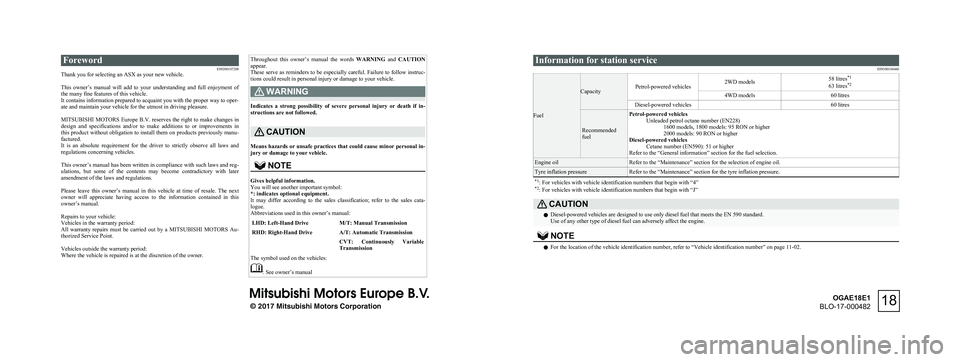
Information for station service
E09300104660
Fuel
CapacityPetrol-powered vehicles2WD models58 litres*1
63 litres *24WD models60 litresDiesel-powered vehicles 60 litres
Recommended
fuel
Petrol-powered vehicles Unleaded petrol octane number (EN228)1600 models, 1800 models: 95 RON or higher
2000 models: 90 RON or higher
Diesel-powered vehicles Cetane number (EN590): 51 or higher
Refer to the “General information” section for the fuel selection.Engine oilRefer to the “Maintenance” section for the selection of engine oil.Tyre inflation pressureRefer to the “Maintenance” section for the tyre inflation pressure.*1 : For vehicles with vehicle identification numbers that begin with “4”
*2 : For vehicles with vehicle identification numbers that begin with “J”CAUTIONl Diesel-powered vehicles are designed to use only diesel fuel that meets the EN 590 standard.
Use of any other type of diesel fuel can adversely affect the engine.NOTEl For the location of the vehicle identification number, refer to “Vehicle identification number” on page 11-02.
© 2017 Mitsubishi Motors Corporation18
OGAE18E1
BLO-17-000482
Page 23 of 514

Protect the environment
It is illegal to pollute drains, water coursesand soil. Use authorized waste collection fa-cilities, including civic amenity sites and ga- rages providing facilities for disposal of used
oil and used oil filters. If in doubt, contact your local authority for advice on disposal.
Disposal information for
used batteries E00201300032Your vehicle contains batter-
ies and/or accumulators.
Do not mix with general household waste.
For proper treatment, recov-
ery and recycling of used bat-
teries, please take them to ap- plicable collection points, in accordance with your nation-
al legislation and the Direc- tives 2006/66/EC.
By disposing of these batter- ies correctly, you will help to
save valuable resources and
prevent any potential nega-
tive effects on human health and the environment which could otherwise arise frominappropriate waste handling.Auto Stop & Go (AS&G)
system* E00201501057This paragraph summarizes the major itemsof the Auto Stop & Go (AS&G) system
such as the characteristics, operating proce- dures, etc. For details, refer to “Auto Stop &
Go (AS&G) system” on page 6-19.
The AS&G system reduces the emission of
exhaust gases and increases fuel efficiency. The AS&G system automatically stops and restarts the engine without the use of the igni-tion switch or the engine switch when the ve-
hicle is stopped, such as at traffic lights or in
a traffic jam.
Activation
E00201601061
The AS&G system is automatically activated when the ignition switch is turned to the
“ON” position or the operation mode is put in
ON.
Deactivation
E00201701091
You can deactivate the system by pressing
the “AS&G OFF” switch. Then the “
” dis-
play/indicator will turn on.
Auto stop
E00201801106
1. Stop the vehicle.
Disposal information for used batteries
2-07OGAE18E1General information2 Type 1 Type 2
Page 24 of 514

2.Place the gearshift lever in the “N”
(Neutral) position.Vehicles with 5M/TVehicles with 6M/T
3. Release the clutch pedal.
4. The “
” display/indicator will turn on
and the engine will stop automatically.
Type 1Type 2Auto go
E00201901077
Depress the clutch pedal while the gearshift
lever is in the “N” (Neutral) position. The
“
” display/indicator turns off and the en-
gine restarts automatically.
Type 2Type 1System characteristics
E00202301065
The principle of the AS&G system is that it
adapts to the vehicle’s needs (i.e. energy sup- ply). This means that in certain circumstancesthe engine will not stop and in other circum-
stances the engine will restart by itself.
Circumstances when the engine
will restart by itself
E00202400027
l The interior temperature rises and the air
conditioning starts operating in order to lower the temperature.
l Electric power consumption is high.
l The brake pedal is depressed repeatedly.
l Vehicle speed is 3 km/h (2 mph)
or
higher when coasting on a slope.
l Mode selection dial is set to the demister
position.
l When the air conditioning is operated by
pressing the air conditioning switch.
l When the preset temperature of the air
conditioning is changed significantly.
l When the air conditioning is operated in
AUTO mode where the temperature con-trol dial is set to the max. hot or the max.
cool position (for vehicles with automat- ic air conditioning).
Other than the conditions mentioned above, the engine may restart automatically. For de-
tails, refer to “Auto Stop & Go (AS&G) sys- tem” on page 6-19.
Circumstances when the engine
will not stop
E00202501054
l Ambient temperature is low.
Auto Stop & Go (AS&G) system*
2-08OGAE18E1General information2
Page 25 of 514

lAfter the engine restarts automatically
and the vehicle stops again within 10 seconds.
l After the engine restarts automatically
and the vehicle remains stationary.
l Mode selection dial is set to the demister
position (see illustration below).
l When the air conditioning is operated in
AUTO mode where the temperature con-
trol dial is set to the max. hot or the max.
cool position (for vehicles with automat- ic air conditioning).
Other than the conditions mentioned above, the engine may not stop automatically. For details, refer to “Auto Stop & Go (AS&G)
system” on page 6-19.
Auto Stop & Go (AS&G) system*
2-09OGAE18E1General information2
Page 29 of 514

NOTElThe engine is designed so that it will not
start if the ID code registered in the immo- bilizer computer and the key’s ID code do
not match. Refer to the “Electronic immobil-
izer” section for details and key usage.
l [For vehicles equipped with the security
alarm system]
Pay attention to the following if the security alarm is set to “Active”.
Refer to “Security alarm system” on page
3-32.
• If the security alarm is in the system
armed mode, the alarm will sound if the doors are opened after being unlocked
with the key, the inside lock knob or the
central door lock switch.
• Even if the security alarm is set to “Ac-
tive”, the system preparation mode is not
entered if the keyless entry system or the keyless operation function was not used to
lock the vehicle.Electronic immobilizer
(Anti-theft starting system) E00300203805CAUTIONlDo not modify or add parts to the immobiliz-
er system. Doing so could cause the immo- bilizer to malfunction.[For vehicles equipped with keyless opera-
tion system]
For information on operations for vehicles
equipped with the keyless operation system, refer to “Keyless operation system: Electron-ic immobilizer (Anti-theft starting system)”
on page 3-12.
[Except vehicles equipped with keyless oper-
ation system]
The electronic immobilizer has been de-
signed to significantly reduce the possibility of vehicle theft. The purpose of the system is
to immobilize the vehicle if an invalid start is
attempted. A valid start attempt can only be achieved by using a key “registered” to the immobilizer system.NOTEl In the following cases, the vehicle may not
be able to receive the registered ID code from the registered key and the engine may
not start.
• When the key contacts a key ring or other
metallic or magnetic object.NOTE
• When the key grip contacts metal of an-
other key.
• When the key contacts or is close to other
immobilizing keys (including keys of oth-er vehicles).
Electronic immobilizer (Anti-theft starting system)
3-03OGAE18E1Locking and unlocking3
Page 30 of 514

NOTE
In cases like these, remove the object oradditional key from the vehicle key. Then
try again to start the engine. If the engine
does not start, we recommend you to con- tact your MITSUBISHI MOTORS Au-
thorized Service Point.
l If you lose one of them, contact a
MITSUBISHI MOTORS Authorized Serv-
ice Point as soon as possible. To obtain a re- placement or extra spare key, take your vehi-
cle and all remaining keys to your MITSUBISHI MOTORS Authorized Serv-
ice Point. All the keys have to be re-regis- tered in the immobilizer computer unit. The immobilizer can register up to 8 different
keys.
Keyless entry system*
E00300304425
Press the remote control switch, and all doors and the tailgate will be locked or unlocked as
desired. It is also possible to operate the out-
side rear-view mirrors (Vehicles equipped with the mirror retractor switch).
1- LOCK switch
2- UNLOCK switch
3- Indication lamp
To lock
Press the LOCK switch (1). All the doors and the tailgate will be locked. The turn-signal
lamps will blink once when the doors and the
tailgate are locked.
NOTEl With a vehicle that has a Dead Lock System,
pressing the LOCK switch (1) two times in
succession causes the Dead Lock System to be set. (Refer to “Setting the system” on
page 3-27.)
To unlock
Press the UNLOCK switch (2). All the doors
and the tailgate will be unlocked. If the doors and tailgate are unlocked when the frontroom lamp switch is in the “DOOR” positionor the rear room lamp switch (except for ve-
hicles equipped with the sunshade) is in the
middle (•) position, the room lamp will illu- minate for approximately 15 seconds and theturn-signal lamps will blink twice.
Depending on the vehicle model, the position
and tail lamps can also be set to turn on for
approximately 30 seconds. Refer to “Instru-
ments and controls: Welcome light” on page
5-54.
NOTEl The remote control switch does not operate
in the following conditions:
• The key is left in the ignition switch.
• A door or the tailgate is open or ajar. (On-
ly the unlock function operates.)
Keyless entry system*
3-04OGAE18E1Locking and unlocking3
Page 31 of 514

NOTElExcept for vehicles equipped with a Dead
Lock System, the door and tailgate unlock function can be set so that only the driver’sdoor unlocks when the UNLOCK switch (2) is pressed once.
If the door and tailgate unlock function is set
to work as described above, all the doors and the tailgate unlock when the UNLOCK
switch is pressed two times in succession.
Refer to “Setting of door and tailgate unlock function” on page 3-06.
l The indication lamp (3) comes on each time
a switch is pressed.
l For vehicles equipped with the mirror retrac-
tor switch, the outside rear-view mirrors au- tomatically retract or extend when all the
doors and tailgate are locked or unlocked us- ing the remote control switches of the key- less entry system.
Refer to “Starting and driving: Outside rear- view mirrors” on page 6-10.
l If the UNLOCK switch (2) is pressed and no
door or tailgate is opened within approxi-mately 30 seconds, relocking will automati-
cally occur.
l It is possible to modify functions as follows:
For further information, please contact your MITSUBISHI MOTORS Authorized Serv-
ice Point.
• The time for automatic relocking can be
changed.NOTE• The confirmation function (flashing of the
turn-signal lamps) can be set to operate
only when the doors and backdoor are locked or only when the doors and back- door are unlocked.
• The confirmation function (this indicates
locking or unlocking of the doors and tail-
gate with the blink of the turn-signal lamps) can be deactivated.
• The number of times the turn-signal
lamps are flashed by the confirmation function can be changed.
Operation of the Dead Lock
System
In a vehicle that has a Dead Lock System, it
is possible to set the Dead Lock System using the remote controller.
(Refer to “Dead Lock System” on page 3-27.)
Operation of the outside rear-
view mirrors (Vehicles equip-ped with mirror retractorswitch)
E00310800236
To fold
Within 30 seconds of locking the doors and tailgate using the LOCK switch (1), press the LOCK switch twice rapidly to fold the out- side rear-view mirrors.
To extend
Within 30 seconds of unlocking the doors
and tailgate using the UNLOCK switch (2),
press the UNLOCK switch twice rapidly to
return the outside rear-view mirrors to their
extended positions.
The outside rear-view mirrors are not ini-
tially set to work as described above. If you
want them to work as described above, you need to set them so that they do not retract/ extend when the doors and tailgate are
locked/unlocked using the keyless entry sys-
tem or keyless operation system.
Refer to “Starting and driving: Outside rear-
view mirrors” on page 6-10.
For details, please consult a MITSUBISHI
MOTORS Authorized Service Point.
Keyless entry system*
3-05OGAE18E1Locking and unlocking3
Page 32 of 514

NOTElThe outside rear-view mirrors cannot be fol-
ded or extended using the remote control
switch in the following conditions:
• The key is left in the ignition switch.
• A door or the tailgate is open or ajar.
l The remote control switch will operate with-
in approximately 4 m from the vehicle.
However, the operating range of the remote control switch may change if the vehicle is located near a power station, or radio/TV
broadcasting station.
l If either of the following problems occurs,
the battery may be exhausted.
• The remote control switch is operated at
the correct distance from the vehicle, but
the doors and tailgate are not locked/ unlocked in response.
• The indication lamp (3) is dim or does not
come on.
For further information, please contact your MITSUBISHI MOTORS Authorized
Service Point.
If you replace the battery yourself, refer to
“Procedure for replacing the remote con-
trol switch battery” on page 3-06.
l If your remote control switch is lost or dam-
aged, please contact your MITSUBISHI
MOTORS Authorized Service Point for a re-
placement remote control switch.NOTEl If you wish to add a remote control switch,
we recommend you to contact a
MITSUBISHI MOTORS Authorized Serv-
ice Point.
A maximum of 8 remote control switches
are available for your vehicle.Setting of door and tailgate un-
lock function (Except for vehi- cles equipped with a Dead
Lock System)
E00310300257
The door and tailgate unlock function can be set to the following two conditions.
Each time the door and tailgate unlock func-
tion is set, a chime will sound to tell you the
condition of the door and tailgate unlock function.
Number of
chimesConditionOne chimeAll doors and the tailgate un-lockTwo chimesDriver’s door unlock only
1. Remove the key from the ignition
switch.
2. Place the combination headlamps and
dipper switch in the “OFF” position, and leave the driver’s door open.
3. Press and hold the LOCK switch (1) for
4 to 10 seconds and then also press the
UNLOCK switch (2) during this time.
4. Release in sequence the LOCK and UN-
LOCK switches within 10 seconds of pressing the LOCK switch in step 3.Procedure for replacing the re-
mote control switch battery
E00309501692
Before replacing the battery, remove static electricity from your body by touching a met-
al part such as doorknob of the room.
WARNINGl Danger of explosion if battery is incor-
rectly replaced.
Replace only with the same battery or an
equivalent type.CAUTIONl When the remote control switch case is
opened, be careful to keep water, dust, etc. out. Also, do not touch the internal compo-
nents.NOTEl You may purchase a replacement battery at
an electric appliance store.
Keyless entry system*
3-06OGAE18E1Locking and unlocking3