2018 MERCEDES-BENZ SLC ROADSTER ECU
[x] Cancel search: ECUPage 221 of 298
Stowage areas
Stowage spaces
Important safety notes
GWARNING
If object sinthe passenger compartmenta re
stowed incorrectly, they can slide or be
thrown around and hit vehicle occupants. In
addition, cup holders, open stowage spaces
and mobile phone brackets cannot always
retain all object sthey contain. There is arisk
of injury, particularly in the event of sudden
braking or asudden change in direction.
RAlways stow object ssothat they cannot be
thrown around in such situations.
RAlways make sure that object sdonot pro-
trude from stowage spaces, parcel nets or
stowage nets.
RClose the lockable stowage spaces before
startin gajourney.
RAlways stow and secure heavy, hard, poin-
ted, sharp-edged, fragile or bulky object sin
the trunk.
Glove box
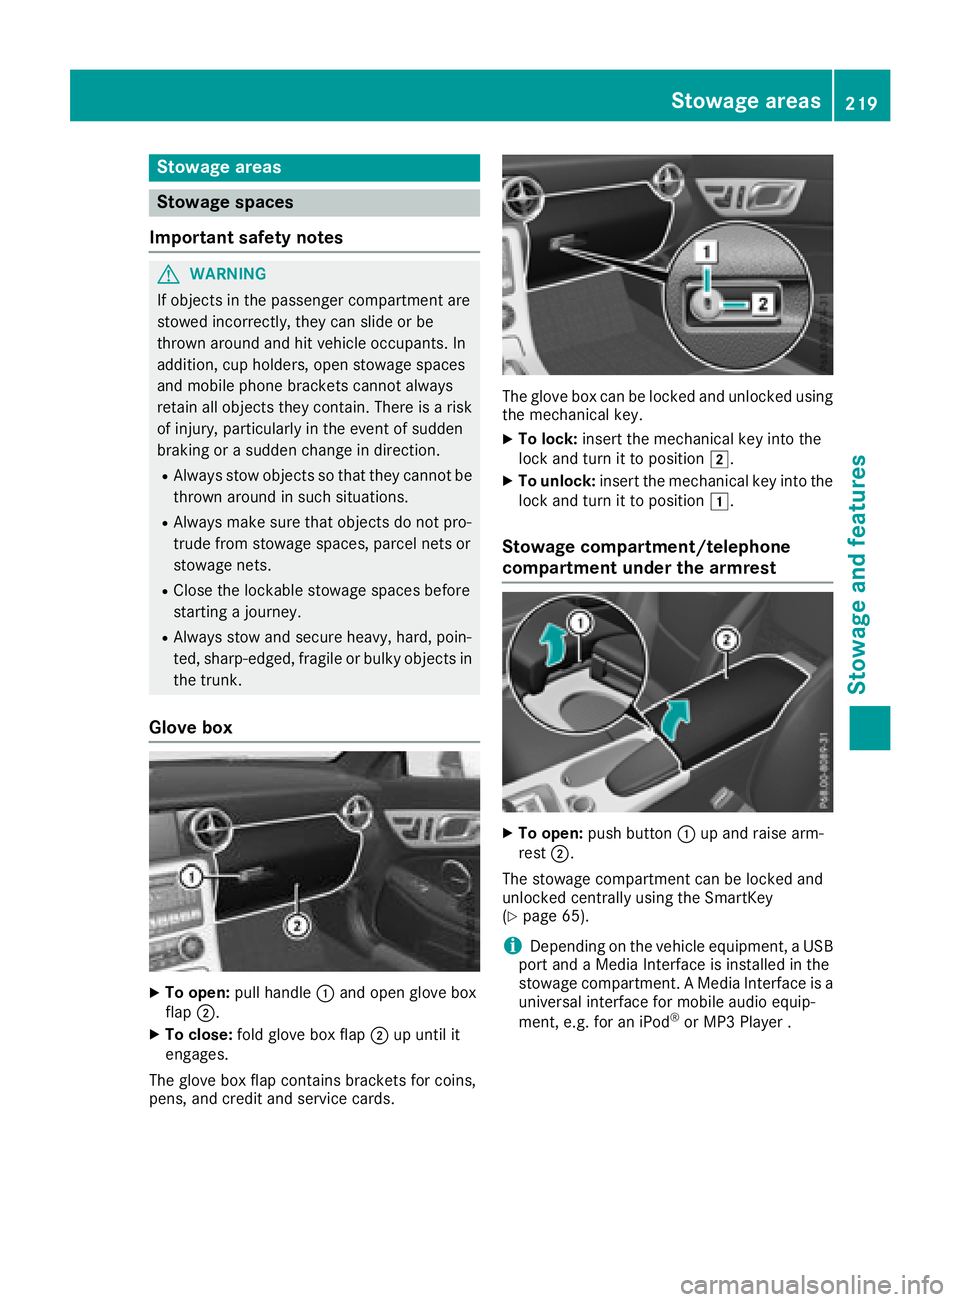
XTo open: pull handle :and open glove box
flap ;.
XTo close: fold glove box flap ;up until it
engages.
The glove box flap contains brackets for coins,
pens, and credit and service cards.
The glove box can be locked and unlocked using
the mechanical key.
XTo lock: insert the mechanical key into the
lock and turn it to position 2.
XTo unlock:insert the mechanical key into the
lock and turn it to position 1.
Stowage compartment/telephone
compartment under the armrest
XTo open:push button :up and raise arm-
rest ;.
The stowage compartmentc an be locked and
unlocked centrally using the SmartKey
(
Ypage 65).
iDepending on the vehicle equipment, aUSB
port and aMedia Interface is installed in the
stowage compartment. AMedia Interface is a
universal interface for mobile audio equip-
ment,e .g. for an iPod
®or MP3 Player.
Stowage areas219
Stowage and features
Z
Page 223 of 298
Reversible floor panelinthe trunk
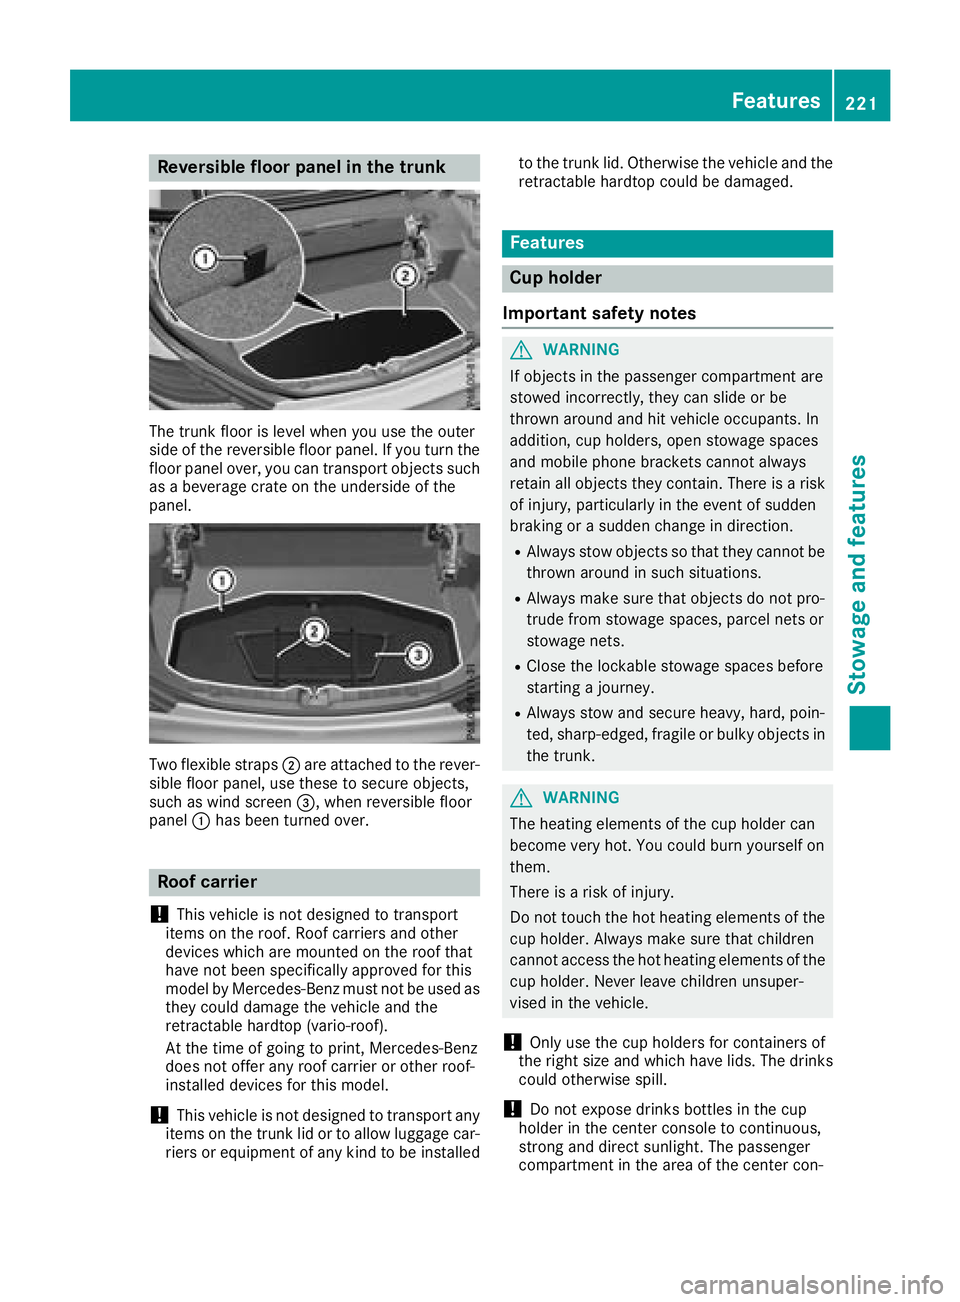
The trunk floor is level when yo uusethe outer
sid eoft he reversibl efloor panel.Ify outurn the
floor panel over, yo ucan transpor tobjects such
as ab everage crate on the undersid eofthe
panel.
Twof lexible straps ;are attached to the rever-
sible floor panel,u sethesetos ecure objects,
such as wind screen =,whenr eversibl efloor
panel :hasb eent urne dover.
Roo fcarrier
!
Thisv ehicleisn ot designed to transport
item sont he roof. Roof carriers and other
device swhich are mounted on the rooft hat
have not bee nspecifically approved for this
model by Mercedes-Benz mus tnot be used as
they could damag ethe vehicl eand the
retractable hardto p(vario-roof).
At the time of going to print, Mercedes-Benz
doe snot offera ny roofcarrieroro therr oof-
installed device sfor this model.
!Thisv ehicleisn ot designed to transpor tany
item sont he trunk li dortoallowluggage car-
riers or equipment of any kind to be installed to the trunk lid. Otherwise the vehicl
eand the
retractable hardto pcould be damaged.
Features
Cup holder
Important safety notes
GWARNING
If objects in the passenger compartment are
stowed incorrectly, they can slide or be
throwna round and hit vehicl eoccupants. In
addition, cup holders, ope nstowag espaces
and mobil ephone brackets canno talway s
retain al lobjects they contain. There is arisk
of injury, particularly in the event of sudden
braking or asudde nchange in direction.
RAlway sstow objects so that they canno tbe
throwna round in such situations.
RAlwaysmake sure that objects do not pro-
trud efrom stowag espaces, parcel nets or
stowag enets.
RClose the lockable stowag espaces before
starting ajourney.
RAlway sstow and secure heavy, hard, poin-
ted, sharp-edged, fragile or bulky objects in
the trunk.
GWARNING
The heating elements of the cup holder can
become very hot. Yo ucould burn yourselfo n
them.
There is ariskofi njury.
Do not touch the hot heating elements of the
cup holder .Alway smake sure that children
canno taccess the hot heating elements of the
cup holder .Neverl eave children unsuper-
vised in the vehicle.
!Only us ethe cup holder sfor containers of
the right size and which have lids. The drinks could otherwise spill.
!Do not expose drinks bottles in the cup
holder in the center console to continuous,
strong and direct sunlight. The passenger
compartment in the are aofthe center con-
Features221
Stowage and features
Z
Page 224 of 298
sole can otherwise be damaged by the con-
centrated and reflected sunlight.
Cup holder in the center console
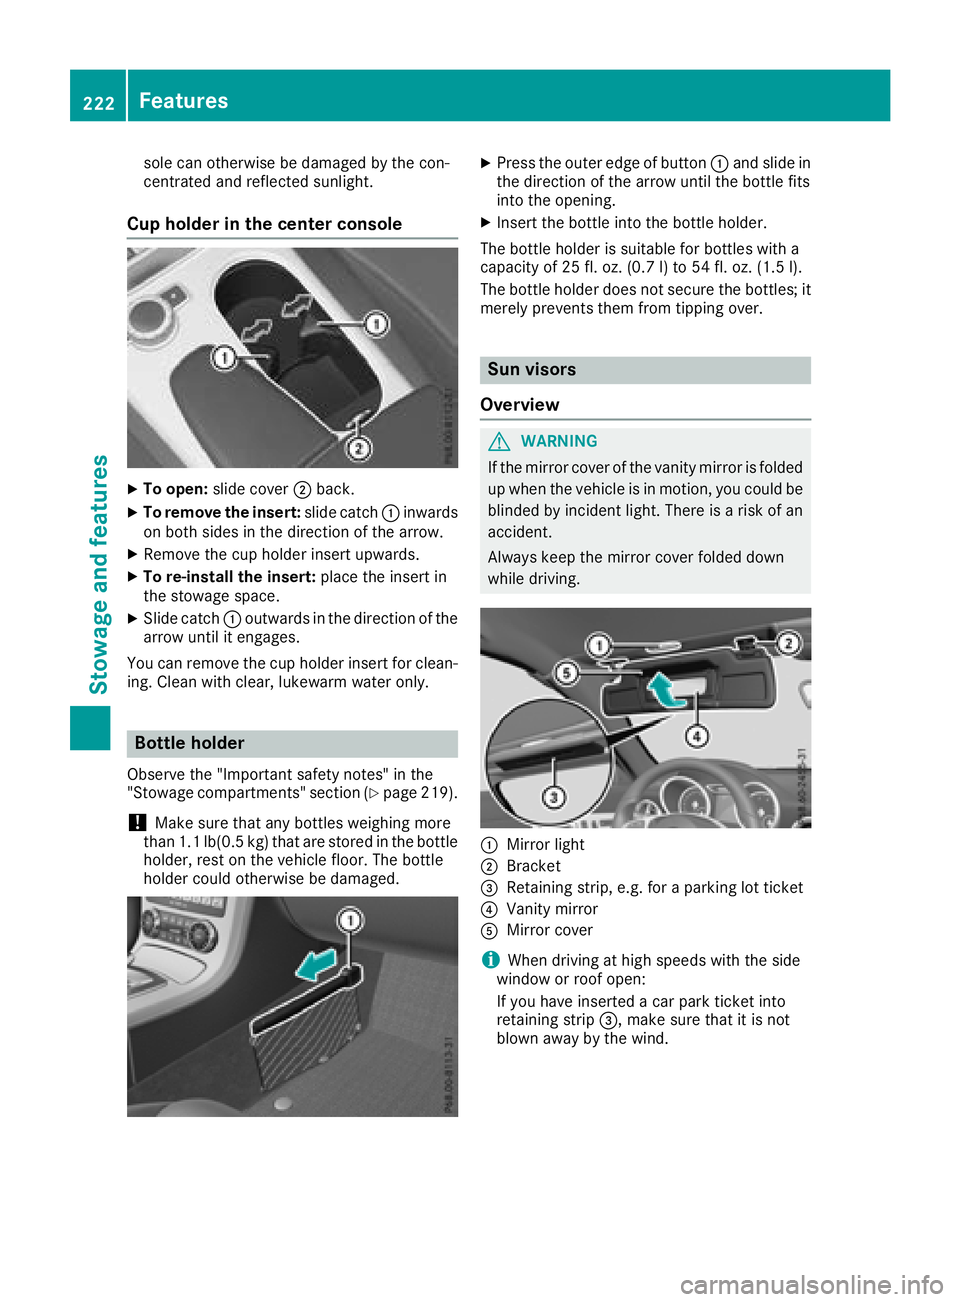
XTo open:slide cover ;back.
XTo remove the insert: slide catch:inwards
on both sides in the direction of the arrow.
XRemove the cup holder insert upwards.
XTo re-install the insert: place the insert in
the stowage space.
XSlide catch :outwards in the direction of the
arrow until it engages.
You can remove the cup holder insert for clean-
ing. Cleanw ith clear, lukewarm water only.
Bottle holder
Observe the "Important safety notes" in the
"Stowage compartments" section (Ypage 219).
!Make sure that any bottles weighing more
than 1.1 lb(0.5 kg) that are stored in the bottle
holder, rest on the vehicle floor. The bottle
holder could otherwise be damaged.
XPress the outer edge of button :and slide in
the direction of the arrow until the bottle fits
into the opening.
XInsert the bottle into the bottle holder.
The bottle holder is suitable for bottles with a
capacity of 25 fl. oz. (0.7 l)to 54 fl. oz. (1.5 l).
The bottle holde rdoesn ot secur ethe bottles; it
merel yprevents themf romtipping over.
Sun visors
Overview
GWARNING
If the mirrorc overoft he vanity mirrorisf olded
up when the vehicl eisinmotion, yo ucould be
blinded by incident light. There is ariskofa n
accident.
Alway skeept he mirrorc overfolde ddown
whil edriving.
:Mirrorl ight
;Bracket
=Retaining strip, e.g .for ap arking lo tticket
?Vanity mirror
AMirrorc over
iWhen drivin gathighs peeds with the side
windo worroofo pen:
If yo uhavei nserte dacar park ticke tinto
retaining strip =,makes uret hatiti snot
blow nawaybyt he wind.
222Features
Stowag eand featur es
Page 227 of 298
Emergency call
Important safety notes
GWARNING
It can be dangerous to remain in th evehicle,
even if you have pressed th eSOS button in an
emergency if:
Ryou see smoke inside or outside of th evehi-
cle ,e.g.ift here is afirea fter an accident
Rthev ehicle is on adangerous sectio nof
road
Rth ev ehicle is no tvisible or canno teasily be
seen by other road users, particularly when
dark or in poor visibilityc onditions
Thereisar isk of an accidenta nd injury.
Leavet hevehicle immediately in this or simi-
lar situations as soon as it is safe to do so.
Movetoas afe locationalongw ith other vehi-
cle occupants. In suchs ituations,secure the
vehicle in accordanc ewith national regula-
tions ,e.g.w ith aw arning triangle.
You must have alicens eagreementtoa ctivate
th em brace service. Makes ure that your system
is activated and operational. To register, press
the ï MB Info call button.Ifa ny of thesteps
mentioned are no tcarried out,t hesystem may
no tbea ctivated.
If you have questionsa bout theactivation,c on-
tac tone of th efollowingt elephone hotlines:
RUSA: Mercedes-Ben zCustomerA ssistance
Center at 1-800-FOR-MERCedes
(1-800-367-6372 )or1 -866-990-9007
RCanada: Customer Service at
1-888-923-8367
General notes
An emergencyc all is dialed automatically if an
air bag or Emergency TensioningD evice is trig-
gered.
iYou cannot end an automatically triggered
emergency
c all yourself.
An emergencyc all can also be initiated man-
ually.
As soon as the emergencyc all has been initi-
ated, the indicator lamp in the SOS button
flashes. The multifunction display shows the
Connecting Call
message. The audio output is muted.
Once the connection has been made, the
Call
Connectedmessage appears in the multifunc-
tion display.
All important information on the emergencyi s
transmitted, for example:
Rcurrent location of the vehicle (as determined
by the GPS system)
Rvehicle identification number
Rinformation on the severity of the accident
Shortly after the emergencyc all has been initi-
ated, avoice connection is automatically estab-
lished between the Customer Assistance Center
and the vehicle occupants.
RIf the vehicle occupantsr espond, the
Mercedes-Benz Customer Assistance Center
attempt stoget more information on the
emergency.
RIf there is no response from the vehicle occu-
pants, an ambulance is immediately sent to
the vehicle.
If no voice connection can be established to the
Mercedes-Benz Customer Assistance Center,
the system has been unable to initiate an emer-
gency call.
This can occur, for example, if the relevant
mobile phone network is not available. The indi-
cator lamp in the SOS button flashes continu-
ously.
The Call Failed
message appears in the mul-
tifunction display and must be confirmed.
In this case, summon assistance by other
means.
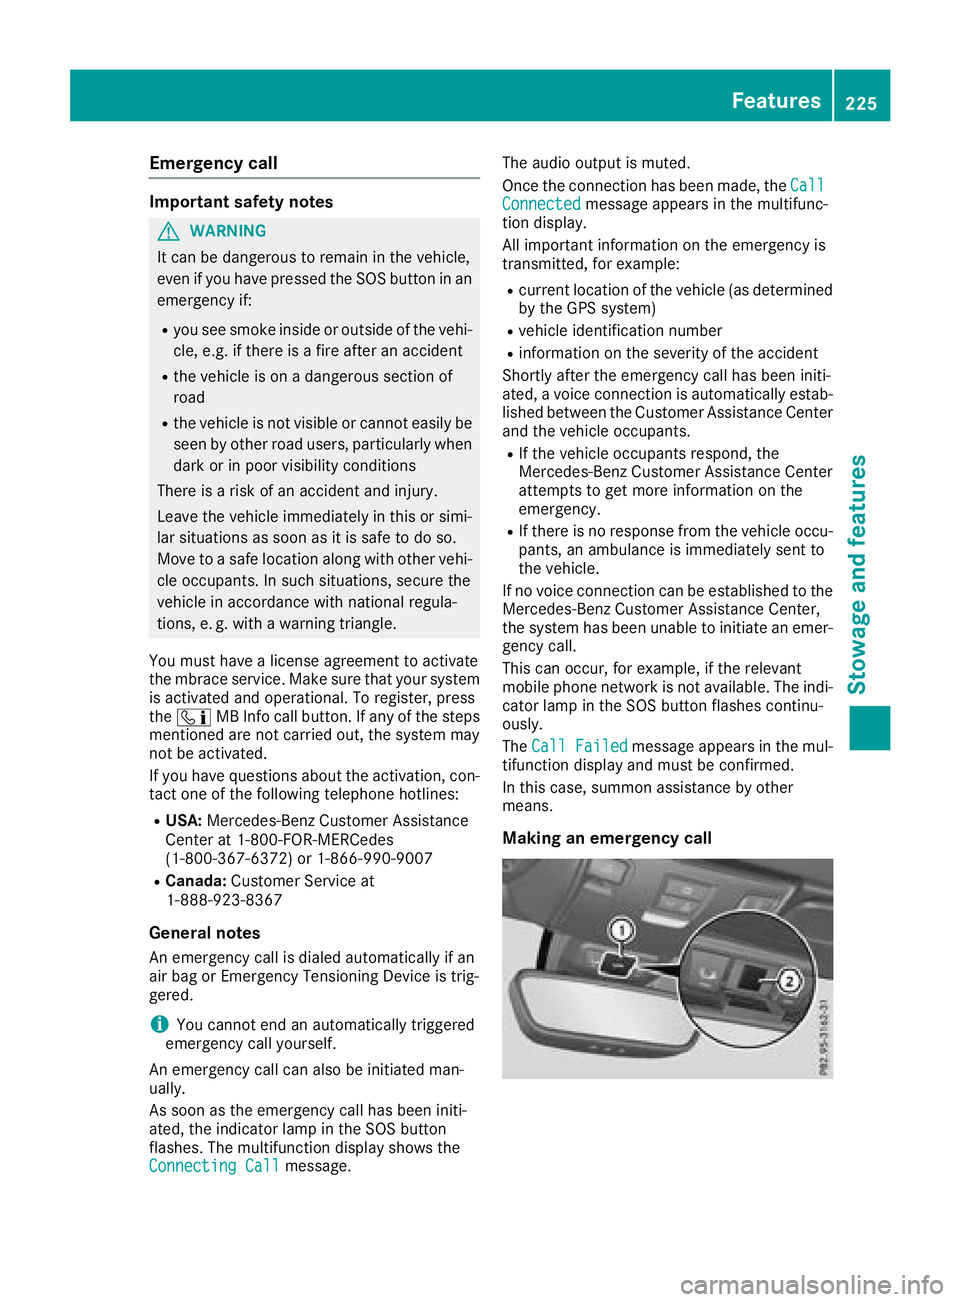
Making an emergency call
Features225
Stowage and features
Z
Page 234 of 298
Calibratingthe compass
XMakes ure that there is sufficient spacef or
you to driv einacircle without impedingt raf-
fic.
In order to calibrat ethe compass correctly, do
th ef ollowing:
Rcalibrat ethe compass in th eopen and no tin
th ev icinity of steel structures or high-voltage
transmission lines.
Rswitch off electrical consumers suchast he
climate control, windshield wipersorr ear win-
dow defroster.
Rclose all doorsa nd thetrunk lid.
XSwitch on th eignition.
XPush aroun dpen int oopening =
(Ypage 231) for approximately six seconds,
until symbol Cis shown in compass display ;
(Ypage 231).
XDrive your vehicle in afull circle at approx-
imately 3mph (5 km/h )to6mph (10 km/h).
When th ecalibration has successfully been
completed, th ecurren tdirection is shown in
compass display ;(
Ypage 231).
Floormats
GWARNING
Object sinthedriver'sf ootwell may restrict
th ec learance aroun dthe pedals or blocka
depressed pedal. This jeopardizes th eoper-
atin gand road safety of th evehicle .Thereisa
ris kofana ccident.
Stow all object ssecurely in th evehicle so that
they do no tget int othe driver'sf ootwell.
When usingf loormats or carpets, mak esure
that they are properl ysecured so that they do
no tslip or obstruc tthe pedals.Don otplace
several floormats or carpetsont opof one
another.
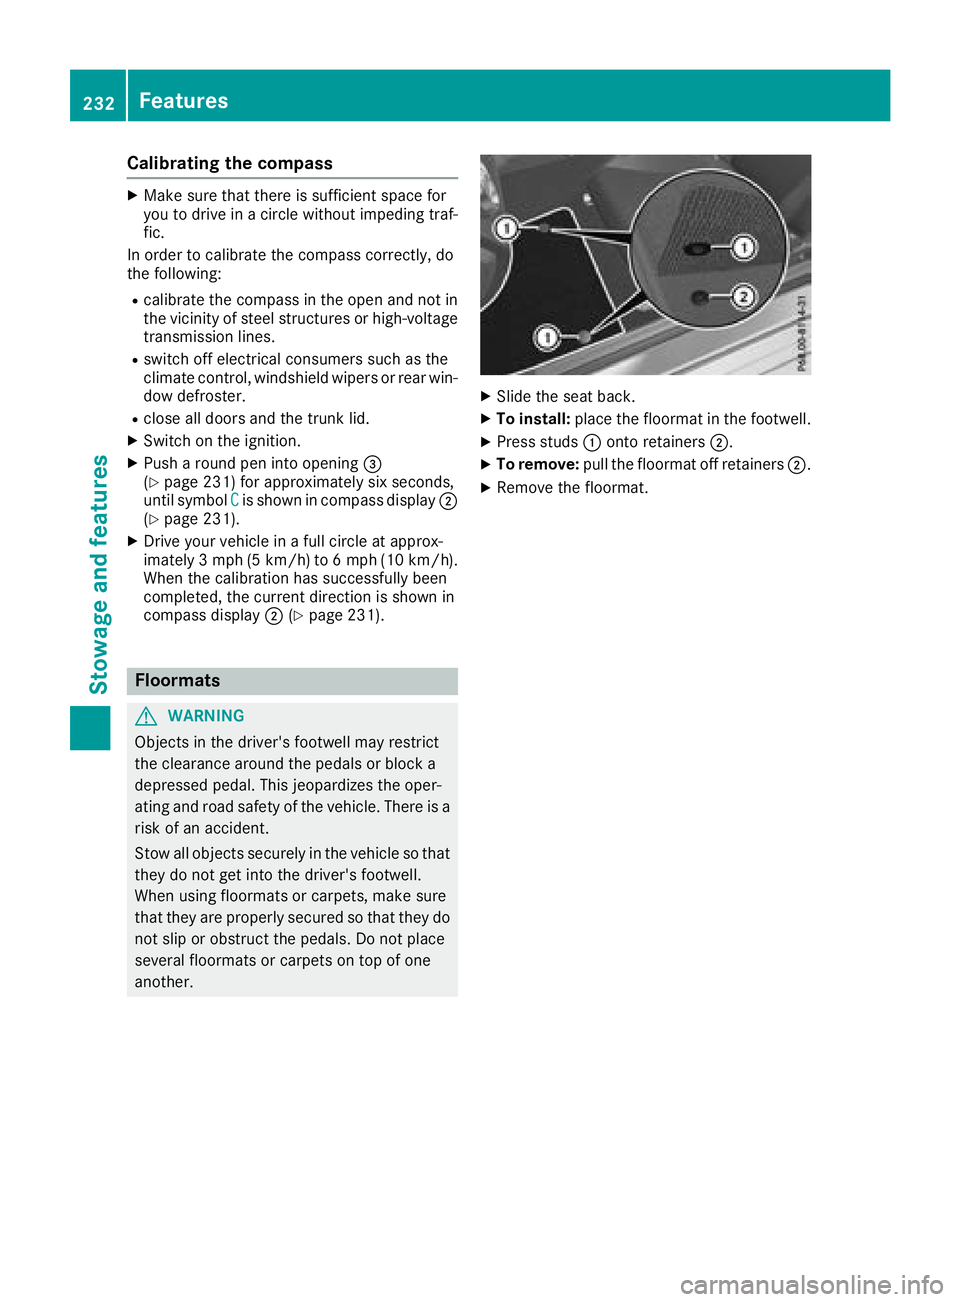
XSlid ethe seat back.
XTo install: placethefloormat in th efootwell.
XPress studs :onto retainers ;.
XTo remove:pull thefloormat off retainers ;.
XRemove thefloormat.
232Features
Stowage and features
Page 237 of 298
XPull out oil dipstick:.
XWipe off oil dipstick :.
XSlowly slide oil dipstick :into the guide tube
to the stop, and take it out again.
If the level is between MIN mark =and MAX
mark ;,the oil level is correct.
XIf the oil level has dropped to MIN mark =or
below, add 1.1 US qt (1.0 liter) of engine oil.
Adding engine oil
GWARNING
Certain components in the engine compart-
ment ,such as the engine, radiator and parts
of the exhaust system, can become very hot.
Workingint he engine compartment poses a
risk of injury.
Where possible, let the engine cool down and touch only the components described in the
following.
GWARNING
If engine oil comes into contact with hot com- ponentsint he engine compartment ,itmay
ignite. There is arisk of fire and injury.
Make sure that engine oil is not spilled next to
the filler neck.L et the engine cool down and
thoroughly clean the engine oil off the com-
ponentsb efore starting the engine.
HEnvironmenta lnote
When adding oil, take care not to spill any. If
oil enter sthe soil or waterways, it is harmful to
the environment.
!Use only engine oils and oil filters that are
approved for vehicles with aservice system. A
list of the engine oils and oil filters that have
been tested and approved in accordanc ewith
Mercedes-Benz Specifications for Service
Products is availableata ny authorized
Mercedes-Benz Center. The following cause engine failure or damage
to the exhaust system:
RUse of engine oils and oil filters that have
not been expressly approved for the service
system
RReplacement of engine oil and oil filter after
the replacement interval specified by the
service system has expired
RUse of engine oil additives
!Do not add too much oil. If the oil level is
above the "max" mark on the dipstick ,too
much oil has been added. This can lead to
damage to the engine or the catalytic con-
verter .Have excess oil siphoned off.
Example: engine oil cap
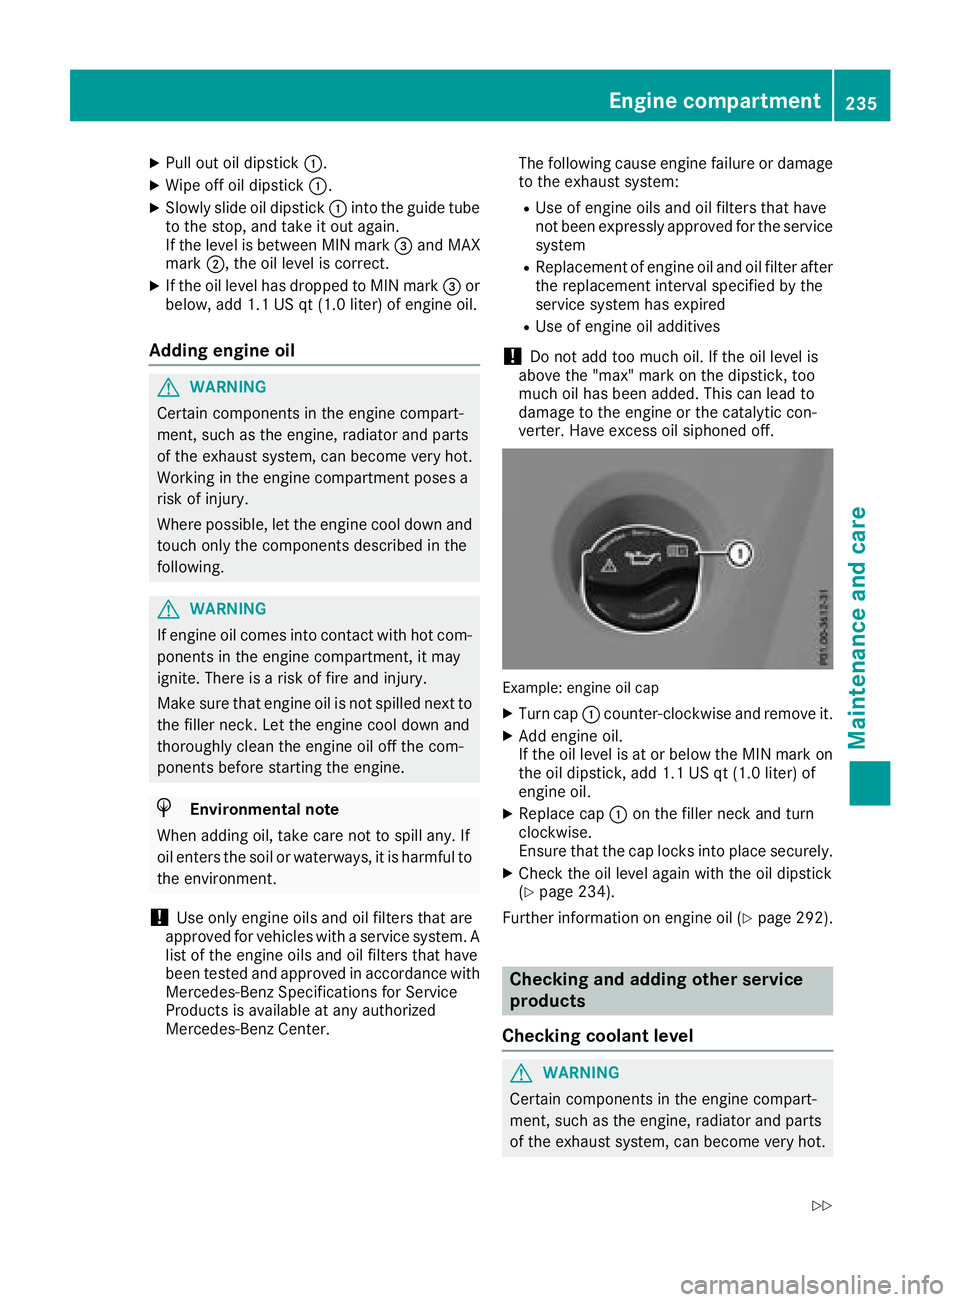
XTurn cap :counter-clockwise and remove it.
XAdd engine oil.
If the oil level is at or below the MIN mark on
the oil dipstick ,add 1.1 US qt (1.0 liter) of
engine oil.
XReplace cap :on the filler neck and turn
clockwise.
Ensure that the cap locks into place securely.
XCheck the oil level again with the oil dipstick
(Ypage 234).
Further information on engine oil (
Ypage 292).
Checking and adding other service
products
Checking coolant level
GWARNING
Certain components in the engine compart-
ment ,such as the engine, radiator and parts
of the exhaust system, can become very hot.
Engine compartment235
Maintenance and care
Z
Page 244 of 298
Alwaysswitch off the windshield wipers and
the ignition before cleaning the windshield.
!Do not pull the wipe rblade .Otherwise, the
wipe rblade could be damaged.
!Do not clean wipe rblade stoo oftena nd do
not rubt hem too hard. Otherwise, the graph-
ite coating could be damaged .Thisc ould
cause wipe rnoise.
!Hol dthe wipe rarm securel ywhenf olding
back. The windshield could be damaged if the
wipe rarm smacks against it suddenly.
XFoldt he windshield wipe rarm sawa yfrom the
windshield.
XCarefully clean the wipe rblade swithad amp
cloth.
XFoldt he windshield wipe rarm sb acka gain
before switching on the ignition.
Cleanin gthe exterior lighting
!Onlyu secleaning agents or cleaning cloths
which ar esuitabl efor plastic light lenses.
Unsuitabl ecleaning agents or cleaning cloths
could scratch or damage the plastic light len- ses.
XClea nthe plastic lenses of the exterio rlights
with awetsponge and amildc leaning agent,
e.g .M ercedes-Benz car shampo oorcleaning
cloths.
Cleanin gthe mirrort urn signals
!Onlyusecleaning agents or cleaning cloths
thata resuitabl efor plastic lenses .Unsuitable
cleaning agents or cleaning cloths could
scratch or damage the plastic lenses of the
mirror turn signals.
XClea nthe plastic lenses of the mirror turn sig-
nal sint he exterio rmirror housing using awet
sponge and mil dcleaning agent, e.g.
Mercedes-Benz car shampo oorwithc leaning
cloths.
Cleanin gthe sensors
!If yo uclean the sensors with apower
washer, make sure thaty oukee pad istance
of at leas t11.8 in (30 cm )between the vehicle
and the powe rwashern ozzle. Information aboutt
he correct distance is availabl efrom
the equipment manufacturer.
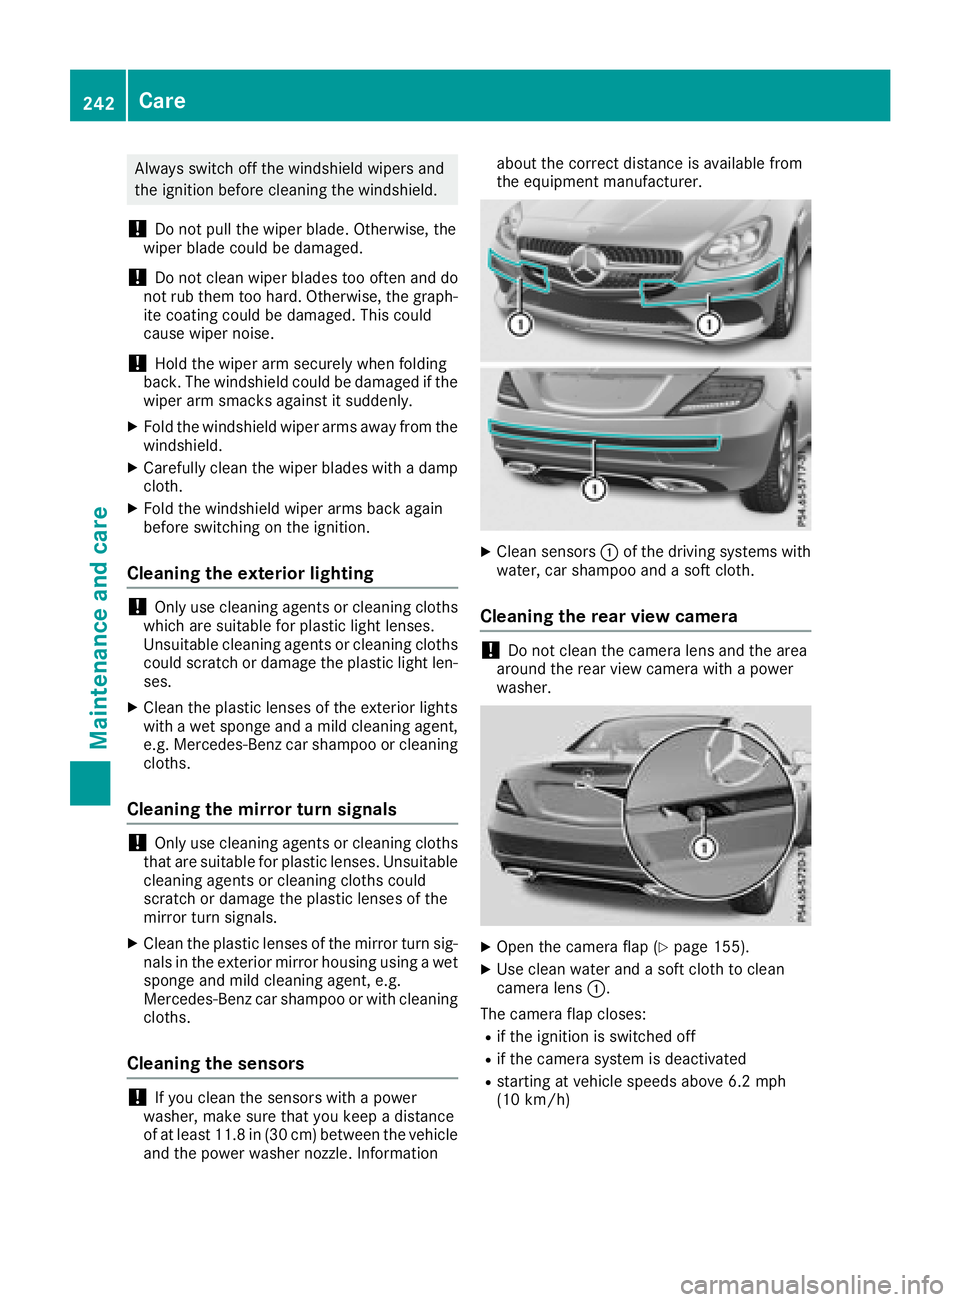
XClea nsensors :of the driving system swith
water, car shampo oand asoftc loth.
Cleanin gthe rear view camera
!Do not clean the camera lens and the area
around the rea rviewc amera with apower
washer.
XOpe nthe camera fla p(Ypage 155).
XUse clean water and asoftc loth to clean
camera lens :.
The camera fla pcloses:
Rif the ignition is switched off
Rif the camera system is deactivated
Rstarting at vehicl espeed sabove 6.2 mph
(10 km/h)
242Care
Maintenance and care
Page 246 of 298
Where willIfind...?
Warning triangle
Removing the warning triangle
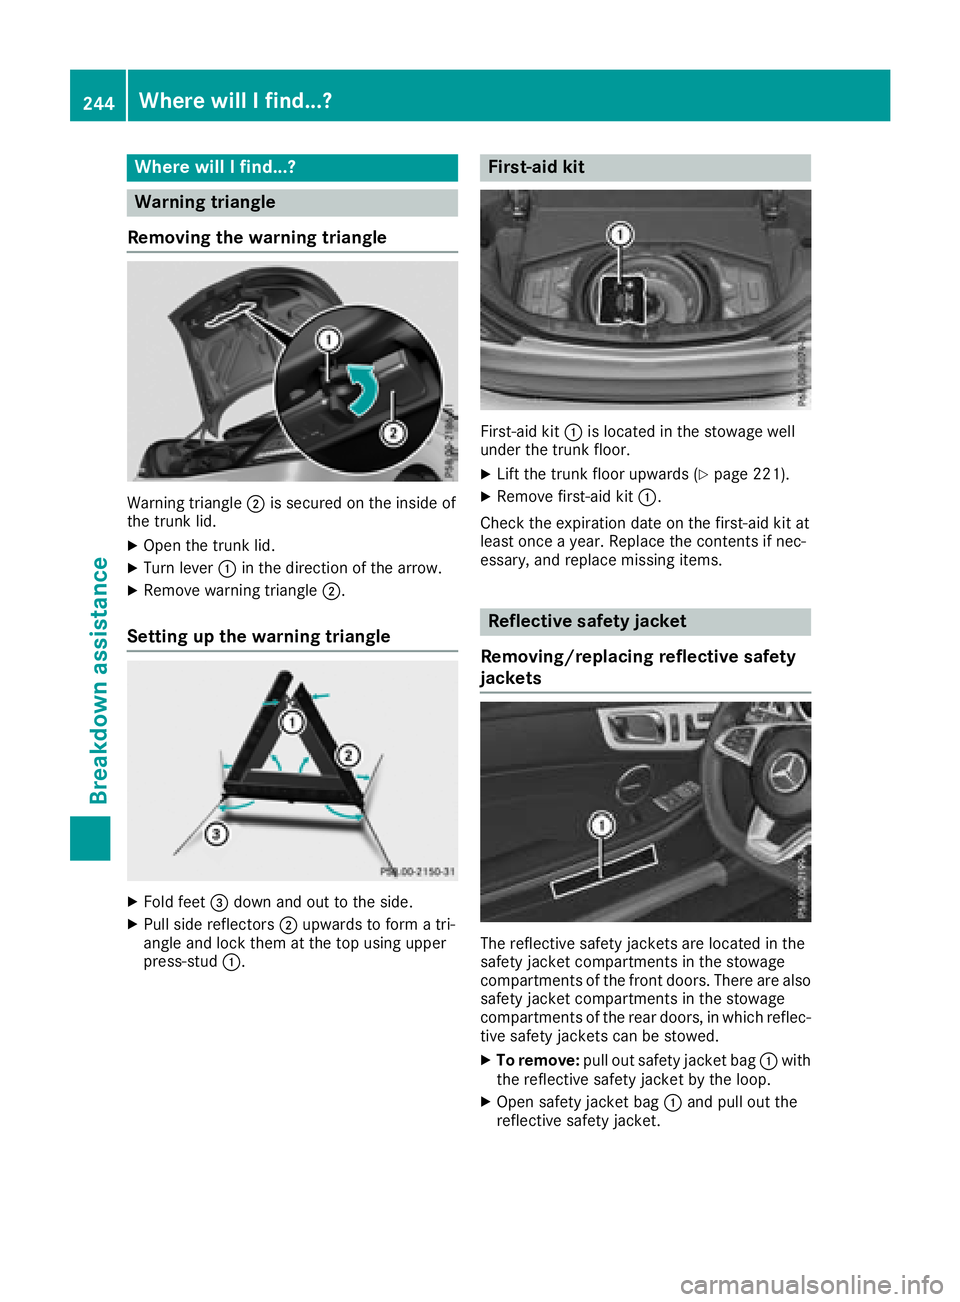
Warning triangle ;is secure donthe insid eof
the trunk lid.
XOpen the trunk lid.
XTurn lever :in the direction of the arrow.
XRemove warning triangle ;.
Setting up the warning triangle
XFold feet=downa nd out to the side.
XPullside reflectors ;upwards to form atri-
angl eand lock them at the top using upper
press-stud :.
First-aid kit
First-aidkit: is located in the stowage well
under the trunk floor.
XLift the trunk floor upwards (Ypag e221).
XRemove first-ai dkit:.
Check the expiration date on the first-ai dkit at
least once ayear. Replace the contents if nec-
essary, and replace missing items.
Reflective safety jacket
Removing/replacing reflective safety
jackets
The reflective safety jackets are located in the
safety jacket compartments in the stowage
compartments of the front doors.T here are also
safety jacket compartments in the stowage
compartments of the rear doors,inw hich reflec-
tive safety jackets can be stowed.
XTo remove: pullout safety jacket bag :with
the reflective safety jacket by the loop.
XOpen safety jacket bag :and pul lout the
reflective safety jacket.
244Where will Ifind...?
Breakdown assistance