2018 MERCEDES-BENZ SLC ROADSTER instrument cluster
[x] Cancel search: instrument clusterPage 130 of 298
matic transmission protects against engine
damage by not shifting down.
Shift recommendation
All vehicles (except for Mercedes-AMG
SLC 43)
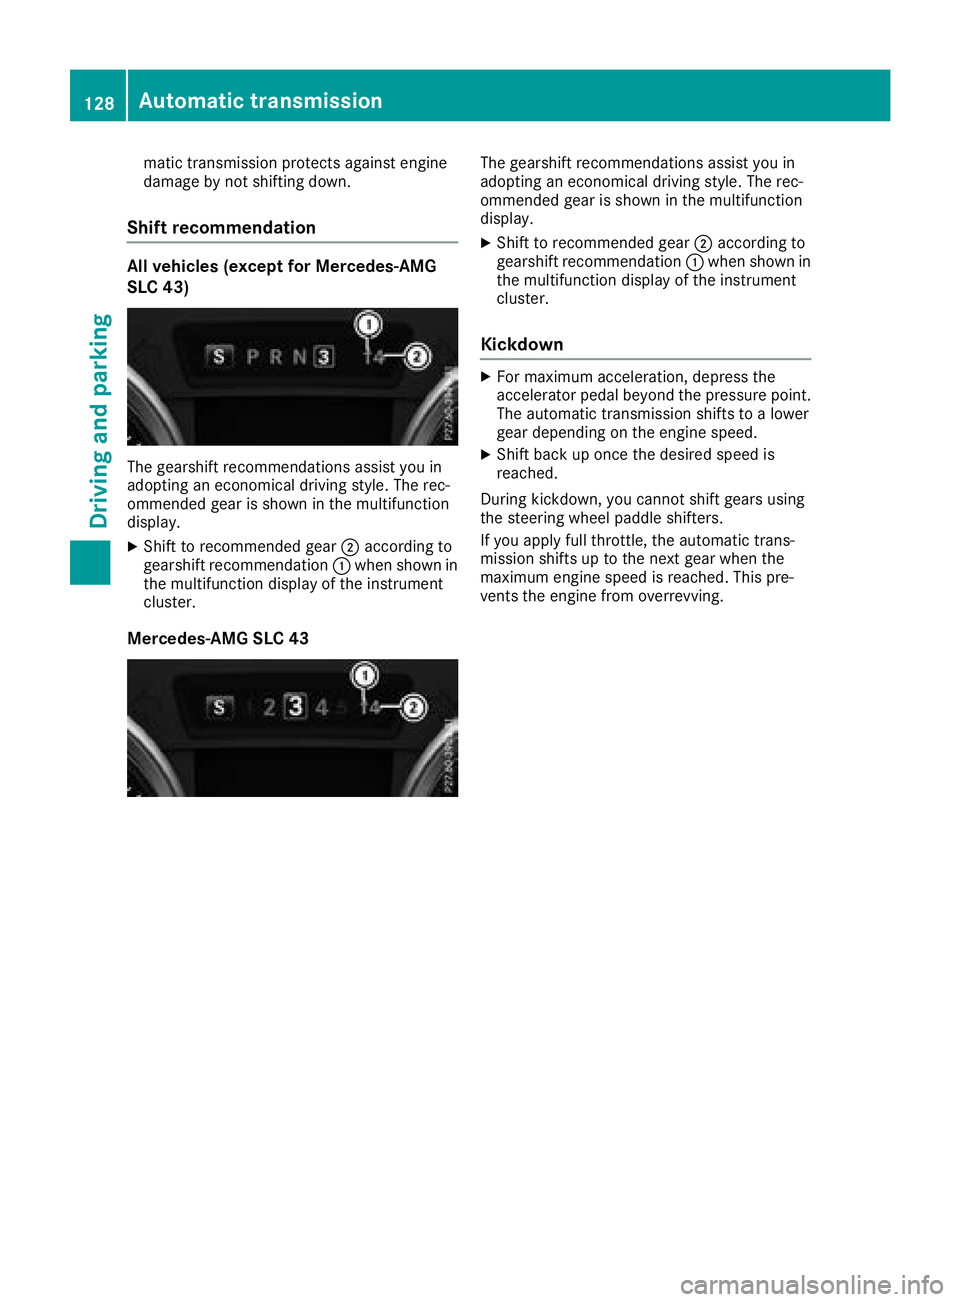
The gearshift recommendations assist you in
adopting an economical driving style.The rec-
ommended gear is shown in the multifunction
display.
XShift to recommended gear ;according to
gearshift recommendation :when shown in
the multifunction display of the instrument
cluster.
Mercedes-AMG SLC 43
The gearshift recommendations assist you in
adopting an economical driving style .The rec-
ommended gear is shown in the multifunction
display.
XShift to recommended gear ;according to
gearshift recommendation :when shown in
the multifunction display of the instrument
cluster.
Kickdown
XFor maximu macceleration, depress the
accelerator pedalb eyond the pressure point.
The automatic transmission shifts to alower
gear depending on the engine speed.
XShift back up once the desired speed is
reached.
During kickdown, you cannot shift gears using
the steering wheelp addle shifters.
If you apply full throttle, the automatic trans-
mission shifts up to the next gear when the
maximu mengine speed is reached. This pre-
vents the engine from overrevving.
128Automatic transmission
Driving and parking
Page 132 of 298
!Overfilling the fuel tank could damage the
fuel system.
!Take care not to spill any fuel on painted
surfaces. You could otherwise damage the
paintwork.
!Use afilter when adding fuel from afuel can.
The fuel lines and/or the fuel injection system
could otherwise be blocked by particles from
the fuel can.
If you overfill the fuel tank, fuel could spray out
when the fuel pump nozzle is removed.
For further information on fuel and fuel quality
(
Ypage 291).
Refueling
General information
The fuel filler flap is unlocked or locked auto-
matically when you unlock or lock the vehicle
with the SmartKey or using KEYLESS-GO.
The position of the fuel filler cap is displayed
8 in the instrument cluster. The arrow next
to the filling pump indicates the side of the vehi-
cle.
Opening the fuel filler flap
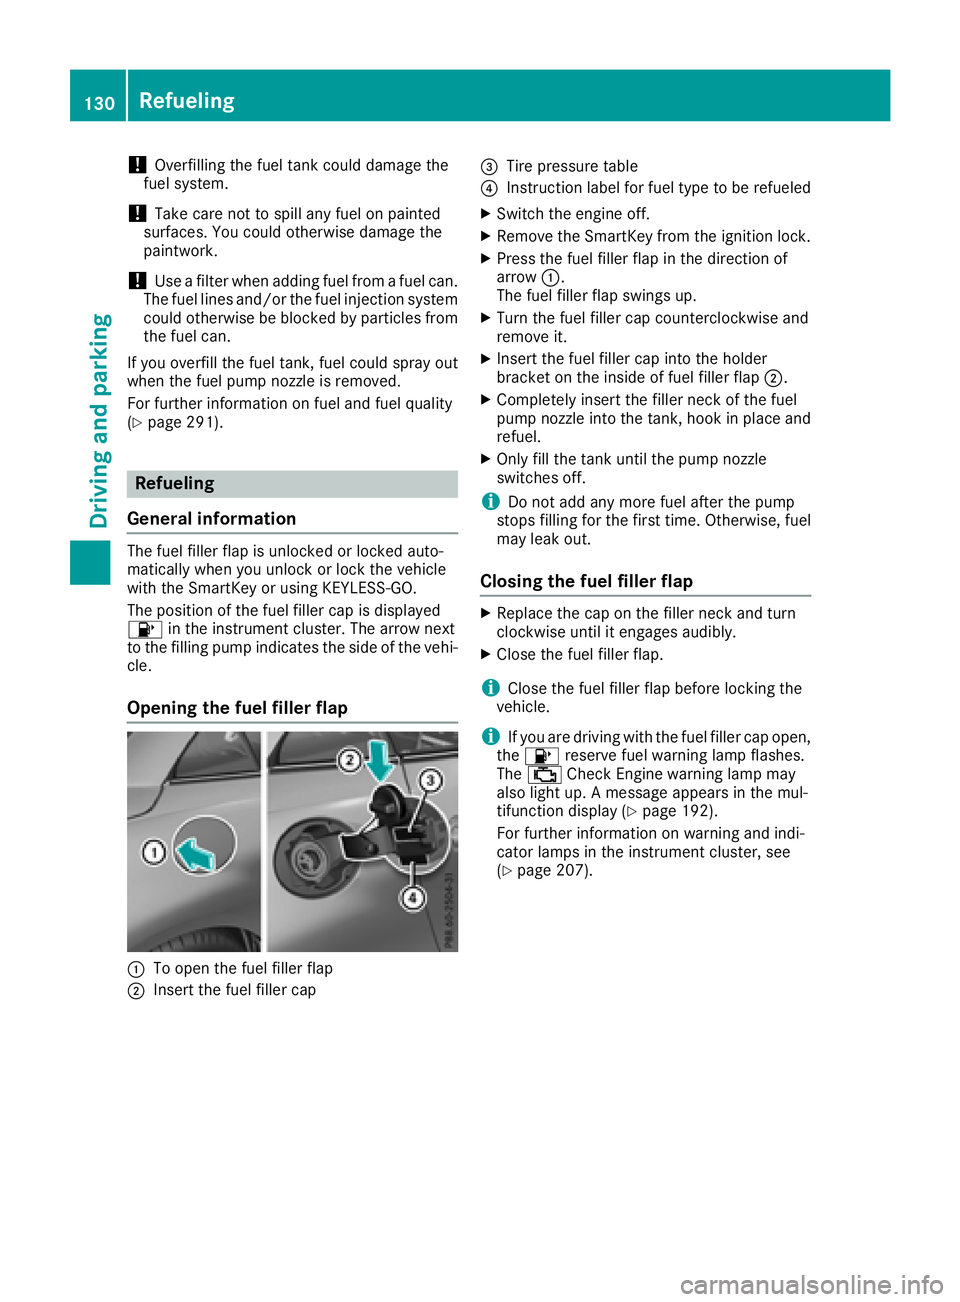
:To open the fuel filler flap
;Insert the fuel filler cap
=Tire pressure table
?Instruction label for fuel type to be refueled
XSwitch the engine off.
XRemove the SmartKey from the ignition lock.
XPress the fuel filler flap in the direction of
arrow :.
The fuel filler flap swings up.
XTurn the fuel filler cap counterclockwise and
remove it.
XInsert the fuel filler cap into the holder
bracket on the inside of fuel filler flap ;.
XCompletely insert the filler neck of the fuel
pump nozzle into the tank, hook in place and
refuel.
XOnly fill the tank until the pump nozzle
switches off.
iDo not add any more fuel after the pump
stops filling for the first time. Otherwise, fuel
may leak out.
Closing the fuel filler flap
XReplace the cap on the filler neck and turn
clockwise until it engages audibly.
XClose the fuel filler flap.
iClose the fuel filler flap before locking the
vehicle.
iIf you are driving with the fuel filler cap open,
the 8 reserve fuel warning lamp flashes.
The ; Check Engine warning lamp may
also light up. Amessage appears in the mul-
tifunction display(
Ypage 192).
For further information on warning and indi-
cator lamps in the instrument cluster, see
(
Ypage 207).
130Refueling
Driving and parking
Page 134 of 298
cle from rolling away by applying the parking
brake.
XApplythe electri cparking brake.
XShif tthe transmission to position j
(Ypage 123).
XWith the SmartKe y:turn the SmartKey to
position uin the ignition lock and remove it.
The immobilizer is activated.
XWith KEYLESS-GO: press the KEYLESS-GO
Start/Stop button (Ypage 116).
The engine stopsa nd allthe indicator lamps in
the instrument cluster go out.
If the driver'sd oorisc losed, this is the same
as SmartKey position 1.Ifthe driver'sd oor
is open, this is the sam easSmartKey position
u (
Ypage 116).
The engine can be switched off while the vehicle
is in motio nbypressing and holding the Start/
Stop button for aboutt hree seconds. Thisfunc-
tion operate sindependently of the ECO start/
stop automatic engine switch-off function.
Electric parkingb rake
General notes
GWARNING
If yo ulea ve childrenu nsupervised in the vehi-
cle ,they could set it in motio nby,for example:
Rrelease the parking brake.
Rshift the automatic transmission outoft he
parking position P.
Rstartthe engine.
In addition, they may operate vehicle equip-
ment and become trapped .There is arisko f
an accident and injury.
Whenl eaving the vehicle ,alway stake the
SmartKey with yo uand lock the vehicle .Never
leave childrenu nsupervised in the vehicle. The function of the electri
cparking brake is
dependent on the on-board voltage .Ifthe on-
board voltage is low or there is amalfunction in
the system, it may not be possible to applyt he
released parking brake.
XIf this is the case ,only park the vehicle on
level ground and secure it to prevent it rolling
away.
XShif tthe automatic transmission to position
j.
It may not be possible to release an applied
parking brake if the on-board voltage is low or
there is amalfunction in the system. Contact a
qualified specialist workshop.
The electri cparking brake performs afunction
test at regula rinterval swhile the engine is
switched off. The sounds that can be heard while
this is occurring are normal.
Applyingorr eleasingmanually
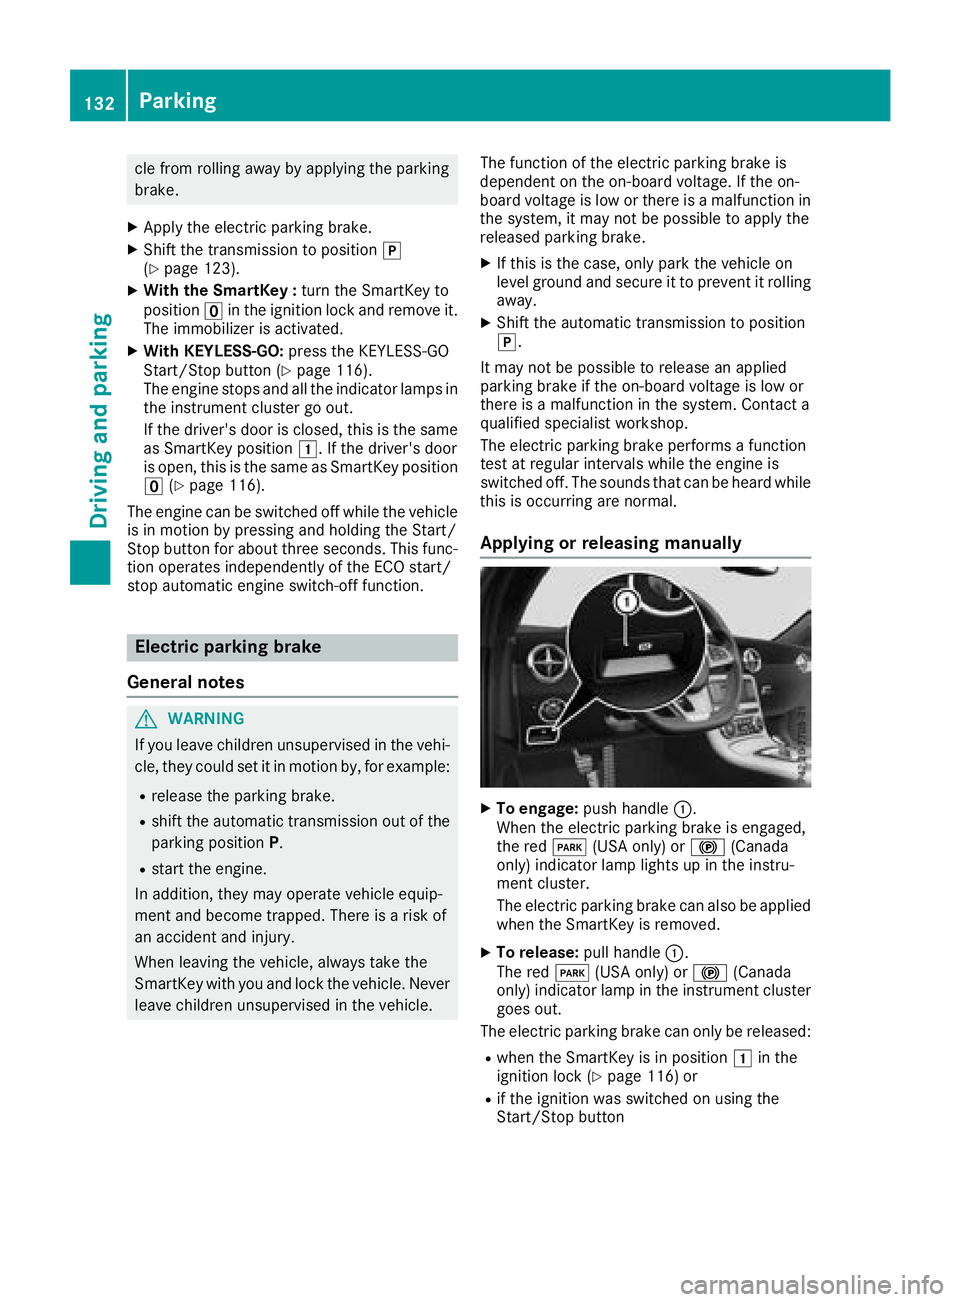
XTo engage: push handle :.
Whent he electri cparking brake is engaged,
the red F(USA only )or! (Canada
only )indicator lamp lights up in the instru-
ment cluster.
The electricp arking brake can also be applied
whe nthe SmartKey is removed.
XTo release: pull handle:.
The red F(USA only )or! (Canada
only )indicator lamp in the instrument cluster
goeso ut.
The electricp arking brake can only be released:
Rwhe nthe SmartKey is in position 1in the
ignition lock (Ypage 116 )or
Rif the ignition wa sswitched on using the
Start/Stop button
132Parking
Drivin gand parking
Page 147 of 298
Settingaspecified minimum distance
You can set the specified minimum distance for
Distanc ePilot DISTRONIC by varying the time
span between one and two seconds. With this
function, you can set the minimum distance that
Distanc ePilot DISTRONIC maintains to the vehi-
cle in front,d ependent on the vehicle speed. You
can see this distance in the multifunction dis-
play (
Ypage 145).
The specified minimum distance can be
changed while Distanc ePilot DISTRONIC is
switched on or off.
Make sure that you maintain asufficiently safe
distance from the vehicle in front.A djust the
distance to the vehicle in front if necessary.
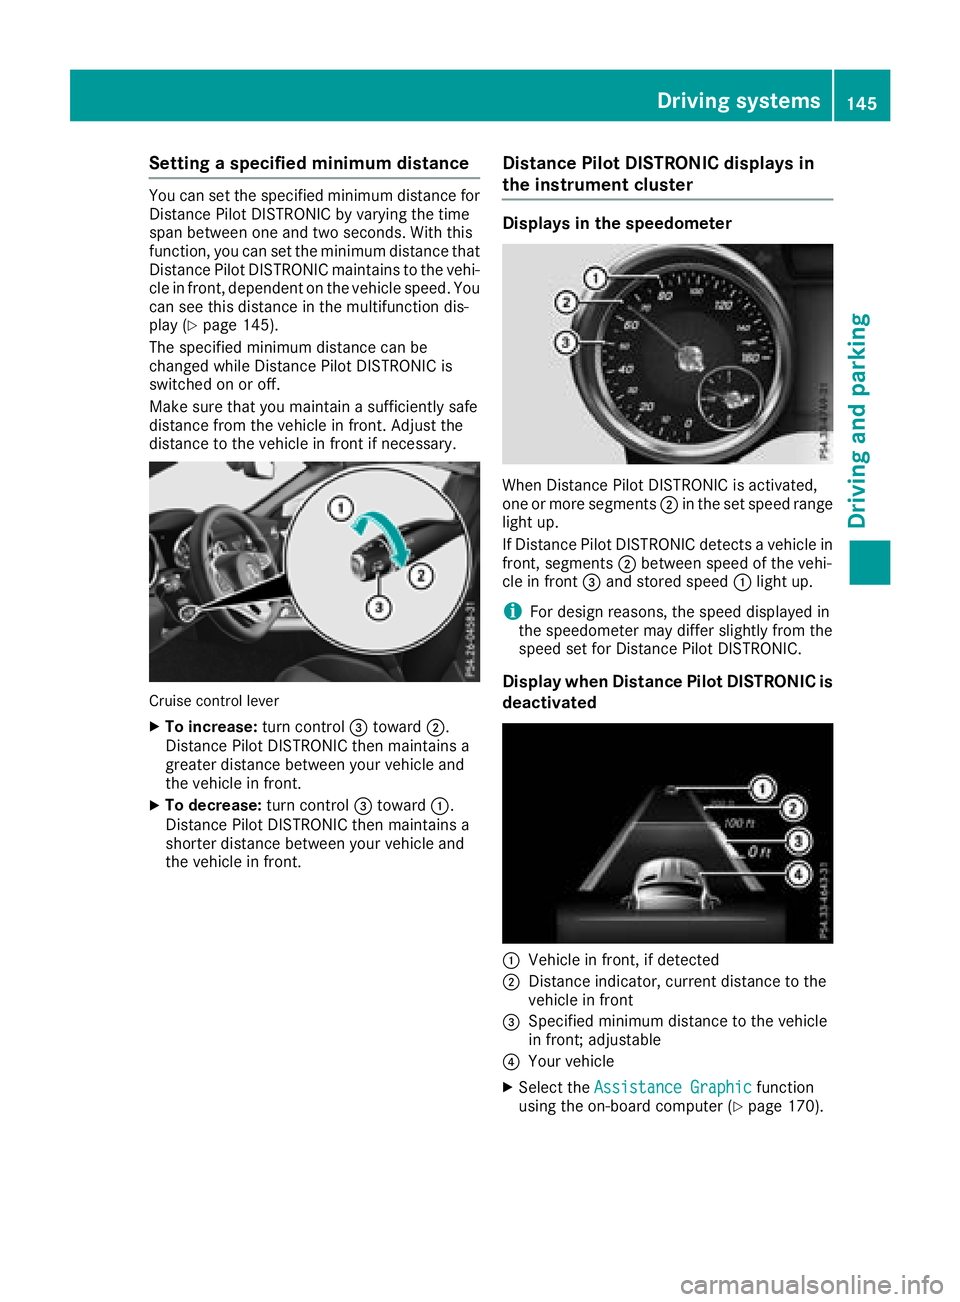
Cruise control lever
XTo increase: turn control=toward ;.
Distanc ePilot DISTRONIC then maintains a
greater distance between your vehicle and
the vehicle in front.
XTo decrease: turn control=toward :.
Distanc ePilot DISTRONIC then maintains a
shorter distance between your vehicle and
the vehicle in front.
Distance Pilot DISTRONIC displays in
the instrument cluster
Displays in the speedometer
When Distanc ePilot DISTRONIC is activated,
one or more segments ;in the set speed range
light up.
If Distanc ePilot DISTRONIC detectsav ehicle in
front,s egments ;between speed of the vehi-
cle in front =and stored speed :light up.
iFor design reasons, the speed displayed in
the speedometer may differ slightly from the
speed set for Distanc ePilot DISTRONIC.
Display when Distance Pilot DISTRONIC is
deactivated
:Vehicle in front,ifd etected
;Distanceindicator, current distance to the
vehicle in front
=Specified minimum distance to the vehicle
in front;a djustable
?Your vehicle
XSelect the Assistance Graphicfunction
using the on-board computer (Ypage 170).
Driving systems145
Driving and parking
Z
Page 155 of 298
Parking tips:
Ron narrow roads, drive as closely as possible
past the parking space
Rparking spaces that are littered or overgrown
might be identified or measured incorrectly
Rparking spaces that are partially occupied by
trailer drawbars might not be identified as
such or be measured incorrectly
Rsnowfall or heavy rain may lead to aparking
space being measured inaccurately
Rpay attention to the Active Parking Assist
PARKTRONIC warning messages during the
parking procedure (
Ypage 151)
Rwhen transportin gaload which protrudes
from your vehicle, you should not use Parking
Guidance
Rnever use Parking Guidance with snow chains
or an emergencys pare wheel fitted
Rmake sure that the tire pressures are always
correct. This hasadirect effect on the steer-
ing instructions
Rthe way your vehicle is positioned in the park-
ing space after parking is dependent on vari-
ous factors. These include the position and
shape of the vehicles parked in fronta nd
behind it and the conditions of the location. In
some cases, Parking Guidance may guide you
too far or not far enough into aparking space.
In some cases, it may also lead you across or
ont othe curb. If necessary, cancel the park-
ing procedure with Parking Guidance.
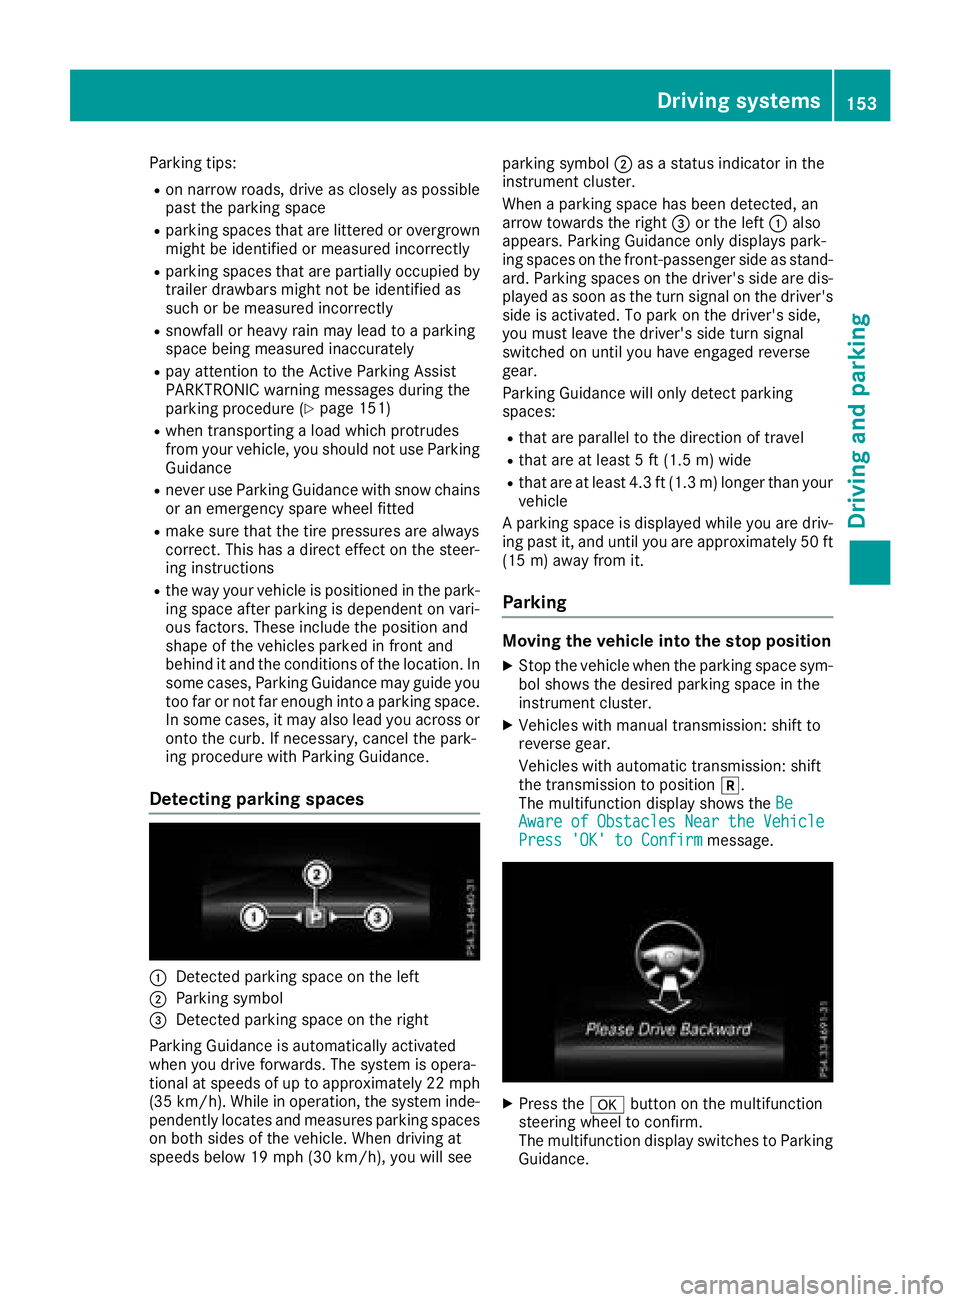
Detecting parking spaces
:Detected parking space on the left
;Parking symbol
=Detected parking space on the right
Parking Guidance is automatically activated
when you drive forwards. The system is opera-
tional at speeds of up to approximately 22 mph (3 5k m/ h).W hile in operation, the system inde-
pendently locate sand measures parking spaces
on both sides of the vehicle. Whend riving at
speeds below 19 mph (30 km/h), yo uwills ee parking symbol
;asastatu sindicator in the
instrument cluster.
Whenap arking space hasb eend etected, an
arrow towards the right =or the left :also
appears. Parking Guidance only display spark-
ing spaces on the front-passenger sid easstand-
ard .Parking spaces on the driver'ss idea re dis-
played as soona sthe turn signal on the driver's
sid eisa ctivated. To park on the driver'ss ide,
yo um ustlea ve the driver'ss idet urn signal
switched on unti lyou have engaged reverse
gear.
Parking Guidance will only detect parking
spaces:
Rthat are paralle ltothe direction of travel
Rthat are at leas t5ft(1.5 m) wid e
Rthatareat leas t4.3 ft (1.3 m) longer thany our
vehicle
Ap arking space is displayed whil eyou are driv-
ing past it, and unti lyou are approximately5 0ft
(15 m) away from it.
Parking
Movin gthe vehicle into the stopp osition
XStop the vehiclewhent he parking space sym-
bo lshows the desired parking space in the
instrument cluster.
XVehicles with manua ltransmission: shift to
reverse gear.
Vehicles with automatic transmission: shift
the transmission to position k.
The multifunctio ndisplay shows the Be
AwareofObstaclesNeartheVehiclePress 'OK'toC onfirmmessage.
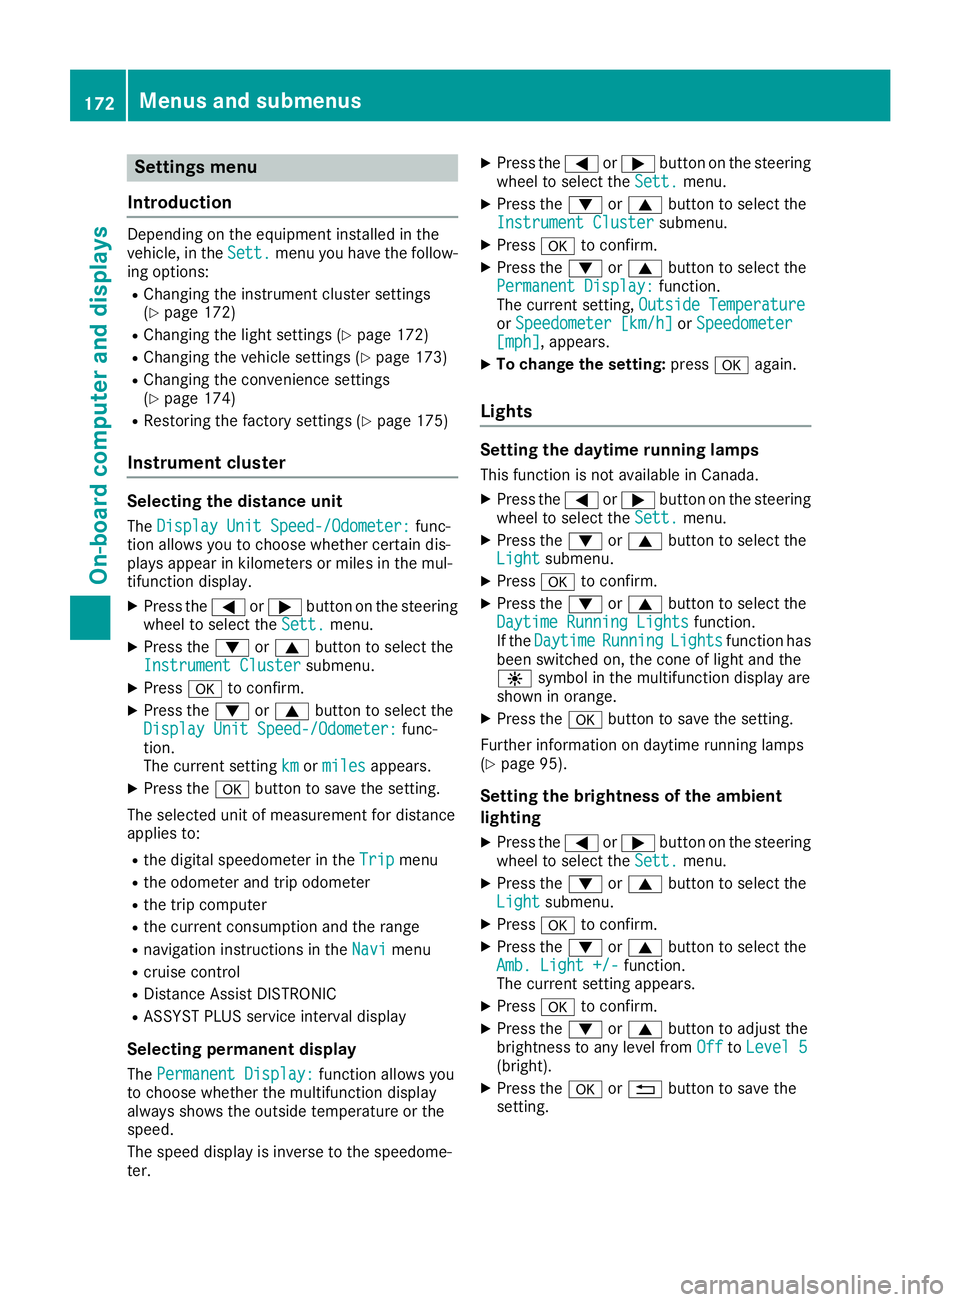
XPress theabutton on the multifunction
steering whee ltoconfirm.
The multifunctio ndisplay switches to Parking
Guidance.
Driving systems153
Driving an dparking
Z
Page 174 of 298
Settings menu
Introduction
Depending on the equipment installed in the
vehicle, in the Sett.menu you have the follow-
ing options:
RChanging the instrumentc luster settings
(Ypage 172)
RChanging the light settings (Ypage 172)
RChanging the vehicle settings (Ypage 173)
RChanging the convenience settings
(Ypage 174)
RRestoring the factory settings (Ypage 175)
Instrument cluster
Selecting the distance unit
The Display Unit Speed-/Odometer:func-
tion allowsy ou to choose whether certain dis-
playsa ppear in kilometers or miles in the mul-
tifunction display.
XPress the =or; button on the steering
wheel to select the Sett.menu.
XPress the:or9 button to select the
Instrument Clustersubmenu.
XPress ato confirm.
XPress the :or9 button to select the
Display Unit Speed-/Odometer:func-
tion.
The current setting km
ormilesappears.
XPress the abutton to save the setting.
The selected unit of measurement for distance
appliest o:
Rthe digital speedometer in the Tripmenu
Rthe odometer and trip odometer
Rthe trip computer
Rthe current consumption and the range
Rnavigation instructions in theNavimenu
Rcruise control
RDistanceAssist DISTRONIC
RASSYST PLUS service interval display
Selecting permanent display
The Permanent Display:function allowsy ou
to choose whether the multifunction display
always shows the outside temperature or the
speed.
The speed display is inverse to the speedome-
ter.
XPress the =or; button on the steering
wheel to select the Sett.menu.
XPress the:or9 button to select the
Instrument Clustersubmenu.
XPress ato confirm.
XPress the :or9 button to select the
Permanent Display:function.
The current setting, Outside Temperature
orSpeedometer [km/h]orSpeedometer[mph],appears.
XTo change the setting: pressaagain.
Lights
Setting the daytime running lamps
This function is not available in Canada.
XPress the =or; button on the steering
wheel to select the Sett.menu.
XPress the:or9 button to select the
Lightsubmenu.
XPress ato confirm.
XPress the :or9 button to select the
Daytime Running Lightsfunction.
If the DaytimeRunningLightsfunction has
been switched on, the cone of light and the
W symbol in the multifunction display are
shown in orange.
XPress the abutton to save the setting.
Further information on daytime running lamps
(
Ypage 95).
Setting the brightness of the ambient
lighting
XPress the =or; button on the steering
wheel to select the Sett.menu.
XPress the:or9 button to select the
Lightsubmenu.
XPress ato confirm.
XPress the :or9 button to select the
Amb. Light +/-function.
The current settinga ppears.
XPressato confirm.
XPress the :or9 button to adjust the
brightness to any level from OfftoLevel 5(bright).
XPress the aor% button to save the
setting.
172Menus and submenus
On-board computer and displays
Page 181 of 298
Safety systems
Display messagesPossible causes/consequences andMSolutions
!÷
Currently Unavaila‐ble See Operator'sManual
ABS (Anti-lock Braking System) and ESP®(Electronic Stability Pro-
gram) are temporarily not available.
Other driving systems and driving safety systems may also malfunc-
tion.
In addition, the ÷,åand! warning lamps light up in the
instrument cluster.
Possible causes are:
RSelf-diagnosis is not yet complete.
RThe on-board voltage may be insufficient.
GWARNING
The brake system continues to function normally, but without the
functions listed above. The wheels could therefore lock if you brake
hard, for example.
The steerability and braking characteristics may be severely affected.
The braking distance in an emergency braking situation can increase.
If ESP
®is not operational, ESP®is unable to stabilize the vehicle.
There is an increased risk of skidding and an accident.
XCarefully drive asuitabled istance, making slight steering move-
ments at aspeed above 12 mph (20 km/h).
If the displaym essage disappears, the functions mentioned above
are available again.
If the multifunction displays till shows the displaymessage:
XDrive on carefully.
XVisitaqualified specialist workshop immediately.
!÷
Inoperative SeeOperator's Manual
ABS and ESP®are malfunctioning.
Other driving systems and driving safety systems may also malfunc-
tion.
The $ (USA only) or J(Canadao nly),÷, åand!
warning lamps in the instrument cluster also light up.
GWARNING
The brake system continues to function normally, but without the
functions listed above. The wheels could therefore lock if you brake
hard, for example.
The steerability and braking characteristics may be severely affected.
The braking distance in an emergency braking situation can increase.
If ESP
®is not operational, ESP®is unable to stabilize the vehicle.
There is an increased risk of skidding and an accident.
XDrive on carefully.
XVisit aqualified specialist workshop immediately.
Display messages179
On-board computer and displays
Z
Page 250 of 298
GWARNING
In the following situations, the tire sealant is
unable to provides ufficient breakdown assis-
tance, as it is unable to seal the tire properly:
Rthere are cuts or puncture sinthe tire larger
than those mentioned above.
Rthe wheelr im is damaged.
Ryou have drivenatv ery low tire pressures or
on aflat tire.
There is arisk of an accident.
Do not drive the vehicle. Contact aqualified
specialist workshop.
GWARNING
The tire sealant is harmfu land causes irrita-
tion. It must not come into contact with your
skin, eye sorclothing or be swallowed.Don ot
inhal eTIREFIT fumes .Keep tire sealant away
from children. There is arisk of injury.
If you come into contact with the tire sealant,
observe the following:
RRinse off the tire sealant from you rskin
immediatel ywith water.
RIf the tire sealant comes into contact with
you reyes, immediatel yrinse them thor-
oughly with cleanw ater.
RIf tire sealant is swallowed,i mmediately
rinse you rmouth out thoroughly and drink
plenty of water. Do not induce vomiting,
and seek medical attention immediately.
RImmediately change out of clothing which
has come into contact with tire sealant.
RIf an allergic reactio noccurs, seek medical
attention immediately.
!Do not operate the tire inflation compressor
for longer than eightm inutes atatime without
ab reak. It may otherwise overheat.
The tire inflation compressor can be operated
again once it has cooledd own.
Comply with the manufacturer’s safety instruc-
tions on the sticker on the tire inflation com-
pressor.
Using the TIREFIT kit
XDo not remove any foreigno bjects which have
penetrated the tire, e.g. screws or nails.
XRemove the tire sealant bottle, the accompa-
nying TIREFIT sticker and the tire inflation
compressor from the stowage wellu nder-
neath the trunk floor (
Ypag e245).
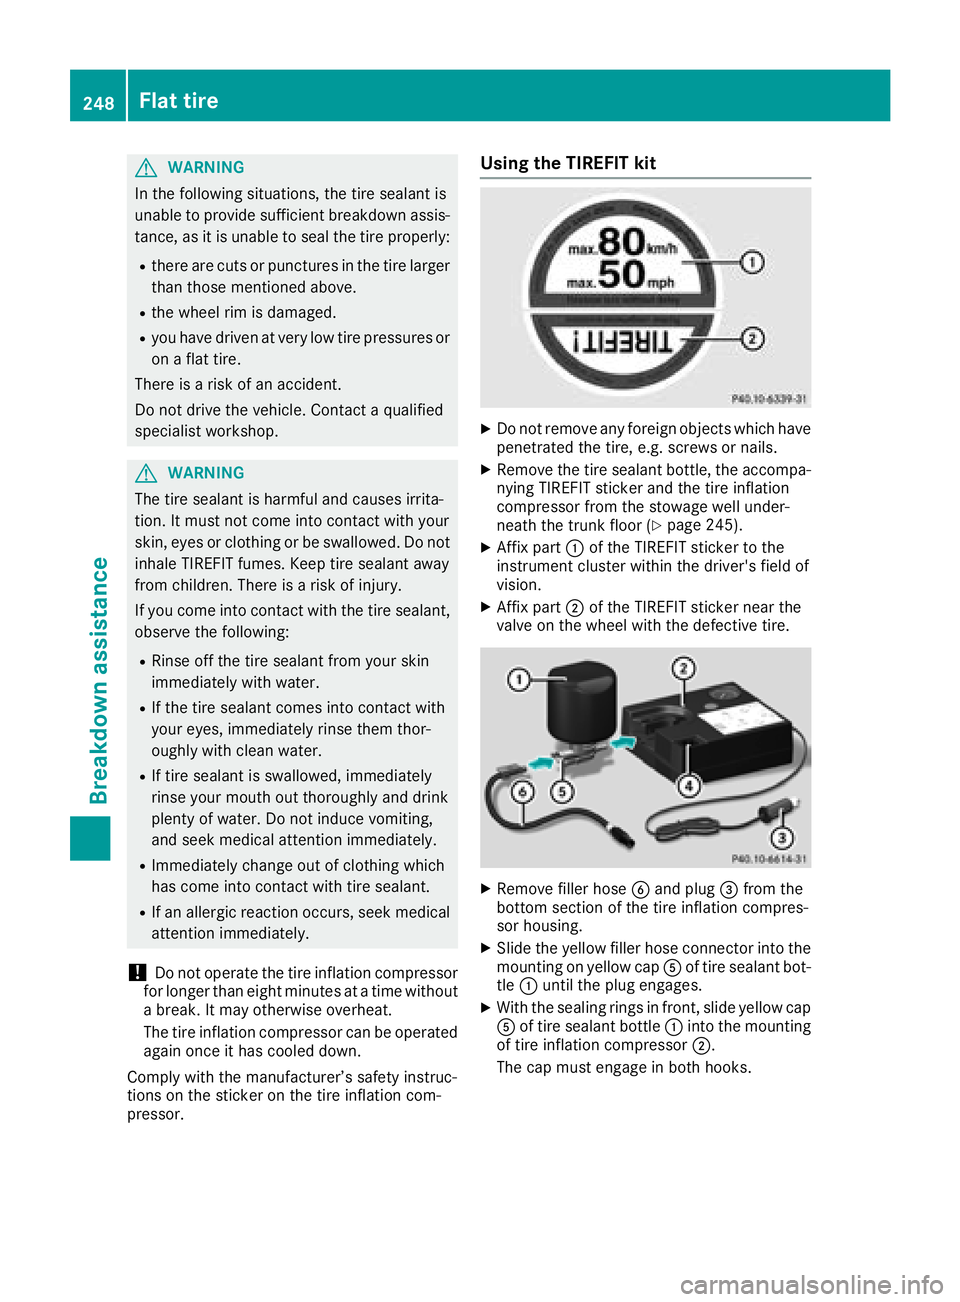
XAffix part :of the TIREFIT sticker to the
instrument cluster withi nthe driver's fieldo f
vision.
XAffix part ;of the TIREFIT sticker near the
valve on the wheelw ith the defective tire.
XRemove filler hoseBand plug =from the
bottom section of the tire inflation compres-
sor housing.
XSlide the yellow filler hose connector into the
mounting on yellow cap Aof tire sealant bot-
tle : until the pluge ngages.
XWith the sealing rings in front, slidey ellow cap
A of tire sealant bottle :into the mounting
of tire inflation compressor ;.
The cap must engag einboth hooks.
248Flat tire
Breakdown assistance