2018 MERCEDES-BENZ SLC ROADSTER open hood
[x] Cancel search: open hoodPage 202 of 298
Display messagesPossible causes/consequences andMSolutions
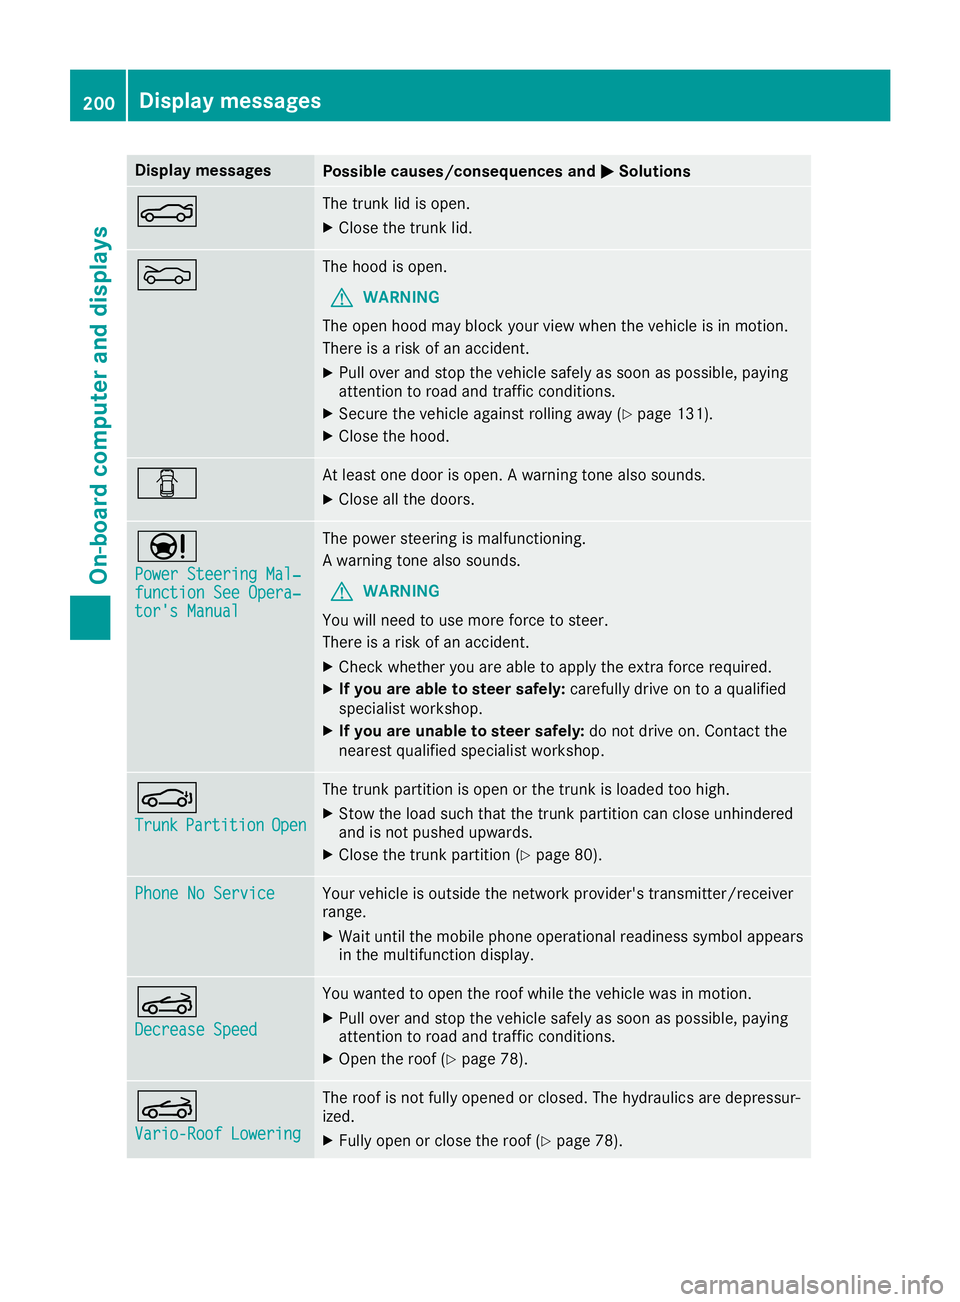
NThe trunk lid is open.
XClosethe trunk lid.
MThe hoo disopen.
GWARNIN G
The open hoo dmay bloc kyour vie wwhen th evehicl eisinm otion.
There is ariskofana ccident.
XPull overand stop th evehicl esafely as soo naspossible, payin g
attention to roa dand traffic conditions.
XSecur ethe vehicl eagainst rollin gaway (Ypage 131).
XClosethe hood.
CAt least on edoor is open .Awarning tone also sounds.
XCloseall th edoors.
Ð
Power Steering Mal ‐function See Opera‐tor's Manual
The powersteering is malfunctioning .
Aw arning tone also sounds.
GWARNIN G
You will need to use mor eforce to steer .
There is ariskofana ccident.
XCheckwhether you are able to apply th eextra force required.
XIf you ar eabletos teer safely: carefully drive on to aqualified
specialist workshop .
XIf you areunable to steer safely: do notdrive on .Contac tthe
neares tqualified specialist workshop .
J
TrunkPartitionOpen
The trunk partition is open or th etrunk is loade dtoo high .
XStow th eload suc hthatthe trunk partition can close unhindere d
and is no tpushed upwards.
XClos ethe trunk partition (Ypage 80).
Phone No Servic eYour vehicleisoutside th enetwork provider' stransmitter/receiver
range.
XWait until th emobile phone operational readiness symbol appear s
in th emultifunction display.
K
Decrease Speed
You wante dtoopen th eroofw hile th evehicl ewas in motion .
XPull overand stop th evehicl esafely as soo naspossible, payin g
attention to roa dand traffic conditions.
XOpe nthe roo f(Ypage 78).
K
Vario-Roo fLowering
The roo fisnotfull yopened or closed .The hydraulic sare depressur-
ized.
XFull yopen or close th eroof(Ypage 78).
200Display messages
On-boardc omputer andd isplays
Page 210 of 298
Warning/
indicator
lampNSignal type
Possiblec auses/consequences and M
Solutions
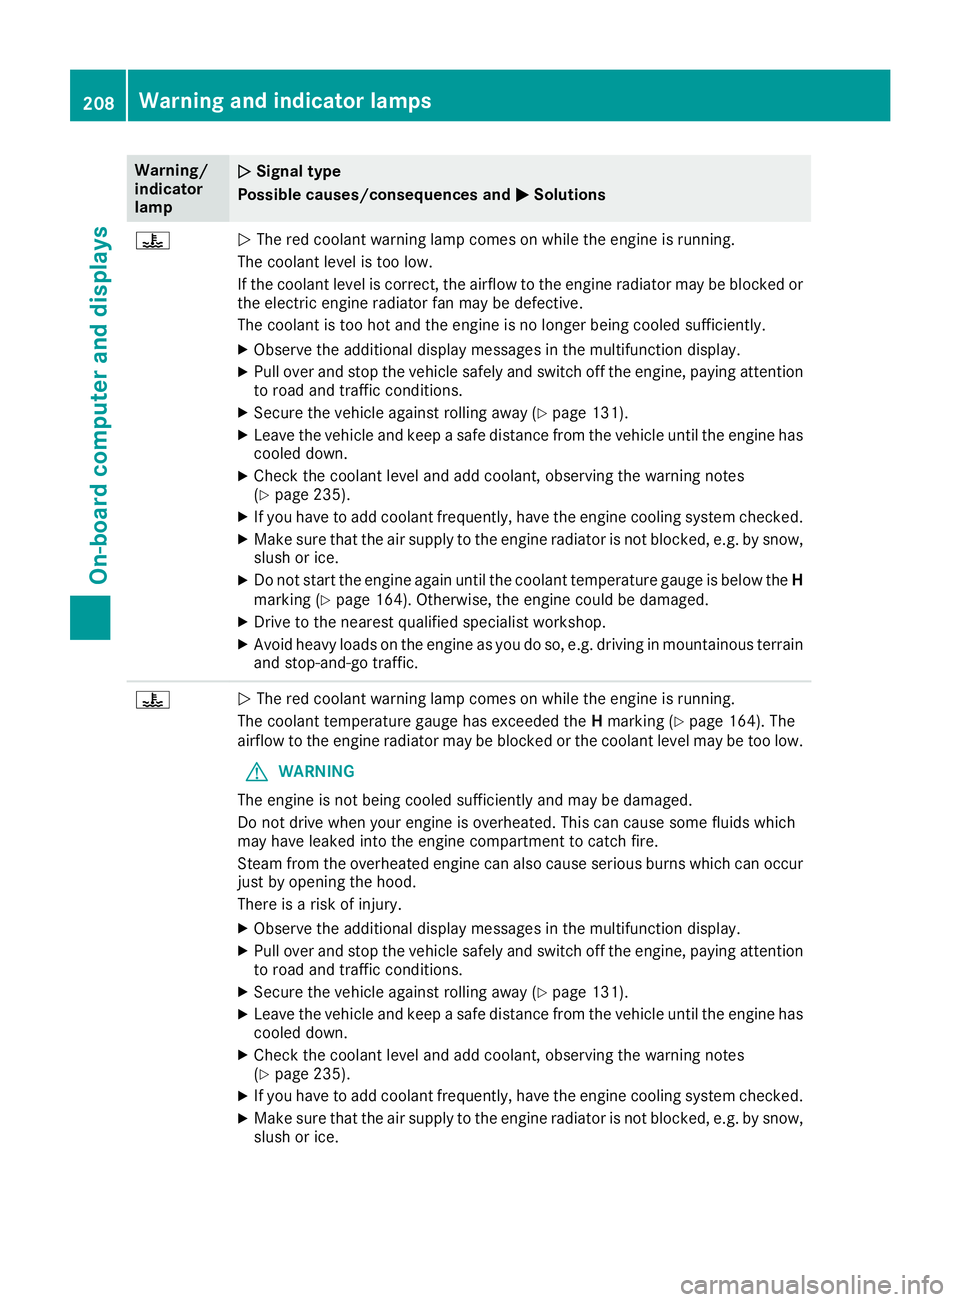
?NThe red coolant warning lamp comes on while the engine is running.
The coolant levelist oo low.
If the coolant levelisc orrect, the airflow to the engine radiator may be blocked or
the electric engine radiator fan may be defective.
The coolant is too hot and the engine is no longer being cooleds ufficiently.
XObserve the additionaldisplay messages in the multifunction display.
XPullover and stop the vehicles afelyand switch off the engine, paying attention
to road and traffic conditions.
XSecure the vehiclea gainst rolling away(Ypage131).
XLeave the vehiclea nd keepasafe distance from the vehicleu ntil the engine has
cooledd own.
XCheck the coolant levela nd add coolant, observing the warning notes
(Ypage2 35).
XIf you have to add coolant frequently, have the engine cooling system checked.
XMake sure that the air supply to the engine radiator is not blocked,e .g. by snow,
slush or ice.
XDo not start the engine again until the coolant temperature gauge is below the H
marking (Ypage1 64). Otherwise, the engine coul dbedamaged.
XDrive to the neares tqualified specialist workshop.
XAvoid heavy loads on the engine as you do so, e.g. driving in mountainous terrain
and stop-and-go traffic.
?N The red coolant warning lamp comes on while the engine is running.
The coolant temperature gauge has exceededt heHmarking (
Ypage1 64).The
airflow to the engine radiator may be blocked or the coolant levelm ay be too low.
GWARNING
The engine is not being cooleds ufficiently and may be damaged.
Do not drive when you rengine is overheated. This can caus esome fluids which
may have leaked into the engine compartment to catch fire.
Steam from the overheated engine can als ocaus eserious burns which can occur
just by opening the hood.
There is arisk of injury.
XObserve the additiona ldisplay messages in the multifunction display.
XPul lover and stop the vehicles afelyand switch off the engine, paying attention
to road and traffic conditions.
XSecure the vehiclea gainst rolling away(Ypage131).
XLeave the vehiclea nd keepasafe distance from the vehicleu ntil the engine has
cooledd own.
XCheck the coolant levela nd add coolant, observing the warning notes
(Ypage2 35).
XIf you have to add coolant frequently, have the engine cooling system checked.
XMake sure that the air supply to the engine radiator is not blocked,e .g. by snow,
slush or ice.
208Warning and indicator lamps
On-board computer and displays
Page 232 of 298
with Canadian law, some U.S.garage door open-
ers also feature a"break".
Proceed as follows:
Rif you live in Canada.
Rif you have difficulties programming the
garage door opener (regardless of where you live) when following th eprogramming steps.
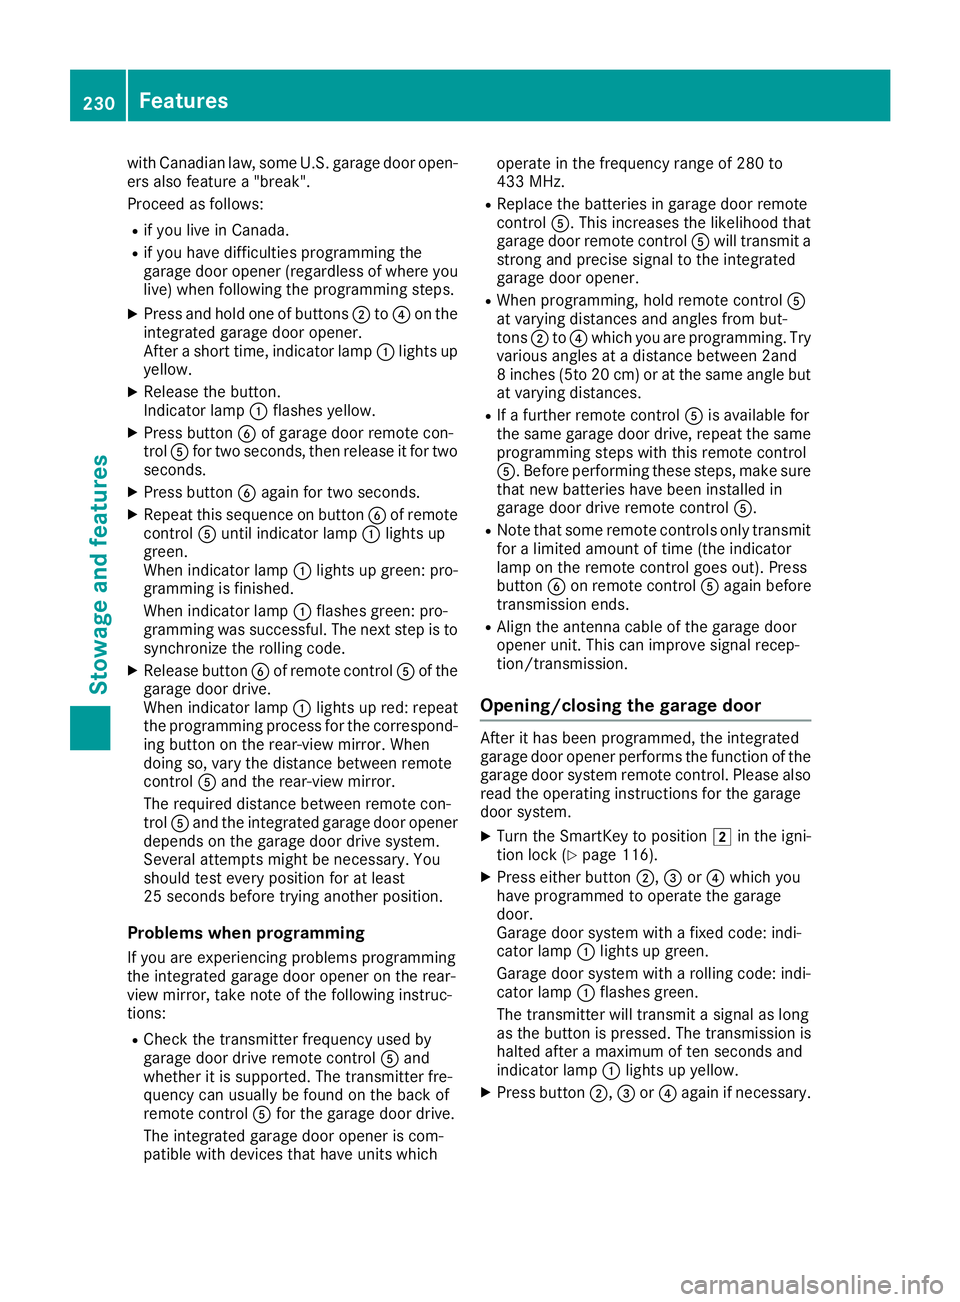
XPressa nd hold one of buttons ;to? on the
integrated garage door opener.
After ashortt ime, indicator lamp :lightsu p
yellow.
XRelease th ebutton.
Indicator lamp :flashes yellow.
XPressb uttonBof garage door remote con-
trol Afor two seconds, then releaseitf or two
seconds.
XPressb uttonBagain for two seconds.
XRepeat this sequence on button Bof remote
control Auntil indicator lamp :lightsu p
green.
When indicator lamp :lightsupg reen: pro-
grammingisf inished.
When indicator lamp :flashes green: pro-
grammingw as successful. The nex tstepist o
synchronize th erollin gcode.
XRelease button Bof remote control Aof the
garage door drive.
When indicator lamp :lightsupr ed: repeat
th ep rogramming process for th ecorrespond-
ing button on th erear-view mirror. When
doings o, vary th edistanc ebetween remote
control Aand th erear-view mirror.
The required distanc ebetween remote con-
trol Aand th eintegrated garage door opener
depends on th egarage door drives ystem.
Several attemptsm ightbenecessary. You
should tes teveryp osition for at least
25 second sbefore trying another position.
Problems when programming
If you are experiencin gproblems programming
t
h ei ntegrated garage door opener on th erear-
view mirror, tak enoteoft hefollowing instruc-
tions:
RCheck th etransmitter frequenc yused by
garage door driver emote controlAand
whether it is supported .The transmitter fre-
quenc ycan usually be foundont heback of
remote control Afor th egarage door drive.
The integrated garage door opener is com-
patible with devices that have unit swhich operate in th
efrequenc yrange of 28 0to
433M Hz.
RReplace th ebatteries in garage door remote
control A.This increasest helikelihood that
garage door remote control Awill transmit a
stronga nd precise signal to th eintegrated
garage door opener.
RWhen programming, hold remote control A
at varyingd istances and angle sfromb ut-
tons ;to? which you are programming. Try
various angle satadistancebetween 2and
8i nches (5t o20cm) or at th esame angle but
at varyingd istances.
RIfaf urther remote control Ais available for
th es ame garage door drive, repeat th esame
programming steps with this remote control
A.B efore performing these steps, makes ure
that new batteries have been installed in
garage door driver emote controlA.
RNotethatsome remote controls only transmit
for alimited amountoft ime( thei ndicator
lamp on th eremote control goes out) .Press
button Bon remote control Aagain before
transmission ends.
RAlig nthe antenn acable of th egarage door
opener un
it .T his can improve signal recep-
tion/transmission.
Opening/closing th egarage door
After it has been programmed, th eintegrated
garage door opener perform sthe function of the
garage door system remote control. Please also
read th eoperatin ginstructions for th egarage
door system.
XTurn th eSmartKey to position 2in th eigni-
tio nlock (Ypage 116).
XPresse ither button ;,=or? which you
have programmed to operate th egarage
door.
Garage door system with afixed code: indi-
cator lamp :lightsupg reen.
Garage door system with arollin gcode: indi-
cator lamp :flashes green.
The transmitter will transmit asignal as long
as th ebutton is pressed. The transmission is
halted after amaximum of ten second sand
indicator lamp :lightsupy ellow.
XPressbutton;,=or? again if necessary.
230Features
Stowage and features
Page 235 of 298
Engine compartment
Hood
Important safety notes
GWARNING
If th ehood is unlatched, it may open up when
th ev ehicle is in motion and blocky our view.
Thereisar isk of an accident.
Never unlatch th ehood while driving .Before
ever ytrip, ensure that th ehood is locked.
GWARNING
When opening and closingt hehood,itm ay
suddenly fall int othe closed position.T hereis
ar isk of injury to personsw ithin range of
movementoft hehood.
Open and close th ehood only when no onei s
within its range of movement.
GWARNING
Opening th ehood when th eengine is over-
heated or when there is afireint heengine
compartmen tcoul de xpose you to hot gases
or other servic eproducts. Thereisar isk of
injury.
Let an overheate dengine coo ldown before
opening th ehood.Ift here is afireint he
engine compartment, keep th ehood closed
and contac tthe fired epartment.
GWARNING
The engine compartmen tcontain smoving
components. Certain components, sucha s
th er adiator fan ,may continue to run or start
again suddenly when th eignition is off .There
is ar isk of injury.
If you nee dtodoany work inside th eengine
compartment:
Rswitch off th eignition
Rnever reac hintot he area wheret here is a
risk of danger from moving components,
suchast hefan rotatio narea
Rremove jewelry and watches
Rkeep items of clothing and hair, for exam-
ple, away from moving parts
Opening th ehood
GWARNING
Certain component sintheengine compart-
ment, suchast heengine ,radiator and parts
of th eexhaust system, can become ver yhot.
Workin gintheengine compartmen tposesa
risk of injury.
Wherep ossible, let th eengine coo ldown and
touch only th ecomponent sdescribe dinthe
following.
GWARNING
When th ehood is open and th ewindshield
wipersa re set in motion,y ou can be injured by
th ew iper linkage. Thereisar isk of injury.
Always switch off th ewindshield wipersa nd
th ei gnition before opening th ehood.
!Makes ure that th ewindshield wipersa re
no tfolded away from th ewindshield. You
coul dotherwise damag ethe windshield wip-
ers or th ehood.
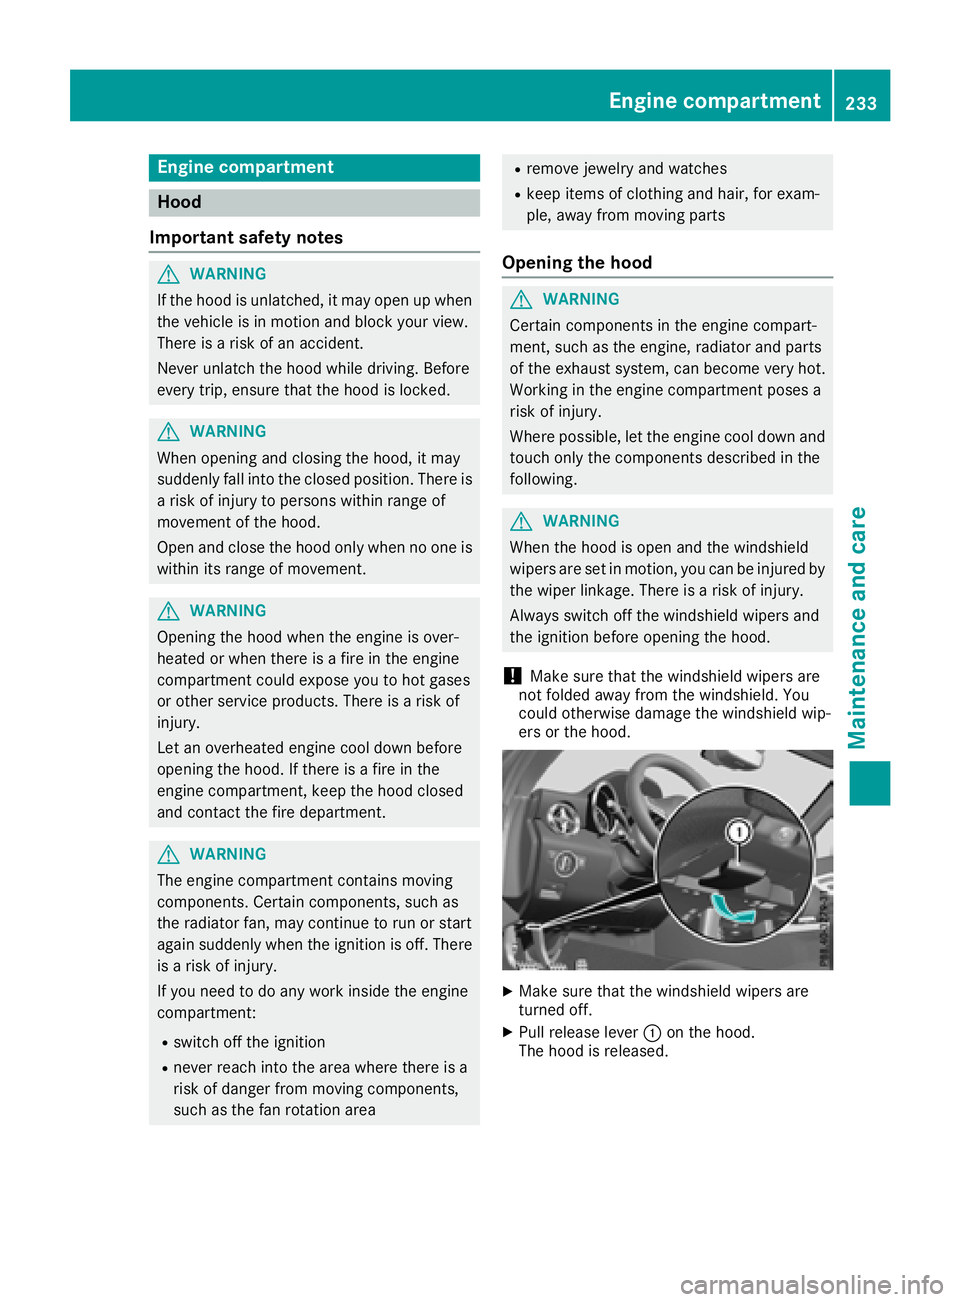
XMakes ure that th ewindshield wipersa re
turned off.
XPull release lever :on th ehood.
The hood is released.
Engine compartment233
Maintenance and care
Z
Page 236 of 298
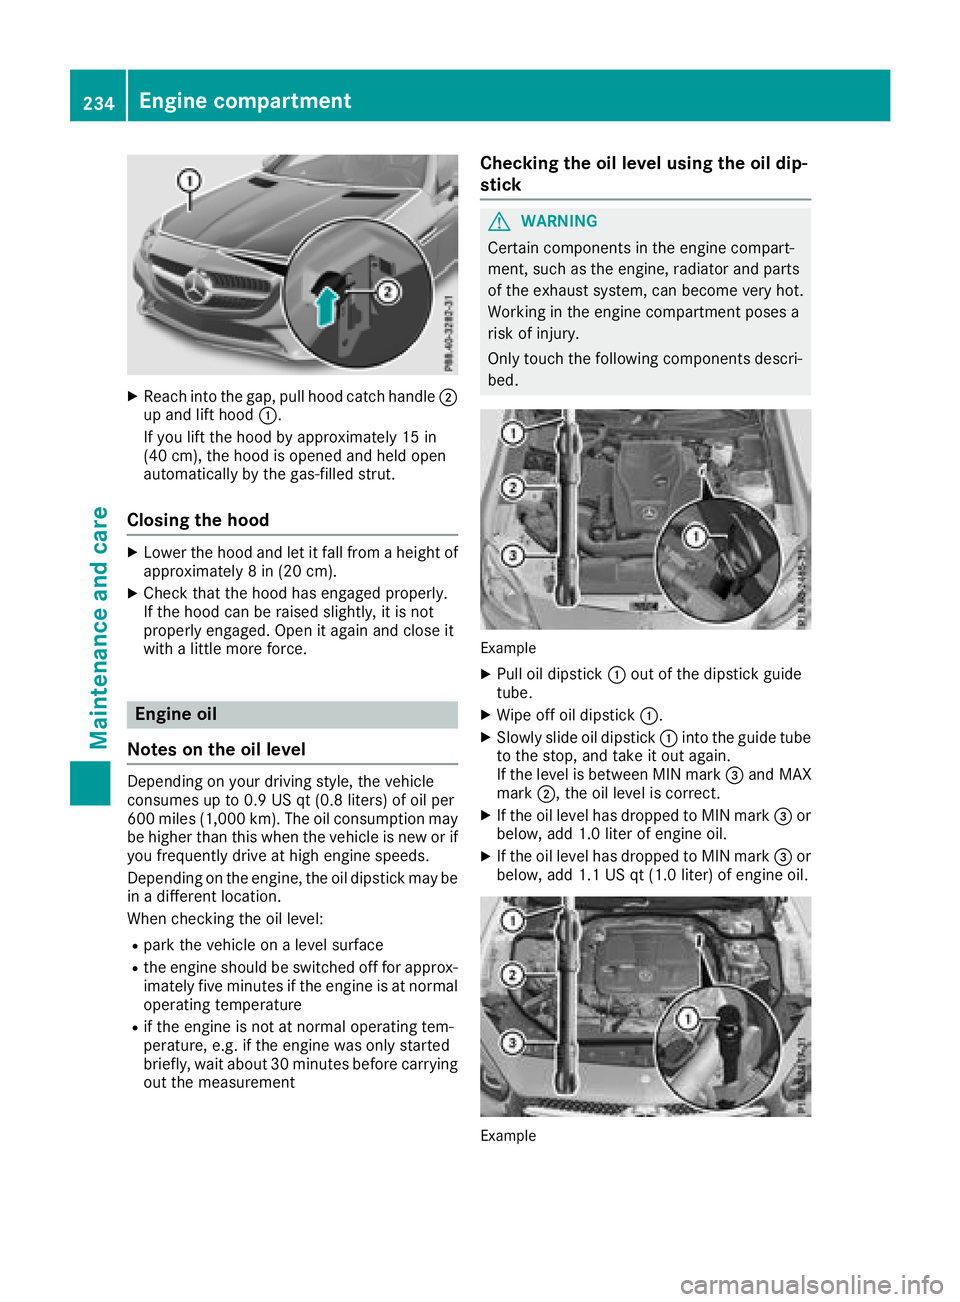
XReachintot he gap, pull hoo dcatch handle ;
up and lift hoo d:.
If you lift th ehoodbya pproximately 15 in
(40 cm), th ehoodiso pened and held open
automatically by th egas-filled strut .
Closingthehood
XLowe rthe hoo dand let it fall from aheight of
approximately 8in(20 cm).
XChec kthatthe hoo dhas engage dproperly.
If th ehoodc an be raised slightly, it is no t
properly engaged. Open it again and close it
wit hal ittlem oref orce .
Engine oil
Notes on th eoil level
Dependin gonyour driving style, th evehicl e
consumes up to 0. 9USqt(0.8 liters )ofoilpe r
60 0m iles (1,000 km). Th eoilcons umption may
be higher than th iswhen th evehicle is newori f
you frequently driveath igh engines peeds.
Dependin gontheengine, th eoil dipst ick may be
in ad ifferent location.
When checking th eoilleve l:
Rpark th evehicle onaleve lsurface
Rthee ngines hould be swit ched off for approx-
imately fiv eminute sift heengineisatn ormal
operatin gtem perature
Rifth ee ngineisn otat normal operatin gtem -
perature, e.g .iftheenginew as onlystarted
brie fly,wait about 30 minute sbefore carrying
out the measurement
Checking the oil level using the oil dip-
stick
GWARNING
Certain component sinthe engine compart-
ment ,such as the engine, radiator and parts
of the exhaust system, can become very hot.
Workin ginthe engine compartment poses a
risk of injury.
Only touch the following component sdescri-
bed.
Example
XPull oil dipstick :out of the dipstick guide
tube.
XWipe off oil dipstick :.
XSlowly slide oil dipstick :into the guide tube
to the stop, and take it out again.
If the level is between MIN mark =and MAX
mark ;,the oil level is correct.
XIf the oil level has dropped to MIN mark =or
below, add 1.0 liter of engine oil.
XIf the oil level has dropped to MIN mark =or
below, add 1.1 US qt (1.0 liter) of engine oil.
Example
234Engine compartment
Maintenance and care
Page 242 of 298
Rseals
Rtrim
Rventilation slots
Damaged seals or electrical componentsc an
lead to leaks or failures.
!Do not use high-pressure cleaners if the
tank recess is open while you clean it. This
can cause damage to the seals or other com-
ponents.
Cleaning the paintwork
!Do not affix:
Rstickers
Rfilms
Rmagnetic plates or similar items
to painted surfaces. You could otherwise
damage the paintwork.
Scratches, corrosive deposits, areas affected by
corrosion and damage caused by inadequate
care cannot always be completely repaired. In
such cases, visit aqualified specialist workshop.
XRemove dirt immediately,w here possible,
while avoiding rubbing too hard.
XSoak insect remains with insect remover and
rinse off the treated areas afterwards.
XSoak bird droppings with water and rinse off
the treated areas afterwards.
XRemove coolant, brake fluid, tree resin, oils,
fuels and greases by rubbing gently with a
cloth soaked in petroleum ether or lighter
fluid.
XUse tar remover to remove tar stains.
XUse silicone remover to remove wax.
If water no longer forms "beads" on the paint
surface, use the paint care products recommen-
ded and approved by Mercedes-Benz.T his is the
case approximately every three to five months,
depending on the climate conditions and the
care product used.
If dirt has penetrated the paint surface or if the
paint has become dull,t he paint cleaner recom-
mended and approved by Mercedes-Benz
should be used.
Do not use these care products in the sun or on
the hood while the hood is hot.
XUse asuitable touch-up stick, e.g. MB Touch-
Up Stick,tor epair slight damage to the paint-
work quickly and provisionally.
Mattef inish care
!Never polish the vehicle or the light alloy
wheels. Polishing causes the finish to shine.
!The following can give the paint aglossy
appearance and thus reduce the matt effect:
RRubbing hard with unsuitable agents
RWashing the vehicle in direct sunlight
!Never use paint cleaner, buffing or polishing
products, or gloss preserver, e.g. wax, for the
purpose of paintwork care. These products
are only suitable for high-gloss surfaces. Their
use on vehicles with matte paintwork leads to
considerable surface damage or, more spe-
cifically,tos hiny, spotted areas.
Always have paintwork repairs carried out at a
qualified specialist workshop.
!Only use automatic car washes which cor-
respond to the latest technological stand-
ards. Never use wash programs which finish
by treating the vehicle with hot wax.
Observe these notes if your vehicle has aclear
matte finish. This will help you to avoid damage
to the paintwork due to incorrect treatment.
These notes also apply to light alloy wheels with
ac lear matte finish.
iUse only insect remover and car shampoo
from the range of recommended and
approved Mercedes-Benz care products.
Cleaning the decorative film
!The following may have an effect on the ser-
vice life and coloring of decorative film:
Rsunlight
Rtemperature, e.g. hot-air fan
Rweather conditions
Rstone impacts and dirt
Rchemical cleaning agents
Rgreasy substances
!Do not use any types of polish on matt dec-
orative film. Polishing surfaces covered with
film gives it ashiny finish.
!Do not treat matt or structured decorative
film with wax. This may lead to marks that
cannot be removed.
240Care
Maintenance and care
Page 255 of 298
Charging thebattery
GWARNING
During chargin gand jump-starting, explosive
gases can escape from th ebattery. Thereisa
ris kofane xplosion.
Particularly avoid fire, open flames, creating
sparks and smoking. Ensure there is sufficient
ventilatio nwhile chargin gand jump-starting.
Do no tlean ove rabattery.
GWARNING
Battery acid is caustic .Thereisar iskofi njury.
Avoid contac twiths kin, eyes or clothing .Do
no tinhale any battery gases.Don otlean over
th eb attery. Keep childre naway from batter-
ies. Wash away battery acid immediately with
plenty of clean wate rand seek medical atten-
tion.
GWARNING
Ad ischarged battery can freezeatt empera-
tures below freezing point. When jump-start-
ing th evehicle or chargin gthe battery, gases
can escape from th ebattery. Thereisar isko f
an explosion.
Allow th efroze nbattery to thaw out before
chargin gitorjump-starting.
!Only use battery chargers witham aximum
chargin gvoltage of 14.8 V.
!Only charge th ebattery usingt hejump-
starting connection point.
The jump-startin gconnection pointisint he
enginec ompartment.
If th eindicator/warning lamps do no tlight up at
low temperatures, it is ver ylikely that th edis-
charge dbattery has frozen.Int hisc ase, you
may neither charge th ebattery no rjump-start
th ev ehicle .The servic elife of athawed-out bat-
tery may be shorter. The starting characteristics
can be impaired, particularly at low tempera-
tures. Hav ethe thawed-out battery checked at a
qualified specialist workshop.
Read th ebattery charger's operatin ginstruc-
tions before chargin gthe battery.
XOpen th ehood.
XConnect th ebattery charge rtothepositive
terminal and ground pointint hesame order
as when connecting th edonor battery in the
jump-startin gprocedure (
Ypage 253).
Jump-starting
For th ejump-startin gprocedure, use only th ejump-startin gconnection pointint heenginec om-
partment, consisting of apositiv etermi nal and aground point.
GWARNING
Battery acid is caustic .Thereisar iskofi njury.
Avoid contac twiths kin, eyes or clothing .Donotinhale any battery gases.Don otlean ove rthe
battery. Keep childre naway from batteries .Wash away battery acid immediately withp lenty of
clean wate rand seek medical attention.
GWARNING
During chargin gand jump-starting, explosive gases can escape from th ebattery. Thereisar isk
of an explosion.
Particularly avoid fire, open flames, creating sparks and smoking. Ensure there is sufficient ven-
tilatio nwhile chargin gand jump-starting. Do no tlean ove rabattery.
Jump-starting253
Breakdown assistance
Z
Page 257 of 298
XMake sure that the ignition is switched off. All indicator lamps in the instrumentcluster must be
off. When using the SmartKey, turn the SmartKey to position uin the ignition lock and remove it
(
Ypage 116).
XSwitch off all electrical consumers, e.g. rear window defroster, lighting, etc.
XOpen the hood.
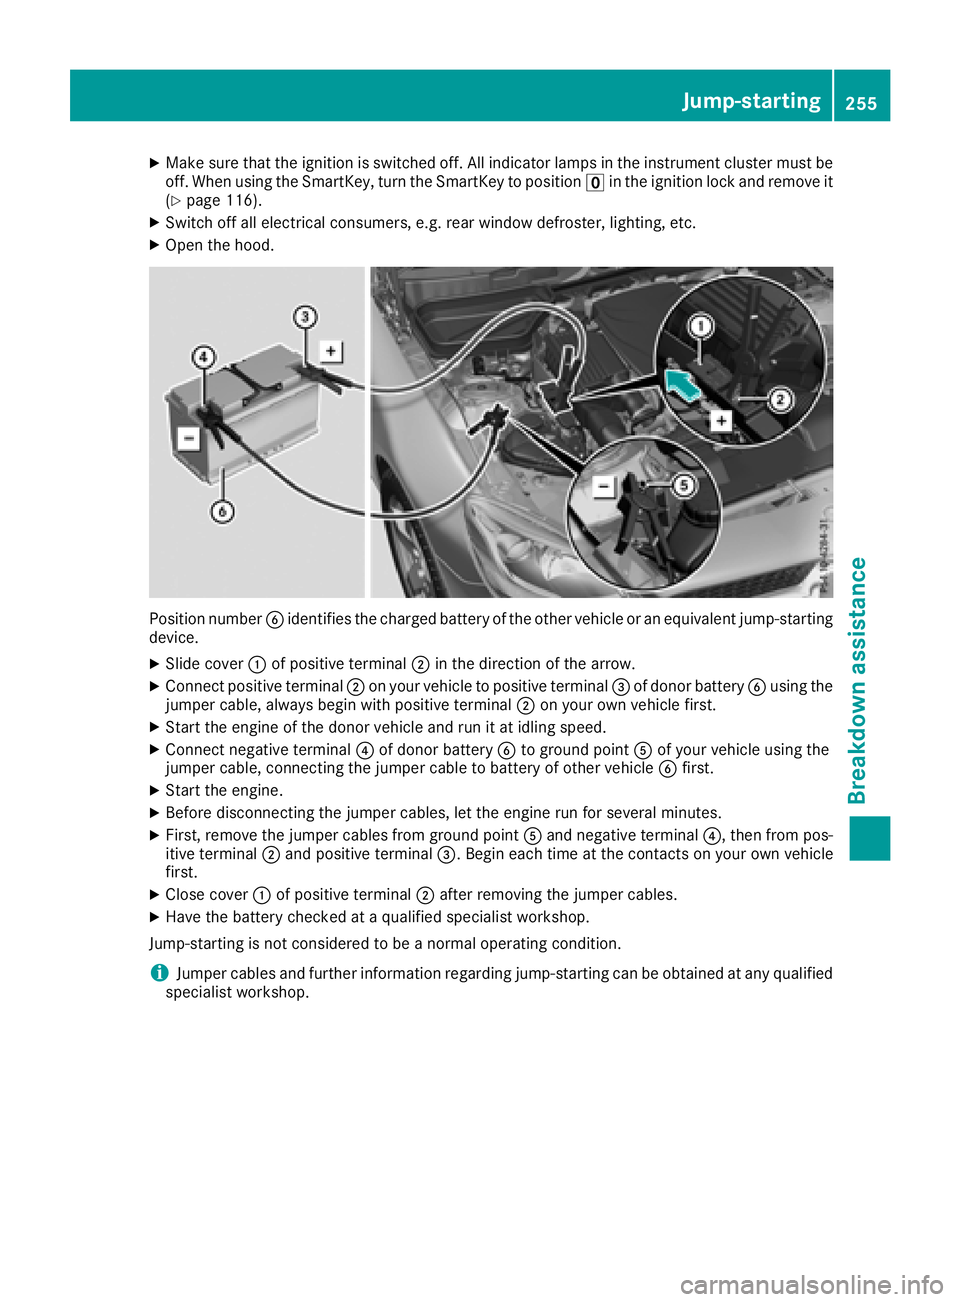
Position number Bidentifies the charged battery of the other vehicle or an equivalent jump-starting
device.
XSlide cover :of positive terminal ;in the direction of the arrow.
XConnect positive terminal ;on your vehicle to positive terminal =of donor battery Busing the
jumper cable, always begin with positive terminal ;on your own vehicle first.
XStart the engine of the donor vehicle and run it at idling speed.
XConnect negative terminal ?of donor battery Bto ground point Aof your vehicle using the
jumper cable, connecting the jumper cable to battery of other vehicle Bfirst.
XStart the engine.
XBefore disconnecting the jumper cables, let the engine run for several minutes.
XFirst, remove the jumper cables from ground point Aand negative terminal ?,then from pos-
itive terminal ;and positive terminal =.Begin each time at the contacts on your own vehicle
first.
XClose cover :of positive terminal ;after removing the jumper cables.
XHave the battery checked at aqualified specialist workshop.
Jump-starting is not considered to be anormal operating condition.
iJumper cables and further information regarding jump-starting can be obtained at any qualified
specialist workshop.
Jump-starting255
Breakdown assistance
Z