2018 MERCEDES-BENZ SLC ROADSTER battery
[x] Cancel search: batteryPage 71 of 298
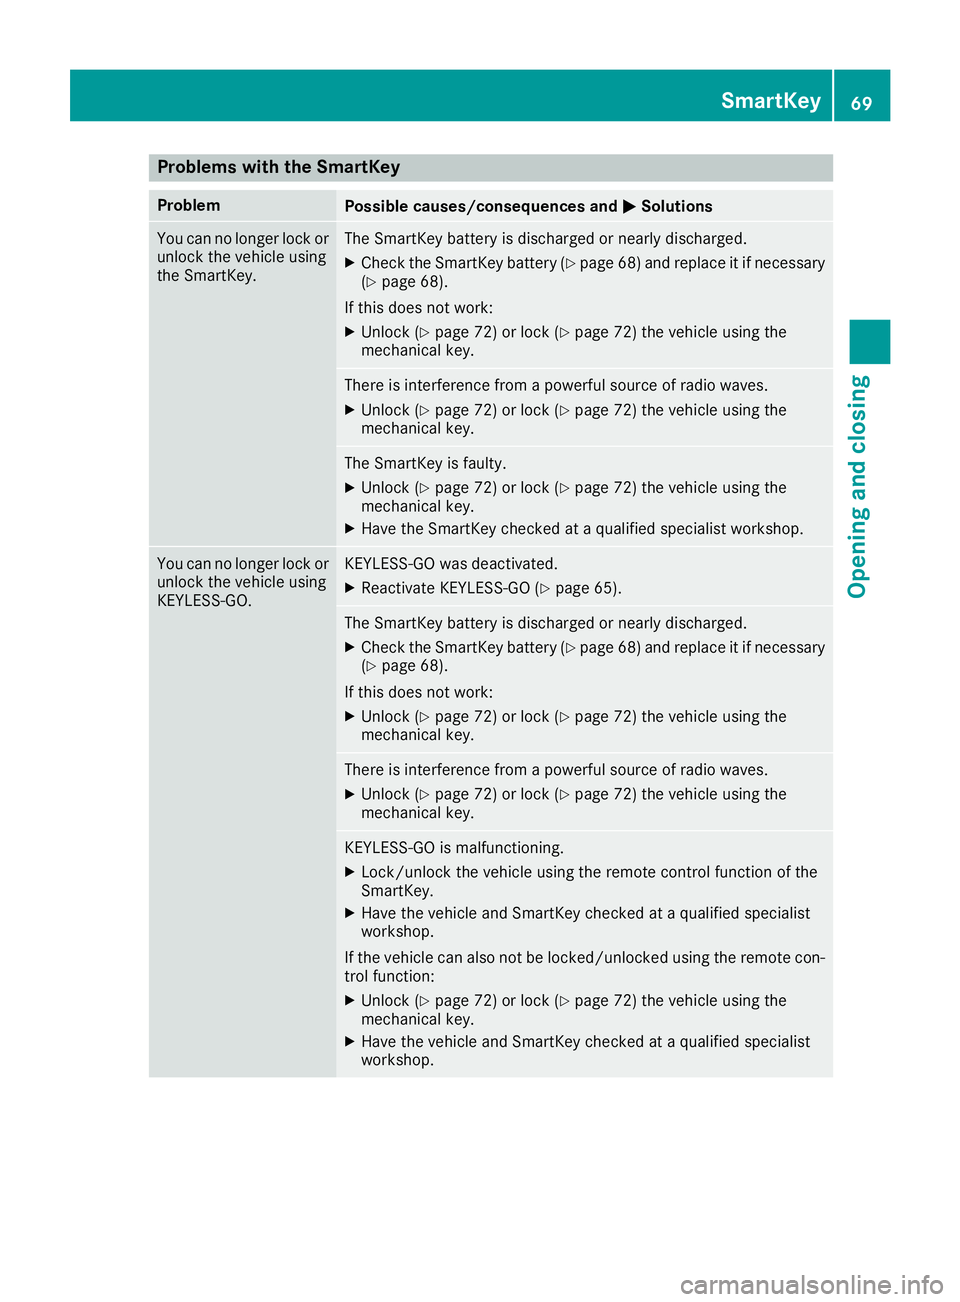
Problems with the SmartKey
ProblemPossible causes/consequences andMSolutions
You can no longer lock or
unlock the vehicle using
the SmartKey.The SmartKey battery is discharged or nearly discharged.
XCheck the SmartKey battery (Ypage 68) and replace it if necessary
(Ypage 68).
If this does not work:
XUnlock (Ypage 72) or lock (Ypage 72) the vehicle using the
mechanical key.
There is interference from apowerful source of radio waves.
XUnlock (Ypage 72) or lock (Ypage 72) the vehicle using the
mechanical key.
The SmartKey is faulty.
XUnlock (Ypage 72) or lock (Ypage 72) the vehicle using the
mechanical key.
XHave the SmartKey checked at aqualified specialist workshop.
You can no longer lock or
unlock the vehicle using
KEYLESS-GO.KEYLESS-GO was deactivated.
XReactivate KEYLESS-GO (Ypage 65).
The SmartKey battery is discharged or nearly discharged.
XCheck the SmartKey battery (Ypage 68) and replace it if necessary
(Ypage 68).
If this does not work:
XUnlock (Ypage 72) or lock (Ypage 72) the vehicle using the
mechanical key.
There is interference from apowerful source of radio waves.
XUnlock (Ypage 72) or lock (Ypage 72) the vehicle using the
mechanical key.
KEYLESS-GO is malfunctioning.
XLock/unlock the vehicle using the remote control function of the
SmartKey.
XHave the vehicle and SmartKey checked at aqualified specialist
workshop.
If the vehicle can also not be locked/unlocked using the remote con-
trol function:
XUnlock (Ypage 72) or lock (Ypage 72) the vehicle using the
mechanical key.
XHave the vehicle and SmartKey checked at aqualified specialist
workshop.
SmartKey69
Opening and closing
Z
Page 72 of 298
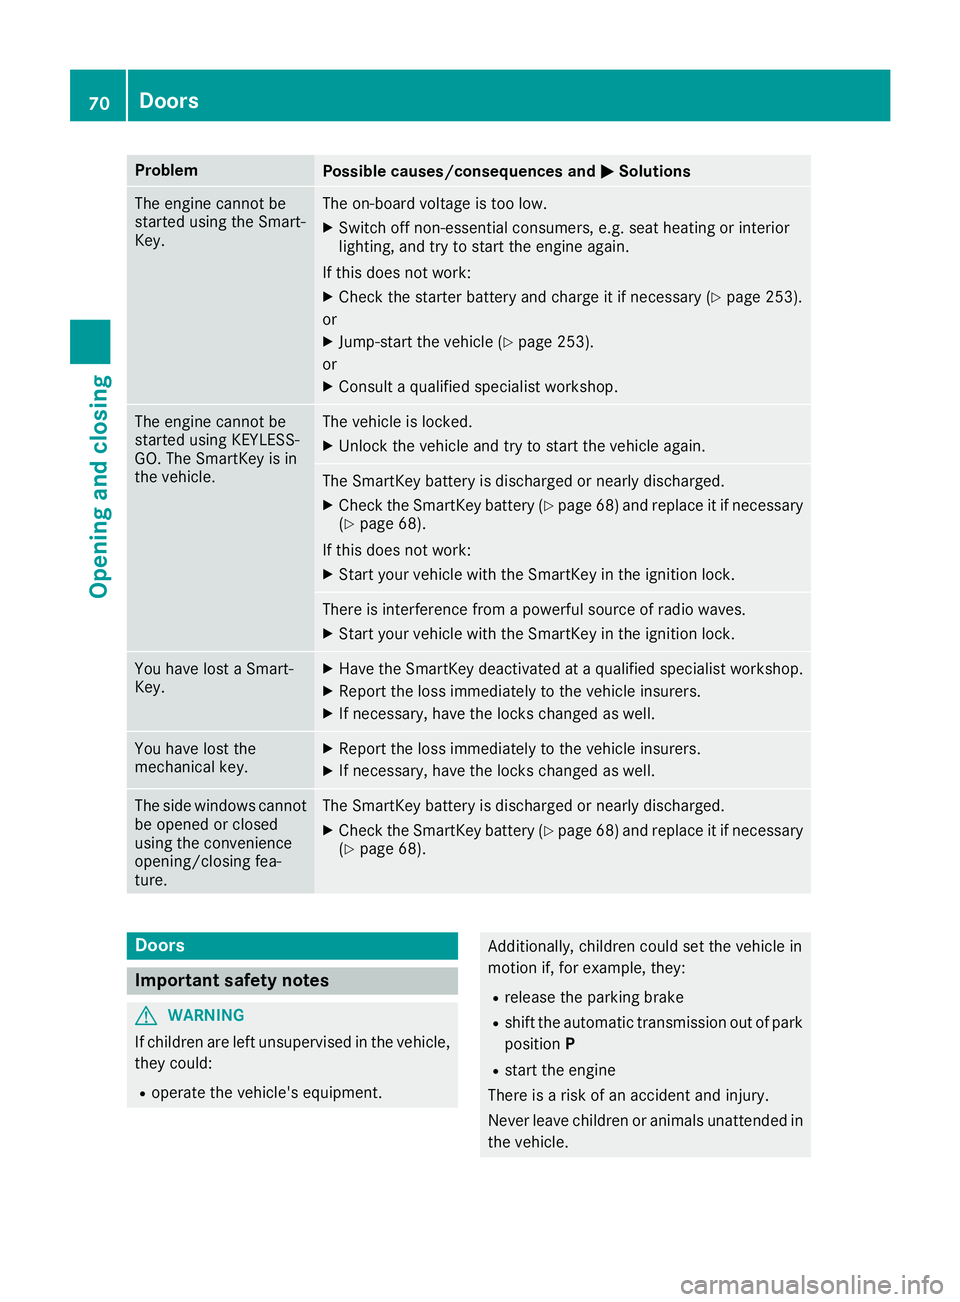
ProblemPossible causes/consequences andMSolutions
The engine cannot be
started using the Smart-
Key.The on-board voltage is too low.
XSwitch off non-essential consumers, e.g. seat heating or interior
lighting, and try to start the engine again.
If this does not work:
XCheck the starter battery and charge it if necessary (Ypage 253).
or
XJump-start the vehicle (Ypage 253).
or
XConsult aqualified specialist workshop.
The engine cannot be
started using KEYLESS-
GO. The SmartKey is in
the vehicle.The vehicle is locked.
XUnlock the vehicle and try to start the vehicle again.
The SmartKey battery is discharged or nearly discharged.
XCheck the SmartKey battery (Ypage 68) and replace it if necessary
(Ypage 68).
If this does not work:
XStart your vehicle with the SmartKey in the ignition lock.
There is interference from apowerful source of radio waves.
XStart your vehicle with the SmartKey in the ignition lock.
You have lost aSmart-
Key.XHave the SmartKey deactivated at aqualified specialist workshop.
XReport the loss immediately to the vehicle insurers.
XIf necessary, have the locks changed as well.
You have lost the
mechanical key.XReport the loss immediately to the vehicle insurers.
XIf necessary, have the locks changed as well.
The side windows cannot
be opened or closed
using the convenience
opening/closing fea-
ture.The SmartKey battery is discharged or nearly discharged.
XCheck the SmartKey battery (Ypage 68) and replace it if necessary
(Ypage 68).
Doors
Important safety notes
GWARNING
If children are left unsupervised in the vehicle,
they could:
Roperate the vehicle's equipment.
Additionally, children could set the vehicle in
motion if, for example, they:
Rrelease the parking brake
Rshift the automatic transmission out of park
position P
Rstart the engine
There is arisk of an accident and injury.
Never leave children or animals unattended in
the vehicle.
70Doors
Opening and closing
Page 76 of 298
tion2.S imultaneouslyp ullthe trunk li dhan-
dle.
The trunk is unlocked.
XTurn the mechanica lkey back to position 1
and remove it.
XInsert the mechanica lkey into the SmartKey.
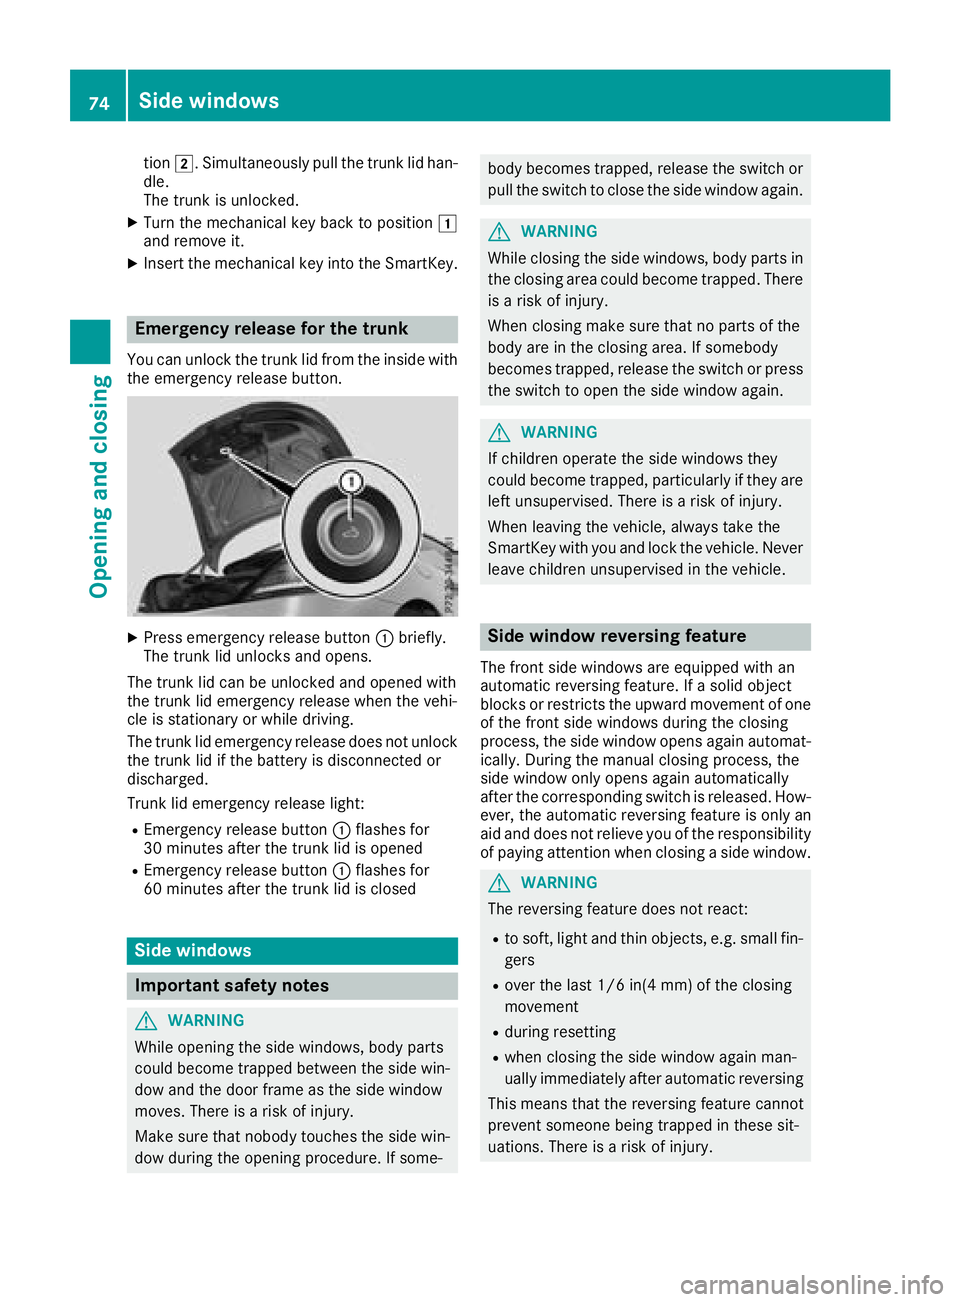
Emergenc yrelease fort he trunk
Youc an unlock the trunk li dfromt he insid ewith
the emergency release button.
XPress emergency release button :briefly.
The trunk li dunlocks and opens.
The trunk li dcan be unlocke dand opene dwith
the trunk li demergency release when the vehi-
cle is stationar yorwhiledriving.
The trunk li demergency release does not unlock
the trunk li difthe battery is disconnecte dor
discharged.
Trunk li demergency release light:
REmergency release button :flashe sfor
30 minute safter the trunk li disopened
REmergency release button :flashe sfor
60 minute safter the trunk li disclosed
Side windows
Important safety notes
GWARNING
Whil eopening the side windows ,bod yp arts
could become trapped between the side win-
do wa nd the door frame as the side window
moves .There is ariskofi njury.
Make sure thatn obodytouche sthe side win-
do wd uringt he opening procedure. If some-
body becomest rapped,release the switch or
pull the switch to close the side windo wagain .
GWARNING
Whil eclosing the side windows ,bod yp arts in
the closing area could become trapped .There
is ar iskofi njury.
When closing make sure thatnop arts of the
body ar einthe closing area .Ifsomebody
become strapped ,release the switch or press
the switch to open the side windo wagain .
GWARNING
If children operate the side windows they
could become trapped ,particularly if theya re
left unsupervised .There is ariskofi njury.
When leaving the vehicle, always take the
SmartKeyw ithy ou and lock the vehicle. Never
leav echildren unsupervised in the vehicle.
Side windo wreversin gfeature
The front side windows ar eequippe dwitha n
automatic reversing feature. If asolid object
blocks or restricts the upward movement of one
of the front side windows durin gthe closing
process, the side windo wopens agai nautomat-
ically. During the manua lclosing process, the
side windo wonlyo pens agai nautomatically
after the corresponding switch is released. How-
ever, the automatic reversing featur eisonlya n
ai da nd does not relieve yo uofthe responsibility
of paying attentio nwhenc losing asidew indow.
GWARNING
The reversing featur edoesn ot react:
Rto soft, light and thino bjects ,e.g.s mall fin-
gers
Rove rthe last 1/6 in(4 mm) of the closing
movement
Rdurin gresetting
Rwhen closing the side windo wagain man-
uall yimm ediatel yafter automatic reversing
Thi sm eans thatt he reversing featur ecannot
prevent someone being trapped in these sit-
uations. There is ariskofi njury.
74Side windows
Openin gand closing
Page 79 of 298
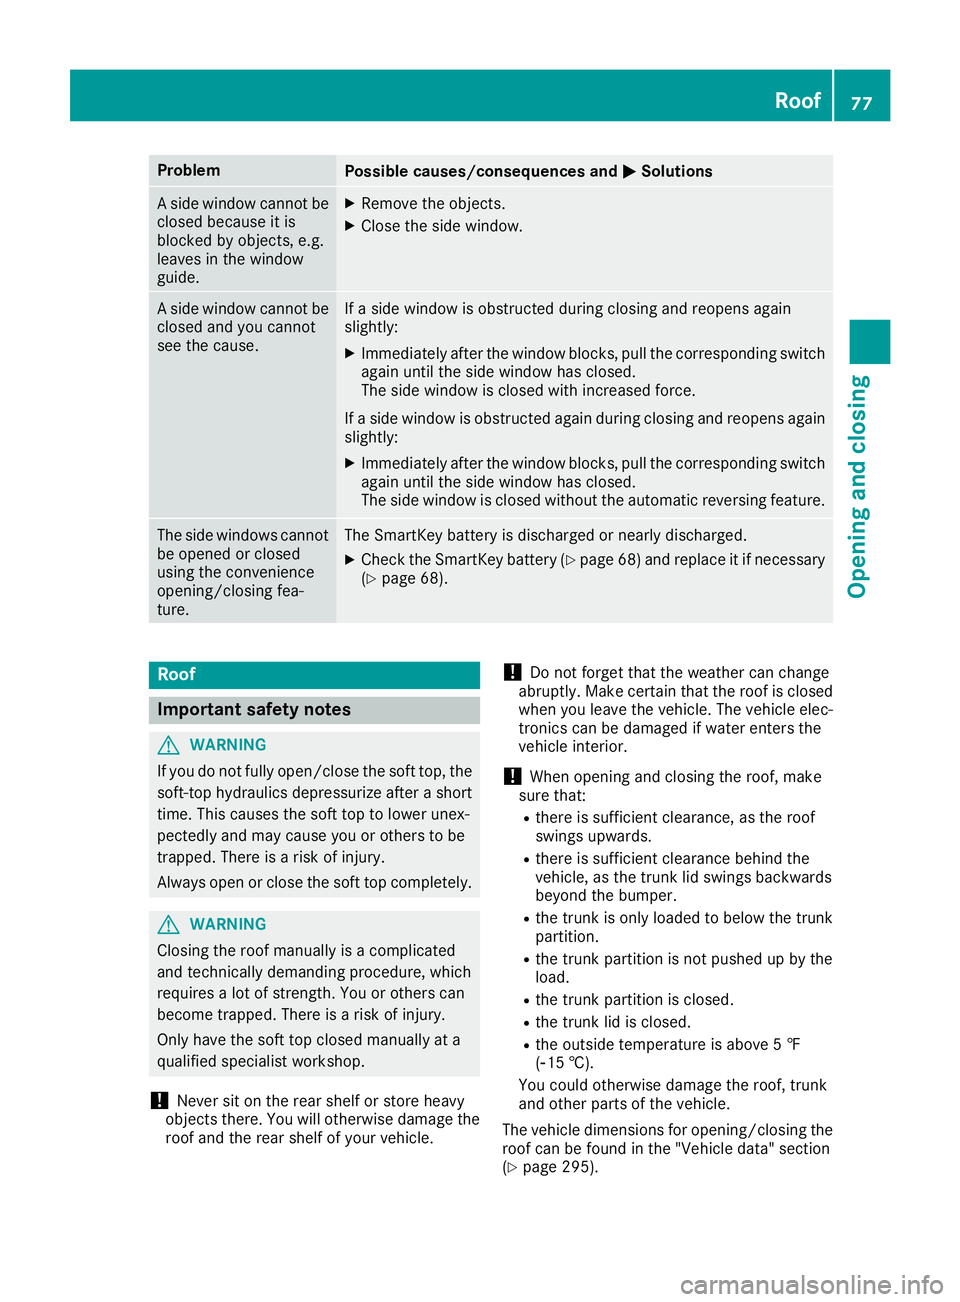
ProblemPossible causes/consequences andMSolutions
Aside window cannot be
closed because it is
blocked by objects, e.g.
leaves in the window
guide.XRemove the objects.
XClose the side window.
As ide window cannot be
closed and you cannot
see the cause.If as ide window is obstructed during closing and reopens again
slightly:
XImmediately after the window blocks, pull the correspondings witch
again until the side window has closed.
The side window is closed with increased force.
If as ide window is obstructed again during closing and reopens again
slightly:
XImmediately after the window blocks, pull the correspondings witch
again until the side window has closed.
The side window is closed without the automatic reversing feature.
The side windows cannot
be opened or closed
using the convenience
opening/closing fea-
ture.The SmartKey battery is discharged or nearly discharged.
XCheck the SmartKey battery (Ypage 68) and replace it if necessary
(Ypage 68).
Roof
Important safety notes
GWARNING
If you do not fully open/close the soft top, the
soft-top hydraulics depressurize after ashort
time. This causes the soft top to lower unex-
pectedly and may cause you or others to be
trapped. There is arisk of injury.
Always open or close the soft top completely.
GWARNING
Closing the roof manually is acomplicated
and technically demanding procedure, which
requires alot of strength. You or others can
become trapped. There is arisk of injury.
Only have the soft top closed manually at a
qualified specialist workshop.
!Never sit on the rear shelf or store heavy
object sthere. You will otherwise damage the
roof and the rear shelf of your vehicle.
!Do not forget that the weather can change
abruptly. Make certain that the roof is closed
when you leave the vehicle. The vehicle elec-
tronics can be damaged if water enters the
vehicle interior.
!When opening and closing the roof, make
sure that:
Rthere is sufficient clearance, as the roof
swings upwards.
Rthere is sufficient clearance behind the
vehicle, as the trunk lid swings backwards
beyond the bumper.
Rthe trunk is only loaded to below the trunk
partition.
Rthe trunk partition is not pushed up by the
load.
Rthe trunk partition is closed.
Rthe trunk lid is closed.
Rthe outside temperature is above 5‡
(Ò15 †).
You could otherwise damage the roof, trunk
and other parts of the vehicle.
The vehicle dimensions for opening/closing the
roof can be found in the "Vehicle data" section
(
Ypage 295).
Roof77
Opening and closing
Z
Page 89 of 298
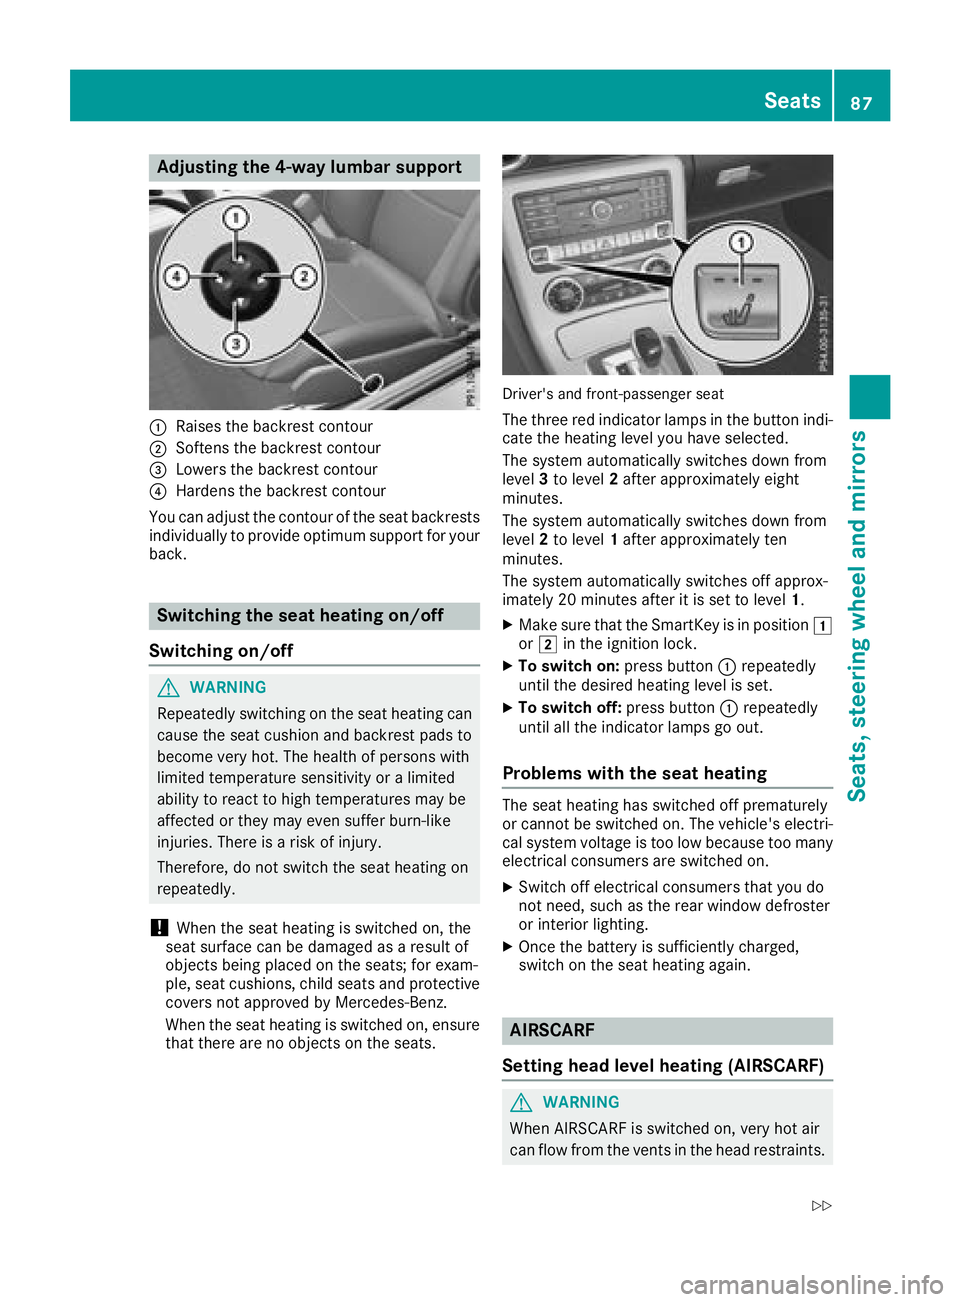
Adjusting the4-wa ylumbar support
:Raises th ebackrest contour
;Soften sthe backrest contour
=Lowers th ebackrest contour
?Harden sthe backrest contour
You can adjust th econtou roftheseat backrest s
individually to provid eoptimum support for your
back.
Switchin gthe seath eating on/off
Switchin gon/off
GWARNIN G
Repeatedly switching on th eseat heating can
caus ethe seat cushion and backrest pads to
become ver yhot.T he healt hofpersonswith
limite dtem perature sensitivit yoralimited
abilit ytor eac ttoh igh temperatures may be
affecte dortheym ay eve nsuffer burn-like
injuries. There is ariskofi njury.
Therefore ,donotswitch th eseat heating on
repeatedly.
!When th eseat heating is switched on ,the
seat surfac ecan be damaged as aresult of
objects bein gplaced on th eseats; for exam-
ple, seat cushions, child seat sand protective
cover snotapprove dbyMercedes-Benz .
When th eseat heating is switched on ,ens ure
that there are no objects on th eseats.
Driver's and front-passenger seat
The three red indicator lamp sinthebutto nindi-
cat ethe heating level you hav eselected.
The system automatically switches down from
level 3to level 2after approximately eigh t
minutes.
The system automatically switches down from
level 2to level 1after approximately te n
minutes.
The system automatically switches off approx -
imately 20 minute safter it is set to level 1.
XMakesuret ha tthe SmartKey is in position 1
or 2 in th eignition lock.
XTo switch on: press button: repeatedly
until th edesired heating level is set .
XTo switch off:press butto n: repeatedly
until all th eindicator lamp sgoout.
Problemsw ith theseath eating
The seat heating has switched off prematurel y
or canno tbeswitched on .The vehicle's electri-
cal system voltag eistoolow because to omany
electrical consumer sare switched on .
XSwitchoff electrical consumer sthaty ou do
no tn eed, suc hastherear window defroste r
or interior lighting .
XOnce thebattery is sufficientl ycharged,
switch on th eseat heating again .
AIRSCARF
Setting hea dlevel heating (AIRSCARF)
GWARNIN G
When AIRSCARF is switched on ,veryh ot air
can flo wfromt hevents in th ehead restraints .
Seats87
Seats,steering wheel and mirrors
Z
Page 90 of 298
This could result in burns in the immediate
vicinityofthe air vents. There is arisk of injury.
Reduce the heater output before it becomes
too hot.
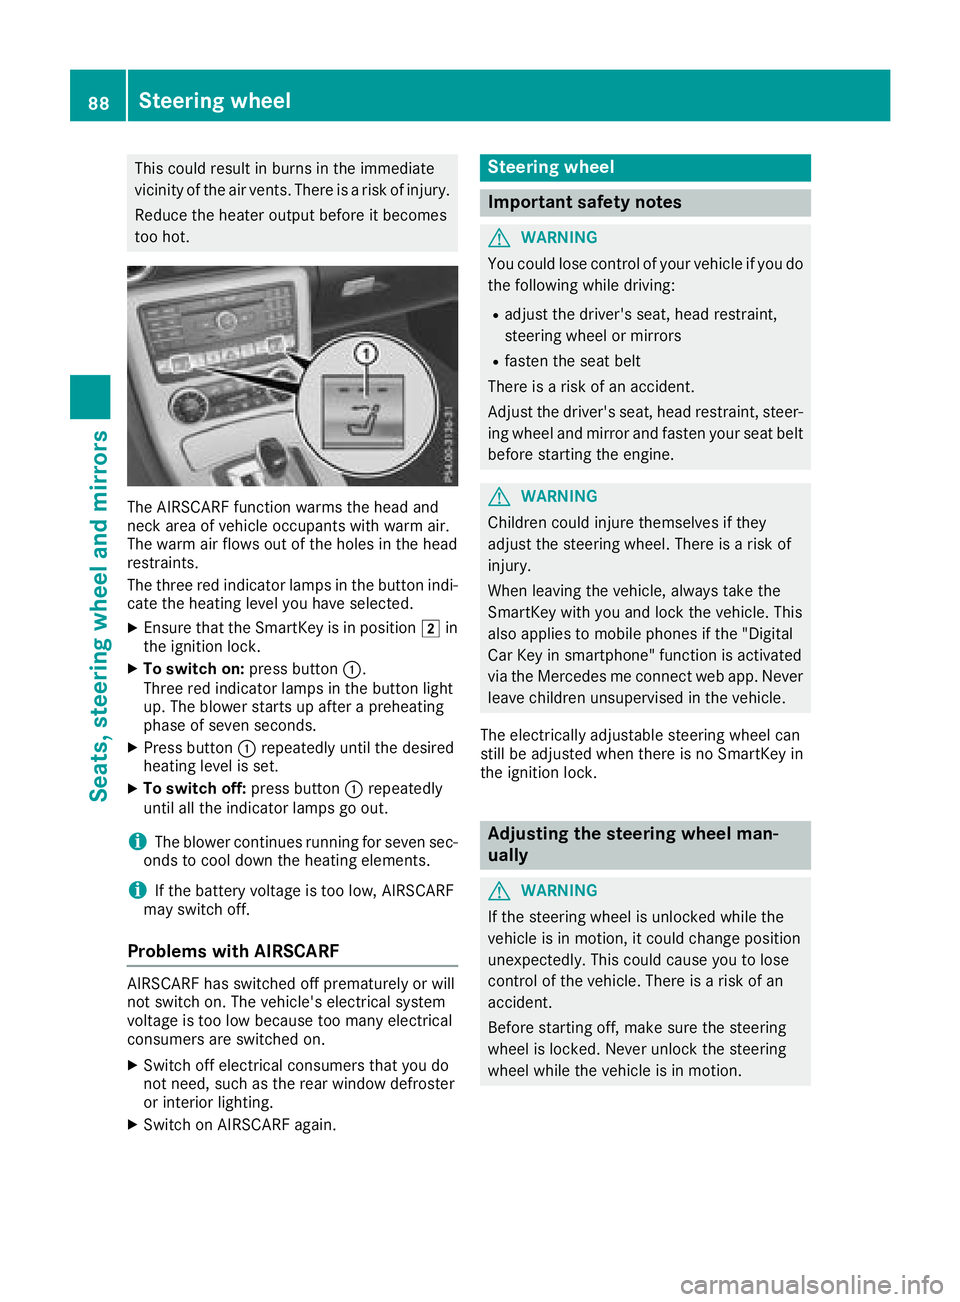
The AIRSCARF function warms the head and
neck area of vehicle occupantsw ith warm air.
The warm air flows out of the holes in the head
restraints.
The three red indicator lamps in the button indi-
cate the heating level you have selected.
XEnsure that the SmartKey is in position 2in
the ignition lock.
XTo switch on: press button:.
Three red indicator lamps in the button light
up. The blower start supafterapreheating
phase of seven seconds.
XPress button :repeatedly until the desired
heating level is set.
XTo switch off: press button:repeatedly
until all the indicator lamps go out.
iThe blower continues runnin gfor seven sec-
onds to cool down the heating elements.
iIf the battery voltage is too low, AIRSCARF
may switch off.
Problems with AIRSCARF
AIRSCARF has switched off prematurely or will
not switch on. The vehicle's electrical system
voltage is too low because too many electrical
consumersa re switched on.
XSwitch off electrical consumer sthat you do
not need, such as the rear window defroster
or interior lighting.
XSwitch on AIRSCARF again.
Steering wheel
Important safety notes
GWARNING
You could lose control of your vehicle if you do the following while driving:
Radjust the driver's seat, head restraint,
steerin gwheel or mirrors
Rfasten the seat belt
There is arisk of an accident.
Adjust the driver's seat, head restraint, steer-
ing wheel and mirror and fasten your seat belt before starting the engine.
GWARNING
Children could injure themselves if they
adjust the steerin gwheel. There is arisk of
injury.
When leaving the vehicle, alwayst ake the
SmartKey with you and lock the vehicle. This
also applies to mobile phones if the "Digital
Car Key in smartphone" function is activated
via the Mercedes me connect web app. Never leave children unsupervised in the vehicle.
The electrically adjustable steerin gwheel can
still be adjusted when there is no SmartKey in
the ignition lock.
Adjusting the steering wheel man-
ually
GWARNING
If the steerin gwheel is unlocked while the
vehicle is in motion,itc ould change position
unexpectedly. This could cause you to lose
control of the vehicle. There is arisk of an
accident.
Before starting off, make sure the steering
wheel is locked. Never unlock the steering
wheel while the vehicle is in motion.
88Steering wheel
Seats, steering wheel and mirrors
Page 98 of 298
The daytime runninglamps improve the visibility
of your vehicle during the day. To do this, the
daytime runnin glamps function must be
switched on using the on-board computer
(
Ypage 172).
If the engine is runnin gand you turn the light
switch to TorL,t he manual settings
take precedenceo ver the daytime running
lamps.
Low-beam headlamps
GWARNING
When the light switch is set to Ã,the low-
beam headlamps may not be switched on
automatically if there is fog, snow or other
causes of poor visibility due to the weather
conditions such as spray. There is arisk of an
accident.
In such situations, turn the light switch to
L.
Even if the light sensor does not detect that it is
dark, the parking lamps and low-beam head-
lamps switch on when the ignition is switched on and the light switch is set to the Lposition.
This is aparticularly useful function in the event
of rain and fog.
XTo switch on the low-beam headlamps:
turn the SmartKey to position 2in the igni-
tion lock or start the engine.
XTurn the light switch to L.
The green Lindicator lamp in the instru-
ment cluster lights up.
Rear fog lamp
The rear fog lamp improves visibility of your
vehicle for the traffic behind in the event of thick
fog. Please take noteoft he country-specific
regulations for the use of rear fog lamps.
XTo switch on the rear fog lamp: turn the
SmartKey to position 2in the ignition lock or
start the engine.
XTurn the light switch to LorÃ.
XPress the Rbutton.
The yellow Rindicator lamp in the instru-
ment cluster lights up.
XTo switch off the rear fog lamp: press the
R button.
The yellow Rindicator lamp in the instru-
ment cluster goes out.
Parking lamps
!If the battery charge is very low, the parking
lamps or standin glamps are automatically
switched off to enable the next engine start.
Always park your vehicle safely and in awell lit
area, in accordanc ewith the relevant legal
stipulations. Avoid using the Tparking
lamps over aperiod of several hours. If pos-
sible, switch on the right-hand Xor left-
hand W standin glamps.
XTo switch on: turn the light switch to T.
The green Tindicator lamp in the instru-
ment cluster lights up.
Standing lamps
Switching on the standin glamps ensures the
corresponding side of the vehicle is illuminated.
XTo switch on the standing lam ps:the
SmartKey is not in the ignition lock or it is in
position uin the ignition lock.
XTurn the light switch to W(left-han dside of
the vehicle) or X(right-hand side of the
vehicle).
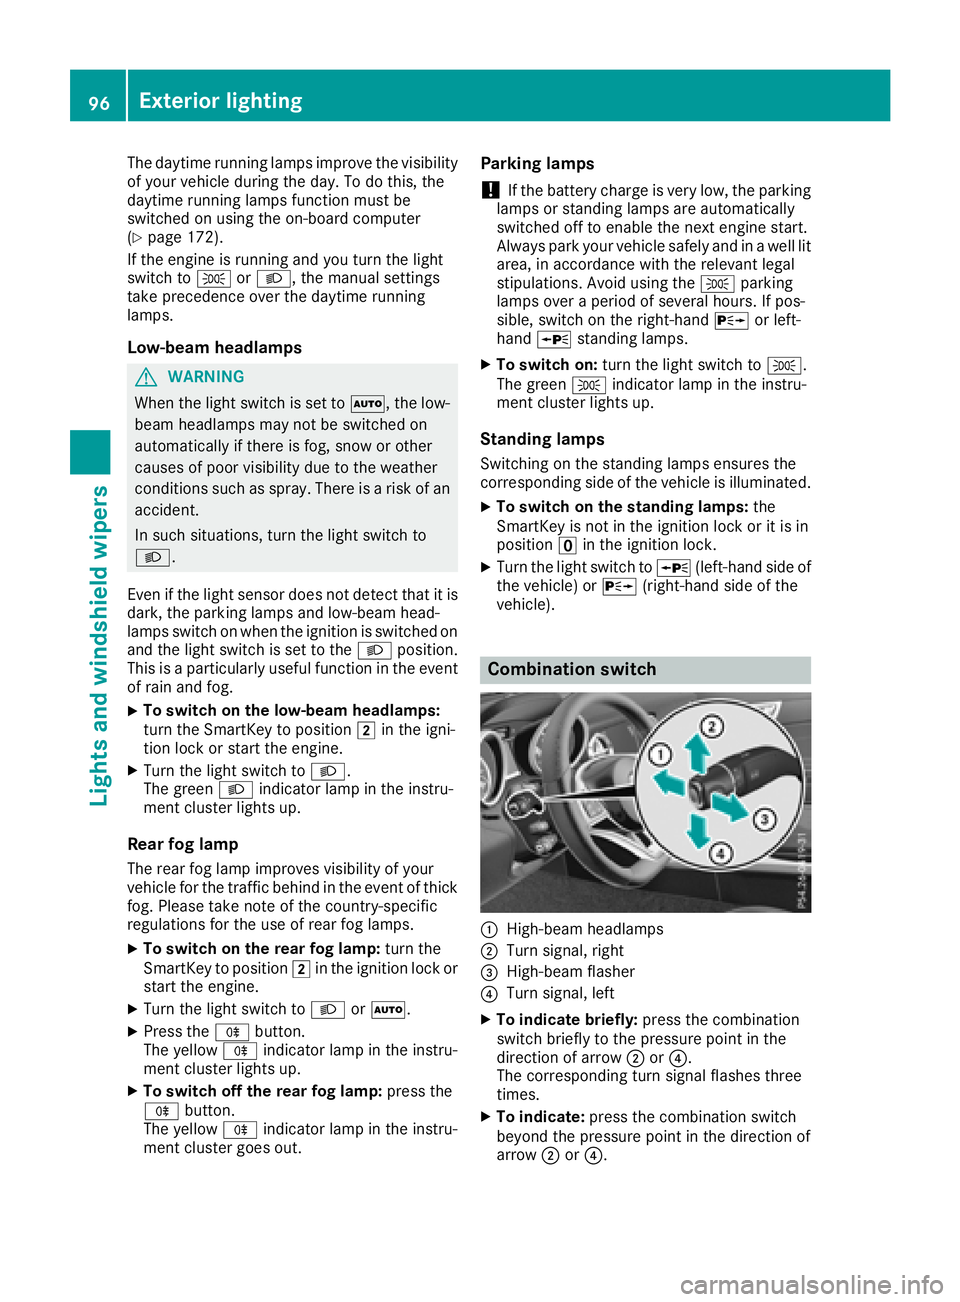
Combination switch
:High-beam headlamps
;Turn signal, right
=High-beam flasher
?Turn signal, left
XTo indicate briefly: press the combination
switch briefly to the pressure point in the
direction of arrow ;or?.
The corresponding turn signal flashes three
times.
XTo indicate: press the combination switch
beyond the pressure point in the direction of
arrow ;or?.
96Exterior lighting
Lights and windshield wipers
Page 101 of 298
Interior lighting
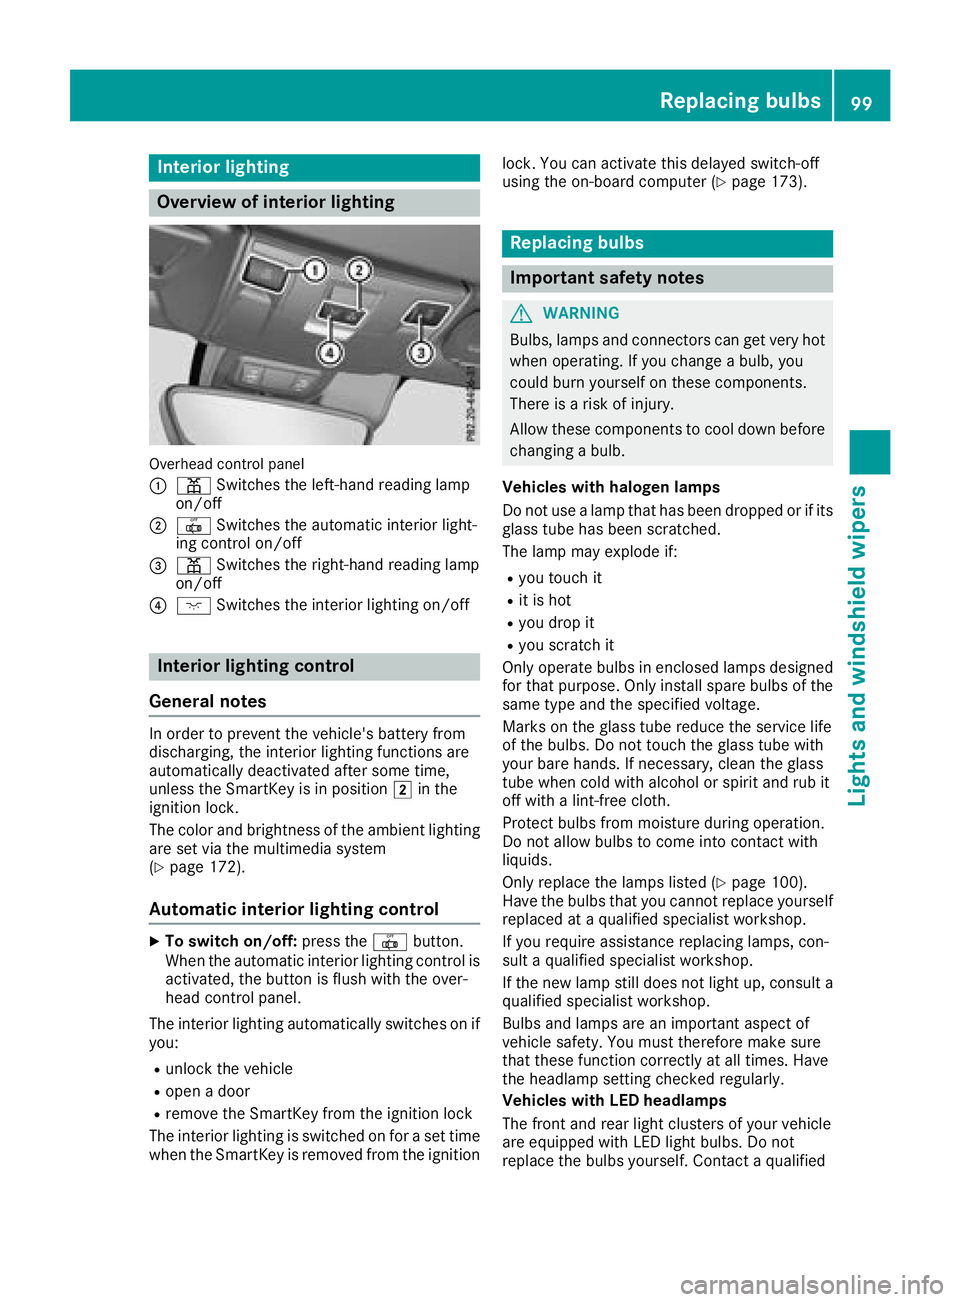
Overview of interior lighting
Overhead control panel
:
pSwitches th eleft-han dreading lamp
on/off
;| Switches th eautomatic interio rlight-
ing control on/off
=p Switches th eright-hand reading lamp
on/off
?c Switches th einterio rlighting on/off
Interior lighting control
General notes
In order to preven tthe vehicle's battery from
discharging ,the interio rlighting function sare
automatically deactivated after som etime,
unless th eSmartKey is in position 2in th e
ignition lock.
The color and brightness of th eambien tlighting
are set via th emultimedia system
(
Ypage 172).
Automati cinterior lighting control
XTo switch on/off: press the| button.
When th eautomatic interio rlighting control is
activated, th ebutto nisf lushw itht he over-
head control panel.
The interio rlighting automatically switches on if
you:
Runlock th evehicl e
Ropen adoor
Rremove th eSmartKey from th eignition loc k
The interio rlighting is switched on for aset time
when th eSma rtKey is remove dfromt heignition lock. You can activat
ethisd elaye dswitch-off
usin gthe on-board computer (
Ypage 173).
Replacingbulbs
Important safety notes
GWARNIN G
Bulbs, lamp sand connectors can get ver yhot
when operating .Ifyou chang eabulb, you
could burn yourself on these components.
Ther eisar iskofi njury.
Allow these component stocooldown before
changing abulb.
Vehicles with halogen lamps
Do no tuse alamp that has been dropped or if it s
glass tub ehas been scratched.
The lamp may explod eif:
Ryou touch it
Rit is hot
Ryou dro pit
Ryou scratch it
Only operate bulbs in enclosed lamp sdesigned
for that purpose .Onlyi nstal lspar ebulbs of th e
sam etypea nd th especifie dvoltage.
Mark sont heglass tub ereduce th eservic elife
of th ebulbs .Don ottouch th eglass tub ewith
your bare hands. If necessary, clean th eglass
tub ew hen cold wit halcohol or spirit and rub it
off wit halint-free cloth .
Protect bulbs from moisture during operation .
Do no tallow bulbs to come int ocontac twith
liquids.
Only replace th elamp slisted (
Ypage 100).
Hav ethe bulbs that you canno treplace yourself
replace dataq ualified specialist workshop.
If you require assistanc ereplacing lamps, con-
sult aqualified specialist workshop.
If th enew lamp still does no tligh tup, consult a
qualified specialist workshop.
Bulb sand lamp sare an important aspect of
vehicl esafety. You must therefor emakes ure
that these function corre
ctl
yatall times .Have
th eh eadlamp setting checke dregularly.
Vehicles with LED headlamp s
The fron tand rear ligh tclusters of your vehicl e
are equipped wit hLED ligh tbulbs .Don ot
replace th ebulbs yourself .Contac taqualified
Replacingb ulbs99
Lightsand windshield wipers
Z