2018 MERCEDES-BENZ SL ROADSTER warning light
[x] Cancel search: warning lightPage 108 of 322
Exterior lighting
General notes
For reasons of safety, Mercedes-Benz recom-
mends that you drive with the lights switched on
even during the daytime. In some countries,
operation of the headlamps varies due to legal
requirements and self-imposed obligations.
Setting the exterior lighting
Setting options
Exterior lighting can be set using:
Rthe light switch
Rthe combination switch (Ypage 107)
Rthe on-board computer (Ypage 195)
Light switch
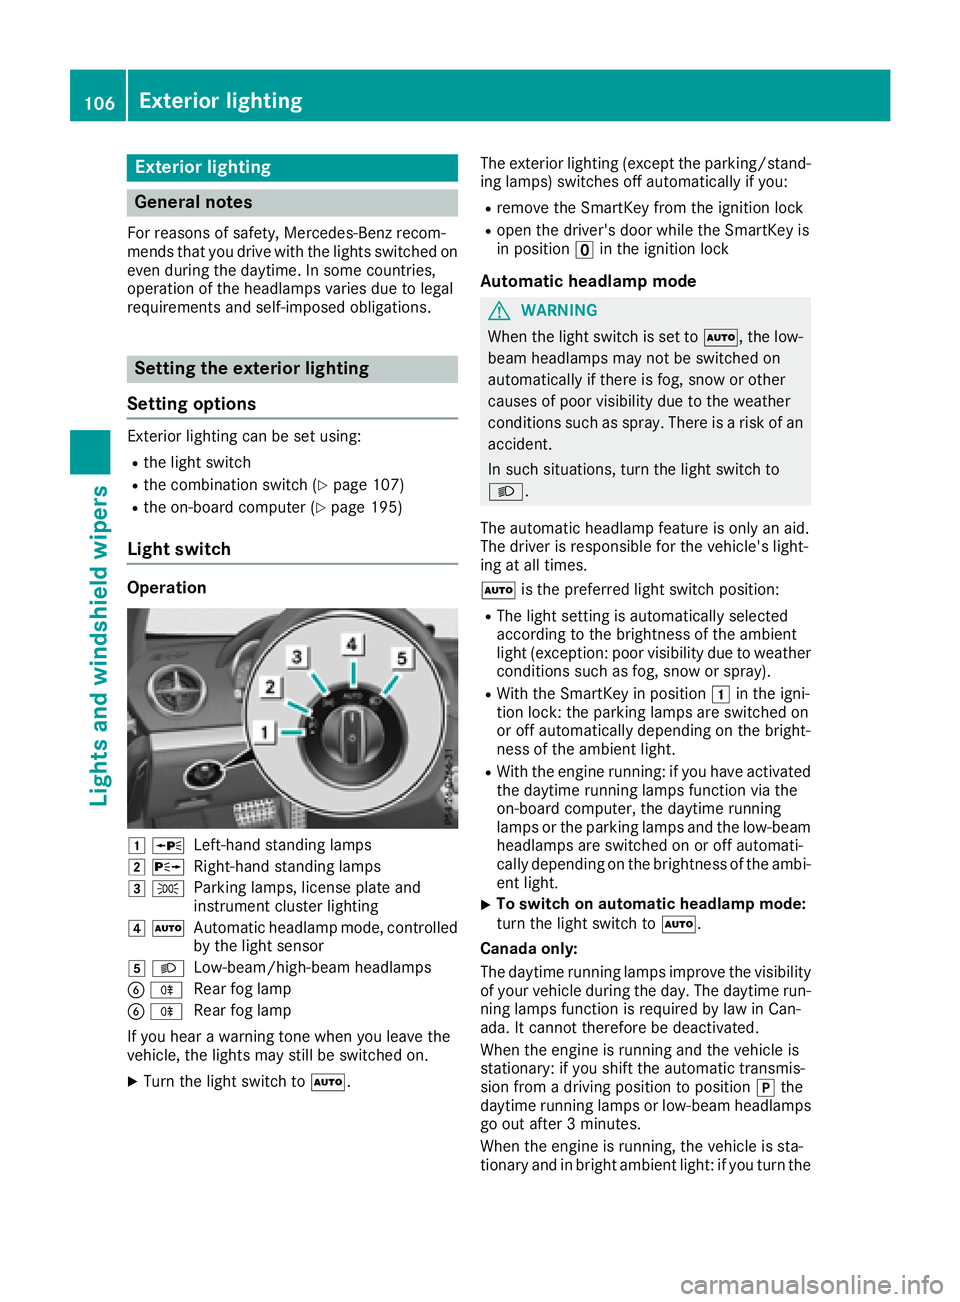
Operation
1 WLeft-hand standing lamps
2XRight-hand standing lamps
3TParking lamps, license plate and
instrument cluster lighting
4ÃAutomatic headlamp mode, controlled
by the light sensor
5 LLow-beam/high-beam headlamps
BRRear fog lamp
BRRear fog lamp
If you hear a warning tone when you leave the
vehicle, the lights may still be switched on.
XTurn the light switch to Ã. The exterior lighting (except the parking/stand-
ing lamps) switches off automatically if you:
Rremove the SmartKey from the ignition lock
Ropen the driver's door while the SmartKey is
in position uin the ignition lock
Automatic headlamp mode
GWARNING
When the light switch is set to Ã, the low-
beam headlamps may not be switched on
automatically if there is fog, snow or other
causes of poor visibility due to the weather
conditions such as spray. There is a risk of an
accident.
In such situations, turn the light switch to
L.
The automatic headlamp feature is only an aid.
The driver is responsible for the vehicle's light-
ing at all times.
à is the preferred light switch position:
RThe light setting is automatically selected
according to the brightness of the ambient
light (exception: poor visibility due to weather
conditions such as fog, snow or spray).
RWith the SmartKey in position 1in the igni-
tion lock: the parking lamps are switched on
or off automatically depending on the bright-
ness of the ambient light.
RWith the engine running: if you have activated
the daytime running lamps function via the
on-board computer, the daytime running
lamps or the parking lamps and the low-beam
headlamps are switched on or off automati-
cally depending on the brightness of the ambi-
ent light.
XTo switch on automatic headlamp mode:
turn the light switch to Ã.
Canada only:
The daytime running lamps improve the visibility of your vehicle during the day. The daytime run-
ning lamps function is required by law in Can
-
ada. It cannot therefore be deactivated.
When the engine is running and the vehicle is
stationary: if you shift the automatic transmis-
sion from a driving position to position jthe
daytime running lamps or low-beam headlamps
go out after 3 minutes.
When the engine is running, the vehicle is sta-
tionary and in bright ambient light: if you turn the
106Exterior lighting
Lights and windshield wipers
Page 109 of 322
light switch to theTposition, the daytime
running lamps and parking lamps switch on.
If the engine is running and you turn the light
switch to L, the manual settings take prec-
edence over the daytime running lamps.
USA only:
The daytime running lamps improve the visibility
of your vehicle during the day. To do this, the
daytime running lamps function must be
switched on using the on-board computer
(
Ypage 195).
If the engine is running and you turn the light
switch to TorL, the manual settings
take precedence over the daytime running
lamps.
Low-beam headlamps
GWARNING
When the light switch is set to Ã, the low-
beam headlamps may not be switched on
automatically if there is fog, snow or other
causes of poor visibility due to the weather
conditions such as spray. There is a risk of an
accident.
In such situations, turn the light switch to
L.
Even if the light sensor does not detect that it is
dark, the parking lamps and low-beam head-
lamps switch on when the ignition is switched on and the light switch is set to the Lposition.
This is a particularly useful function in the event
of rain and fog.
XTo switch on the low-beam headlamps:
turn the SmartKey to position 2in the igni-
tion lock or start the engine.
XTurn the light switch to L.
The green Lindicator lamp in the instru-
ment cluster lights up.
Parking lamps
!If the battery charge is very low, the parking
lamps or standing lamps are automatically
switched off to enable the next engine start.
Always park your vehicle safely and in a well lit
area, in accordance with the relevant legal
stipulations. Avoid using the Tparking
lamps over a period of several hours. If pos-
sible, switch on the right-hand Xor left-
hand W standing lamps.
XTo switch on: turn the light switch to T.
The green Tindicator lamp in the instru-
ment cluster lights up.
Standing lamps
Switching on the standing lamps ensures the
corresponding side of the vehicle is illuminated.
XTo switch on the standing lamps: the
SmartKey is not in the ignition lock or it is in
position uin the ignition lock.
XTurn the light switch to W(left-hand side of
the vehicle) or X(right-hand side of the
vehicle).
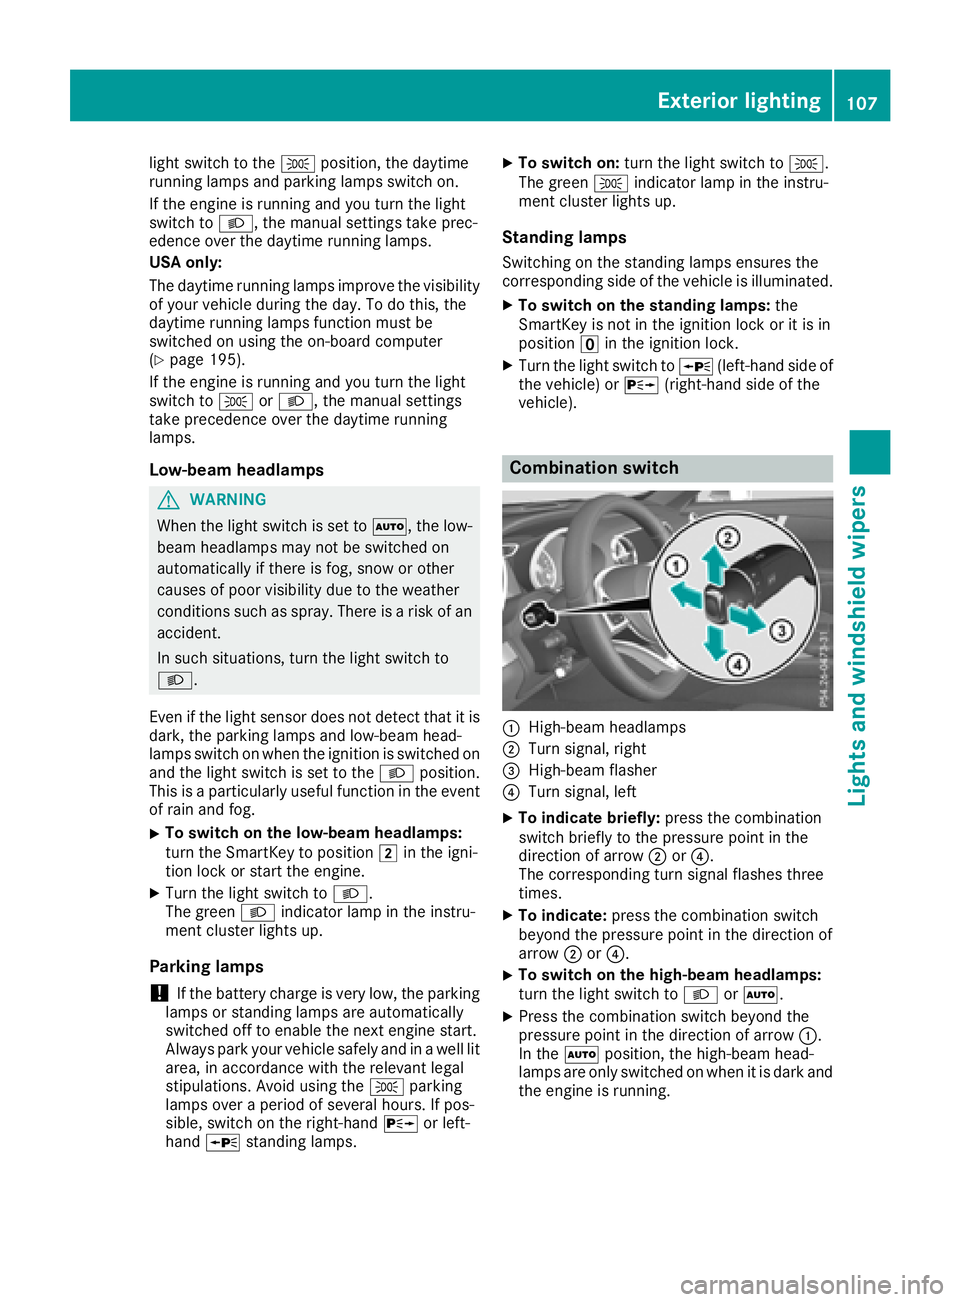
Combination switch
:High-beam headlamps
;Turn signal, right
=High-beam flasher
?Turn signal, left
XTo indicate briefly: press the combination
switch briefly to the pressure point in the
direction of arrow ;or?.
The corresponding turn signal flashes three
times.
XTo indicate: press the combination switch
beyond the pressure point in the direction of
arrow ;or?.
XTo switch on the high-beam headlamps:
turn the light switch to LorÃ.
XPress the combination switch beyond the
pressure point in the direction of arrow :.
In the Ãposition, the high-beam head-
lamps are only switched on when it is dark and
the engine is running.
Exterior lighting107
Lights and windshield wipers
Z
Page 110 of 322
The blueKindicator lamp in the instru-
ment cluster lights up when the high-beam
headlamps are switched on.
XTo switch off the high-beam headlamps:
move the combination switch back to its nor-
mal position.
The blue Kindicator lamp in the instru-
ment cluster goes out.
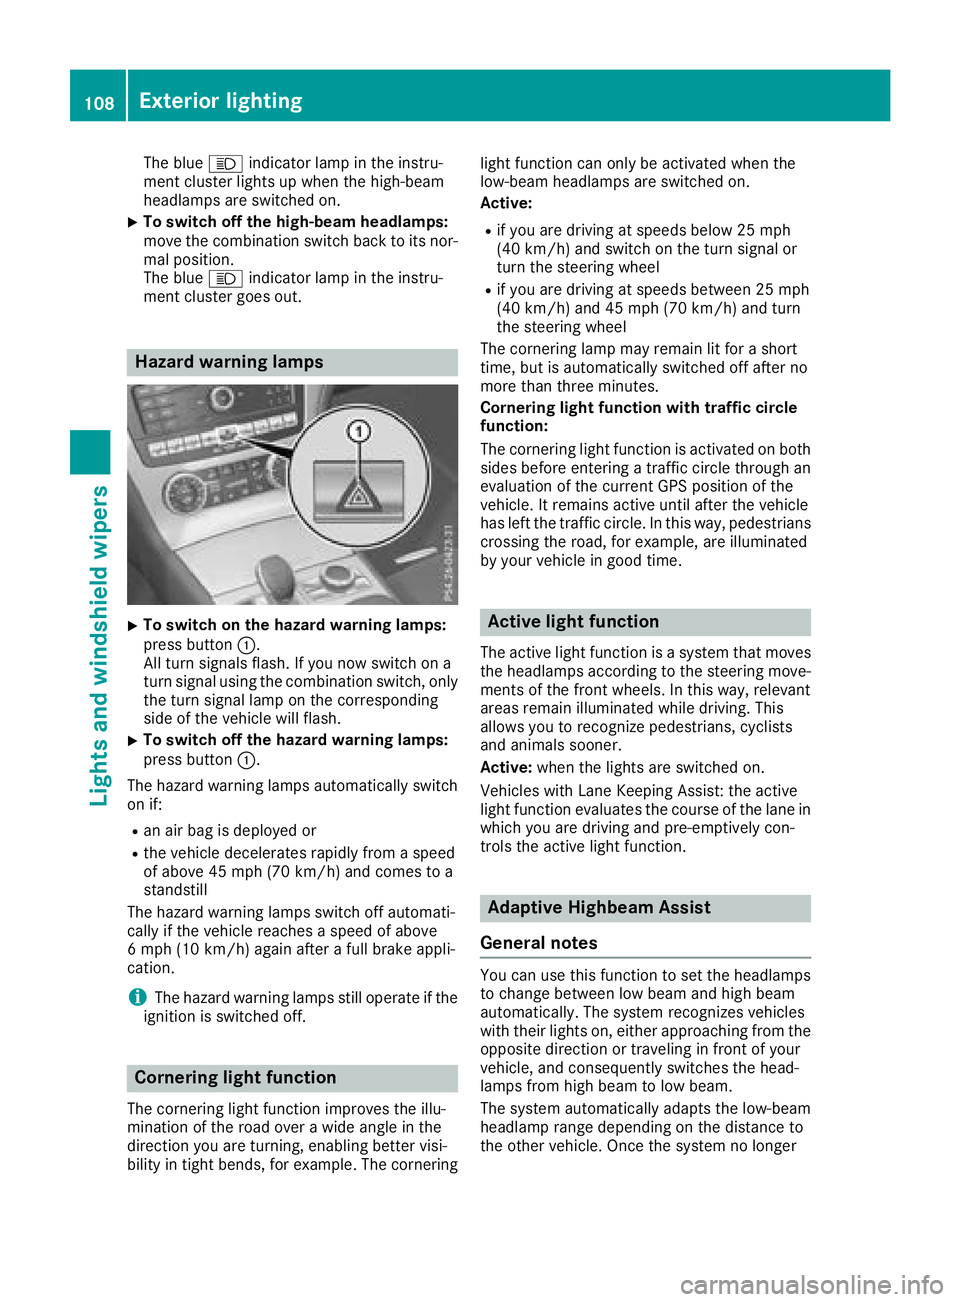
Hazard warning lamps
XTo switch on the hazard warning lamps:
press button :.
All turn signals flash. If you now switch on a
turn signal using the combination switch, only
the turn signal lamp on the corresponding
side of the vehicle will flash.
XTo switch off the hazard warning lamps:
press button :.
The hazard warning lamps automatically switch
on if:
Ran air bag is deployed or
Rthe vehicle decelerates rapidly from a speed
of above 45 mph (70 km/h) and comes to a
standstill
The hazard warning lamps switch off automati-
cally if the vehicle reaches a speed of above
6 mph (10 km/h) again after a full brake appli-
cation.
iThe hazard warning lamps still operate if the
ignition is switched off.
Cornering light function
The cornering light function improves the illu-
mination of the road over a wide angle in the
direction you are turning, enabling better visi-
bility in tight bends, for example. The cornering light function can only be activated when the
low-beam headlamps are switched on.
Active:
Rif you are driving at speeds below 25 mph
(40 km/h) and switch on the turn signal or
turn the steering wheel
Rif you are driving at speeds between 25 mph
(40 km/h) and 45 mph (70 km/h) and turn
the steering wheel
The cornering lamp may remain lit for a short
time, but is automatically switched off after no
more than three minutes.
Cornering light function with traffic circle
function:
The cornering light function is activated on both
sides before entering a traffic circle through an
evaluation of the current GPS position of the
vehicle. It remains active until after the vehicle
has left the traffic circle. In this way, pedestrians
crossing the road, for example, are illuminated
by your vehicle in good time.
Active light function
The active light function is a system that moves
the headlamps according to the steering move-
ments of the front wheels. In this way, relevant
areas remain illuminated while driving. This
allows you to recognize pedestrians, cyclists
and animals sooner.
Active: when the lights are switched on.
Vehicles with Lane Keeping Assist: the active
light function evaluates the course of the lane in
which you are driving and pre-emptively con-
trols the active light function.
Adaptive Highbeam Assist
General notes
You can use this function to set the headlamps
to change between low beam and high beam
automatically. The system recognizes vehicles
with their lights on, either approaching from the
opposite direction or traveling in front of your
vehicle, and consequently switches the head-
lamps from high beam to low beam.
The system automatically adapts the low-beam
headlamp range depending on the distance to
the other vehicle. Once the system no longer
108Exterior lighting
Lights and windshield wipers
Page 111 of 322
detects any other vehicles, it reactivates the
high-beam headlamps.
The system's optical sensor is located behind
the windshield near the overhead control panel.
Important safety notes
GWARNING
Adaptive Highbeam Assist does not recognize
road users:
Rwho have no lights, e.g. pedestrians
Rwho have poor lighting, e.g. cyclists
Rwhose lighting is blocked, e.g. by a barrier
On very rare occasions, Adaptive Highbeam
Assist may fail to recognize other road users
that have lights, or may recognize them too
late. In this, or in similar situations, the auto-
matic high-beam headlamps will not be deac-
tivated or will be activated regardless. There is a risk of an accident.
Always carefully observe the traffic conditions
and switch off the high-beam headlamps in
good time.
Adaptive Highbeam Assist cannot take into
account road, weather or traffic conditions.
Adaptive Highbeam Assist is only an aid. You are responsible for adjusting the vehicle's lighting
to the prevailing light, visibility and traffic con-
ditions.
In particular, the detection of obstacles can be
restricted if there is:
Rpoor visibility, e.g. due to fog, heavy rain or
snow
Rdirt on the sensors or the sensors are
obscured
Switching Adaptive Highbeam Assist
on/off
XTo switch on: turn the light switch to Ã.
XPress the combination switch beyond the
pressure point in the direction of arrow :.
The _ indicator lamp in the multifunction
display lights up when it is dark and the light
sensor activates the low-beam headlamps.
If you are driving at speeds above approx-
imately 16 mph (25 km/h): The headlamp range is set automatically
depending on the distance between the vehi-
cle and other road users.
If you are driving at speeds above approx-
imately 19 mph (30 km/
h)and no other road
users have been detected:
The high-beam headlamps are switched on
automatically. The Kindicator lamp in the
instrument cluster also lights up.
If you are driving at speeds below approx-
imately 16 mph (25 km/h) or other road users
have been detected or the roads are ade-
quately lit:
The high-beam headlamps are switched off
automatically. The Kindicator lamp in the
instrument cluster goes out. The _indi-
cator lamp in the multifunction display
remains lit.
XTo switch off: move the combination switch
back to its normal position or move the light
switch to another position.
The _ indicator lamp in the multifunction
display goes out.
Interior lighting
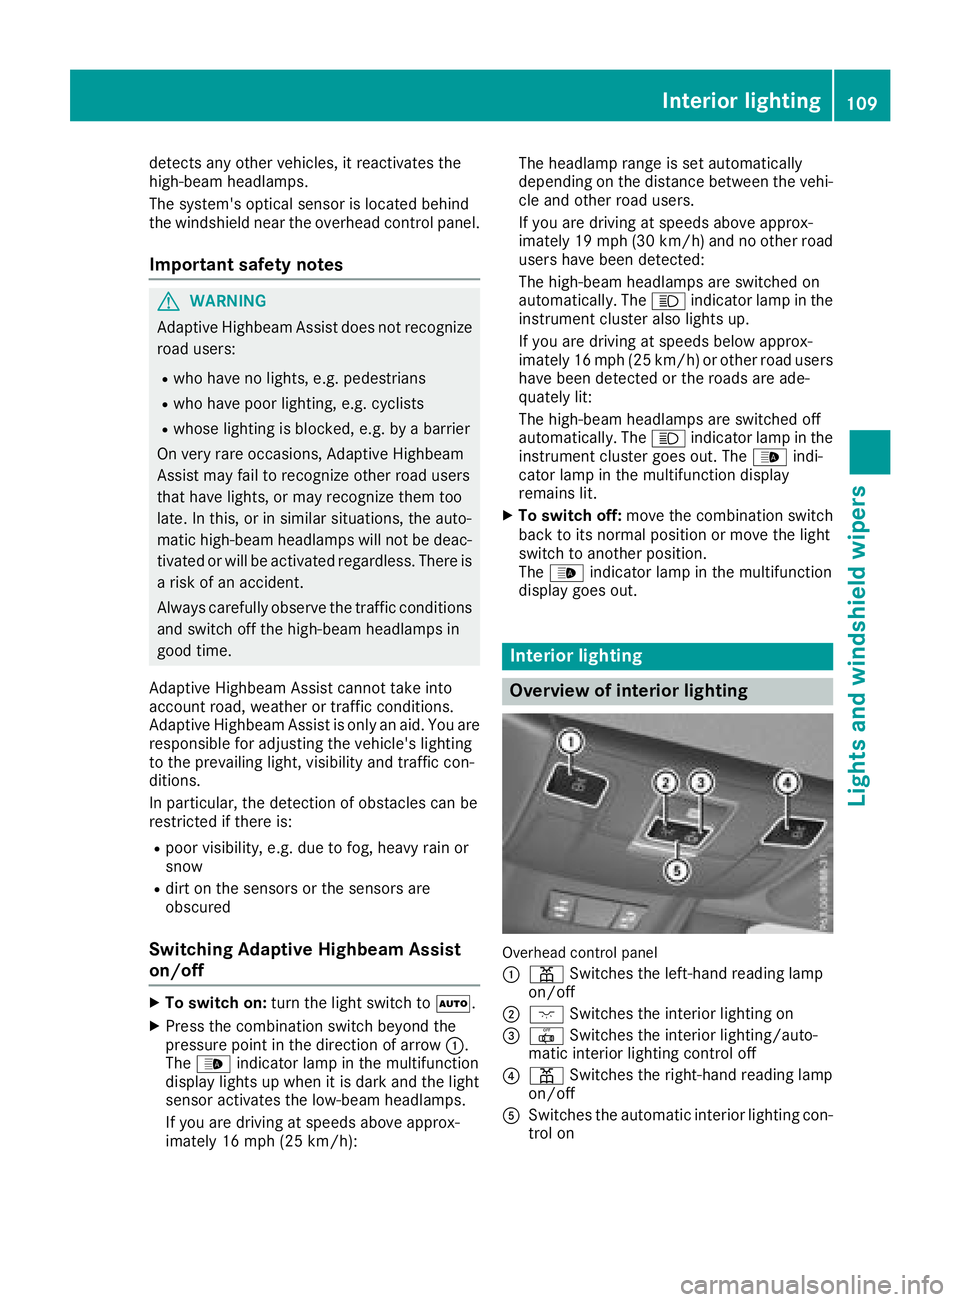
Overview of interior lighting
Overhead control panel
:
p Switches the left-hand reading lamp
on/off
;c Switches the interior lighting on
=|Switches the interior lighting/auto-
matic interior lighting control off
?p Switches the right-hand reading lamp
on/off
ASwitches the automatic interior lighting con-
trol on
Interior lighting109
Lights and windshield wipers
Z
Page 113 of 322
Replacing the wiper blades
Important safety notes
GWARNING
If the windshield wipers begin to move while
you are changing the wiper blades, you could be trapped by the wiper arm. There is a risk of
injury.
Always switch off the windshield wipers and
ignition before changing the wiper blades.
!To avoid damaging the wiper blades, make
sure that you touch only the wiper arm of the
wiper.
!Never open the hood if a windshield wiper
arm has been folded away from the wind-
shield.
Never fold a windshield wiper arm without a
wiper blade back onto the windshield.
Hold the windshield wiper arm firmly when
you change the wiper blade. If you release the
windshield wiper arm without a wiper blade
and it falls onto the windshield, the windshield
may be damaged by the force of the impact.
Mercedes-Benz recommends that you have
the wiper blades changed at a qualified spe-
cialist workshop.
!Always position the windshield wiper arms
vertically before folding them away from the
windshield. By doing so, you will avoid dam-
age to the hood.
Changing the windshield wiper blades
Moving the wiper arm to a vertical posi-
tion
On vehicles without KEYLESS-GO:
XTurn the SmartKey to position 1or2 in the
ignition lock.
XSet the windshield wiper to position °.
XWhen the wiper arms are vertical to the hood,
turn the SmartKey to positionuin the igni-
tion lock and remove it.
XFold the wiper arm away from the windshield
until you feel it engage. On vehicles with KEYLESS-GO:
XSwitch off the engine.
XRemove your foot from the brake pedal.
XSet the windshield wiper to the
°position.
XPress the Start/Stop button repeatedly until
the windshield wiper starts.
XWhen the wiper arms are in a vertical position
to the hood, press the Start/Stop button.
XFold the wiper arm away from the windshield
until you feel it engage.
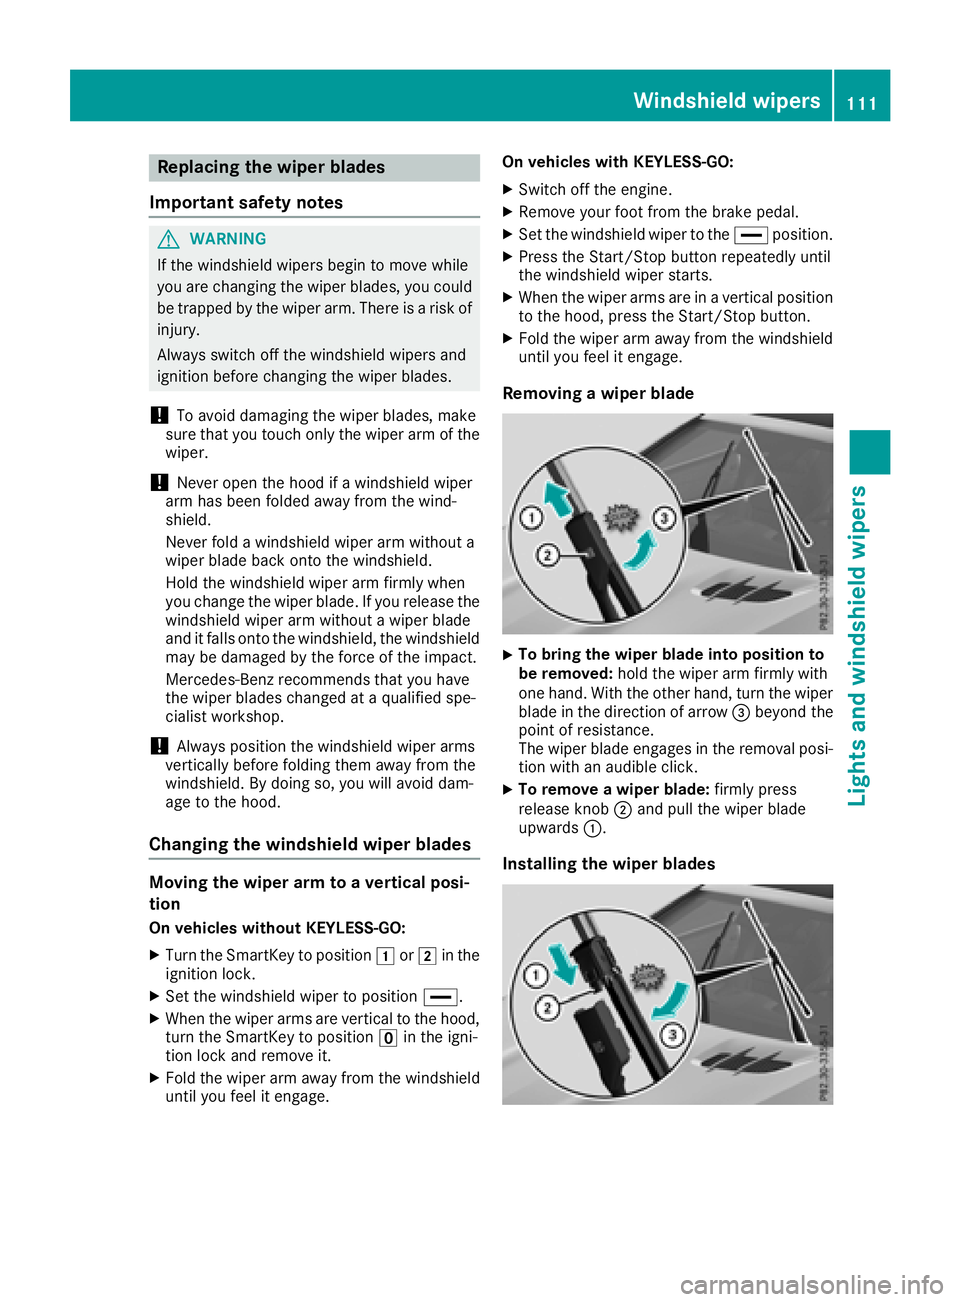
Removing a wiper blade
XTo bring the wiper blade into position to
be removed: hold the wiper arm firmly with
one hand. With the other hand, turn the wiper
blade in the direction of arrow =beyond the
point of resistance.
The wiper blade engages in the removal posi-
tion with an audible click.
XTo remove a wiper blade: firmly press
release knob ;and pull the wiper blade
upwards :.
Installing the wiper blades
Windshield wipers111
Lights and windshield wipers
Z
Page 121 of 322
side temperatures. When air-recirculation
mode is activated automatically, the indicator
lamp in thegbutton is not lit. Outside air
is added after about 30 minutes.
XTo deactivate: press thegbutton.
The indicator lamp in the gbutton goes
out.
iAir-recirculation mode deactivates auto-
matically:
Rafter approximately five minutes at outside
temperatures below approximately 41 ‡
(5 †)
Rafter approximately five minutes if cooling
with air dehumidification is deactivated
Rafter approximately 30 minutes at outside
temperatures above approximately 41 ‡
(5 †) if the "Cooling with air dehumidifica-
tion" function is activated
Switching the residual heat on or off
General notes
The residual heat function is only available on
vehicles for Canada.
It is possible to make use of the residual heat of
the engine to continue heating the stationary
vehicle for up to 30 minutes after the engine has
been switched off. The heating time depends on
the set interior temperature.
Activating/deactivating
XTurn the SmartKey to position uin the igni-
tion lock or remove it (Ypage 122).
XTo activate: press theÌbutton.
The indicator lamp in the Ìbutton lights
up.
iThe blower will run at a low speed regardless
of the airflow setting.
iIf you activate the residual heat function at
high temperatures, only the ventilation will be
activated. The blower runs at medium speed.
XTo deactivate: press theÌbutton.
The indicator lamp in the Ìbutton goes
out.
Residual heat is deactivated automatically:
Rafter approximately 30 minutes
Rwhen the ignition is switched on
Rif the battery voltage drops
Setting the air vents
Important safety notes
GWARNING
Very hot or very cold air can flow from the air
vents. This could result in burns or frostbite in
the immediate vicinity of the air vents. There
is a risk of injury.
Make sure that all vehicle occupants always
maintain a sufficient distance to the air out-
lets. If necessary, redirect the airflow to
another area of the vehicle interior.
GWARNING
When AIRSCARF is switched on, very hot air
can flow from the vents in the head restraints. This could result in burns in the immediate
vicinity of the air vents. There is a risk of injury.
Reduce the heater output before it becomes
too hot.
In order to ensure the direct flow of fresh air
through the air vents into the vehicle interior,
please observe the following notes:
Rkeep the air inlet grille on the hood and in the engine compartment on the front-passenger
side free of blockages, such as ice, snow or
leaves.
Rnever cover the air vents or air intake grilles in
the vehicle interior.
iYou can move the adjusters for the air vents
vertically or horizontally to set the direction of
the airflow.
iFor optimal climate control in the vehicle,
open the air vents completely and set the
adjusters to the central position.
Setting the air vents119
Climate control
Z
Page 125 of 322
the vehicle. This occurs, for example, when
starting the engine.
To start the vehicle without actively using the
SmartKey:
Rthe Start/Stop button must be inserted in the
ignition lock.
Rthe SmartKey must be in the vehicle.
Rthe vehicle must not be locked with the
SmartKey or KEYLESS-GO (Ypage 73).
Do not keep the SmartKey:
Rwith electronic devices, e.g. a mobile phone
or another SmartKey.
Rwith metallic objects, e.g. coins or metal foil.
Rinside metallic objects, e.g. a metal case.
This can impair the functionality of the KEY-
LESS-GO key.
If you lock the vehicle with the SmartKey's
remote control or with KEYLESS-GO, after a
short time:
Ryou will not be able to switch on the ignition
with the Start/Stop button.
Ryou will not be able to start the engine with the
Start/Stop button until the vehicle is
unlocked again.
The engine can be switched off while the vehicle
is in motion by pressing and holding the Start/
Stop button for three seconds. This function
operates independently of the ECO start/stop
automatic engine switch-off function.
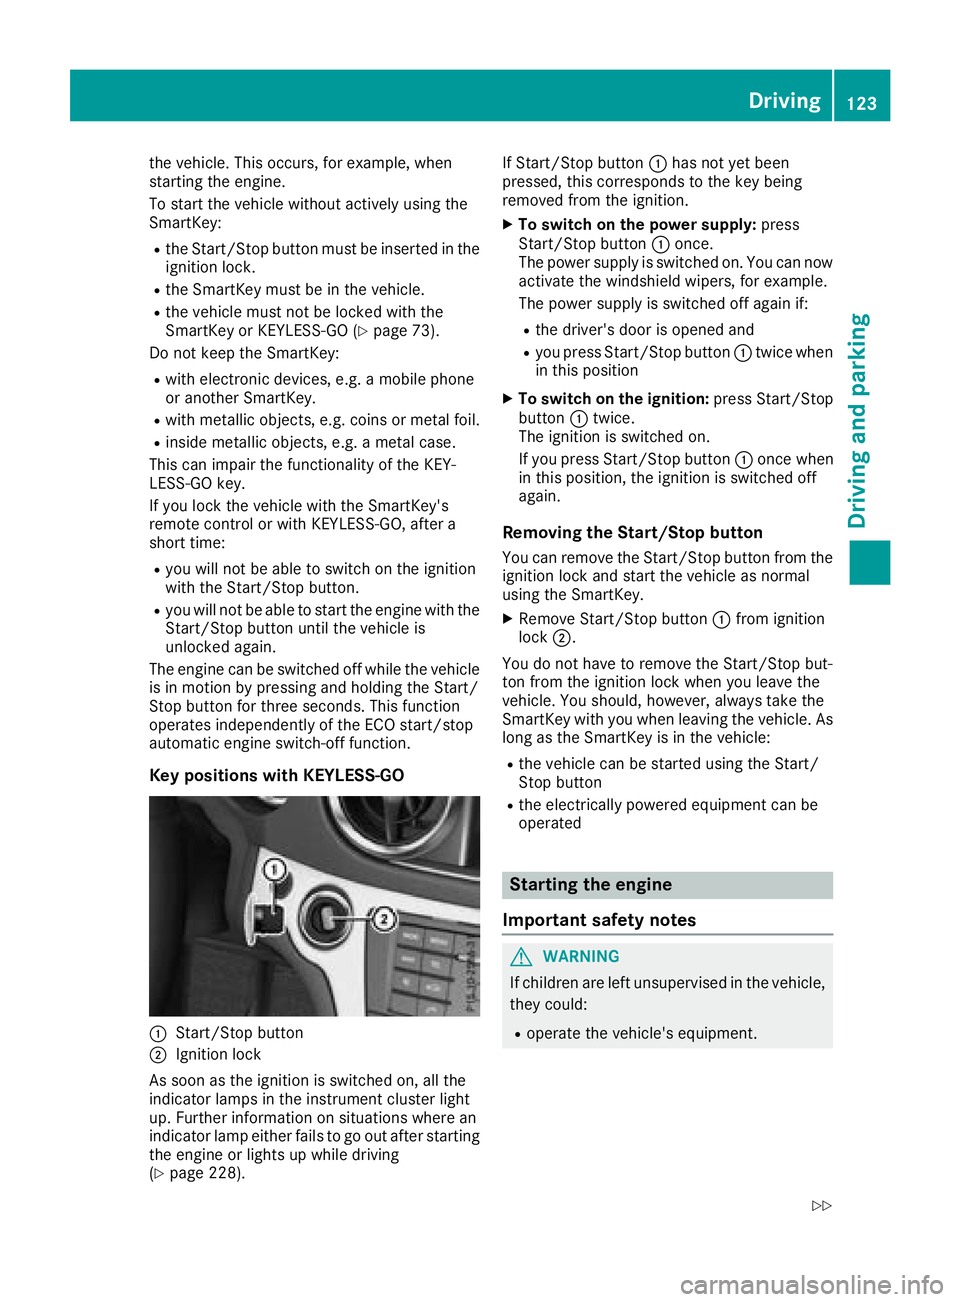
Key positions with KEYLESS-GO
:Start/Stop button
;Ignition lock
As soon as the ignition is switched on, all the
indicator lamps in the instrument cluster light
up. Further information on situations where an
indicator lamp either fails to go out after starting
the engine or lights up while driving
(
Ypage 228). If Start/Stop button
:has not yet been
pressed, this corresponds to the key being
removed from the ignition.
XTo switch on the power supply: press
Start/Stop button :once.
The power supply is switched on. You can now activate the windshield wipers, for example.
The power supply is switched off again if:
Rthe driver's door is opened and
Ryou press Start/Stop button :twice when
in this position
XTo switch on the ignition: press Start/Stop
button :twice.
The ignition is switched on.
If you press Start/Stop button :once when
in this position, the ignition is switched off
again.
Removing the Start/Stop button
You can remove the Start/Stop button from the
ignition lock and start the vehicle as normal
using the SmartKey.
XRemove Start/Stop button :from ignition
lock ;.
You do not have to remove the Start/Stop but-
ton from the ignition lock when you leave the
vehicle. You should, howe
ver, always take the
SmartKey with you when leaving the vehicle. As
long as the SmartKey is in the vehicle:
Rthe vehicle can be started using the Start/
Stop button
Rthe electrically powered equipment can be
operated
Starting the engine
Important safety notes
GWARNING
If children are left unsupervised in the vehicle,
they could:
Roperate the vehicle's equipment.
Driving123
Dr iving an d parking
Z
Page 137 of 322
Vehicles with adaptive adjustable damp-
ing: drive program E (Economy)
Drive programEis characterized by the follow-
ing:
Rthe vehicle exhibits comfortable, economical
handling characteristics.
Rthe vehicle pulls away more gently in forward
and reverse gears, unless the accelerator
pedal is depressed fully.
Roptimal fuel consumption resulting from the
automatic transmission shifting up sooner.
The vehicle is driven in the low engine speed
range and the wheels are less likely to spin.
Rthe suspension exhibits comfortable damping
settings.
Rthe steering exhibits a comfortable steering
curve.
Rduring deceleration, the engine is disconnec- ted from the drive train. The vehicle uses
kinetic energy and consumes less fuel (coast-
ing mode).
RESP®provides the optimum compromise
between traction and stability. For further
information about ESP
®, see (Ypage 66).
Vehicles with Active Body Control: drive
program CURVE
CURVE drive program is characterized by the
following:
Rincreased driving comfort on bends.
Rthe vehicle tilts actively into the bend. Further
information on the cornering function
(
Ypage 164).
Rthe vehicle exhibits comfortable, economical
handling characteristics.
Rthe vehicle pulls away more gently in forward
and reverse gears, unless the accelerator
ped
al is depressed fully.
Rcomfortable suspension setting.
Rthe steering exhibits a comfortable steering
curve.
Roptimal fuel consumption resulting from the
automatic transmission shifting up sooner.
Rthe automatic transmission shifting up
sooner. This results in the vehicle being driven
at lower engine speeds and the wheels being
less likely to spin.
Rduring deceleration, the engine is disconnec-
ted from the drive train. The vehicle uses kinetic energy and consumes less fuel (coast-
ing mode).
RESP®provides the optimum compromise
between traction and stability. For further
information about ESP
®, see (Ypage 66).
Mercedes-AMG vehicles
RACE drive program
The RACE drive program is characterized by the
following:
Rthe vehicle exhibits driving characteristics
suitable for the racetrack.
Rall vehicle systems are set for maximum
sportiness.
Rthe gearshift recommendation gives you
information for slowly warming up the drive
assemblies and for adopting a fuel-efficient
driving style (
Ypage 136). You can follow the
gearshift recommendations at all times and
shift gear accordingly using the steering
wheel paddle shifters. On the basis of the
gearshift recommendation, using the steering
wheel paddle shifters, you can optimize the
drive train and engine operating mode at any
time.
Rif you have selected a gear manually, this will
be maintained until the vehicle speed increa-
ses or decreases dramatically.
Rthe vehicle pulls away in first gear.
Rthe automatic transmission shifts up later, the
fuel consumption possibly being higher as a
result of the later automatic transmission
shift points.
Rthe suspension exhibits particularly firm
damping settings.
Rgliding mode is not available.
Rthe ECO start/stop function is not available.
RESP®switches to SPORT handling mode. The
M SPORT handling mode warning lamp in
the instrument cluster lights up. The SPORT
HandlingModemessage appears in the mul-
tifunction display. Observe the important
safety notes for the SPORT handling mode
(
Ypage 67).
RESP®only improves driving stability to a limi-
ted degree. The engine's torque is only
restricted to a limited degree and the drive
wheels can spin. For further information
about ESP
®, see (Ypage 67).
Automatic transmission135
Driving and parking
Z