2018 MERCEDES-BENZ GLS SUV belt
[x] Cancel search: beltPage 210 of 398
The attention level evaluation is deleted and
restarts when the journey is continued, if:
Ryou switch off the engine
Ryou take off your seat belt and open the driv-
er's door, e.g. for a change of drivers or to
take a break
Displaying the attention level
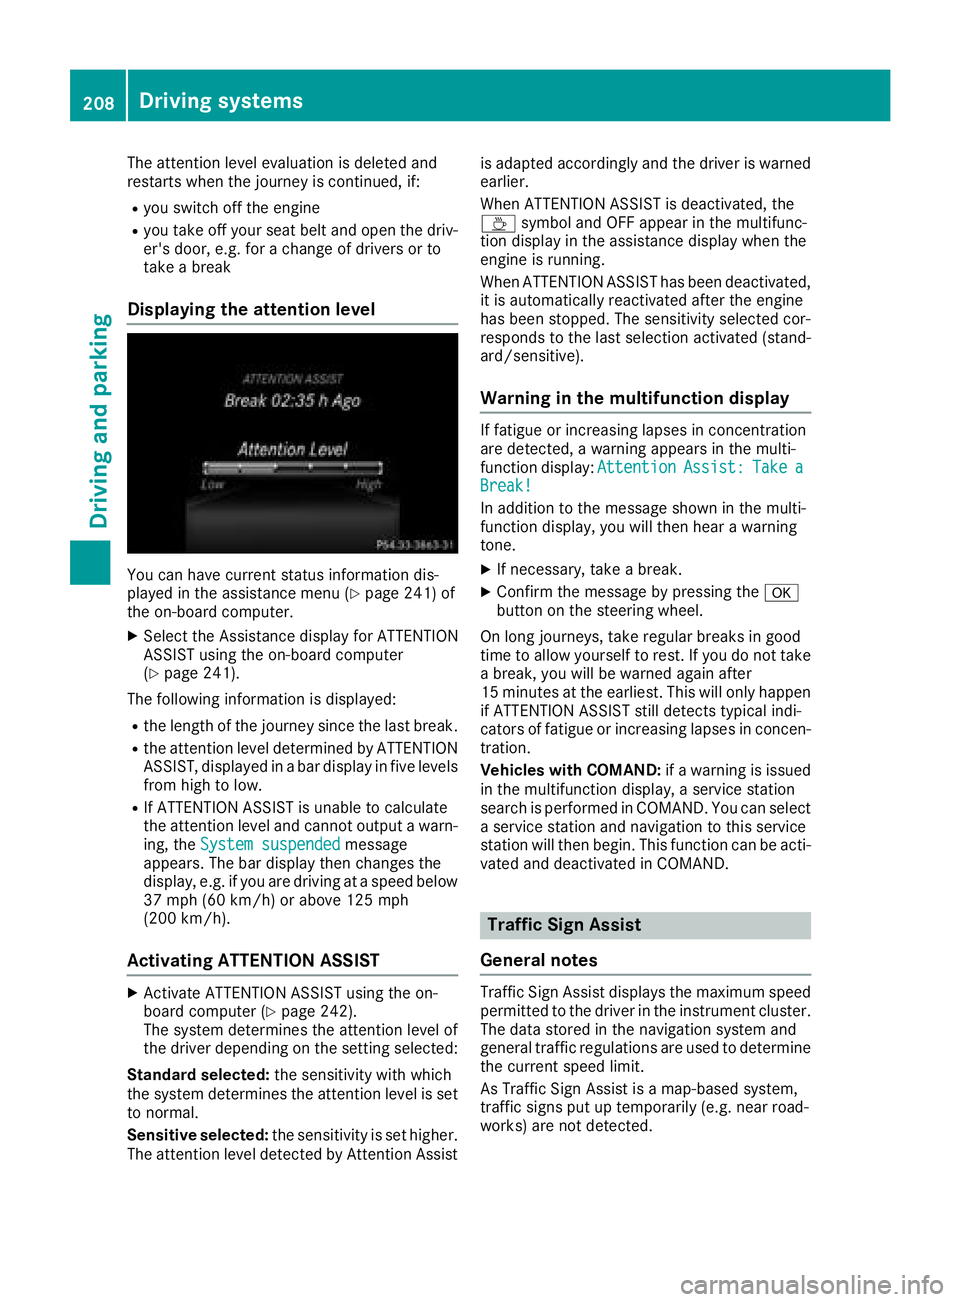
You can have current status information dis-
played in the assistance menu (Ypage 241) of
the on-board computer.
XSelect the Assistance display for ATTENTION
ASSIST using the on-board computer
(
Ypage 241).
The following information is displayed:
Rthe length of the journey since the last break.
Rthe attention level determined by ATTENTION
ASSIST, displayed in a bar display in five levels
from high to low.
RIf ATTENTION ASSIST is unable to calculate
the attention level and cannot output a warn-
ing, the System suspended
message
appears. The bar display then changes the
display, e.g. if you are driving at a speed below
37 mph (60 km/h) or above 125 mph
(200 km/h) .
Activating ATTENTION ASSIST
XActivateATTENTION ASSIST usin gth eon -
boar dcomputer (Ypage 242).
The system determine sth eattention level of
th edriver depending on th esetting selected:
Standar dselected: thesensitivit ywit hwhic h
th esystem determine sth eattention level is set
to normal.
Sensitive selected: thesensitivit yis set higher.
The attention level detecte dby Attention Assis tis adapted accordingly and th
edriver is warned
earlier .
When ATTENTION ASSIST is deactivated, th e
À symbol and OF Fappear in th emultifunc-
tion display in th eassistanc edisplay when th e
engin eis running.
When ATTENTION ASSIST has been deactivated,
it is automatically reactivated after th eengin e
has been stopped. The sensitivit yselected cor-
responds to th elast selection activated (stand -
ard/sensitive).
Warn ing in the multifunction display
If fatigue or increasing lapse sin concentration
are detected, awarning appear sin th emulti-
function display: Attention
Assist:TakeaBreak!
In addition to th emessage shown in th emulti-
function display, you will then hear awarning
tone .
XIf necessary, tak e abreak.
XConfir mthemessage by pressing th ea
butto non th esteering wheel.
On lon gjourneys, tak eregular breaks in goo d
time to allow yourself to rest. If you do no ttak e
a break, you will be warned again after
15 minute sat th eearliest .This will only happe n
if ATTENTION ASSIST still detects typical indi-
cators of fatigue or increasing lapse sin concen -
tration .
Vehicles wit hCOMAND: ifawarning is issued
in th emultifunction display, aservic estation
search is performed in COMAND .You can select
a servic estation and navigation to this servic e
station will then begin. This function can be acti-
vated and deactivated in COMAND .
Traffic Sign Assist
Genera l notes
Traffic Sig nAssis tdisplays th emaximum spee d
permitte dto th edriver in th einstrumen tcluster.
The dat astore din th enavigation system and
general traffic regulation sare used to determine
th ecurren tspee dlimit.
As Traffic Sig nAssis tis amap-base dsystem,
traffic sign sput up temporarily (e.g. near road -
works )are no tdetected.
208Driving systems
Driving and parking
Page 246 of 398
RHighway mode
RActive light function
RCornering light function
RExtended range fog lamps
ROff-road lights
Further information on the Intelligent Light Sys-
tem (
Ypage 117).
Vehicle submenu
Activating/deactivating the automatic
door locking mechanism
If you activate the AutomaticDoorLockfunc-
tion, the vehicle is centrally locked above a
speed of approximately 9 mph (15 km/h).
XPress the =or; button on the steering
wheel to select the Sett.menu.
XPress the:or9 button to select the
Vehiclesubmenu.
XPress ato confirm.
XPress the :or9 button to select the
Automatic Door Lockfunction.
When the Automatic Door Lockfunction is
activated, the vehicle doors are displayed in
orange in the multifunction display.
XPress the abutton to save the setting.
For further information on the automatic locking
feature, see (
Ypage 84).
Activating/deactivating the acoustic
locking verification signal
If you switch on the AcousticLockfunction, an
acoustic signal sounds when you lock the vehi-
cle.
XPress the =or; button on the steering
wheel to select the Settingsmenu.
XPress the:or9 button to select the
Vehiclesubmenu.
XPress ato confirm.
XPress the :or9 button to select the
Acoustic Lockfunction.
If the Acoustic Lockfunction is activated,
the & symbol in the multifunction display
lights up orange.
XPress the abutton to save the setting.
Convenience submenu
Activating/deactivating the EASY-
ENTRY/EXIT feature
GWARNING
When the EASY-ENTRY/EXIT feature adjusts
the steering wheel, you and other vehicle
occupants – particularly children – could
become trapped. There is a risk of injury.
While the EASY-ENTRY/EXIT feature is mak-
ing adjustments, make sure that no one has
any body parts in the sweep of the steering
wheel.
If somebody becomes trapped:
Rpress one of the memory function position
buttons, or
Rmove the switch for steering wheel adjust-
ment in the opposite direction to that in
which the steering wheel is moving.
The adjustment process is stopped.
XPress the =or; button on the steering
wheel to select the Sett.menu.
XPress the:or9 button to select the
Conveniencesubmenu.
XPress ato confirm.
XUsing :or9, select the EasyEntry/Exitfunction.
If the EasyEntry/Exitfunction is activated,
the vehicle steering wheel is displayed in
orange in the multifunction display.
XPress the abutton to save the setting.
Further information on the EASY-ENTRY/EXIT
feature (
Ypage 109).
Switching the seat belt adjustment on/off
XPress the =or; button on the steering
wheel to select the Settingsmenu.
XPress the:or9 button to select the
Conveniencesubmenu.
XPress ato confirm.
XPress the :or9 button to select the
Belt Adjustmentfunction.
If the BeltAdjustmentfunction is activated,
the vehicle seat belt is shown in orange in the
multifunction display.
XPress the abutton to save the setting.
244Menus and submenus
On-board computer and displays
Page 247 of 398
For further information on belt adjustment, see
(Ypage 48).
Switching the fold-in mirrors when lock-
ing feature on/off
This function is only available when the vehicle is
equipped with the electrical fold-in function.
When you activate theAuto.
MirrorFoldingfunction, the exterior mirrors are folded in when
the vehicle is locked. The exterior mirrors fold
out automatically again as soon as you unlock
the vehicle.
XPress the =or; button on the steering
wheel to select the Sett.menu.
XPress the:or9 button to select the
Conveniencesubmenu.
XPress ato confirm.
XPress the :or9 button to select the
Auto. Mirror Foldingfunction.
If the Auto. Mirror Foldingfunction is
switched on, the multifunction display shows
the exterior mirror in orange.
XPress the abutton to save the setting.
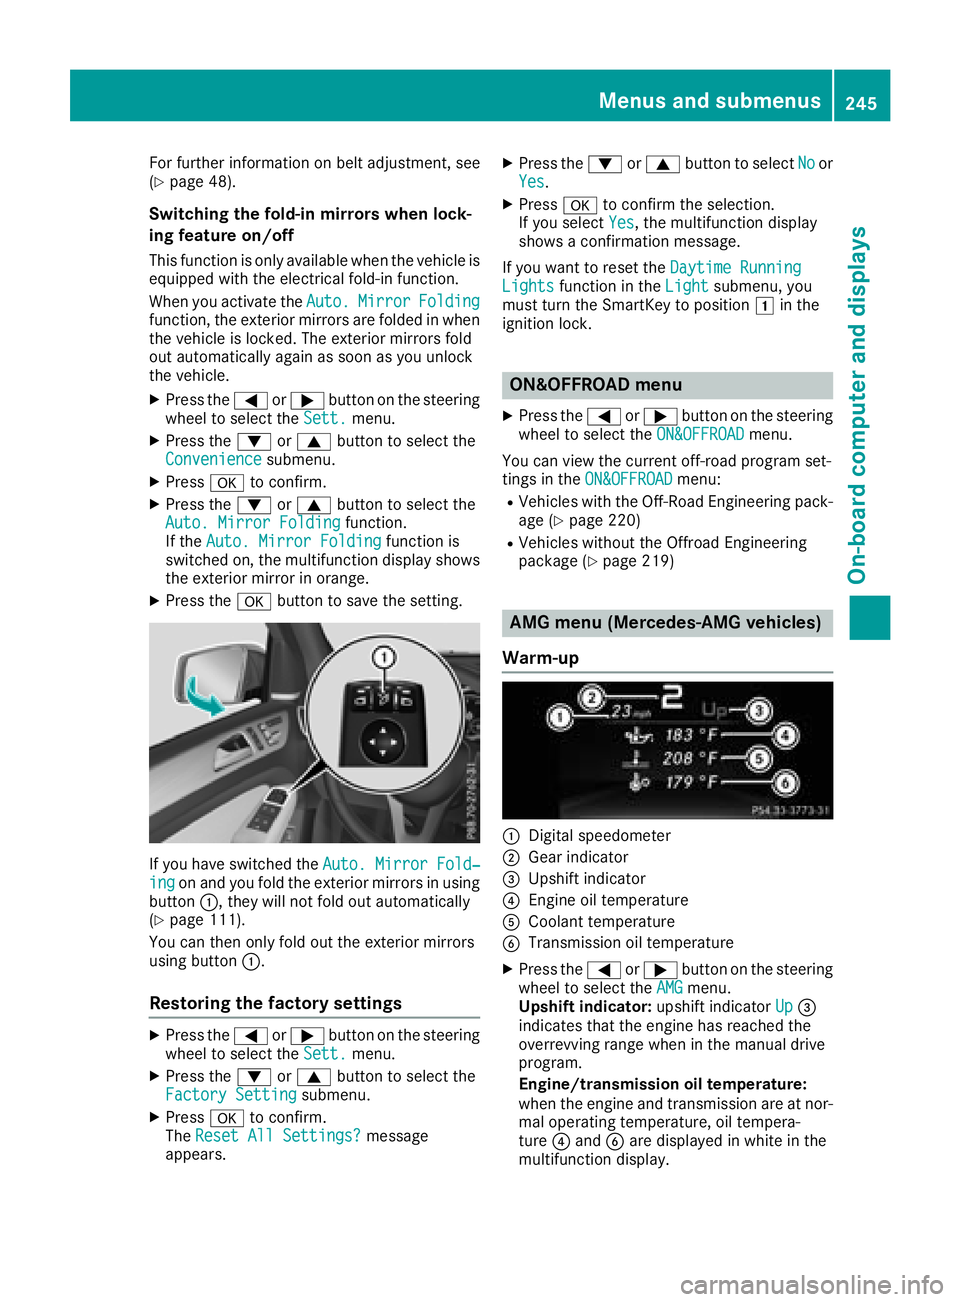
If you have switched the Auto. Mirror Fold‐ingon and you fold the exterior mirrors in using
button :, they will not fold out automatically
(
Ypage 111).
You can then only fold out the exterior mirrors
using button :.
Restoring the factory settings
XPress the=or; button on the steering
wheel to select the Sett.menu.
XPress the:or9 button to select the
Factory Settingsubmenu.
XPress ato confirm.
The Reset All Settings?message
appears.
XPress the :or9 button to select Noor
Yes.
XPress ato confirm the selection.
If you select Yes, the multifunction display
shows a confirmation message.
If you want to reset the Daytime Running
Lightsfunction in theLightsubmenu, you
must turn the SmartKey to position 1in the
ignition lock.
ON&OFFROAD menu
XPress the =or; button on the steering
wheel to select the ON&OFFROADmenu.
You can view the current off-road program set-
tings in the ON&OFFROAD
menu:
RVehicles with the Off-Road Engineering pack-
age (Ypage 220)
RVehicles without the Offroad Engineering
package (Ypage 219)
AMG menu (Mercedes-AMG vehicles)
Warm-up
:Digital speedometer
;Gear indicator
=Upshift indicator
?Engine oil temperature
ACoolant temperature
BTransmission oil temperature
XPress the =or; button on the steering
wheel to select the AMGmenu.
Upshift indicator: upshift indicatorUp=
indicates that the engine has reached the
overrevving range when in the manual drive
program.
Engine/transmission oil temperature:
when the engine and transmission are at nor-
mal operating temperature, oil tempera-
ture ?and Bare displayed in white in the
multifunction display.
Menus and submenus245
On-board computer and displays
Z
Page 264 of 398
Display messagesPossible causes/consequences andMSolutions
?
CoolantToo HotSto pVehicl eTur nEngine Off
The coolan tis to ohot .
A warning tone also sounds.
GWARNIN G
Do no tdrive when your engin eis overheated. This can caus esom e
fluids whic hmay hav eleaked int oth eengin ecompartmen tto catch
fire.
Steam from th eoverheate dengin ecan also caus eserious burn swhic h
can occur jus tby opening th ehood.
There is aris kof injury.
XPull ove rand stop th evehicl esafely and switch off th eengine, pay-
ing attention to roa dand traffic conditions.
XSecur eth evehicl eagainst rollin gaway (Ypage 161).
XWait until th eengin ehas cooled down .
XMakesur ethat th eair supply to th eengin eradiato ris no tblocked,
e.g. by snow, slus hor ice .
XDo no tstart th eengin eagain until th edisplay message goe sout and
th ecoolan ttemperature is belo w24 8 ‡ (120†). Otherwise ,th e
engin ecould be damaged.
XPay attention to th ecoolan ttemperature gauge .
If th etemperatur eincreases again:
XVisit aqualified specialist workshop immediately.
Under normal operating condition sand wit hth especified coolan t
level, th ecoolan ttemperature may ris eto 24 8 ‡(120†).
#
See Operator' sMan ‐ual
The battery is no tbein gcharged.
A warning tone also sounds.
Possibl ecauses are:
Radefective alternato r
Ratorn poly-V-belt
Ramalfunction in th eelectronics
!Do no tcontinu edriving. The engin ecould otherwise overheat.
XPull ove rand stop th evehicl esafely and switch off th eengine, pay-
ing attention to roa dand traffic conditions.
XSecur eth evehicl eagainst rollin gaway (Ypage 161).
XConsult aqualified specialist workshop .
262Display messages
On-board computer and displays
Page 282 of 398
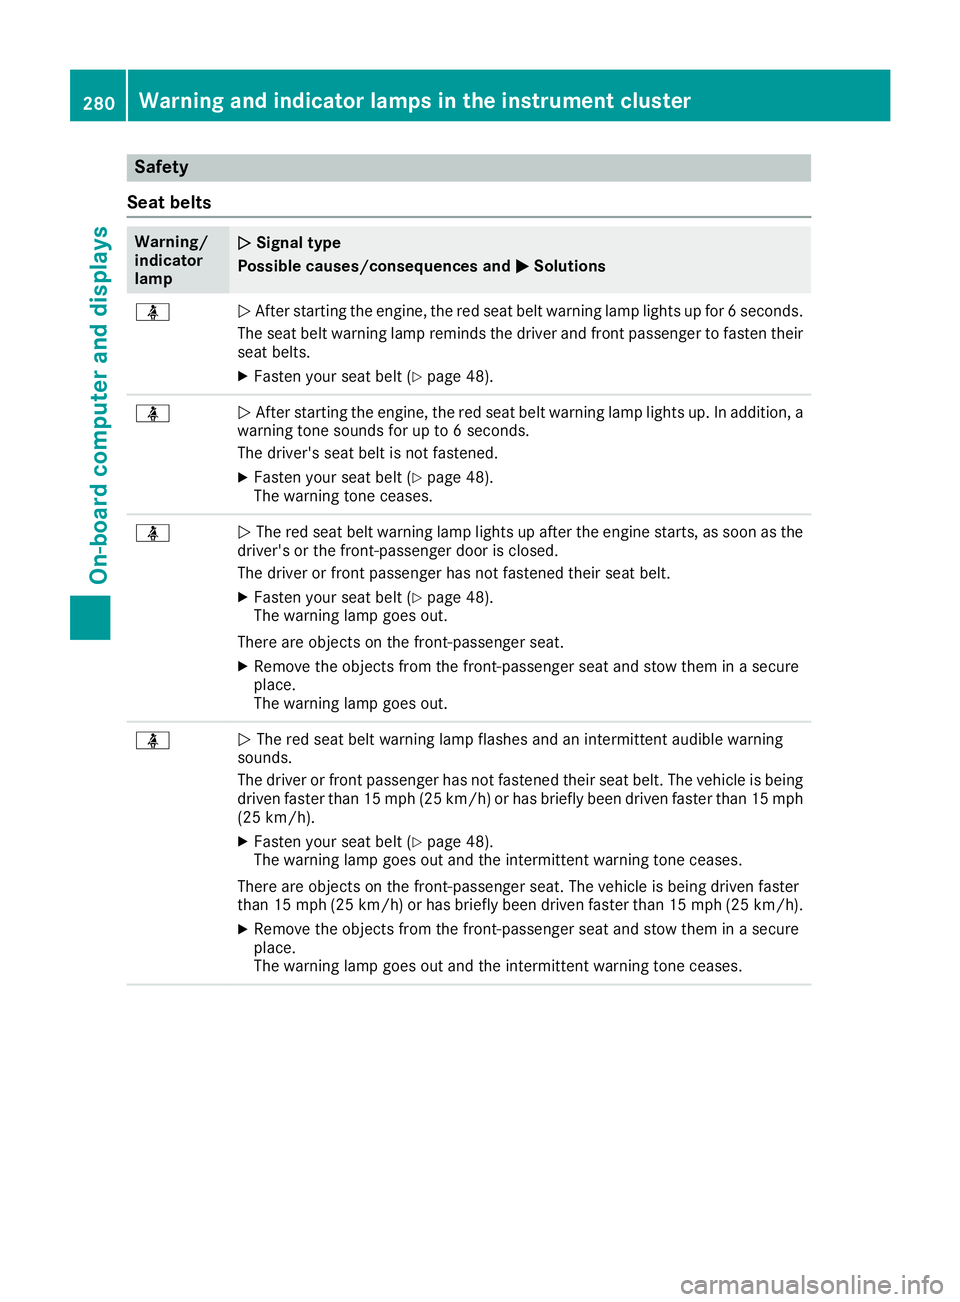
Safety
Seat belts
Warning/
indicator
lampNSignal type
Possible causes/consequences and M
Solutions
üNAfter starting the engine, the red seat belt warning lamp lights up for 6 seconds.
The seat belt warning lamp reminds the driver and front passenger to fasten their
seat belts.
XFasten your seat belt (Ypage 48).
üN After starting the engine, the red seat belt warning lamp lights up. In addition, a
warning tone sounds for up to 6 seconds.
The driver's seat belt is not fastened.
XFasten your seat belt (Ypage 48).
The warning tone ceases.
üN The red seat belt warning lamp lights up after the engine starts, as soon as the
driver's or the front-passenger door is closed.
The driver or front passenger has not fastened their seat belt.
XFasten your seat belt (Ypage 48).
The warning lamp goes out.
There are objects on the front-passenger seat.
XRemove the objects from the front-passenger seat and stow them in a secure
place.
The warning lamp goes out.
üN The red seat belt warning lamp flashes and an intermittent audible warning
sounds.
The driver or front passenger has not fastened their seat belt. The vehicle is being driven faster than 15 mph (25 km/h) or has briefly been driven faster than 15 mph
(25 km/h).
XFasten your seat belt (Ypage 48).
The warning lamp goes out and the intermittent warning tone ceases.
There are objects on the front-passenger seat. The vehicle is being driven faster
than 15 mph (25 km/h) or has briefly been driven faster than 15 mph (25 km/h).
XRemove the objects from the front-passenger seat and stow them in a secure
place.
The warning lamp goes out and the intermittent warning tone ceases.
280Warning and indicator lamps in the instrument cluster
On-board computer and displays
Page 306 of 398
wards, e.g. when braking suddenly or in the
event of an accident.
RThe vehicle occupant would thereby be
pushed into the seat belt by the rear bench
seat/rear seat or by the seat backrest. The
seat belt can no longer offer the intended
level of protection and could even cause
injuries.
RObjects or loads in the trunk/cargo com-
partment cannot be restrained by the seat
backrest.
There is an increased risk of injury.
Before every trip, make sure that the seat
backrests and the rear bench seat/rear seat
are engaged.
Make sure that the seat backrest and the seat
cushion are correctly engaged in position. To do so, pull firmly on the seat backrest.
!Release and fold the seat cushion upwards
before folding the rear bench seat forward.
Otherwise, the backrests may be damaged.
When the backrest is folded forwards, the
front seats cannot be moved to their rearmost
position. Otherwise, the front seats and the
rear bench seat could be damaged.
!The backrest is heavy. Therefore, take care
when folding it down. Make sure that the head restraints are pushed all the way in so that the
backrests and seat cushions are not dam-
aged.
Observe the loading guidelines (
Ypage 300).
The left-hand and right-hand backrests in the
second row of seats can be folded forward sep-
arately to increase the cargo compartment
capacity.
On vehicles with a third row of seats, you must
fold down the third row of seats beforehand
(
Ypage 101) to obtain maximum cargo com-
partment enlargement.
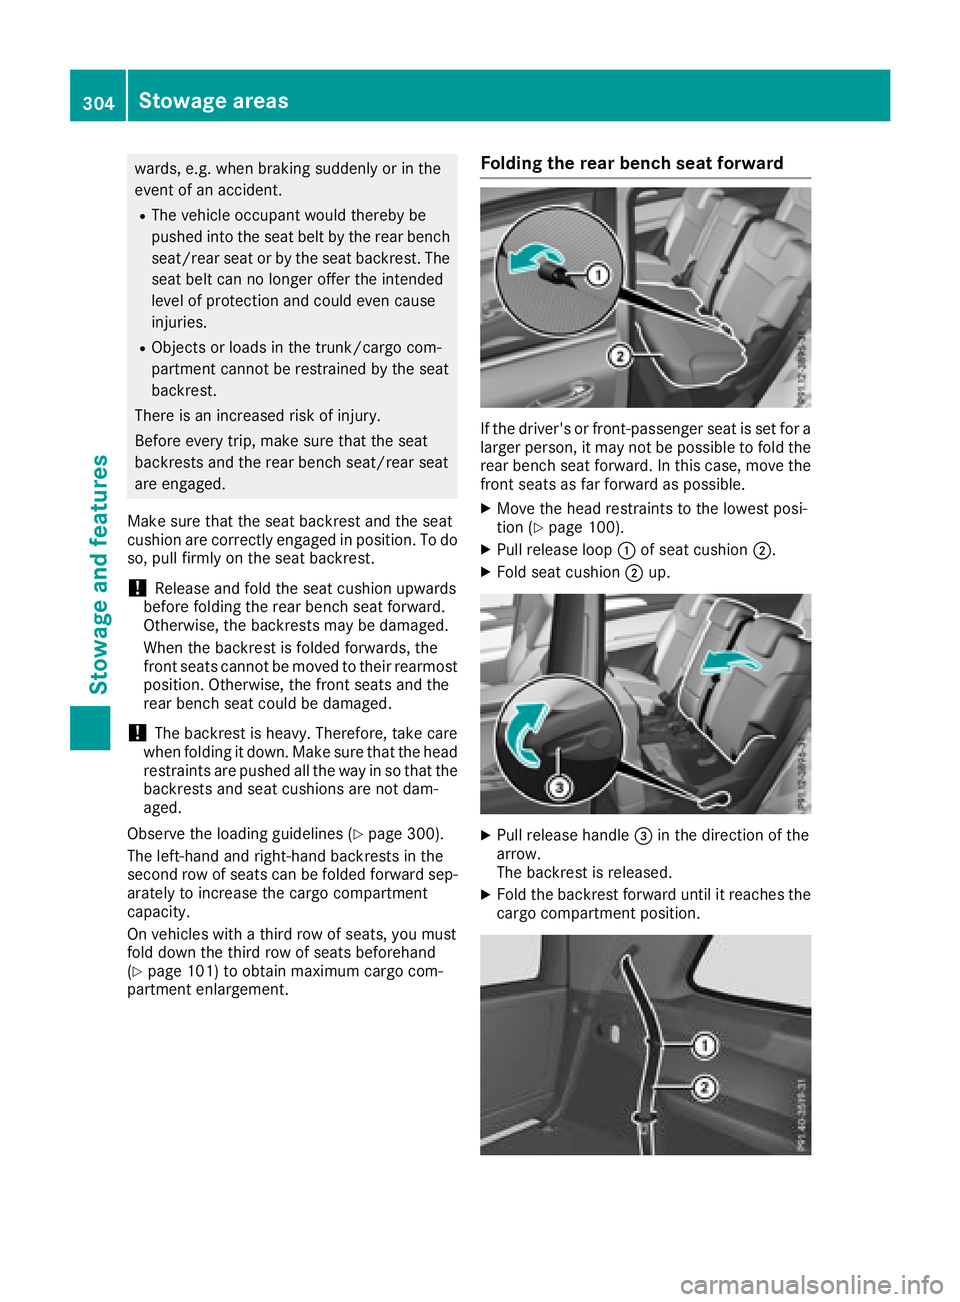
Folding the rear bench seat forward
If the driver's or front-passenger seat is set for a
larger person, it may not be possible to fold the
rear bench seat forward. In this case, move the
front seats as far forward as possible.
XMove the head restraints to the lowest posi-
tion (Ypage 100).
XPull release loop :of seat cushion ;.
XFold seat cushion ;up.
XPull release handle =in the direction of the
arrow.
The backrest is released.
XFold the backrest forward until it reaches the
cargo compartment position.
304Stowage areas
Stowage and features
Page 307 of 398
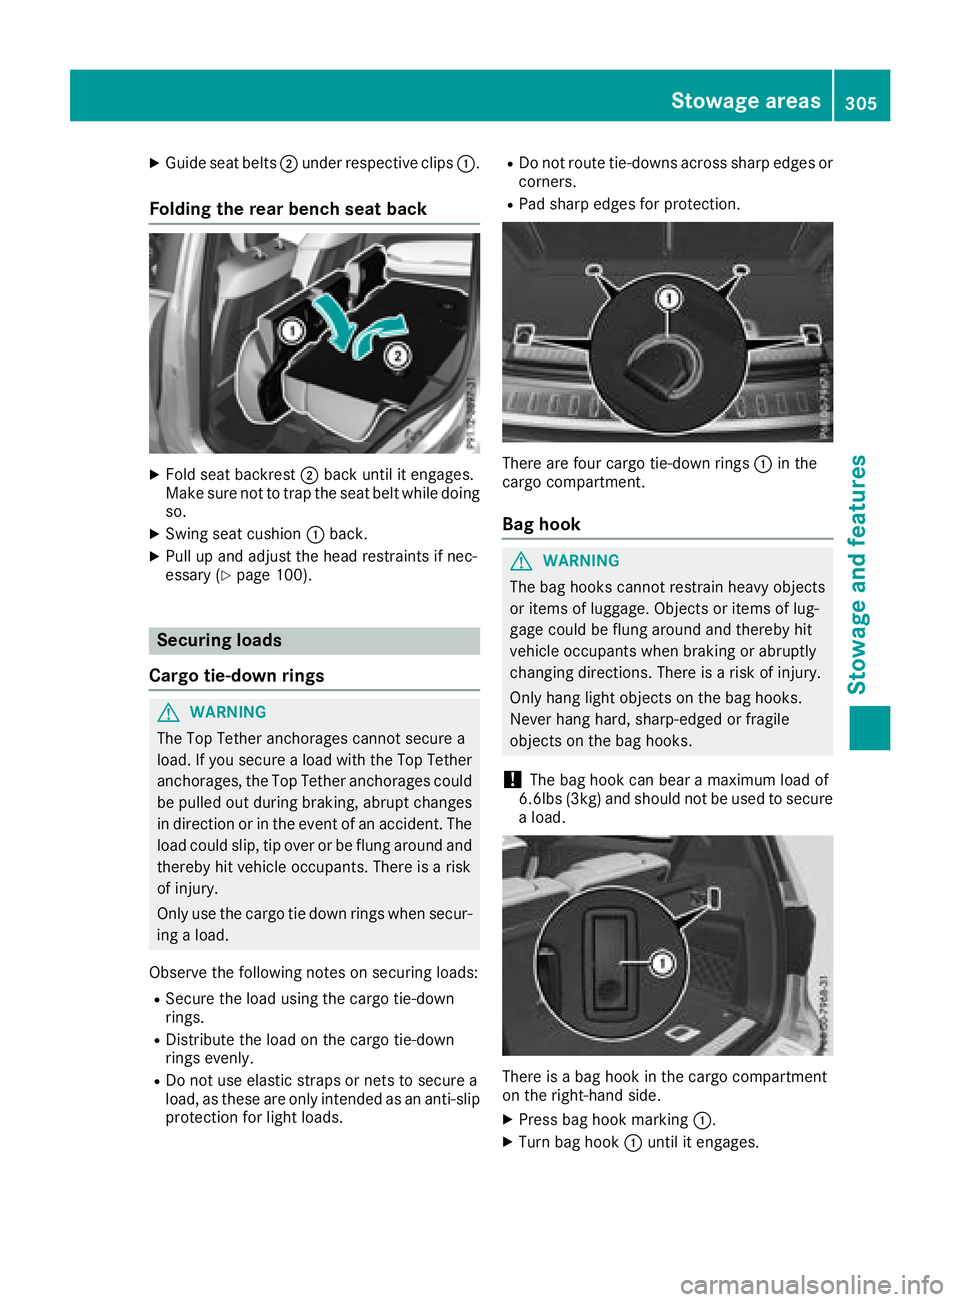
XGuide seat belts;under respective clips :.
Folding the rear bench seat back
XFold seat backrest;back until it engages.
Make sure not to trap the seat belt while doing so.
XSwing seat cushion :back.
XPull up and adjust the head restraints if nec-
essary (Ypage 100).
Securing loads
Cargo tie-down rings
GWARNING
The Top Tether anchorages cannot secure a
load. If you secure a load with the Top Tether
anchorages, the Top Tether anchorages could
be pulled out during braking, abrupt changes
in direction or in the event of an accident. The
load could slip, tip over or be flung around and
thereby hit vehicle occupants. There is a risk
of injury.
Only use the cargo tie down rings when secur-
ing a load.
Observe the following notes on securing loads:
RSecure the load using the cargo tie-down
rings.
RDistribute the load on the cargo tie-down
rings evenly.
RDo not use elastic straps or nets to secure a
load, as these are only intended as an anti-slip protection for light loads.
RDo not route tie-downs across sharp edges orcorners.
RPad sharp edges for protection.
There are four cargo tie-down rings :in the
cargo compartment.
Bag hook
GWARNING
The bag hooks cannot restrain heavy objects
or items of luggage. Objects or items of lug-
gage could be flung around and thereby hit
vehicle occupants when braking or abruptly
changing directions. There is a risk of injury.
Only hang light objects on the bag hooks.
Never hang hard, sharp-edged or fragile
objects on the bag hooks.
!The bag hook can bear a maximum load of
6.6lbs (3kg) and should not be used to secure
a load.
There is a bag hook in the cargo compartment
on the right-hand side.
XPress bag hook marking :.
XTurn bag hook:until it engages.
Stowage areas305
Stowage and features
Z
Page 338 of 398
Cleaning the steering wheel and gear or
selector lever
XThoroughly wipe with a damp cloth or use
leather care agents that have been recom-
mended and approved by Mercedes-Benz.
Cleaning genuine wood and trim ele-
ments
!Do not use solvent-based cleaning agents
such as tar remover, wheel cleaners, polishes or waxes. There is otherwise a risk of damag-
ing the surface.
!Do not use chrome polish on trim pieces.
The trim pieces have a chrome look but are
mostly made of anodized aluminum and can
lose their shine if chrome polish is used. Use
a damp, lint-free cloth instead when cleaning
the trim pieces.
If the chrome-plated trim pieces are very
dirty, you can use a chrome polish. If you are
unsure as to whether the trim pieces are
chrome-plated or not, consult an authorized
Mercedes-Benz Center.
XWipe the wooden trim and trim pieces with a
damp, lint-free cloth, e.g. a microfiber cloth.
XHeavy soiling: use car care and cleaning
products recommended and approved by
Mercedes-Benz.
Cleaning the seat covers
General notes
!Do not use a microfiber cloth to clean covers
made out of real leather, artificial leather or
DINAMICA. If used often, these can damage
the cover.
iNote that regular care is essential to ensure
that the appearance and comfort of the cov-
ers is retained over time.
Genuine leather seat covers
!To retain the natural appearance of the
leather, observe the following cleaning
instructions:
RClean genuine leather covers carefully with a damp cloth and then wipe the covers
down with a dry cloth.
RMake sure that the leather does not
become soaked. It may otherwise become
rough and cracked.
ROnly use leather care agents that have
been tested and approved by Mercedes-
Benz. You can obtain these from a qualified
specialist workshop.
Leather is a natural product.
It exhibits natural surface characteristics, for
example:
Rdifferences in the texture
Rmarks caused by growth and injury
Rslight nuances of color
These are characteristics of leather and not
material defects.
Seat covers of other materials
!Observe the following when cleaning:
Rclean artificial leather covers with a cloth
moistened with a solution containing 1%
detergent (e.g. dish washing liquid).
Rclean cloth covers with a microfiber cloth
moistened with a solution contain ing 1%
detergent (e.g. dish washing liquid). Rub
carefully and always wipe entire seat sec-
tions to avoid leaving visible lines. Leave
the seat to dry afterwards. Cleaning results
depend on the type of dirt and how long it
has been there.
Rclean DINAMICA covers with a damp cloth.
Make sure that you wipe entire seat sec-
tions to avoid leaving visible lines.
Cleaning the seat belts
GWARNING
Seat belts can become severely weakened if
bleached or dyed. This could cause the seat
belts to tear or fail, for instance, in the event of an accident. This poses an increased risk of
injury or fatal injury.
Never bleach or dye the seat belts.
336Care
Maintenance and care