2018 MERCEDES-BENZ GLS SUV child seat
[x] Cancel search: child seatPage 112 of 398
When leaving the vehicle, always take the
SmartKey with you and lock the vehicle. Never
leave children unsupervised in the vehicle.
GWARNING
If you drive off while the EASY-ENTRY/EXIT
feature is making adjustments, you could lose
control of the vehicle. There is a risk of an
accident.
Always wait until the adjustment process is
complete before driving off.
The EASY-ENTRY/EXIT feature makes getting in
and out of your vehicle easier.
You can activate and deactivate the EASY-
ENTRY/EXIT feature in the on-board computer
(
Ypage 244).
Position of the steering wheel when the
EASY-ENTRY/EXIT feature is active
The steering wheel swings up when you:
Rremove the SmartKey from the ignition lock.
Ropen the driver's door and KEYLESS-GO is in
position 1.
Ropen the driver's door and the SmartKey is in
positionuor1 in the ignition lock.
iThe steering wheel only moves up if it has
not already reached the upper stop.
Position of the steering wheel for driv-
ing
The steering wheel is moved to the last selected
position when:
Rthe driver's door is closed
Ryou insert the SmartKey into the ignition lock
or
Ryou press the Start/Stop button once on vehi-
cles with KEYLESS-GO
When you close the driver's door with the igni-
tion switched on, the steering wheel is also
automatically moved to the previously set posi-
tion.
The last position of the steering column is stored
when you:
Rswitch the ignition off
Rsave the setting with the memory function
(Ypage 113).
Crash-responsive EASY-EXIT feature
If the crash-responsive EASY-EXIT feature is trig-
gered in an accident, the steering column will
move upwards when the driver's door is opened.
This occurs irrespective of the position of the
SmartKey in the ignition lock. This makes it eas- ier to exit the vehicle and rescue the occupants.
The crash-responsive EASY-EXIT feature is only
operational if the EASY-EXIT/ENTRY feature is
activated in the on-board computer
(
Ypage 244).
Mirrors
Rear-view mirror
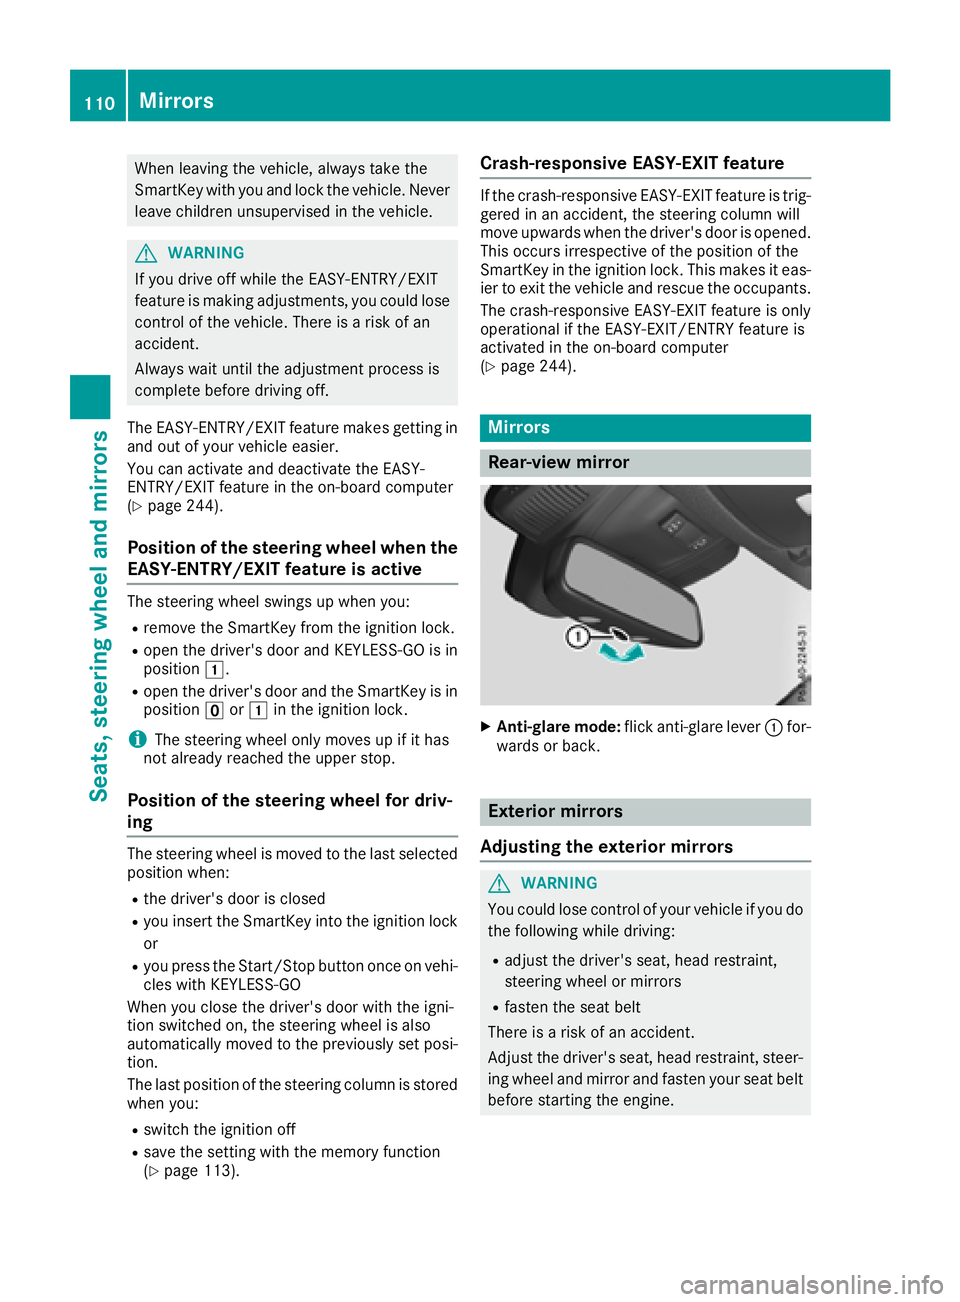
XAnti-glare mode: flick anti-glare lever :for-
wards or back.
Exterior mirrors
Adjusting the exterior mirrors
GWARNING
You could lose control of your vehicle if you do the following while driving:
Radjust the driver's seat, head restraint,
steering wheel or mirrors
Rfasten the seat belt
There is a risk of an accident.
Adjust the driver's seat, head restraint, steer-
ing wheel and mirror and fasten your seat belt before starting the engine.
110Mirrors
Seats, steering wheel and mirrors
Page 115 of 398
XEngage reverse gear.
The exterior mirror on the front-passenger
side moves to the default setting parking posi-
tion.
XUse button=to adjust the exterior mirror to
a position that allows you to see the rear
wheel and the curb.
The parking position is stored.
iIf you shift the transmission to another posi-
tion, the exterior mirror on the front-
passenger side returns to the driving position.
Using the memory button
You can store the parking position of the exte-
rior mirror on the front-passenger side using
memory button M?. The reverse gear must not
be engaged during the process.
XTurn the SmartKey to position 2in the igni-
tion lock (Ypage 140).
XPress button ;.
XUse button=to adjust the exterior mirror to
a position that allows you to see the rear
wheel and the curb.
XPress memory button M? and one of the
arrows on button =within three seconds.
The parking position is stored if the exterior
mirror does not move.
XIf the mirror moves out of position, repeat the
steps.
Calling up a stored parking position set-
ting
XTurn the SmartKey to position 2in the igni-
tion lock (Ypage 140).
XAdjust the exterior mirror on the front-
passenger side using button ;.
XEngage reverse gear.
The exterior mirror on the front-passenger
side moves to the stored parking position.
The exterior mirror on the front-passenger side
moves back to its original position:
Ras soon as you exceed a speed of 9 mph
(15 km/h)
Rif you press button :for the exterior mirror
on the driver's side
Memory function
Storing settings
GWARNING
If you use the memory function on the driver's side while driving, you could lose control of
the vehicle as a result of the adjustments
being made. There is a risk of an accident.
Only use the memory function on the driver's
side when the vehicle is stationary.
GWARNING
When the memory function adjusts the seat or steering wheel, you and other vehicle occu-
pants – particularly children – could become
trapped. There is a risk of injury.
While the memory function is making adjust-
ments, make sure that no one has any body
parts in the sweep of the seat or steering
wheel. If somebody becomes trapped, imme-
diately release the memory function position
button. The adjustment process is stopped.
GWARNING
Children could become trapped if they acti-
vate the memory function, particularly when
unattended. There is a risk of injury.
When leaving the vehicle, always take the
SmartKey with you and lock the vehicle. Never
leave children unsupervised in the vehicle.
The memory function can be used at any time,
e.g. even when the SmartKey isn't in the ignition
lock.
With the memory function, you can store up to
three different settings, e.g. for three different
people.
The following settings are stored as a single
memory preset:
Rposition of the seat, backrest and head
restraint
Rdriver's side: steering wheel position
Rdriver's side: position of the exterior mirrors
on the driver's and front-passenger sides
Memory function113
Seats, steering wheel and mirrors
Z
Page 233 of 398
Use only bicycle racks approved by
Mercedes-Benz.
Bicycle racks cause your vehicle's driving char-
acteristics to change. The vehicle:
Ris heavier
Ris restricted in its acceleration and gradient-
climbing capability
Rhas an increased braking distance This could impair the handling characteristics.
Adapt your driving style accordingly. Maintain a
safe distance and drive carefully.
When using bicycle racks, set the tire pressure
on the rear axle of the vehicle for the maximum
load. Further information on tire pressure can be
found on the tire pressure table (
Ypage 357).
Loading instructions
The greater the distance between the load's center of gravity and the ball head, the higher the load
exerted on the trailer tow hitch.
Therefore, observe the following notes:
RAttach heavy bicycles as close as possible to the vehicle.
RAlways distribute the load on the bicycle rack as symmetrically as possible to the vehicle longi-
tudinal axis.
Before loading the bicycle rack, Mercedes-Benz advises you to remove all add-on parts from the
bicycles, e.g. bicycle baskets, child seats or batteries. This will allow you to improve the aerody-
namic resistance and the bicycle rack's center of gravity.
Always secure bicycles against slipping and check that they are firmly seated at regular intervals.
Do not use tarpaulins or other covers. This could impair the driving characteristics and rear visibility.
The aerodynamic resistance would also rise, and so would the load exerted on the trailer tow hitch
as a result.
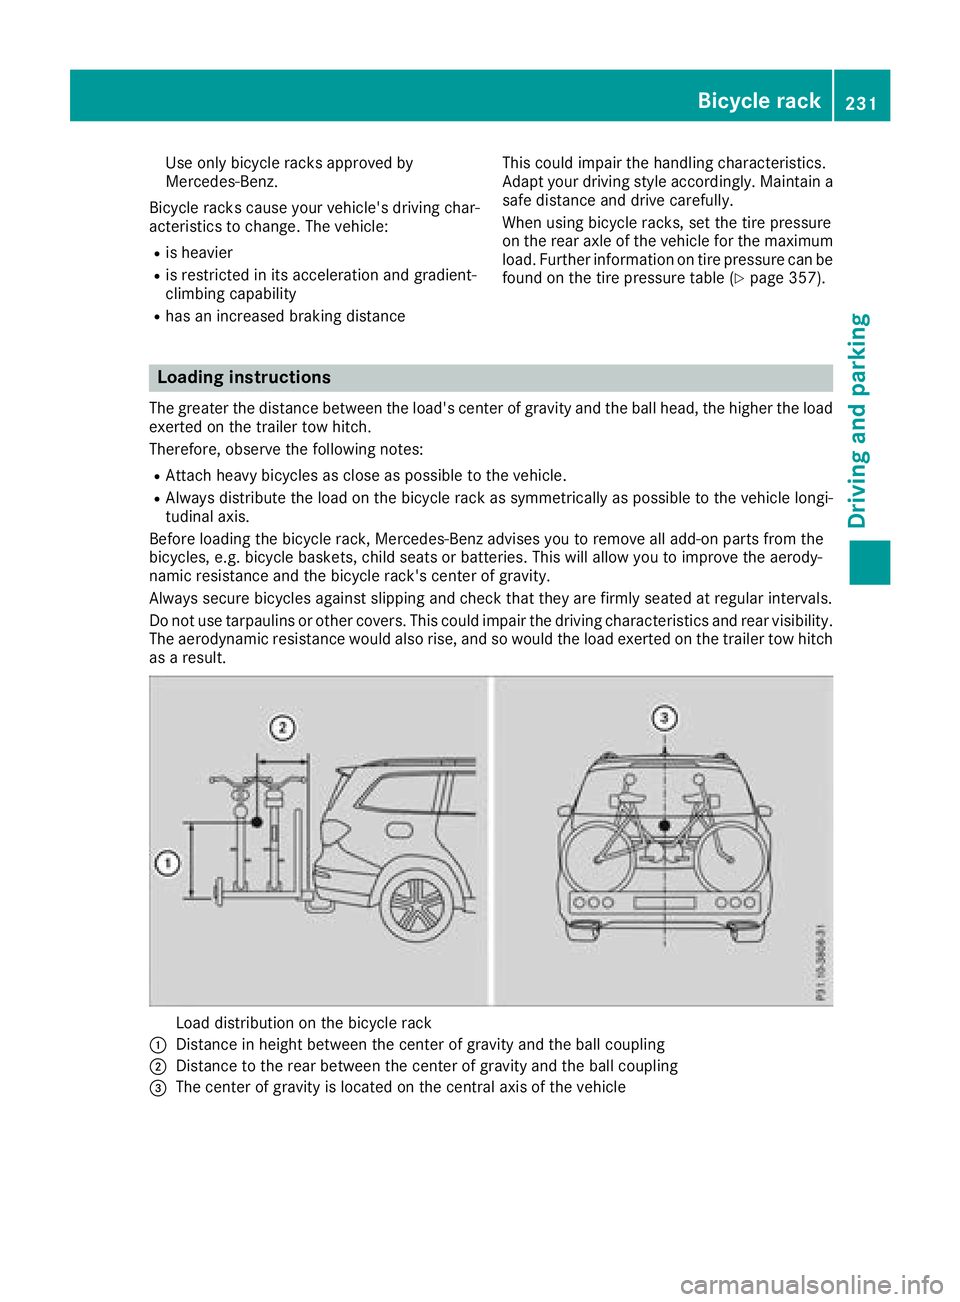
Load distribution on the bicycle rack
:Distance in height between the center of gravity and the ball coupling
;Distance to the rear between the center of gravity and the ball coupling
=The center of gravity is located on the central axis of the vehicle
Bicycle rack231
Driving and parking
Z
Page 246 of 398
RHighway mode
RActive light function
RCornering light function
RExtended range fog lamps
ROff-road lights
Further information on the Intelligent Light Sys-
tem (
Ypage 117).
Vehicle submenu
Activating/deactivating the automatic
door locking mechanism
If you activate the AutomaticDoorLockfunc-
tion, the vehicle is centrally locked above a
speed of approximately 9 mph (15 km/h).
XPress the =or; button on the steering
wheel to select the Sett.menu.
XPress the:or9 button to select the
Vehiclesubmenu.
XPress ato confirm.
XPress the :or9 button to select the
Automatic Door Lockfunction.
When the Automatic Door Lockfunction is
activated, the vehicle doors are displayed in
orange in the multifunction display.
XPress the abutton to save the setting.
For further information on the automatic locking
feature, see (
Ypage 84).
Activating/deactivating the acoustic
locking verification signal
If you switch on the AcousticLockfunction, an
acoustic signal sounds when you lock the vehi-
cle.
XPress the =or; button on the steering
wheel to select the Settingsmenu.
XPress the:or9 button to select the
Vehiclesubmenu.
XPress ato confirm.
XPress the :or9 button to select the
Acoustic Lockfunction.
If the Acoustic Lockfunction is activated,
the & symbol in the multifunction display
lights up orange.
XPress the abutton to save the setting.
Convenience submenu
Activating/deactivating the EASY-
ENTRY/EXIT feature
GWARNING
When the EASY-ENTRY/EXIT feature adjusts
the steering wheel, you and other vehicle
occupants – particularly children – could
become trapped. There is a risk of injury.
While the EASY-ENTRY/EXIT feature is mak-
ing adjustments, make sure that no one has
any body parts in the sweep of the steering
wheel.
If somebody becomes trapped:
Rpress one of the memory function position
buttons, or
Rmove the switch for steering wheel adjust-
ment in the opposite direction to that in
which the steering wheel is moving.
The adjustment process is stopped.
XPress the =or; button on the steering
wheel to select the Sett.menu.
XPress the:or9 button to select the
Conveniencesubmenu.
XPress ato confirm.
XUsing :or9, select the EasyEntry/Exitfunction.
If the EasyEntry/Exitfunction is activated,
the vehicle steering wheel is displayed in
orange in the multifunction display.
XPress the abutton to save the setting.
Further information on the EASY-ENTRY/EXIT
feature (
Ypage 109).
Switching the seat belt adjustment on/off
XPress the =or; button on the steering
wheel to select the Settingsmenu.
XPress the:or9 button to select the
Conveniencesubmenu.
XPress ato confirm.
XPress the :or9 button to select the
Belt Adjustmentfunction.
If the BeltAdjustmentfunction is activated,
the vehicle seat belt is shown in orange in the
multifunction display.
XPress the abutton to save the setting.
244Menus and submenus
On-board computer and displays
Page 261 of 398
Display messagesPossible causes/consequences andMSolutions
FrontPassengerAir‐bag Enable dSeeOperator' sManual
The front-passenger fron tair bag is enabled during th ejourney, eve n
though :
Rachild, asmall adult or an objec tweighing less than th esystem' s
weigh tthreshold is locate don th efront-passenger seat
or
Rth efront-passenger seat is unoccupied
The system may detec tobjects or force sapplyin gadditional weigh ton
th eseat .
GWARNIN G
The front-passenger fron tair bag may deploy unintentionally.
There is an increased ris kof injury.
XPull ove rand stop th evehicl esafely as soo nas possible, payin g
attention to roa dand traffic conditions.
XSecur eth evehicl eagainst rollin gaway (Ypage 161).
XSwitchth eignition off .
XOpenth efront-passenger door .
XRemove thechild and th echild restrain tsystem from th efront-
passenger seat .
XMakesur ethat there are no objects on th eseat addin gto th e
weight.
The system might otherwise detec tth eadditional weigh tand inter-
pre tth eseat occupant's weigh tas greate rthan it actually is.
XKee pth eseat unoccupied ,close th efront-passenger door and
switch on th eignition .
XObserveth ePASSENGER AI RBA Gindicator lamp sin th ecenter
console and th emultifunction display and chec kth efollowing:
Seat unoccupied and ignition switched on :
Raself-diagnosis is carrie dout .The PASSENGER AI RBA GOF Fand
PASSENGER AI RBA GON indicator lamp smus tligh tup simulta-
neousl yfor approximately six seconds.
Rth ePASSENGER AI RBA GOF Findicator lamp mus tthen ligh tup
and remain lit after th eself-diagnosis .If th eindicator lamp is on ,
OCS has disabled th efront-passenger fron tair bag (
Ypage 52)
RtheFront Passenger Airbag Enable dSee Operator' sManualorFront Passenger Airbag Disabled See Opera‐tor'sManualdisplay message smus tno tbe shown on th emul-
tifunction display.
XWait for aperiod of at least 60 seconds until th enecessar ysystem
checks hav ebeen completed.
XMak esur ethat th edisplay message sdo no tappear in th emulti-
function display.
If these condition sare fulfilled ,th efront-passenger seat can be occu-
pied again .Whether th ePASSENGER AI RBA GOF For ON indicator
lamp remain slit or goe sout depend son how OCS classifies th eoccu-
pant.
If th econdition sare no tfulfilled ,th esystem is no toperating correctly.
Display messages25 9
On-board computer and displays
Z
Page 314 of 398
XLift insert:up and out.
XTo re-install the insert: place insert:into
the holder and press down on the right until it
engages.
Cigarette lighter
GWARNING
You can burn yourself if you touch the hot
heating element or the socket of the cigarette lighter.
In addition, flammable materials can ignite if:
Rthe hot cigarette lighter falls
Ra child holds the hot cigarette lighter to
objects, for example
There is a risk of fire and injury.
Always hold the cigarette lighter by the knob.
Always make sure that the cigarette lighter is
out of reach of children. Never leave children
unsupervised in the vehicle.
!The cigarette lighter in the center console in
the front compartment is not intended for
operating the tire inflation compressor.
Your attention must always be focused on the
traffic conditions. Only use the cigarette lighter
when road and traffic conditions permit.
XTurn the SmartKey to position 2in the igni-
tion lock (Ypage 140).
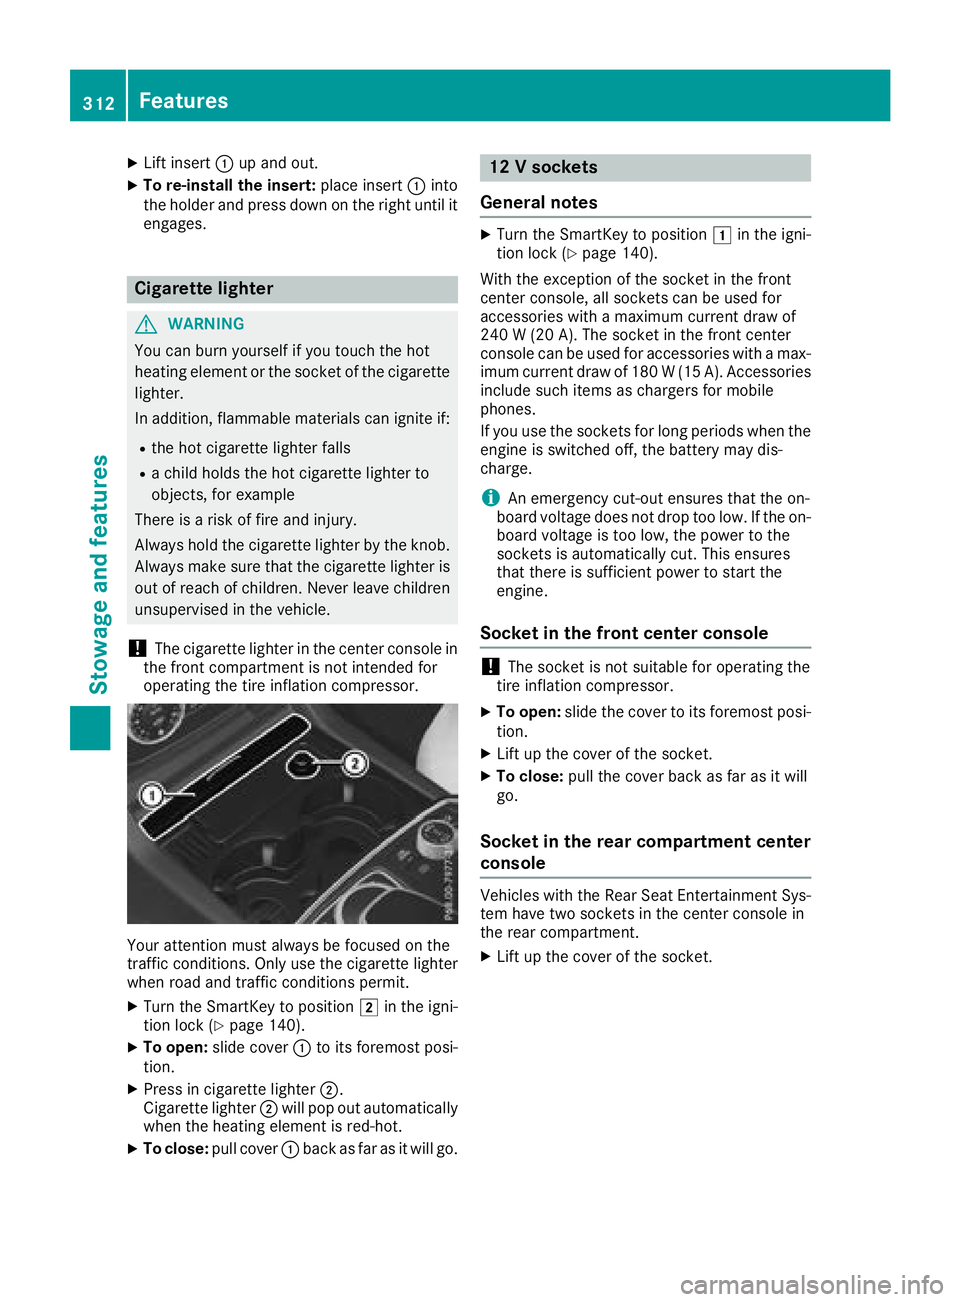
XTo open: slide cover :to its foremost posi-
tion.
XPress in cigarette lighter ;.
Cigarette lighter ;will pop out automatically
when the heating element is red-hot.
XTo close: pull cover :back as far as it will go.
12 V sockets
General notes
XTurn the SmartKey to position 1in the igni-
tion lock (Ypage 140).
With the exception of the socket in the front
center console, all sockets can be used for
accessories with a maximum current draw of
240 W (20 A). The socket in the front center
console can be used for accessories with a max-
imum current draw of 180 W(15 A). Accessories
include such items as chargers for mobile
phones.
If you use the sockets for long periods when the
engine is switched off, the battery may dis-
charge.
iAn emergency cut-out ensures that the on-
board voltage does not drop too low. If the on-
board voltage is too low, the power to the
sockets is automatically cut. This ensures
that there is sufficient power to start the
engine.
Socket in the front center console
!The socket is not suitable for operating the
tire inflation compressor.
XTo open: slide the cover to its foremost posi-
tion.
XLift up the cover of the socket.
XTo close: pull the cover back as far as it will
go.
Socket in the rear compartment center
console
Vehicles with the Rear Seat Entertainment Sys-
tem have two sockets in the center console in
the rear compartment.
XLift up the cover of the socket.
312Features
Stowage and features
Page 346 of 398
Battery (vehicle)
12 V battery - important safety notes
Special tools and expert knowledge are required
when working on the battery, e.g. removal and
installation. You should therefore have all work
involving the battery carried out at a qualified
specialist workshop.
GWARNING
Work carried out incorrectly on the battery
can lead, for example, to a short circuit and
thus damage the vehicle electronics. This can
lead to function restrictions applying to
safety-relevant systems, e.g. the lighting sys-
tem, the ABS (anti-lock braking system) or the
ESP
®(Electronic Stability Program). The oper-
ating safety of your vehicle may be restricted.
You could lose control of the vehicle, for
example:
Rwhen braking
Rin the event of abrupt steering maneuvers
and/or when the vehicle's speed is not
adapted to the road conditions
There is a risk of an accident.
In the event of a short circuit or a similar inci-
dent, contact a qualified specialist workshop
immediately. Do not drive any further. You
should have all work involving the battery car- ried out at a qualified specialist workshop.
For further information about ABS and ESP
®,
see (Ypage 66) and (Ypage 69).
GWARNING
Electrostatic build-up can lead to the creation of sparks, which could ignite the highly explo-
sive gases of a battery. There is a risk of an
explosion.
Before handling the battery, touch the vehicle
body to remove any existing electrostatic
build-up.
The highly flammable gas mixture forms when
charging the battery as well as when jump-start-
ing. Always make sure that neither you nor the bat-
tery is electrostatically charged. A build-up of
electrostatic charge can be caused, for exam-
ple:
Rby wearing clothing made from synthetic
fibers
Rdue to friction between clothing and seats
Rif you push or pull the battery across the car-
pet or other synthetic materials
Rif you wipe the battery with a cloth
GWARNING
During the charging process, a battery produ-
ces hydrogen gas. If a short circuit occurs or
sparks are created, the hydrogen gas can
ignite. There is a risk of an explosion.
RMake sure that the positive terminal of a
connected battery does not come into con- tact with vehicle parts.
RNever place metal objects or tools on a bat-
tery.
RIt is important that you observe the descri-
bed order of the battery terminals when
connecting and disconnecting a battery.
RWhen jump-starting, make sure that the
battery poles with identical polarity are
connected.
RIt is particularly important to observe the
described order when connecting and dis-
connecting the jumper cables.
RNever connect or disconnect the battery
terminals while the engine is running.
GWARNING
Battery acid is caustic. There is a risk of injury.
Avoid contact with skin, eyes or clothing. Do
not inhale any battery gases. Do not lean over
the battery. Keep children away from batter-
ies. Wash away battery acid immediately with
plenty of clean water and seek medical atten-
tion.
HEnvironmental note
Batteries contain dangerous
substances. It is against the
law to dispose of them with
344Battery (vehicle)
Breakdo wn assis tance