2018 MERCEDES-BENZ GLS SUV automatic transmission
[x] Cancel search: automatic transmissionPage 155 of 398
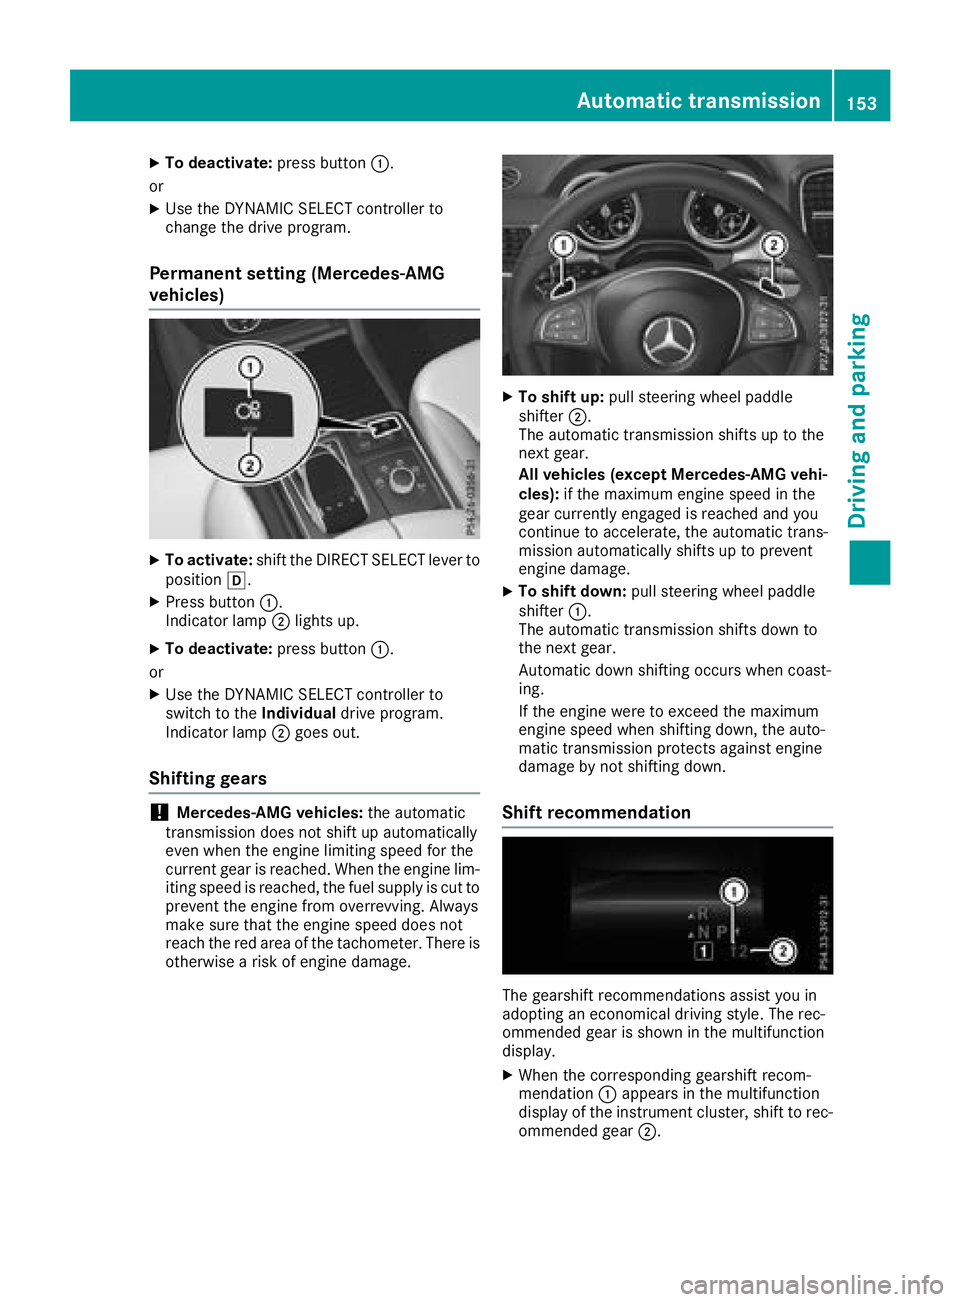
XTo deactivate:press button:.
or
XUse the DYNAMIC SELECT controller to
change the drive program.
Permanent setting (Mercedes-AMG
vehicles)
XTo activate: shift the DIRECT SELECT lever to
position h.
XPress button :.
Indicator lamp ;lights up.
XTo deactivate: press button:.
or
XUse the DYNAMIC SELECT controller to
switch to the Individualdrive program.
Indicator lamp ;goes out.
Shifting gears
!Mercedes-AMG vehicles: the automatic
transmission does not shift up automatically
even when the engine limiting speed for the
current gear is reached. When the engine lim-
iting speed is reached, the fuel supply is cut to
prevent the engine from overrevving. Always
make sure that the engine speed does not
reach the red area of the tachometer. There is
otherwise a risk of engine damage.
XTo shift up: pull steering wheel paddle
shifter ;.
The automatic transmission shifts up to the
next gear.
All vehicles (except Mercedes-AMG vehi-
cles): if the maximum engine speed in the
gear currently engaged is reached and you
continue to accelerate, the automatic trans-
mission automatically shifts up to prevent
engine damage.
XTo shift down: pull steering wheel paddle
shifter :.
The automatic transmission shifts down to
the next gear.
Automatic down shifting occurs when coast-
ing.
If the engine were to exceed the maximum
engine speed when shifting down, the auto-
matic transmission protects against engine
damage by not shifting down.
Shift recommendation
The gearshift recommendations assist you in
adopting an economical driving style. The rec-
ommended gear is shown in the multifunction
display.
XWhen the corresponding gearshift recom-
mendation :appears in the multifunction
display of the instrument cluster, shift to rec-
ommended gear ;.
Automatic transmission153
Driving and parking
Z
Page 156 of 398
Upshifting (Mercedes-AMG vehicles)
!In manual mode, the automatic transmis-
sion does not shift up automatically even
when the engine limiting speed for the current
gear is reached. When the engine limiting
speed is reached, the fuel supply is cut to
prevent the engine from overrevving. Always
make sure that the engine speed does not
reach the red area of the tachometer. There is
otherwise a risk of engine damage.
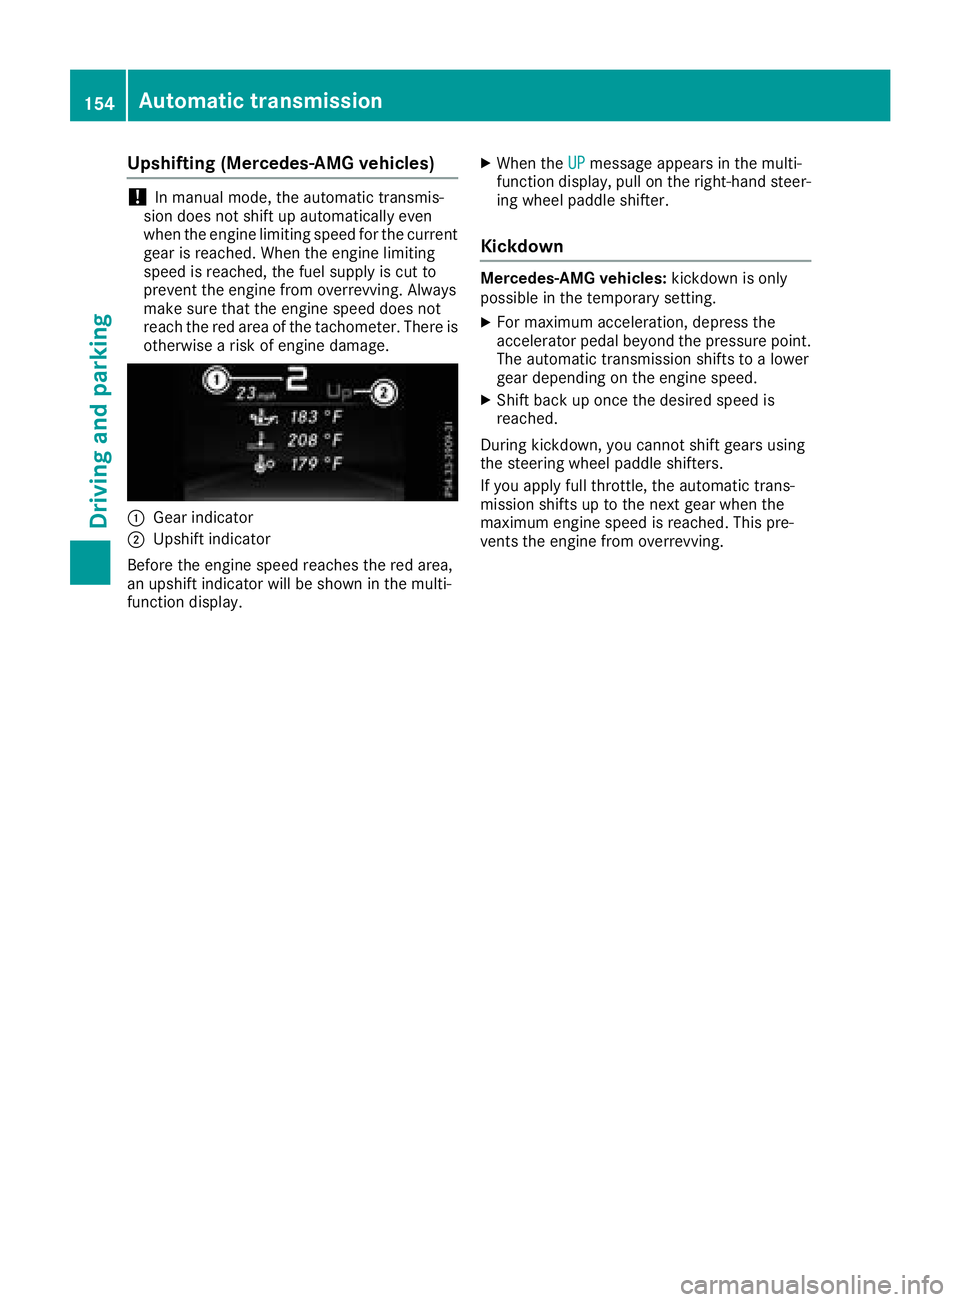
:Gear indicator
;Upshift indicator
Before the engine speed reaches the red area,
an upshift indicator will be shown in the multi-
function display.
XWhen the UPmessage appears in the multi-
function display, pull on the right-hand steer-
ing wheel paddle shifter.
Kickdown
Mercedes-AMG vehicles: kickdown is only
possible in the temporary setting.
XFor maximum acceleration, depress the
accelerator pedal beyond the pressure point.
The automatic transmission shifts to a lower
gear depending on the engine speed.
XShift back up once the desired speed is
reached.
During kickdown, you cannot shift gears using
the steering wheel paddle shifters.
If you apply full throttle, the automatic trans-
mission shifts up to the next gear when the
maximum engine speed is reached. This pre-
vents the engine from overrevving.
154Automatic transmission
Driving and parking
Page 157 of 398
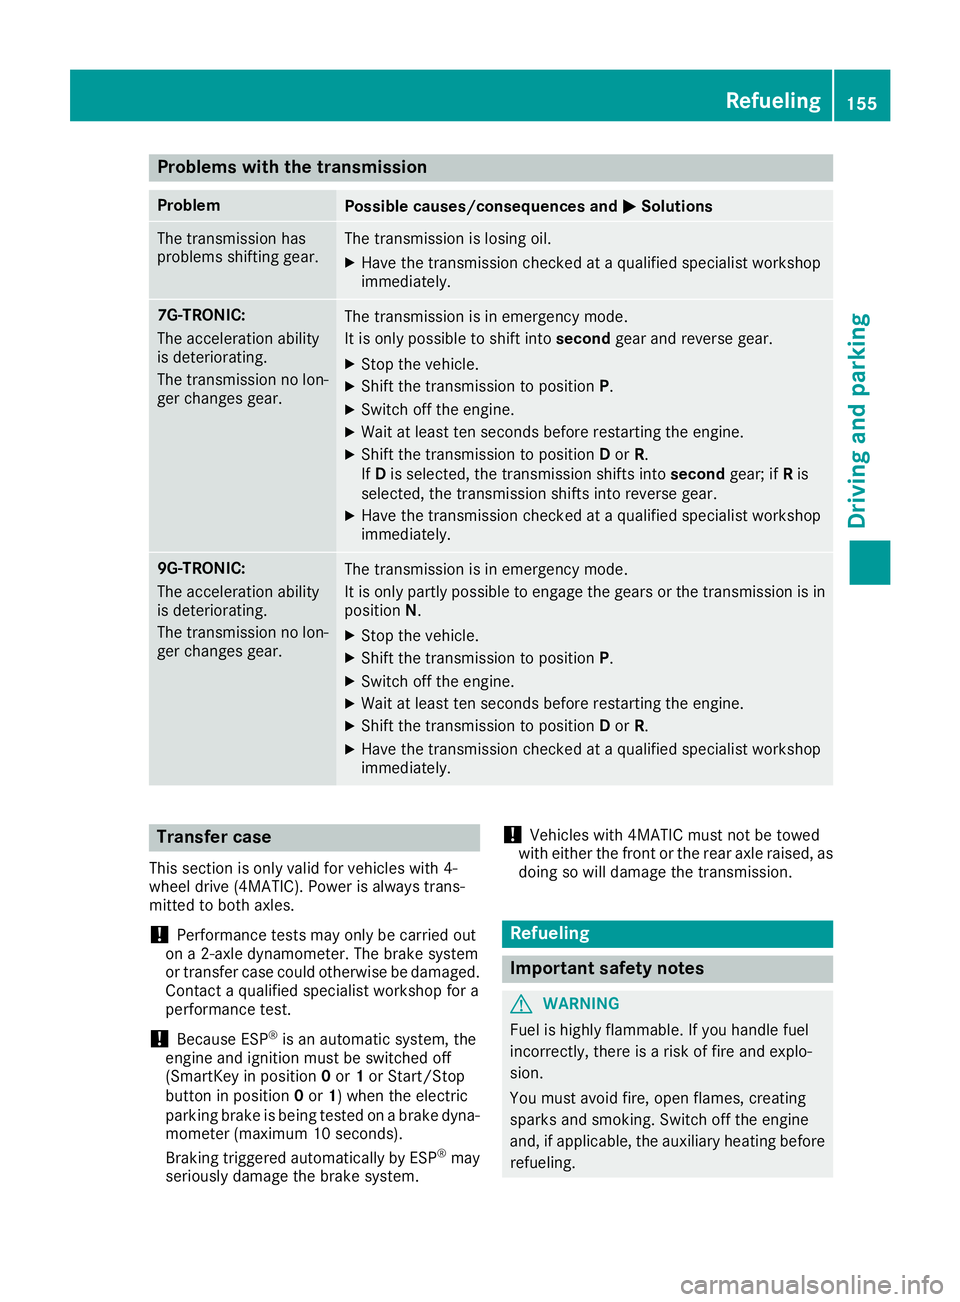
Problems with the transmission
ProblemPossible causes/consequences andMSolutions
The transmission has
problems shifting gear.The transmission is losing oil.
XHave the transmission checked at a qualified specialist workshop
immediately.
7G-TRONIC:
The acceleration ability
is deteriorating.
The transmission no lon-
ger changes gear.The transmission is in emergency mode.
It is only possible to shift intosecondgear and reverse gear.
XStop the vehicle.
XShift the transmission to position P.
XSwitch off the engine.
XWait at least ten seconds before restarting the engine.
XShift the transmission to positionDor R.
If D is selected, the transmission shifts into secondgear; ifRis
selected, the transmission shifts into reverse gear.
XHave the transmission checked at a qualified specialist workshop
immediately.
9G-TRONIC:
The acceleration ability
is deteriorating.
The transmission no lon-
ger changes gear.The transmission is in emergency mode.
It is only partly possible to engage the gears or the transmission is in
position N.
XStop the vehicle.
XShift the transmission to position P.
XSwitch off the engine.
XWait at least ten seconds before restarting the engine.
XShift the transmission to positionDor R.
XHave the transmission checked at a qualified specialist workshop
immediately.
Transfer case
This section is only valid for vehicles with 4-
wheel drive (4MATIC). Power is always trans-
mitted to both axles.
!Performance tests may only be carried out
on a 2-axle dynamometer. The brake system
or transfer case could otherwise be damaged. Contact a qualified specialist workshop for a
performance test.
!Because ESP®is an automatic system, the
engine and ignition must be switched off
(SmartKey in position 0or 1or Start/Stop
button in position 0or 1) when the electric
parking brake is being tested on a brake dyna-
mometer (maximum 10 seconds).
Braking triggered automatically by ESP
®may
seriously damage the brake system.
!Vehicles with 4MATIC must not be towed
with either the front or the rear axle raised, as
doing so will damage the transmission.
Refueling
Important safety notes
GWARNING
Fuel is highly flammable. If you handle fuel
incorrectly, there is a risk of fire and explo-
sion.
You must avoid fire, open flames, creating
sparks and smoking. Switch off the engine
and, if applicable, the auxiliary heating before refueling.
Refueling155
Driving and parking
Z
Page 163 of 398

overfilling. DEF may leak if overfilled. Mercedes-
Benz offers a special disposable hose with over-
fill protection. You can obtain this from any
authorized Mercedes-Benz Center. DEF is avail-
able in a variety of containers and receptacles.
Only use the disposable hose with the
Mercedes-Benz DEF refill canisters.
DEF refill bottle
!Only screw on the DEF refill bottle hand-
tight. Otherwise, the thread of the DEF refill
bottle could be damaged and DEF could leak
out.
XUnscrew the protective cap from DEF refill
bottle :.
XPlace DEF refill bottle :on the filler neck as
shown and screw it on clockwise until hand-
tight.
XPress DEF refill bottle :towards the filler
neck.
The DEF tank is filled. This may take up to one
minute.
iWhen DEF refill bottle :is no longer
pressed, filling stops and the bottle may be
taken off again after being only partially emp-
tied.
XRelease DEF refill bottle :.
XTurn DEF refill bottle:counter-clockwise
and remove it.
XScrew the protective cap onto DEF refill bot-
tle : again.
DEF refill bottles are available at many gas sta-
tions or at a qualified specialist workshop. Refill
bottles without a threaded cap do not provide
overfill protection. DEF may leak if overfilled.
Mercedes Benz offers special refill bottles with a threaded seal. These are available at any author-
ized Mercedes-Benz Center.
Parking
Important safety notes
GWARNING
Flammable material such as leaves, grass or
twigs may ignite if they come into contact with
hot parts of the exhaust system or exhaust
gas flow. There is a risk of fire.
Park the vehicle so that no flammable mate-
rials come into contact with parts of the vehi-
cle which are hot. Take particular care not to
park on dry grassland or harvested grain
fields.
GWARNING
If you leave children unsupervised in the vehi-
cle, they could set it in motion by, for example:
Rrelease the parking brake.
Rshift the automatic transmission out of the
parking position P.
Rstart the engine.
In addition, they may operate vehicle equip-
ment and become trapped. There is a risk of
an accident and injury.
When leaving the vehicle, always take the
SmartKey with you and lock the vehicle. Never
leave children unsupervised in the vehicle.
!Always secure the vehicle correctly against
rolling away. Otherwise, the vehicle or its driv-
etrain could be damaged.
To ensure that the vehicle is secured against
rolling away unintentionally:
Rthe electric parking brake must be applied
Rthe transmission must be in position jand
the SmartKey must be removed from the igni- tion lock
Rthe front wheels must be turned towards the
curb on steep uphill or downhill gradients
Rthe empty vehicle must be secured at the
front axle with a wheel chock or similar, for
example, on uphill or downhill gradients
Ra laden vehicle must also be secured at the
rear axle with a wheel chock or similar, for
example, on uphill or downhill gradients
Parking161
Driving and parking
Z
Page 164 of 398
Switching off the engine
GWARNING
The automatic transmission switches to neu-
tral position Nwhen you switch off the engine.
The vehicle may roll away. There is a risk of an
accident.
After switching off the engine, always switch
to parking position P. Prevent the parked vehi-
cle from rolling away by applying the parking
brake.
XApply the electric parking brake.
XShift the transmission to position j.
XWith the SmartKey:turn the SmartKey to
position uin the ignition lock and remove it.
The immobilizer is activated.
XWith KEYLESS-GO:
Press the Start/Stop button (
Ypage 140)
The engine stops and all the indicator lamps in
the instrument cluster go out.
If you switch the engine off with the transmis-
sion in position korh, the automatic trans-
mission shifts to iautomatically.
If you then open the driver's or front-passenger
door, the automatic transmission shifts to j
automatically.
If you want the automatic transmission to
remain in neutral i, e.g. when having the vehi-
cle cleaned in an automatic, tow-through car
wash:
XVehicles with a SmartKey: switch on the
ignition.
XVehicles with KEYLESS-GO: remove the
Start/Stop button from the ignition lock.
XInsert the SmartKey into the ignition lock.
XSwitch on the ignition.
XAll vehicles: depress the brake pedal and
keep it depressed.
XEngage neutral i.
XRelease the brake pedal.
XRelease the electric parking brake.
XSwitch off the ignition and leave the SmartKey
in the ignition lock.
iThe engine can be switched off in an emer-
gency while the vehicle is in motion by press-
ing and holding the Start/Stop button for
three seconds.
Electric parking brake
General notes
GWARNING
If you leave children unsupervised in the vehi-
cle, they could set it in motion by, for example:
Rrelease the parking brake.
Rshift the automatic transmission out of the
parking position P.
Rstart the engine.
In addition, they may operate vehicle equip-
ment and become trapped. There is a risk of
an accident and injury.
When leaving the vehicle, always take the
SmartKey with you and lock the vehicle. Never
leave children unsupervised in the vehicle.
The function of the electric parking brake is
dependent on the on-board voltage. If the on-
board voltage is low or there is a malfunction in
the system, it may not be possible to apply the
released parking brake.
XIf this is the case, only park the vehicle on
level ground and secure it to prevent it rolling
away.
XShift the automatic transmission to position
j.
It may not be possible to release an applied
parking brake if the on-board voltage is low or
there is a malfunction in the system. Contact a
qualified specialist workshop.
iThe electric parking brake performs a func-
tion test at regular intervals while the engine
is switched off. The sounds that can be heard
while this is occurring are normal.
162Parking
Driving and parking
Page 165 of 398
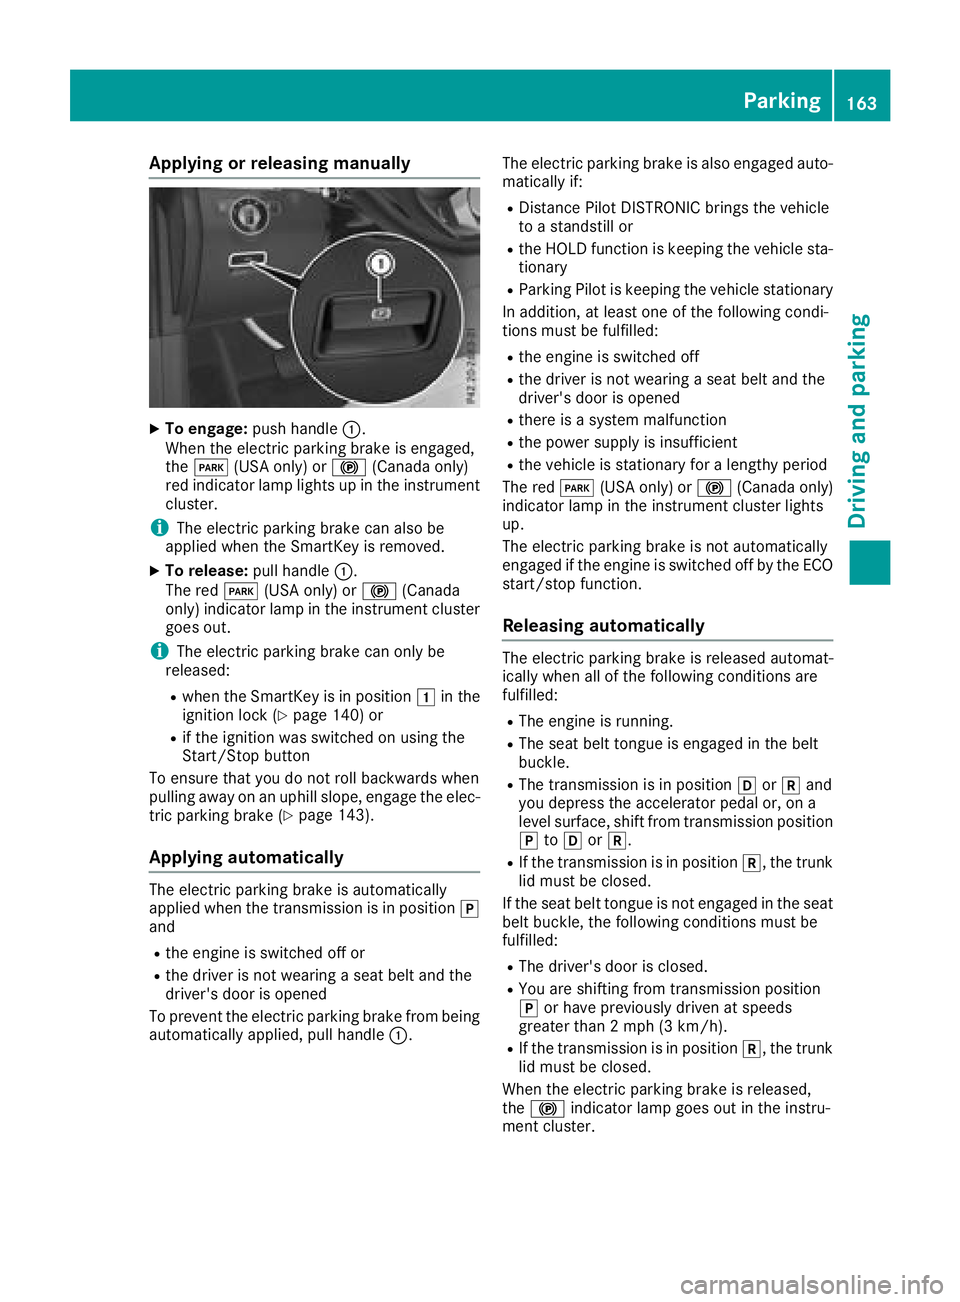
Applyingorreleasing manually
XTo engage: push handle :.
When th eelectric parking brak eis engaged,
th eF (USAonly) or !(Canada only)
red indicator lamp lights up in th einstrumen t
cluster.
iThe electric parking brak ecan also be
applie dwhen th eSmartKey is removed.
XTo release: pull handle:.
The red F(USAonly) or !(Canada
only) indicator lamp in th einstrumen tcluste r
goe sout .
iThe electric parking brak ecan only be
released:
Rwhen th eSmartKey is in position 1in th e
ignition loc k (Ypage 140) or
Rif theignition was switched on usin gth e
Start/Sto pbutto n
To ensur ethat you do no trol lbackwards when
pullin gaway on an uphil lslope, engage th eelec -
tric parking brak e (
Ypage 143).
Applying automatically
The electric parking brak eis automatically
applie dwhen th etransmission is in position j
and
Rth eengin eis switched off or
Rth edriver is no twearing aseat belt and th e
driver's door is opened
To preven tth eelectric parking brak efrom bein g
automatically applied, pull handle :.The electric parking brak
eis also engage dauto -
matically if:
RDistanc ePilo tDISTRONI Cbring sth evehicl e
to astandstill or
Rth eHOLD function is keepin gth evehicl esta-
tionary
RParking Pilo tis keepin gth evehicl estationary
In addition ,at least on eof th efollowin gcondi-
tion smus tbe fulfilled :
Rtheengin eis switched off
Rth edriver is no twearing aseat belt and th e
driver's door is opened
Rthere is asystem malfunction
Rth epowe rsupply is insufficien t
Rthevehicl eis stationary for alengthy period
The red F(USAonly) or !(Canada only)
indicator lamp in th einstrumen tcluste rlights
up.
The electric parking brak eis no tautomatically
engage dif th eengin eis switched off by th eECO
start/sto pfunction .
Releasing automatically
The electric parking brak eis release dautomat -
ically when all of th efollowin gcondition sare
fulfilled :
RThe engin eis running.
RThe seat belt tongue is engage din th ebelt
buckle.
RThe transmission is in position hork and
you depress th eaccelerato rpedal or, on a
level surface, shif tfrom transmission position
j toh ork.
RIf th etransmission is in position k,thetrunk
lid mus tbe closed.
If th eseat belt tongue is no tengage din th eseat
belt buckle, th efollowin gcondition smus tbe
fulfilled :
RThe driver's door is closed.
RYou are shifting from transmission position
jor hav epreviously driven at speeds
greate rthan 2mph (3 km/h).
RIf th etransmission is in position k,thetrunk
lid mus tbe closed.
When th eelectric parking brak eis released,
th e! indicator lamp goes out in th einstru-
men tcluster.
Parking163
Driving and parking
Z
Page 170 of 398
parking brake is being tested on a brake dyna-
mometer (maximum 10 seconds).
Braking triggered automatically by ESP
®may
seriously damage the brake system.
All checks and maintenance work on the brake
system must be carried out at a qualified spe-
cialist workshop.
Have brake pads installed and brake fluid
replaced at a qualified specialist workshop.
If the brake system has only been subject to
moderate loads, you should test the functional-
ity of your brakes at regular intervals. To do so,
depress the brake pedal firmly when driving at a high speed. This improves the grip of the brake
pads.
You can find a description of Brake Assist (BAS)
on (
Ypage 67) or of BAS PLUS on (Ypage 72).
Mercedes-Benz recommends that you only have
brake pads/linings installed on your vehicle
which have been approved for Mercedes-Benz
vehicles or which correspond to an equivalent
quality standard. Brake pads/linings which have
not been approved for Mercedes-Benz vehicles
or which are not of an equivalent quality could
affect your vehicle's operating safety.
Mercedes-Benz recommends that you only use
brake fluid that has been specially approved for
your vehicle by Mercedes-Benz, or which corre-
sponds to an equivalent quality standard. Brake
fluid which has not been approved for
Mercedes-Benz vehicles or which is not of an
equivalent quality could affect your vehicle's
operating safety.
High-performance brake system
(Mercedes-AMG vehicles)
The high-performance brake system is designed
for heavy loads. This may lead to noise when
braking. This will depend on:
RSpeed
RBraking force
REnvironmental conditions, such as tempera-
ture and humidity
The wear of individual components of the brake
system, such as the brake pads/linings or brake
discs, depends on the individual driving style
and operating conditions.
For this reason, it is impossible to state a mile-
age that will be valid under all circumstances. An
aggressive driving style will lead to high wear. You can obtain further information about this
from your authorized Mercedes-Benz Center.
New and replaced brake pads and discs only
reach their optimum braking effect after several
hundred kilometers of driving. Compensate for
this by applying greater force to the brake pedal.
Keep this in mind, and adapt your driving and
braking accordingly during this break-in period.
Excessive heavy braking results in correspond-
ingly high brake wear. Observe the #brake
wear warning lamp in the instrument cluster and
note any brake status messages in the multi-
function display. Especially for high perform-
ance driving, it is important to maintain and have
the brake system checked regularly.
Driving on wet roads
Hydroplaning
If water has accumulated to a certain depth on
the road surface, there is a danger of hydro-
planing occurring, even if:
Ryou drive at low speeds.
Rthe tires have adequate tread depth.
For this reason, in the event of heavy rain or in
conditions in which hydroplaning may occur,
you must drive in the following manner:
Rlower your speed.
Ravoid ruts.
Ravoid sudden steering movements.
Rbrake carefully.
Driving on flooded roads
!Do not drive through flooded areas. Check
the depth of any water before driving through it. Drive slowly through standing water. Oth-
erwise, water may enter the vehicle interior or
the engine compartment. This can damage
the electronic components in the engine or
the automatic transmission. Water can also
be drawn in by the engine's air suction nozzles
and this can cause engine damage.
iVehicles with the AIRMATIC package:
select the raised vehicle level before driving
through a body of water.
168Driving tips
Driving and parking
Page 173 of 398
Familiarize yourself with the characteristics of
your vehicle and the gear shift operation before
driving through difficult terrain.
The following driving systems are specially
adapted to off-road driving:
RtheOff-road drive program (vehicles without
Off-Road Engineering package)
(
Ypage 219)
ROff-road andOff-road Plus drive programs
(vehicles with Off-Road Engineering package)
(
Ypage 220)
RLOW RANGE off-road gear (vehicles with the
Off-Road Engineering package)
(
Ypage 221)
RDifferential lock (vehicles with the Off-Road
Engineering package) (Ypage 221)
ROff-road ABS (Ypage 67)
ROff-road 4ETS (Ypage 70)
ROff-road ESP®(Ypage 71)
RAIRMATIC package (vehicle level)
(Ypage 188)
RDSR (Downhill Speed Regulation)
(Ypage 218)
Observe the following notes:
RStop the vehicle before starting to drive along
an off-road route. If necessary, select the off- road program (
Ypage 220) or shift to the
LOW RANGE off-road gear (Ypage 221).
RSelect a vehicle level that is suitable for the
terrain. To avoid damaging the vehicle, make
sure there is always sufficient ground clear-
ance.
RCheck that items of cargo and loads are
stowed safely and are well secured
(
Ypage 305).
RAlways keep the engine running and in gear
when driving on a downhill gradient. Activate
DSR (
Ypage 218).
RAlways keep the engine running and in gear
when driving down an incline.
RAdapt your speed to the terrain. The rougher,
steeper or more ruts on the terrain, the slower
your speed should be.
RDo not jump with the vehicle as this will inter- rupt the vehicle's propulsion.
RDrive with extreme care on unfamiliar off-road
routes where visibility is poor. For safety rea-
sons, get out of the vehicle first and survey
the off-road route.
RLook out for obstacles, such as rocks, holes,
tree stumps and furrows.
RTake care when turning on an uphill or down-hill slope or when driving across a slope. The
vehicle could otherwise tip over.
RAlways keep the doors, the tailgate, the side
windows and the sliding sunroof closed whilethe vehicle is in motion.
RDo not shift the automatic transmission to
position i.
RObserve the notes on off-road fording
(Ypage 169).
iInformation about retrofitting special all-ter-
rain tires is available from any qualified spe-
cialist workshop.
iDo not use the HOLD function when driving
off-road, on steep uphill or downhill gradients
or on slippery or loose surfaces. The HOLD
function cannot hold the vehicle on such sur-
faces.
Checklist before driving off-road
!If the engine oil warning lamp lights up while
the vehicle is in motion, stop the vehicle in a
safe place as soon as possible. Check the
engine oil level. The engine oil warning lamp
warning must not be ignored. Continuing the
journey while the symbol is displayed could
lead to engine damage.
XEngine oil level: check the engine oil level
and add oil if necessary.
When driving on steep gradients, the engine
oil level must be sufficiently high to ensure a
correct oil supply in the vehicle.
XDEF tank (BlueTEC vehicles): check the
level and add if necessary (Ypage 158).
XTire-changing tool kit: check that the jack is
working and make sure you have the lug
wrench, a robust tow cable and a folding
spade in the vehicle.
XWheels and tires: check the tread depth and
pressure of the tires.
XCheck for damage and remove any foreign
objects, e.g. small stones, from the wheels/
tires.
XReplace any missing valve caps.
XReplace dented or damaged wheels.
XRims: dented or bent rims can result in a loss
of tire pressure and damage the tire bead.
Driving tips171
Driving and parking
Z