2018 MERCEDES-BENZ GLS SUV ESP
[x] Cancel search: ESPPage 219 of 398
ing over a solid lane marking. There is a risk of
an accident.
An inappropriate brake application may be
interrupted at any time if you steer slightly in
the opposite direction. Always make sure that
there is sufficient distance on the side for
other traffic or obstacles.
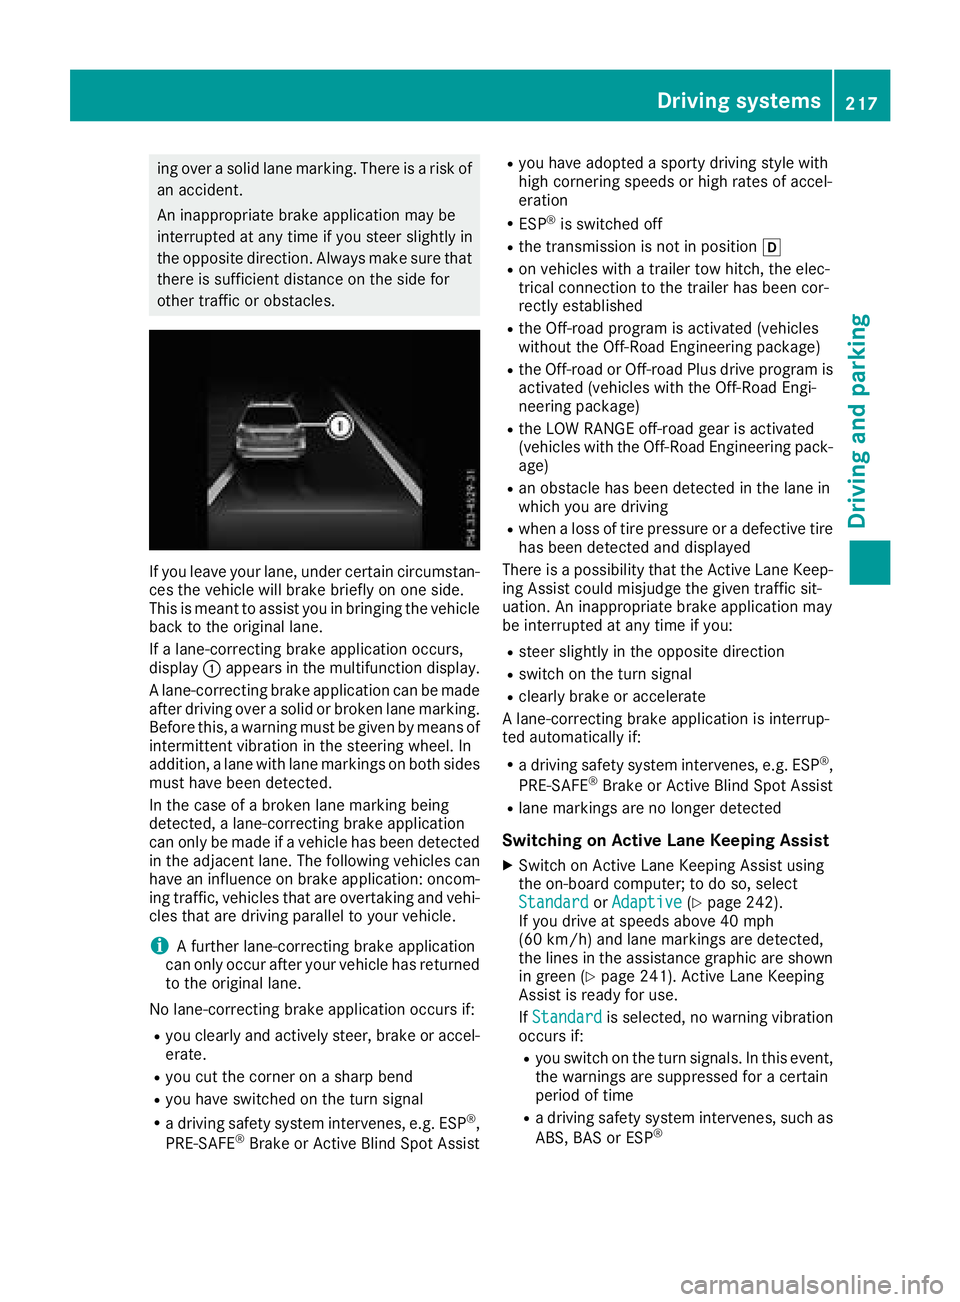
If you leave your lane, under certain circumstan-
ces the vehicle will brake briefly on one side.
This is meant to assist you in bringing the vehicle
back to the original lane.
If a lane-correcting brake application occurs,
display:appears in the multifunction display.
A lane-correcting brake application can be made
after driving over a solid or broken lane marking.
Before this, a warning must be given by means of
intermittent vibration in the steering wheel. In
addition, a lane with lane markings on both sides must have been detected.
In the case of a broken lane marking being
detected, a lane-correcting brake application
can only be made if a vehicle has been detected
in the adjacent lane. The following vehicles can
have an influence on brake application: oncom-
ing traffic, vehicles that are overtaking and vehi-
cles that are driving parallel to your vehicle.
iA further lane-correcting brake application
can only occur after your vehicle has returned
to the original lane.
No lane-correcting brake application occurs if:
Ryou clearly and actively steer, brake or accel-
erate.
Ryou cut the corner on a sharp bend
Ryou have switched on the turn signal
Ra driving safety system intervenes, e.g. ESP®,
PRE-SAFE®Brake or Active Blind Spot Assist
Ryou have adopted a sporty driving style with
high cornering speeds or high rates of accel-
eration
RESP®is switched off
Rthe transmission is not in position h
Ron vehicles with a trailer tow hitch, the elec-
trical connection to the trailer has been cor-
rectly est
ablished
Rthe Off-road program is activated (vehicles
without the Off-Road Engineering package)
Rthe Off-road or Off-road Plus drive program is
activated (vehicles with the Off-Road Engi-
neering package)
Rthe LOW RANGE off-road gear is activated
(vehicles with the Off-Road Engineering pack-
age)
Ran obstacle has been detected in the lane in
which you are driving
Rwhen a loss of tire pressure or a defective tire
has been detected and displayed
There is a possibility that the Active Lane Keep- ing Assist could misjudge the given traffic sit-
uation. An inappropriate brake application may
be interrupted at any time if you:
Rsteer slightly in the opposite direction
Rswitch on the turn signal
Rclearly brake or accelerate
A lane-correcting brake application is interrup-
ted automatically if:
Ra driving safety system intervenes, e.g. ESP®,
PRE-SAFE®Brake or Active Blind Spot Assist
Rlane markings are no longer detected
Switching on Active Lane Keeping Assist
XSwitch on Active Lane Keeping Assist using
the on-board computer; to do so, select
Standard
or Adaptive(Ypage 242).
If you drive at speeds above 40 mph
(60 km/h) and lane markings are detected,
the lines in the assistance graphic are shown
in green (
Ypage 241). Active Lane Keeping
Assist is ready for use.
If Standard
is selected, no warning vibration
occurs if:
Ryou switch on the turn signals. In this event,
the warnings are suppressed for a certain
period of time
Ra driving safety system intervenes, such as
ABS, BAS or ESP®
Driving systems217
Driving and parking
Z
Page 220 of 398
WhenAdaptiveis selected, no warning vibra-
tion occurs if:
Ryou switch on the turn signals. In this event,
the warnings are suppressed for a certain
period of time
Ra driving safety system intervenes, e.g.
ABS, BAS or ESP®
Ryou accelerate hard, e.g. kickdown
Ryou brake hard
Ryou steer actively, e.g. swerve to avoid an
obstacle or change lanes quickly
Ryou cut the corner on a sharp bend
Towing a trailer
When you attach a trailer, make sure you have
correctly established the electrical connection.
This can be accomplished by checking the trailer
lighting. Lane-correcting brake application does
not take place when towing a trailer. Active Lane
Keeping Assist is not activated and the lines in
the assistance graphic are gray.
Off-road driving systems
4MATIC (permanent four-wheel drive)
4MATIC ensures that all four wheels are perma-
nently driven. Together with ESP®and 4ETS, it
improves the traction of your vehicle whenever
a drive wheel spins due to insufficient grip.
If you fail to adapt your driving style, 4MATIC can
neither reduce the risk of accident nor override the laws of physics. 4MATIC cannot take
account of road, weather and traffic conditions.
4MATIC is only an aid. You are responsible for
the distance to the vehicle in front, for vehicle
speed, for braking in good time and for staying in
your lane.
!Never tow the vehicle with one axle raised.
This may damage the transfer case. Damage
of this sort is not covered by the Mercedes-
Benz Limited Warranty. All wheels must
remain either on the ground or be fully raised.
Observe the instructions for towing the vehi-
cle with all wheels in full contact with the
ground.
!A function or performance test should only
be carried out on a two-axle dynamometer.
Before you operate the vehicle on such a
dynamometer, please consult a qualified workshop. You could otherwise damage the
drive train or the brake system.
iIn wintry driving conditions, the maximum
effect of 4MATIC can only be achieved if you
use winter tires (M+S tires), with snow chains
if necessary.
Further information about "Driving off-road"
(
Ypage 170).
DSR (Downhill Speed Regulation)
General notes
DSR is an aid to assist you when driving down-
hill. It keeps the speed of travel at the speed
selected on the on-board computer. The steeper
the downhill gradient, the greater the DSR brak-
ing effect on the vehicle. When driving on flat
stretches of road or on an uphill gradient, the
DSR braking effect is minimal or nonexistent.
DSR controls the vehicle’s speed when it is acti- vated and the transmission is in position D,Ror
N . You can drive at a higher or a lower speed
than that set on the on-board computer at any
time by accelerating or braking.
Important safety notes
GWARNING
If the speed driven and the set speed deviate and you activate DSR on a slippery road sur-
face, the wheels may lose traction. There is an
increased danger of skidding and accidents.
Before switching DSR on, please take into
consideration the road surface and the differ- ence between driving speed and the set
speed.
If you fail to adapt your driving style, DSR can
neither reduce the risk of accident nor override the laws of physics. DSR cannot take account of
road, weather and traffic conditions. DSR is only
an aid. You are responsible for the distance to
the vehicle in front, for vehicle speed, for brak-
ing in good time and for staying in your lane.
You are always responsible for keeping control
of the vehicle and for assessing whether the
downhill gradient can be managed. DSR may not always be able to keep to the set speed, depend-
ing on road surface and tire conditions. Select a
set speed suitable for the prevailing conditions
and when necessary, apply the brakes manually.
218Driving systems
Driving and parking
Page 221 of 398

Activating DSR
XPress button:.
Indicato rlamp ;lights up.
The à DSRsymbol appear sin th emulti-
function display.
You can only activat eDS Rwhen driving at
speeds below 25 mph (40 km/h).
If th ecurren tvehicl espee dis to ohigh ,th eÃ
DS Rsymbol appear sin th emultifunction display
wit hth eMax .speed 25 mph
message (Can -
ada: 40 km/ h).
If you have activated DS Rand you chang eth e
driv eprogram ,DS Ris deactivated. If you switch
between th eoffroad and offroad plus driv epro -
grams, DS Rremains activated.
Deactivating DSR
XPress butto n:.
Indicato rlamp ;goes out .
The à DSRsymbol appear sin th emulti-
function display wit hth eOff
message .
On vehicles wit hth e Off road Engineering pack-
age, if you select adifferent driv eprogram ,DS R
is also deactivated. If you switch between th e
Off road programs, DS Rremains activated.
DS Rswitches off automatically if you driv e
faste rthan 28 mph (Canada: 45 km/h). The
à DSRsymbol appear sin th emultifunction
display wit hth eOff
message .The status indi-
cator in th emultifunction display goes out .You
also hear awarning . Onvehicles wit hth e Off-
road Engineering package, if you select adiffer-
en tonroad/offroad program ,DS Ris also deac -
tivated.
Changing the set speed
XTo increase or reduce th eset speed in
1 mp hincrement s(Canada: 1km/h
increments): briefly press th ecruise control
leve rup : for ahigher set spee dor down ;
for alower set speed.
The set spee dappear sin th emultifunction
display wit hth eà DSRsymbol.
When DS Ris activated, you can chang eth eset
spee dto avalue between 1mph and 11 mph
(Canada: between 2km/h and 18 km/h).
iThe DS Rset spee dis always changed in
1 mph increments (Canada: 1km/h incre-
ments). This is regardless of whether you
press th ecruise control leve rto or beyon dth e
pressur epoint.
Off-road program (vehicles without the
Off-Road Engineering package)
General notes
Selec tth eOff roa dprogram for easil ynegotia-
ble off-road terrain, e.g. dirt tracks, gravel or
sandy surfaces. The engine's torque is restric-
te dto alimited degree and th edriv ewheels can
spin .The spinnin gwheels produce acuttin g
effect for bette rtraction .ABS, ES P
®and 4ETS
program sespecially adapted to off-road driving
are activated. Agentle accelerato rpedal curve
is also selected, i.e .th eaccelerato rpedal must
be depressed muc hfurther in order to acceler -
ate .
You can select th eOff roa ddriv eprogram at
speeds below 60 mph (96 km/h). The Drive
program"Offroad" Max .Speed 60 mphmessage appear sin th emultifunction display. If
you driv eat speeds of mor ethan 60 mph
(96 km/ h)and select the Offroaddrive pro-
gram, the Drive More Slowly
message
Driving systems219
Driving and parking
Z
Page 222 of 398

appears in the multifunction display. The last
active drive program is selected again.
Do not use theOffroadprogram on roads that
are snow-covered or icy or if you have installed
your vehicle with snow chains.
Selecting the Offroad program
Selecting the Offroad program
XTo select drive program: turn DYNAMIC
SELECT controller :until indicator lamp ;
lights up.
The Drive Program "Offroad1" Max.
Speed 60 mphmessage appears in the mul-
tifunction display.
The vehicle is raised by +2.4 in (60 mm).
The vehicle is lowered to normal level again if
you:
Rdrive at speeds above 37 mph (60 km/h) (all
vehicles except Mercedes-AMG vehicles)
Rdrive at speeds above 43 mph (70 km/h)
(Mercedes-AMG vehicles)
Rdrive at speeds between 40 mph (64 km/h)
and 43 mph (70 km/h) for approximately
20 seconds (Mercedes-AMG vehicles)
The vehicle changes from the Offroaddrive pro-
gram to the Comfortdrive program if you drive
faster than 70 mph (112 km/h).
The Drive More Slowly
message appears in
the multifunction display.
Further information about "Driving off-road"
(
Ypage 170).
Off-road programs (vehicles with Off-
Road Engineering package)
General notes
The Offroad andOffroad Plus drive programs
assist you when driving off-road. The engine's
performance characteristics and the gearshift-
ing characteristics of the automatic transmis-
sion are adapted for this purpose. ABS, ESP
®
and 4ETS programs especially adapted to off-
road driving are activated. An accelerator pedal
curve suitable for the terrain is selected, i.e. the
accelerator pedal must be depressed further to
accelerate.
Do not use the OffroadorOffroad Plus drive
programs on roads that are snow-covered or icy,
or if you have installed your vehicle with snow
chains.
Offroad drive program
:DYNAMIC SELECT controller
;Offroad program indicator lamp
Select the Offroadprogram for easily negotia-
ble off-road terrain, e.g. dirt tracks, gravel or
sandy surfaces. The engine's torque is restric-
ted to a limited degree and the drive wheels can
spin. The spinning wheels produce a cutting
effect for better traction. ABS, ESP
®and 4ETS
programs especially adapted to off-road driving are activated. A gentle accelerator pedal curve
is also selected, i.e. the accelerator pedal must
be depressed much further in order to acceler-
ate.
You can select the Offroaddrive program at
speeds below 60 mph (96 km/h). The Drive
Program "Offroad" Max. Speed 60 mphmessage appears in the multifunction display. If
you drive at speeds above 60 mph(96 km/h)
and select the Offroaddrive program, the
Drive More Slowly
message appears in the
220Driving systems
Driving and parking
Page 225 of 398
Messages in the multifunction display
If a gear change process has not been successful, the following messages may be displayed in the
multifunction display:
Display messagesPossible causes/consequences andMSolutions
LOW RANGE Max.Speed 24 mphYou have been driving faster than 24 mph (40 km/h). Additionally, the
indicator lamp on the button in the center console is flashing.
XSlow down to change gear.
LOW RANGE Shift toPosition N BrieflyThe transmission is in positionDand you are driving at below
40 km/h.
XShift the transmission to Nto complete the gear change process.
LOW RANGE ShiftingCanceled PleaseReactivate
The gear change process was not carried out.
XEnsure that all gear change conditions are fulfilled and carry out the
gear change process again.
LOW RANGE StopApply Parking BrakeA warning tone also sounds. The gear change process has not been
completed. LOW RANGE is in the neutral position. There is no con-
nection between the engine and the drive wheels.
!Do not drive any further. You could otherwise damage the vehi-
cle's drive train.
XStop the vehicle. Take into account the road and traffic conditions
when doing this.
XDepress the electric parking brake (Ypage 162).
XCarry out the gear change process again.
If the gear change process has been carried out, the LOW RANGE
Stop Apply Parking Brakemessage disappears.
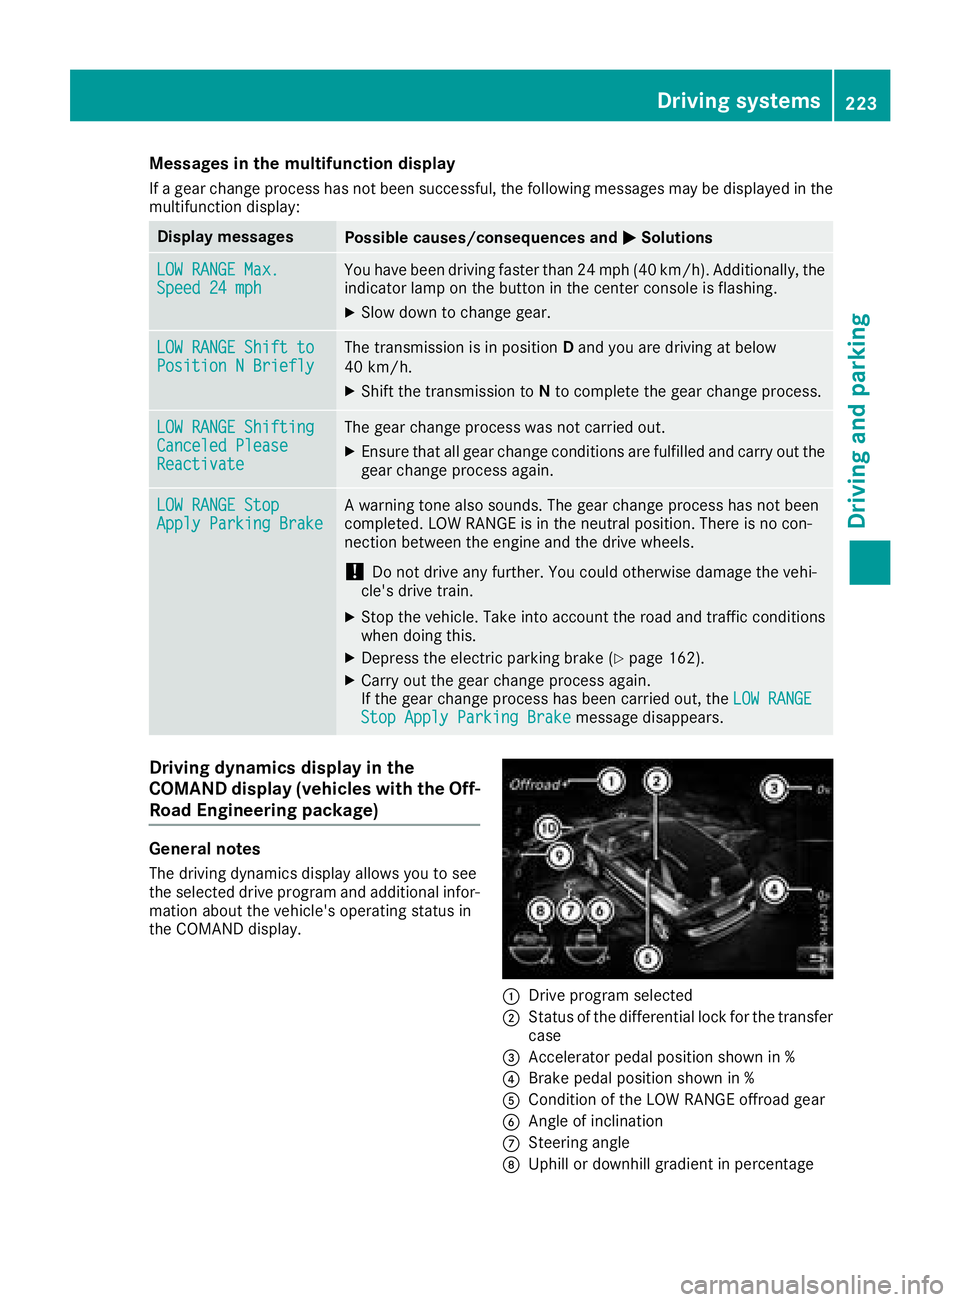
Driving dynamics display in the
COMAND display (vehicles with the Off-
Road Engineering package)
General notes
The driving dynamics display allows you to see
the selected drive program and additional infor-
mation about the vehicle's operating status in
the COMAND display.
:Drive program selected
;Status of the differential lock for the transfer
case
=Accelerator pedal position shown in %
?Brake pedal position shown in %
ACondition of the LOW RANGE offroad gear
BAngle of inclination
CSteering angle
DUphill or downhill gradient in percentage
Driving systems223
Driving and parking
Z
Page 226 of 398

ELevel control
FCompass with angle scale
Activating the driving dynamics display
XSwitch on COMAND (see the Digital Opera-
tor's Manual).
XPress button:.
The driving dynamics display appears in the
COMAND display.
Towing a trailer
Important safety notes
GWARNING
Installing an unsuitable ball coupling may
result in overloading of the trailer tow hitch
and the rear axle. This applies especially if the ball coupling in question is longer or angled
differently. This could seriously impair the
driving characteristics and the trailer can
come loose. There is a risk of an accident.
You should only ever install a ball coupling
that has the permissible dimensions and that
is designed to meet your trailer-towing
requirements. Do not modify the ball coupling
or the trailer tow hitch.
You will find the values approved by the manu-
facturer on the vehicle identification plates and
those for the towing vehicle under "Technical
data" (
Ypage 395).
GWARNING
If the ball coupling is not installed correctly or not secured with the bolt provided and the
corresponding spring cotter, the trailer may
come loose. There is a risk of an accident.
Always install and secure the ball coupling asdescribed. Before every journey, ensure that
the ball coupling is secured with the bolt and
the corresponding spring cotter.
GWARNING
When the vehicle/trailer combination begins
to lurch, you could lose control of it. The vehi- cle/trailer combination could even rollover.
There is a risk of an accident.
On no account should you attempt to
straighten up the vehicle/trailer combination
by increasing the speed. Reduce vehicle
speed and do not countersteer. Apply the
brake as necessary.
Please observe the manufacturer's operating
instructions for the trailer coupling if a detach-
able trailer coupling is used.
Couple and uncouple the trailer carefully. If you
do not couple the trailer to the towing vehicle
correctly, the trailer could become detached.
Make sure that the following values are not
exceeded:
Rthe permissible trailer drawbar noseweight
Rthe permissible trailer load
Rthe permissible rear axle load of the towing
vehicle
Rthe maximum permissible gross vehicle
weight of both the towing vehicle and the
trailer
The applicable permissible values, which must
not be exceeded, can be found:
Rin the vehicle documents
Ron the identification plates for the trailer tow
hitch and the trailer
Ron the vehicle identification plate
If the values differ, the lowest value applies.
When towing a trailer, your vehicle's handling
characteristics will be different in comparison
with when driving without a trailer.
The vehicle/trailer combination:
Ris heavier
Ris restricted in its acceleration and gradient-
climbing capability
Rhas an increased braking distance
224Towing a trailer
Driving and parking
Page 228 of 398
RMaintain a greater distance from the vehicle
in front than when driving without a trailer.
RAvoid braking abruptly. If possible, brake gen-tly at first to allow the trailer to run on. Then,
increase the braking force rapidly.
RThe values given for gradient-climbing capa-
bilities from a standstill refer to sea level.
When driving in mountainous areas, note that
the power output of the engine and, conse-
quently, the vehicle's gradient-climbing capa-
bility, decreases with increasing altitude.
Installing the ball coupling
GWARNING
If the ball coupling is not correctly installed
and secured, it can come loose during the
journey and endanger other road users. There is a risk of an accident and injury.
Always install and secure the ball coupling as
described. Before every journey, ensure that
the ball coupling is secured with the bolt and
the corresponding spring cotter.
GWARNING
If the ball coupling is not installed correctly or not secured with the bolt provided and the
corresponding spring cotter, the trailer may
come loose. There is a risk of an accident.
Always install and secure the ball coupling as
described. Before every journey, ensure that
the ball coupling is secured with the bolt and
the corresponding spring cotter.
GWARNING
If the ball coupling is not installed and secured
correctly the trailer may come loose. There is
a risk of an accident.
Install and secure the ball coupling as descri-
bed in the ball coupling installation instruc-
tions. Make sure that the ball coupling is
installed and secured correctly before every
journey.
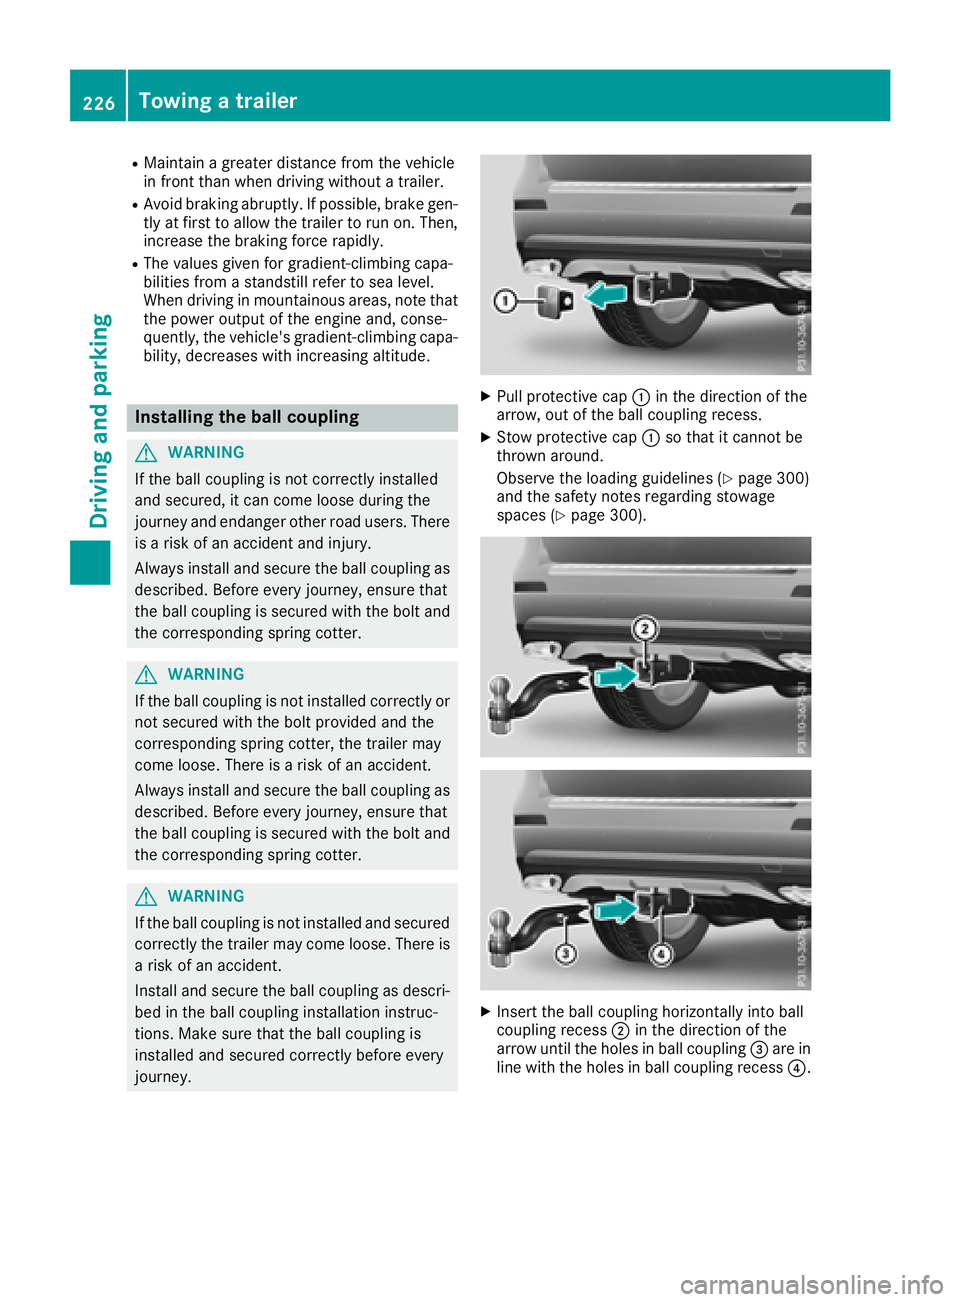
XPull protective cap :in the direction of the
arrow, out of the ball coupling recess.
XStow protective cap :so that it cannot be
thrown around.
Observe the loading guidelines (
Ypage 300)
and the safety notes regarding stowage
spaces (
Ypage 300).
XInsert the ball coupling horizontally into ball
coupling recess ;in the direction of the
arrow until the holes in ball coupling =are in
line with the holes in ball coupling recess ?.
226Towing a trailer
Driving and parking
Page 229 of 398
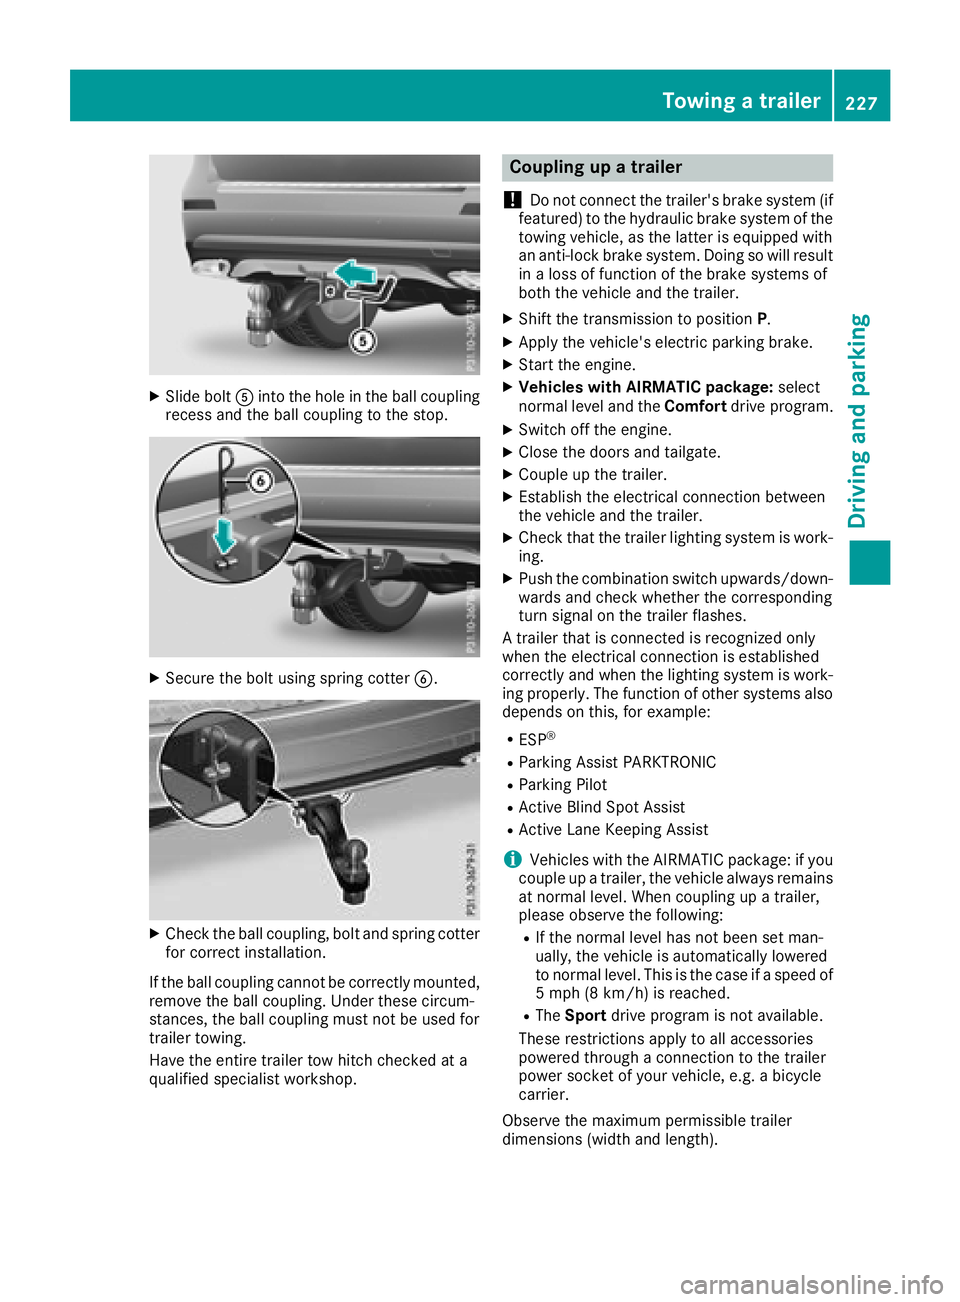
XSlide boltAinto the hole in the ball coupling
recess and the ball coupling to the stop.
XSecure the bolt using spring cotter B.
XCheck the ball coupling, bolt and spring cotter
for correct installation.
If the ball coupling cannot be correctly mounted,
remove the ball coupling. Under these circum-
stances, the ball coupling must not be used for
trailer towing.
Have the entire trailer tow hitch checked at a
qualified specialist workshop.
Coupling up a trailer
!
Do not connect the trailer's brake system (if
featured) to the hydraulic brake system of the
towing vehicle, as the latter is equipped with
an anti-lock brake system. Doing so will result
in a loss of function of the brake systems of
both the vehicle and the trailer.
XShift the transmission to position P.
XApply the vehicle's electric parking brake.
XStart the engine.
XVehicles with AIRMATIC package: select
normal level and the Comfortdrive program.
XSwitch off the engine.
XClose the doors and tailgate.
XCouple up the trailer.
XEstablish the electrical connection between
the vehicle and the trailer.
XCheck that the trailer lighting system is work-
ing.
XPush the combination switch upwards/down-
wards and check whether the corresponding
turn signal on the trailer flashes.
A trailer that is connected is recognized only
when the electrical connection is established
correctly and when the lighting system is work-
ing properly. The function of other systems also
depends on this, for example:
RESP®
RParking Assist PARKTRONIC
RParking Pilot
RActive Blind Spot Assist
RActive Lane Keeping Assist
iVehicles with the AIRMATIC package: if you
couple up a trailer, the vehicle always remains
at normal level. When coupling up a trailer,
please observe the foll
owing:
RIf the normal level has not been set man-
ually, the vehicle is automatically lowered
to normal level. This is the case if a speed of
5 mph (8 km/h) is reached.
RThe
Sport drive program is not available.
These restrictions apply to all accessories
powered through a connection to the trailer
power socket of your vehicle, e.g. a bicycle
carrier.
Observe the maximum permissible trailer
dimensions (width and length).
Towing a trailer227
Driving and parking
Z