2018 MERCEDES-BENZ GLE SUV brake
[x] Cancel search: brakePage 221 of 398
ELevel control
FCompass with angle scale
Activating the driving dynamics display
XSwitch on COMAND (see the Digital Opera-
tor's Manual).
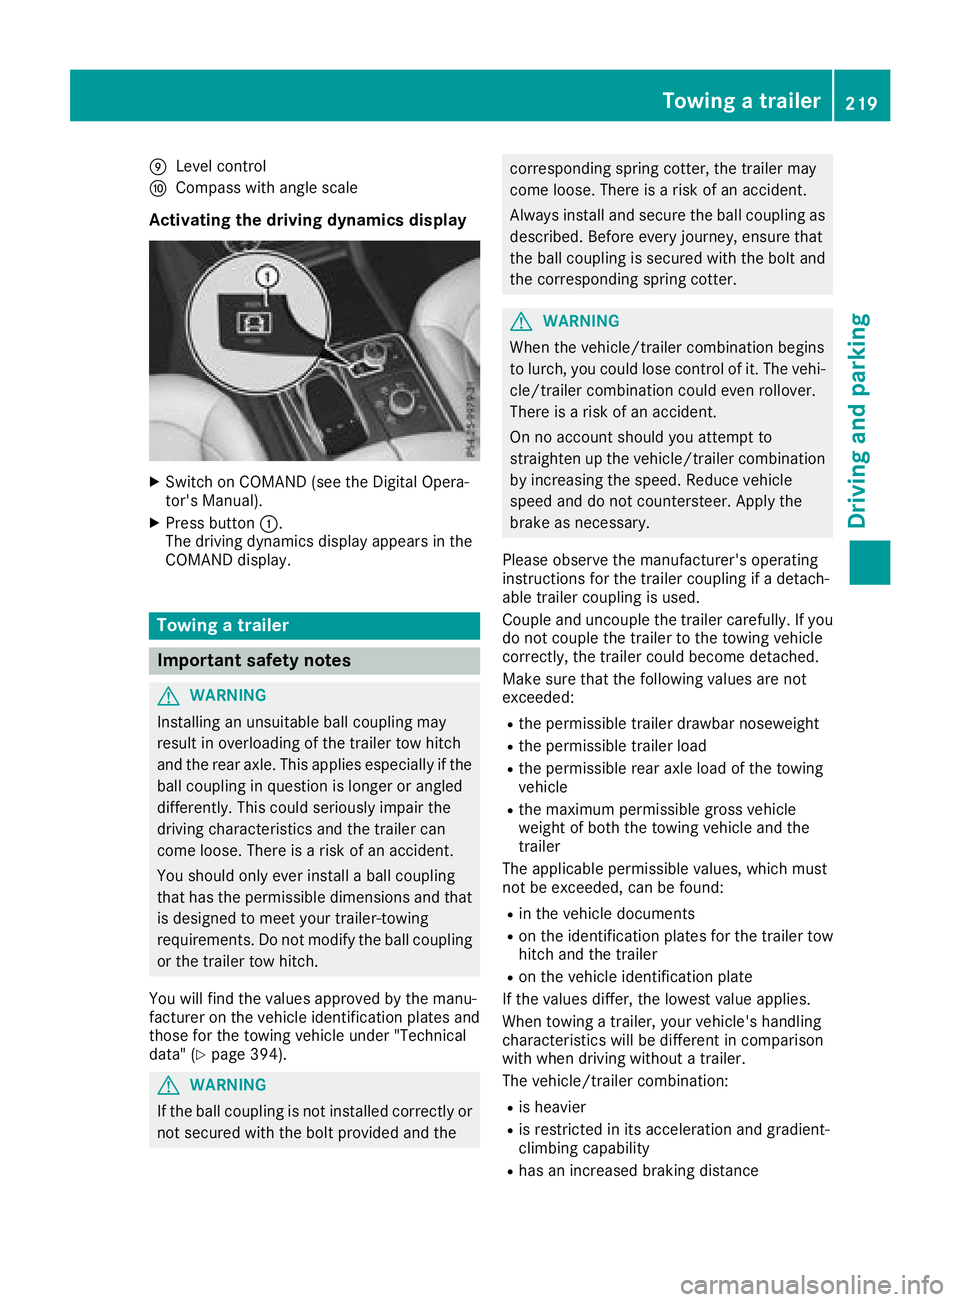
XPress button:.
The driving dynamics display appears in the
COMAND display.
Towing a trailer
Important safety notes
GWARNING
Installing an unsuitable ball coupling may
result in overloading of the trailer tow hitch
and the rear axle. This applies especially if the ball coupling in question is longer or angled
differently. This could seriously impair the
driving characteristics and the trailer can
come loose. There is a risk of an accident.
You should only ever install a ball coupling
that has the permissible dimensions and that
is designed to meet your trailer-towing
requirements. Do not modify the ball coupling
or the trailer tow hitch.
You will find the values approved by the manu-
facturer on the vehicle identification plates and
those for the towing vehicle under "Technical
data" (
Ypage 394).
GWARNING
If the ball coupling is not installed correctly or not secured with the bolt provided and the
corresponding spring cotter, the trailer may
come loose. There is a risk of an accident.
Always install and secure the ball coupling asdescribed. Before every journey, ensure that
the ball coupling is secured with the bolt and
the corresponding spring cotter.
GWARNING
When the vehicle/trailer combination begins
to lurch, you could lose control of it. The vehi- cle/trailer combination could even rollover.
There is a risk of an accident.
On no account should you attempt to
straighten up the vehicle/trailer combination
by increasing the speed. Reduce vehicle
speed and do not countersteer. Apply the
brake as necessary.
Please observe the manufacturer's operating
instructions for the trailer coupling if a detach-
able trailer coupling is used.
Couple and uncouple the trailer carefully. If you
do not couple the trailer to the towing vehicle
correctly, the trailer could become detached.
Make sure that the following values are not
exceeded:
Rthe permissible trailer drawbar noseweight
Rthe permissible trailer load
Rthe permissible rear axle load of the towing
vehicle
Rthe maximum permissible gross vehicle
weight of both the towing vehicle and the
trailer
The applicable permissible values, which must
not be exceeded, can be found:
Rin the vehicle documents
Ron the identification plates for the trailer tow
hitch and the trailer
Ron the vehicle identification plate
If the values differ, the lowest value applies.
When towing a trailer, your vehicle's handling
characteristics will be different in comparison
with when driving without a trailer.
The vehicle/trailer combination:
Ris heavier
Ris restricted in its acceleration and gradient-
climbing capability
Rhas an increased braking distance
Towing a trailer219
Driving and parking
Z
Page 222 of 398
Ris affected more by strong crosswinds
Rdemands more sensitive steering
Rhas a larger turning circle
This could impair the handling characteristics.
When towing a trailer, always adjust your speed
to the current road and weather conditions. Do
not exceed the maximum permissible speed for
your vehicle/trailer combination.
Notes on towing a trailer
General notes
!If you have a trailer tow hitch retrofitted,
changes to the cooling system and drive train
may be necessary, depending on the vehicle
type.
If you have a trailer tow hitch retrofitted,
observe the anchorage points on the chassis
frame.
RDo not exceed the legally prescribed maxi-
mum speed for vehicle/trailer combinations
in the relevant country.
This lowers the risk of an accident.
ROnly install an approved trailer coupling on
your vehicle.
More information on availability and installa-
tion can be obtained at any qualified special-
ist workshop.
RThe bumpers of your vehicle are not suitable
for installing detachable trailer couplings.
RDo not install hired trailer couplings or other
detachable trailer couplings on the bumpers
of your vehicle.
RIf you no longer need the ball coupling,
remove it from the ball coupling recess. This
will reduce the risk of damage to the ball cou-
pling.
When towing a trailer, set the tire pressure on
the rear axle of the towing vehicle for the max-
imum load. You will find the values in the tire
pressure table in the fuel filler flap of the vehicle (
Ypage 369).
Please note that when towing a trailer, the fol-
lowing driving systems have limited availability
or are not available at all:
RParking Assist PARKTRONIC (Ypage 187)
RBlind Spot Assist (Ypage 204)
RActive Lane Keeping Assist (Ypage 210) On vehicles without level control, the height of
the ball coupling will alter according to the load
placed on the vehicle. If necessary, use a trailer
with a height-adjustable drawbar.
You will find installing dimensions and loads
under "Technical data" (
Ypage 394).
Driving tips
Also observe the notes on pulling away with a
trailer (Ypage 138).
The maximum permissible speed for vehicle/
trailer combinations depends on the type of
trailer. Before beginning the journey, check the
trailer's documents to see what the maximum
permissible speed is for your trailer. Observe the
legally permissible maximum speed in the rele-
vant country.
For certain Mercedes-Benz vehicles, the maxi-
mum permissible rear axle load is increased
when towing a trailer. See "Technical data" to
find out whether this applies to your vehicle
(
Ypage 394). If you utilize any of the added
maximum rear axle load when towing a trailer,
the vehicle/trailer combination may not exceed
a maximum speed of 60 mph (100 km/h) for
reasons concerning the operating permit. This
also applies in countries in which the maximum
permissible speed for car/trailer combinations
is greater than 60 mph (100 km/h).
When towing a trailer, your vehicle's handling
characteristics will be different in comparison
with when driving without a trailer.
Use the left-hand steering wheel paddle shifter
to shift into a lower gear in good time on long
and steep downhill gradients.
This also applies if you have activated cruise
control or Distance Pilot DISTRONIC.
This will use the braking effect of the engine, so that less braking will be required to maintain the
speed. This relieves the load on the brake sys-
tem and prevents the brakes from overheating
and wearing too quickly. If you need additional
braking, depress the brake pedal repeatedly
rather than continuously.
Driving tips
If the trailer swings from side to side:
XDo not accelerate.
XDo not counter-steer.
XBrake if necessary.
220Towing a trailer
Driving and parking
Page 223 of 398

RMaintain a greater distance from the vehicle
in front than when driving without a trailer.
RAvoid braking abruptly. If possible, brake gen-tly at first to allow the trailer to run on. Then,
increase the braking force rapidly.
RThe values given for gradient-climbing capa-
bilities from a standstill refer to sea level.
When driving in mountainous areas, note that
the power output of the engine and, conse-
quently, the vehicle's gradient-climbing capa-
bility, decreases with increasing altitude.
Installing the ball coupling
GWARNING
If the ball coupling is not correctly installed
and secured, it can come loose during the
journey and endanger other road users. There is a risk of an accident and injury.
Always install and secure the ball coupling as
described. Before every journey, ensure that
the ball coupling is secured with the bolt and
the corresponding spring cotter.
GWARNING
If the ball coupling is not installed correctly or not secured with the bolt provided and the
corresponding spring cotter, the trailer may
come loose. There is a risk of an accident.
Always install and secure the ball coupling as
described. Before every journey, ensure that
the ball coupling is secured with the bolt and
the corresponding spring cotter.
GWARNING
If the ball coupling is not installed and secured
correctly the trailer may come loose. There is
a risk of an accident.
Install and secure the ball coupling as descri-
bed in the ball coupling installation instruc-
tions. Make sure that the ball coupling is
installed and secured correctly before every
journey.
XPull protective cap :in the direction of the
arrow, out of the ball coupling recess.
XStow protective cap :so that it cannot be
thrown around.
Observe the loading guidelines (
Ypage 295)
and the safety notes regarding stowage
spaces (
Ypage 295).
XInsert the ball coupling horizontally into ball
coupling recess ;in the direction of the
arrow until the holes in ball coupling =are in
line with the holes in ball coupling recess ?.
Towing a trailer221
Driving and parking
Z
Page 224 of 398

XSlide boltAinto the hole in the ball coupling
recess and the ball coupling to the stop.
XSecure the bolt using spring cotter B.
XCheck the ball coupling, bolt and spring cotter
for correct installation.
If the ball coupling cannot be correctly mounted,
remove the ball coupling. Under these circum-
stances, the ball coupling must not be used for
trailer towing.
Have the entire trailer tow hitch checked at a
qualified specialist workshop.
Coupling up a trailer
!
Do not connect the trailer's brake system (if
featured) to the hydraulic brake system of the
towing vehicle, as the latter is equipped with
an anti-lock brake system. Doing so will result
in a loss of function of the brake systems of
both the vehicle and the trailer.
XShift the transmission to position P.
XApply the vehicle's electric parking brake.
XStart the engine.
XVehicles with AIRMATIC package: select
normal level and the Comfortdrive program.
XSwitch off the engine.
XClose the doors and tailgate.
XCouple up the trailer.
XEstablish the electrical connection between
the vehicle and the trailer.
XCheck that the trailer lighting system is work-
ing.
XPush the combination switch upwards/down-
wards and check whether the corresponding
turn signal on the trailer flashes.
A trailer that is connected is recognized only
when the electrical connection is established
correctly and when the lighting system is work-
ing properly. The function of other systems also
depends on this, for example:
RESP®
RParking Assist PARKTRONIC
RParking Pilot
RActive Blind Spot Assist
RActive Lane Keeping Assist
iVehicles with the AIRMATIC package: if you
couple up a trailer, the vehicle always remains
at normal level. When coupling up a trailer,
please observe the foll
owing:
RIf the normal level has not been set man-
ually, the vehicle is automatically lowered
to normal level. This is the case if a speed of
5 mph (8 km/h) is reached.
RThe
Sport drive program is not available.
These restrictions apply to all accessories
powered through a connection to the trailer
power socket of your vehicle, e.g. a bicycle
carrier.
Observe the maximum permissible trailer
dimensions (width and length).
222Towing a trailer
Driving and parking
Page 225 of 398
Most U.S. states and all Canadian provinces
require by law:
RSafety chains between the towing vehicle and
the trailer. The chains should be cross-wound
under the trailer drawbar. They must be fas-
tened to the vehicle's trailer coupling, not to
the bumper or the axle.
Leave enough play in the chains to make tight
cornering possible.
RA separate brake system for certain types of
trailer.
RSafety switch for braked trailers. Check the
specific legal requirements applicable to your
state.
If the trailer becomes detached from the tow-
ing vehicle, the safety feature triggers the
trailer brakes.
Towing a trailer
There are numerous legal requirements con-
cerning the towing of a trailer, e.g. speed restric-
tions. Make sure that your car/trailer combina-tion complies with the local regulations:
Rin your place of residence
Rin the location to which you are driving
The police and local authorities can provide reli-
able information.
Observe the following when towing a trailer:
RTo gain driving experience and to become
accustomed to the new handling characteris-
tics, you should practice the following in a
traffic-free location:
-cornering
-stopping
-backing up
RBefore driving, check:
-trailer tow hitch
-safety switch for braked trailers
-safety chains
-electrical connections
-lights
-wheels
RAdjust the exterior mirrors to provide an
unobstructed view of the rear section of the
trailer.
RIf the trailer has electronically controlled
brakes, pull away carefully. Brake manually using the brake controller and check whether
the brakes function correctly.
RSecure any objects on the trailer to prevent
the cargo from slipping when the vehicle is in
motion.
RWhen you couple up a trailer, check at regular
intervals that the load is firmly secured. If the
trailer is equipped with trailer lights and
brakes, check the trailer to ensure that these
are working.
RBear in mind that the handling will be less
stable when towing a trailer than when driving
without one. Avoid sudden steering move-
ments.
RThe vehicle/trailer combination is heavier,
accelerates more slowly, has a decreased
gradient climbing capability and a longer
braking distance.
It is more susceptible to side winds and
requires more careful steering.
RIf possible, do not brake suddenly, but instead
depress the brake pedal moderately at first so
that the trailer can activate its brakes. Then
increase the pressure on the brake pedal.
RIf the automatic transmission repeatedly
shifts between gears on uphill or downhill gra-
dients, shift to a lower gear using the left-hand
steering wheel paddle shifter.
A lower gear and lower speed reduce the risk
of engine failure.
RWhen driving downhill, shift to a lower gear to
utilize the engine's braking effect.
Avoid continuous brake application as this
may overheat the vehicle brakes and, if instal-
led, the trailer brakes.
RIf the coolant temperature increases dramat-
ically while the air-condit ioning system is
switched on, switch off the air-conditioning
system.
Coolant heat can also be dissipated by open-
ing the windows and switching the ventilation blower and the interior temperature to the
highest level.
RWhen overtaking, pay particular attention to
the extended length of your vehicle/trailer
combination.
Due to the length of the vehicle/trailer com-
bination, you require additional road space in
relation to the vehicle you are overtaking
before you can change back to the original
lane.
Towing a trailer223
Driving and parking
Z
Page 226 of 398
Decouplingatrailer
GWARNING
If you uncoupl e atrailer wit hth eoverrun
brake engaged, you could trap your han d
between th evehicle and th etrailer drawbar .
There is aris kof injury.
Do no tuncoupl e atrailer if th eoverrun brake
is engaged.
GWARNING
Vehicles wit hlevel control:
The vehicle is lowered as soo nas you discon-
nect th etrailer cable. Thi scould result in your
limbs or those of other people that are
between th evehicle bod yand tires or under-
neat hth evehicle bein gtrapped. There is a
ris kof injury.
Mak esur ethat nobod yis in th eimmediate
vicinit yof th ewhee lhousings or under th e
vehicle when you disconnec tth etrailer cable.
!Do no tdisconnec t atrailer wit han engage d
overrun brake .Otherwise ,your vehicle could
be damaged by th ereboundin gof th eoverrun
brake .
XShift th etransmissio nto position P.
XApply thevehicle' selectric parking brake .
XStart theengine.
XClos eth edoors and tailgate.
XApply th etrailer's parking brake .
XDetach thetrailer cable and decoupl eth e
trailer .
XSwitchof fth eengine.
Permissible trailer loads an ddrawbar
loads
Weight specifications
Maximum allowable gross mass
The gross vehicle weight of th etrailer is calcu-
lated by addin gth eweight of th etrailer to th e
weight of th eload and equipmen ton th etrailer .
You will fin dinstallin gdimensions and load s
under "Technical data" (
Ypage 394).
Permissible noseweigh t
You will findinstallin gdimensions and load s
under "Technical data" (Ypage 394).
Loadingatrailer
RWhe nloadin gth etrailer ,mak esur ethat nei-
ther th epermissible gross weight of th etrailer
no rth egross vehicle weight are exceeded.
The permissible gross vehicle weight is indi-
cated on th eidentification plat elocated on
th eB-pilla ron th edriver's sid eof th evehicle.
You can fin dth emaximum permissible values
on th etyp eplates of your vehicle and th e
trailer .Whe ncalculatin ghow muc hweight
th evehicle and trailer may carry, pay atten-
tion to th erespective lowest values.
RThe trailer drawbar load on th eball couplin g
mus tbe adde dto th erea raxl eload to avoid
exceedin gth epermissible gross axl eweight .
The permissible gross vehicle weight is indi-
cated on th eidentification plat elocated on
th eB-pilla ron th edriver's sid eof th evehicle.
iMercedes-Ben zrecommends atrailer load
wher eth etrailer drawbar noseweigh t
accounts fo r 8 %to 15 %of th etrailer's per -
missible gross weight .
iThe weight of additional accessories ,pas-
sengers, and cargo reduce sth epermissible
trailer load and drawbar load fo ryour vehicle.
Checking th evehicle an dtrailer weigh t
RTo checkthat th eweight sof th etowin gvehi-
cl e and th etrailer compl ywit hth emaximum
permissible values, hav eth evehicle/trailer
combination (includin gth edriver ,passen -
gers, and cargo wit h afullylade ntrailer )
weighed on acalibrated weighbridge .
RCheckth egross axl eweight ratin gof th efron t
and rea raxles, th egross weight of th etrailer
and th etrailer drawbar noseweight.
Removin gth eball coupling
XRemov eth esprin gcotter.
XRemov eth ebolt from th eball couplin g
recess .
XRemov eth eball couplin gfrom th eball cou-
plin grecess .
224Towing a trailer
Driving and parking
Page 238 of 398
XPress the6ora button to start dialing.
or
XTo exit the redial memory: press the~
or % button.
Assistance menu
Introduction
Depending on the equipment installed in the
vehicle, you have the following options in the
DriveAssist
menu:
RDisplaying the assistance graphic
(Ypage 236)
RActivating/deactivating the Traffic Sign
Assist display (Ypage 236)
RActivating or deactivating Steering Pilot
(Ypage 236)
RActivating or deactivating Active Brake Assist (Ypage 237)
RActivating or deactivating Active Brake Assist
with cross-traffic function (Ypage 237)
RActivating/deactivating ATTENTION ASSIST
(Ypage 237)
RActivating/deactivating Blind Spot Assist or
Active Blind Spot Assist (Ypage 237)
RActivating/deactivating Lane Keeping Assist
or Active Lane Keeping Assist (Ypage 237)
Displaying the assistance graphic
XPress the =or; button on the steering
wheel to select the DriveAssistmenu.
XPress9or: to select AssistanceGraphic.
XConfirm by pressing aon the steering
wheel.
The multifunction display shows the Distance
Pilot DISTRONIC distance display in the assis-
tance graphic display.
The assistance graphic displays the status of
and information from the following driving
systems or driving safety systems:
RTraffic Sign Assist (Ypage 203)
RDistance Pilot DISTRONIC (Ypage 171)
RActive Brake Assist (Ypage 67)
RActive Brake Assist with cross-traffic func-
tion (Ypage 73)
RATTENTION ASSIST (Ypage 202)
RLane Keeping Assist (Ypage 206) or Active
Lane Keeping Assist (Ypage 210)
RDSR (Ypage 213)
ROff-road program (vehicles with Off-Road
Engineering package) (Ypage 215)
RRear window wiper (Ypage 118)
XPress :to display the ATTENTION ASSIST
assessment.
Traffic Sign Assist
You can switch the Traffic Sign Assist message
function on or off in the TrafficSignAssistmenu. When the function is activated, detected
traffic signs and information appear in the mul-
tifunction display for five seconds.
XPress the=or; button on the steering
wheel to select the DriveAssistmenu.
XPress the9or: button to select
Traffic Sign Assist.
XConfirm by pressing aon the steering
wheel.
The current selection appears.
XTo activate/deactivate the message func-
tion: press the abutton again.
For further information about Traffic Sign Assist,
see (
Ypage 203).
Activating or deactivating Steering Pilot
XPress the =or; button on the steering
wheel to select the DriveAssistmenu.
XPress9or: to select SteeringPilot.
XConfirm by pressing aon the steering
wheel.
The current selection appears.
XTo activate/deactivate: press theabut-
ton again.
When the Steering Pilot is activated, the mul- tifunction display displays a Steering
PilotOnmessage.
Further information about Distance Pilot
DISTRONIC with Steering Pilot (
Ypage 177).
236Menus and submenus
On-board computer and displays
Page 239 of 398
Activating/deactivating Active Brake
Assist
You can use these functionsto activate/deac -
tivat eActive Brake Assis tor, on vehicles wit h
th eDrivin gAssistance package, to activat eor
deactivat eActive Brake Assis twit hcross-traffic
function .
XPress the= or; buttonon th esteering
whee lto select th eDriveAssistmenu.
XPress th e9 or: buttonto select
Brake Assist.
XPress ato confirm .
The curren tselection appears.
XTo activate/deactivate: press thea but-
to nagain .
When Active Brake Assis tor Active Brake
Assis twit hcross-traffic function is deactiva-
ted, th eæ symbol appear sin th emulti-
function display in th eassistanc egraphic dis-
play.
Further information on Active Brake Assis t
(
Ypage 67) and Active Brake Assis twit hcross -
traffic function (Ypage 72).
Activating/deactivating ATTENTION
ASSIST
XPress the= or; buttonon th esteering
whee lto select th eDriveAssistmenu.
XPress th e9 or: buttonto select
Attention Assist.
XPress th ea button.
The curren tselection appears.
XPress ato confirm .
XPress the: or9 buttonto set Off,
Standardor Sensitive.
XPress th ea buttonto sav eth esetting .
When ATTENTION ASSIST is deactivated, th e
é symbol appear sin th emultifunction dis-
play in th eassistanc egraphic sdisplay.
Fo rfurther information about ATTENTION
ASSIST ,see (
Ypage 202).
Activating/deactivating Blind Spot
Assist
XPress th e= or; buttonon th esteering
whee lto select th eDriveAssistmenu.
XPress th e9 or: buttonto select
Blind Spo tAssist.
XConfir mby pressing aon thesteering
wheel.
The curren tselection appears.
XTo activate/deactivate: press thea but-
to nagain .
Fo rfurther information about Blind Spot Assist,
see (
Ypage 204).
Fo rfurther information about Active Blind Spot
Assist, see (
Ypage 208).
Activating/deactivating Lane Keeping
Assist
XPress the= or; buttonon th esteering
whee lto select th eDriveAssistmenu.
XPress th e9 or: buttonto select
Lan eKeepin gAssist.
XPress ato confirm .
The curren tselection appears.
XPress ato confirm .
XPress the: or9 buttonto set Off,
Standardor Adaptive.
When Lan eKeepin gAssis tor Active Lan e
Keepin gAssis tis activated, th emultifunction
display shows th elan emarking sas bright
lines in th eassistanc egraphic .
XPress th ea buttonto sav eth esetting .
Fo rfurther information about Lan eKeepin g
Assist, see (
Ypage 206).
Fo rfurther information about Active Lan eKeep-
ing Assist, see (
Ypage 210).
Service menu
Introd uction
Dependin gon th eequipmen tinstalled in th e
vehicle, you hav eth efollowin goption sin th e
Serv.
menu:
Rcalling up display message sin message mem -
ory (Ypage 243)
Rrestarting th etire pressur eloss warning sys-
te m (Ypage 358) or checking th etire pres-
sur eelectronically (Ypage 360)
Rcalling up theservic edue dat e (Ypage 325).
Menus and submenus237
On-board computer and displays
Z