2018 MERCEDES-BENZ GLE HYBRID brake
[x] Cancel search: brakePage 353 of 398
Important safety notes
G WARNIN G
If wheels and tires of th e wrong siz e are used,
th e whee l brakes or suspension component s
may be damaged. Ther e is a ris k of an acci-
dent.
Always replace wheels and tires wit h those
that fulfill th e specification s of th e original
part .
When replacing wheels, mak e sur e to use th e
correct: R
designation R
model
When replacing tires , mak e sur e to use th e
correct: R
designation R
manufacturer R
model
G WARNIN G
A flat tire severely impairs th e driving , steer -
ing and braking characteristics of th e vehicle.
Ther e is a ris k of accident.
Tires without run-flat characteristics :R
do no t driv e wit h a flat tire.R
immediately replace th e flat tire wit h your
emergenc y spar e whee l or spar e wheel, or
consult a qualified specialist workshop.
Tires wit h run-flat characteristics :R
pay attention to th e information and warn -
ing notice s on MOExtended tires (tire s wit h
run-flat characteristics).
Accessories that are no t approve d for your vehi-
cle by Mercedes-Ben z or are no t bein g used cor-
rectl y can impair th e operating safety.
Before purchasing and usin g non-approve d
accessories, visit a qualified specialist work-
sho p and inquire about :R
suitabilit yR
legal stipulation sR
factory recommendation s Further information regarding wheels and tires
can be foun d under "Wheel/tire combinations"
( Y
page 376).
You can ask for information regarding permitte d
wheel-tire combination s at an authorize d
Mercedes-Ben z Center.
Tir e pressur e information can be found: R
on th e Tir e and Loading Information placard
on th e B-pillar on th e driver' s sideR
in th e tire pressur e table in th e fuel filler flapR
in th e "Tir e p ressure" section
Operation
Information on driving Chec k th e tire pressur e when th e vehicl e is
heavily laden and adjust prio r to a trip.
While driving , pay attention to vibrations, noises
and unusual handlin g characteristics , e.g. pull-
ing to on e side . This may indicat e that th e
wheels or tires are damaged. If you suspec t that
a tire is defective, reduce your spee d immedi-
ately. Stop th e vehicl e as soo n as possible to
chec k th e wheels and tires for damage. Hidden
tire damag e could also be causing th e unusual
handlin g characteristics . If you fin d no sign s of
damage, hav e th e tires and wheels checke d at a
qualified specialist workshop.
When parking your vehicle, mak e sur e that th e
tires do no t get deformed by th e cur b or other
obstacles. If it is necessar y to driv e ove r curbs,
spee d hump s or similar elevations, tr y to do so
slowly and at an obtuse angle. Otherwise, th e
tires , particularly th e sidewalls, may be dam-
aged.
Regular checking of wheels and tires
G WARNIN G
Damaged tires can caus e tire inflation pres-
sur e loss . As a result , you could lose control of
your vehicle. Ther e is a ris k of accident.
Chec k th e tires regularly for sign s of damag e
and replace any damaged tires immediately.
Chec k wheels and tires for damag e at least once
a month . Chec k wheels and tires after driving
off-road or on roug h roads. Damaged wheels
can caus e a loss of tire pressure.Operation 351
Wheels and tires Z
Page 363 of 398
Restarting the tire pressure monitor When you restart the tire pressure monitor, all
existing warning messages are deleted and the
warning lamps go out. The monitor uses the cur-
rently set tire pressures as the reference values
for monitoring. In most cases, the tire pressure
monitor will automatically detect the new refer-
ence values after you have changed the tire
pressure. However, you can also set reference
values manually as described here. The tire
pressure monitor then monitors the new tire
pressure values. X
Set the tire pressure to the value recommen-
ded for the corresponding driving situation on
the Tire and Loading Information placard on
the driver's side B-pillar ( Y
page 354).
You can find more tire pressure values for
various operating conditions in the tire pres-
sure table inside the fuel filler flap
( Y
page 355). X
Make sure that the tire pressure is correct on
all four wheels. X
Make sure that the SmartKey is in position �H
in the ignition lock. X
Press the �Y or �e button on the steering
wheel to select the Serv. menu.X
Press the �c or �d button to select
Tire Pressure .X
Press �v .
The multifunction display shows the current
tire pressure for the individual tires or the
Tire pressure will be displayed
after driving a few minutes message.X
Press the �d button.
The Use Current Pressures as New Ref‐
erence Values message appears in the mul-
tifunction display.
If you wish to confirm the restart: X
Press the �v button.
The Tire Press. Monitor Restarted mes-
sage appears in the multifunction display.
After driving for a few minutes, the system
checks whether the current tire pressures are
within the specified range. The new tire pres-
sures are then accepted as reference values
and monitored.
If you wish to cancel the restart: X
Press the �8 button.
The tire pressure values stored at the last
restart will continue to be monitored. Radio type approval for the tire pres-
sure monitor Country Radio type approval number
USA FCC ID: MRXMW2433A
FCC ID: MRXGG4
FCC ID: MRXMC34MA4
Canada IC: 2546A-MW2433A
IC: 2546A-GG4
IC: 2546A-MC34MA4
Loading the vehicle
Instruction labels for tires and loads
G WARNING
Overloaded tires can overheat, causing a
blowout. Overloaded tires can also impair the
steering and driving characteristics and lead
to brake failure. There is a risk of accident.
Observe the load rating of the tires. The load
rating must be at least half of the GAWR of
your vehicle. Never overload the tires by
exceeding the maximum load.
Two instruction labels on your vehicle show the
maximum possible load.
(1) The Tire and Loading Information placard is
on the B-pillar on the driver's side. The Tire
and Loading Information placard shows the
maximum permissible number of occu-
pants and the maximum permissible vehicle
load. It also contains details of the tire sizes
and corresponding pressures for tires
mounted at the factory.
(2) The vehicle identification plate is on the B-
pillar on the driver's side. The vehicle iden-
tification plate informs you of the gross
vehicle weight rating. It is made up of the
vehicle weight, all vehicle occupants, the
fuel and the cargo. You can also find infor-
mation about the maximum gross axle
weight rating on the front and rear axle.
The maximum gross axle weight rating is
the maximum weight that can be carried by
one axle (front or rear axle). Never exceed
the maximum load or the maxi mum g ross
a
xle weight rating for the front or rear axle.Loading the vehicle 361
Wheels and tires Z
Page 373 of 398
Sidewall The part of the tire between the tread and the
bead.
Weight of optional extras The combined weight of those optional extras
that weigh more than the replaced standard
parts and more than 2.3 kg (5 lbs). These
optional extras, such as high-performance
brakes, level control, a roof rack or a high-per-
formance battery, are not included in the curb
weight and the weight of the accessories.
TIN (Tire Identification Number) This is a unique identifier which can be used by
a tire manufacturer to identify tires, for example
for a product recall, and thus identify the pur-
chasers. The TIN is made up of the manufactur-
er's identity code, tire size, tire type code and
the manufacturing date.
Load bearing index The load bearing index (also load index) is a code
that contains the maximum load bearing capa-
city of a tire.
Traction Traction is the result of friction between the tires
and the road surface.
TWR (Tongue Weight Rating) The TWR specifies the maximum permissible
weight that the ball coupling of the trailer tow
hitch can support.
Treadwear indicators Narrow bars (tread wear bars) that are distrib-
uted over the tire tread. If the tire tread is level
with the bars, the wear limit of �
Page 374 of 398
be required earlier. Do not change the direction
of wheel rotation.
Clean the contact surfaces of the wheel and the
brake disc thoroughly every time a wheel is rota-
ted. Check the tire pressure and, if necessary,
restart the tire pressure loss warning system or
the tire pressure monitor ( Y
page 358).
Direction of rotation Tires with a specified direction of rotation have
additional benefits, e.g. if there is a risk of hydro-
planing. These advantages can only be gained if
the tires are installed corresponding to the
direction of rotation.
An arrow on the sidewall of the tire indicates its
correct direction of rotation.
Storing wheels Store wheels that are not being used in a cool,
dry and preferably dark place. Protect the tires
from oil, grease, gasoline and diesel.
Mounting a wheel
Preparing the vehicle X
Vehicle with emergency spare wheel:
when mounting the emergency spare wheel in
the event of a flat tire, follow the additional
notes on vehicle preparation under "Flat tire"
( Y
page 335).X
Stop the vehicle on solid, non-slippery and
level ground. X
Apply the electric parking brake manually. X
Bring the front wheels into the straight-ahead
position. X
Vehicles with automatic transmission:
shift the transmission to position �] .X
Vehicles with the AIRMATIC package:
make sure that the normal vehicle level is
selected ( Y
page 185).X
Vehicles with the Off-Road Engineering
package: make sure that the normal vehicle
level is selected ( Y
page 179).X
Switch off the engine. X
Vehicles without KEYLESS-GO: remove the
SmartKey from the ignition lock. X
Vehicles with KEYLESS-GO: open the driv-
er's door.
The vehicle electronics are now in position
�
Page 375 of 398
X
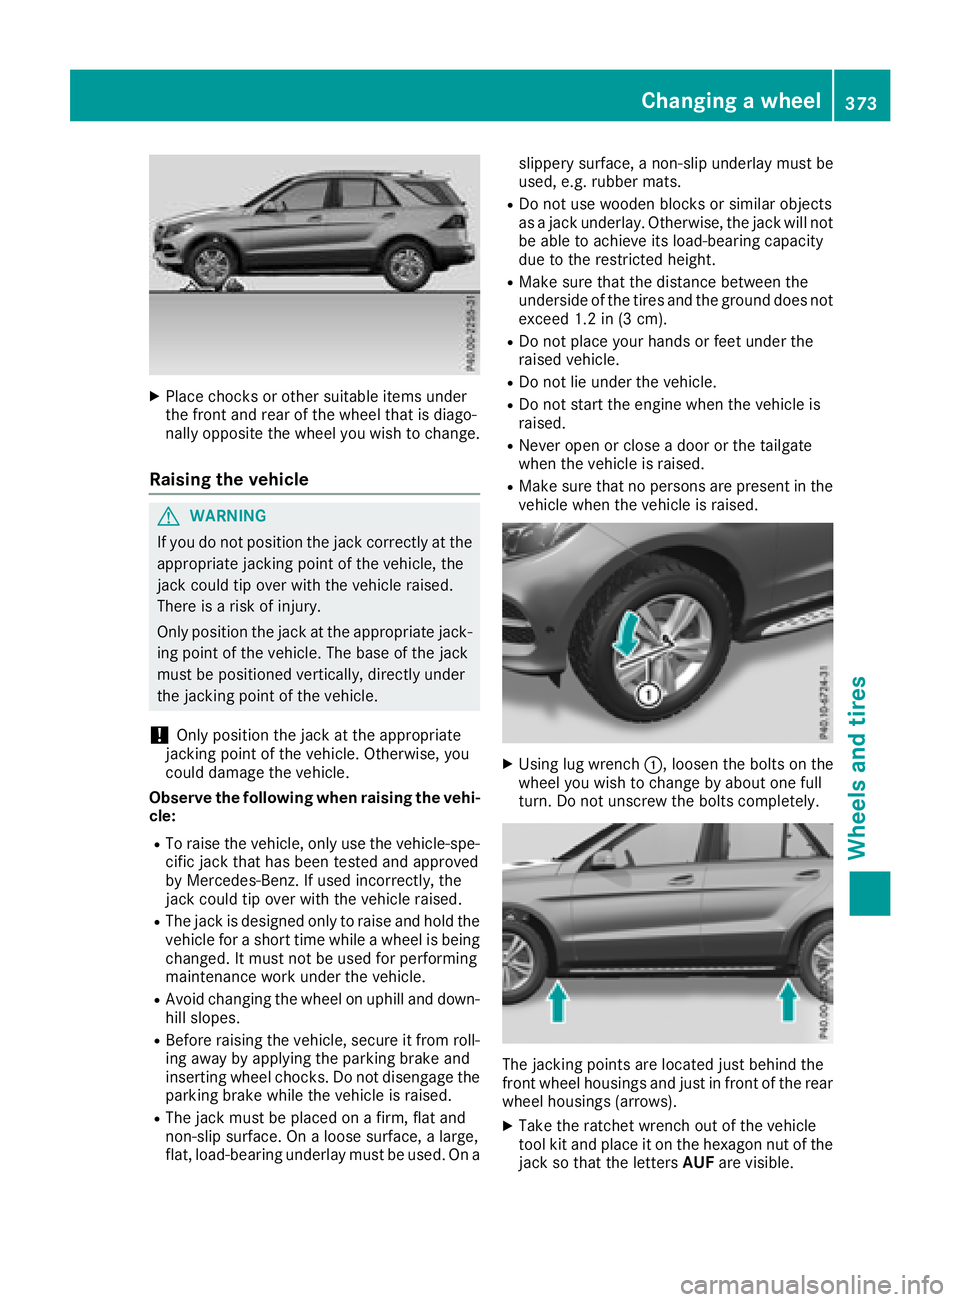
Place chocks or other suitable items under
the front and rear of the wheel that is diago-
nally opposite the wheel you wish to change.
Raising the vehicle
G WARNING
If you do not position the jack correctly at the
appropriate jacking point of the vehicle, the
jack could tip over with the vehicle raised.
There is a risk of injury.
Only position the jack at the appropriate jack-
ing point of the vehicle. The base of the jack
must be positioned vertically, directly under
the jacking point of the vehicle.
! Only position the jack at the appropriate
jacking point of the vehicle. Otherwise, you
could damage the vehicle.
Observe the following when raising the vehi-
cle: R
To raise the vehicle, only use the vehicle-spe-
cific jack that has been tested and approved
by Mercedes-Benz. If used incorrectly, the
jack could tip over with the vehicle raised. R
The jack is designed only to raise and hold the
vehicle for a short time while a wheel is being
changed. It must not be used for performing
maintenance work under the vehicle. R
Avoid changing the wheel on uphill and down-
hill slopes. R
Before raising the vehicle, secure it from roll-
ing away by applying the parking brake and
inserting wheel chocks. Do not disengage the
parking brake while the vehicle is raised. R
The jack must be placed on a firm, flat and
non-slip surface. On a loose surface, a large,
flat, load-bearing underlay must be used. On a slippery surface, a non-slip underlay must be
used, e.g. rubber mats. R
Do not use wooden blocks or similar objects
as a jack underlay. Otherwise, the jack will not
be able to achieve its load-bearing capacity
due to the restricted height. R
Make sure that the distance between the
underside of the tires and the ground does not
exceed 1.2 in (3 cm). R
Do not place your hands or feet under the
raised vehicle. R
Do not lie under the vehicle. R
Do not start the engine when the vehicle is
raised. R
Never open or close a door or the tailgate
when the vehicle is raised. R
Make sure that no persons are present in the
vehicle when the vehicle is raised.
X
Using lug wrench �C , loosen the bolts on the
wheel you wish to change by about one full
turn. Do not unscrew the bolts completely.
The jacking points are located just behind the
front wheel housings and just in front of the rear
wheel housings (arrows). X
Take the ratchet wrench out of the vehicle
tool kit and place it on the hexagon nut of the
jack so that the letters AUF are visible.Changing a wheel 373
Wheels and tires Z
Page 377 of 398
only use wheel bolts which have been approved
for Mercedes-Benz vehicles and the respective
wheel.
! Always use wheel bolts �D to mount the
"Minispare" emergency spare wheel. Using
other wheel bolts to mount the "Minispare"
emergency spare wheel could damage the
brake system.
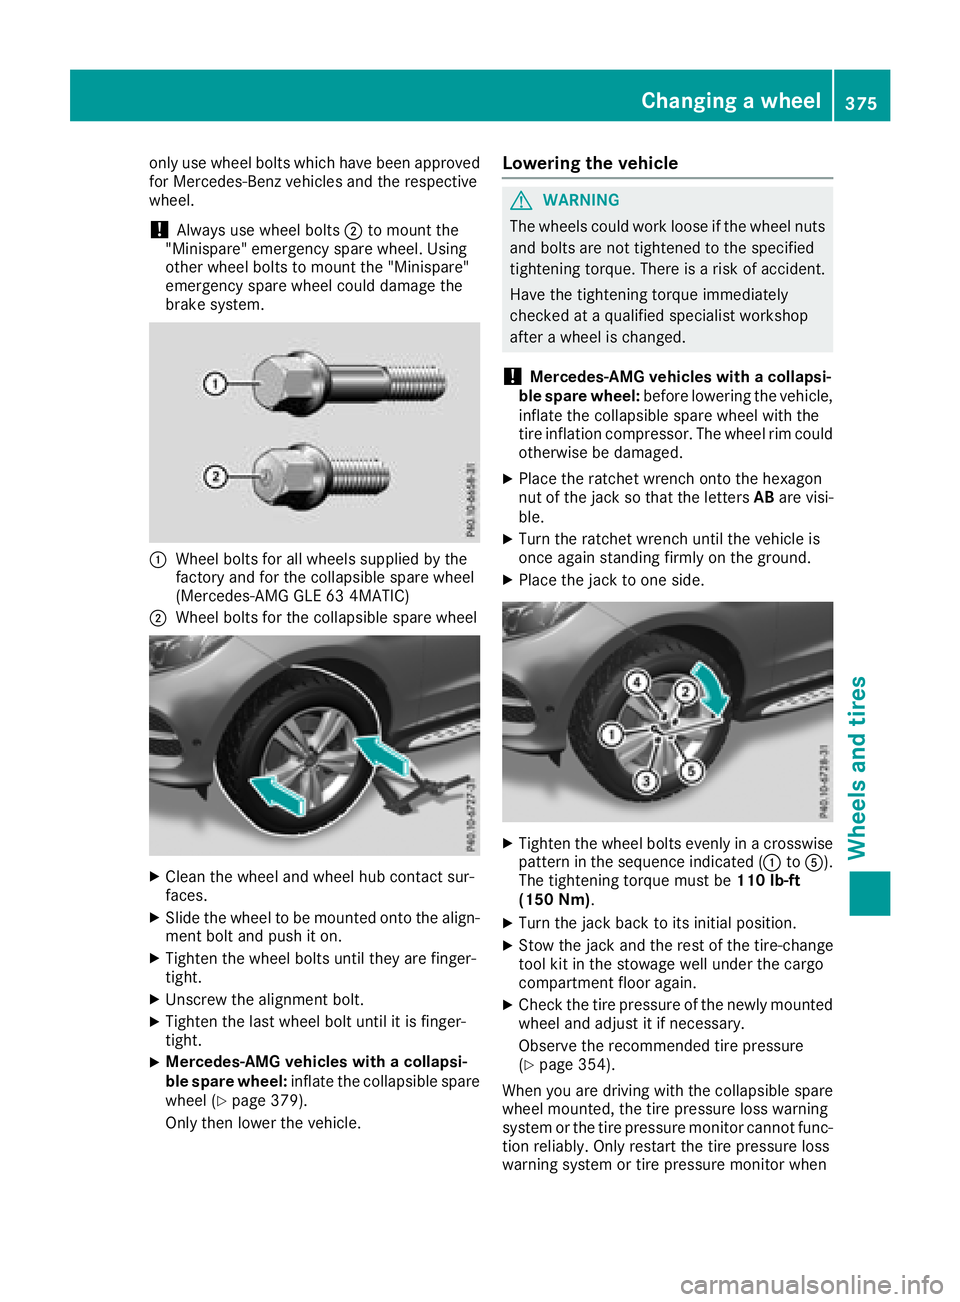
�C
Wheel bolts for all wheels supplied by the
factory and for the collapsible spare wheel
(Mercedes-AMG GLE 63 4MATIC)�D
Wheel bolts for the collapsible spare wheel
X
Clean the wheel and wheel hub contact sur-
faces. X
Slide the wheel to be mounted onto the align-
ment bolt and push it on. X
Tighten the wheel bolts until they are finger-
tight. X
Unscrew the alignment bolt. X
Tighten the last wheel bolt until it is finger-
tight. X
Mercedes-AMG vehicles with a collapsi-
ble spare wheel: inflate the collapsible spare
wheel ( Y
page 379).
Only then lower the vehicle. Lowering the vehicle
G WARNING
The wheels could work loose if the wheel nuts
and bolts are not tightened to the specified
tightening torque. There is a risk of accident.
Have the tightening torque immediately
checked at a qualified specialist workshop
after a wheel is changed.
! Mercedes-AMG vehicles with a collapsi-
ble spare wheel: before lowering the vehicle,
inflate the collapsible spare wheel with the
tire inflation compressor. The wheel rim could
otherwise be damaged. X
Place the ratchet wrench onto the hexagon
nut of the jack so that the letters AB are visi-
ble. X
Turn the ratchet wrench until the vehicle is
once again standing firmly on the ground. X
Place the jack to one side.
X
Tighten the wheel bolts evenly in a crosswise
pattern in the sequence indicated ( �C to �
Page 379 of 398
R
only use a spare wheel or emergency spare
wheel of a different size briefly. R
do not switch ESP ®
off.R
have a spare wheel or emergency spare
wheel of a different size replaced at the
nearest qualified specialist workshop.
Observe that the wheel and tire dimensions
as well as the tire type must be correct.
! Mercedes-AMG vehicles with
"Minispare" emergency spare wheel: only
use the "Minispare" emergency spare wheel
on the rear axle . If you mount the
"Minispare" emergency spare wheel on the
front axle, this could result in damage to the
brake system.
If a tire on the front axle is defective, an intact
wheel from the rear axle must first be
replaced with the "Minispare" emergency
spare wheel. The damaged wheel on the front
axle can then be replaced by the undamaged
wheel from the rear axle.
Make sure to note the placard on the
"Minispare" emergency spare wheel.
When using an emergency spare wheel or spare
wheel of a different size, you must not exceed
the maximum speed of 50 mph (80 km/ h) .
You should regularly check the pressure of the
emergency spare wheel, particularly prior to
long trips, and correct the pressure as neces-
sary ( Y
page 354). The value on the wheel is
valid.
Snow chains must not be mounted on emer-
gency spare wheels.
General notes Information regarding permitted emergency
spare wheels can be found at an authorized
Mercedes-Benz Center.
Mounting the emergency spare wheel is descri-
bed under "Mounting a wheel" ( Y
page 372).
An emergency spare wheel may also be moun-
ted against the direction of rotation. Observe
the time restriction on use as well as the speed
limitation specified on the emergency spare
wheel.
Replace the tires after six years at the latest,
regardless of wear. This also applies to the
emergency spare wheel. When you are driving with the collapsible spare
wheel mounted, the tire pressure loss warning
system or the tire pressure monitor cannot func-
tion reliably. Only restart the tire pressure loss
warning system or tire pressure monitor when
the defective wheel has been replaced with a
new wheel.
Vehicles with tire pressure monitor: after
mounting an emergency spare wheel, the sys-
tem may still display the tire pressure of the
removed wheel for a few minutes. The value dis-
played for the mounted emergency spare wheel
is not the same as the current tire pressure of
the emergency spare wheel.
Removing/stowing the emergency
spare wheel
Vehicles with a "Minispare" emergency
spare wheel under the cargo compart-
ment floor Always observe the instructions and safety
notes in the "Mounting a wheel" section
( Y
page 372).
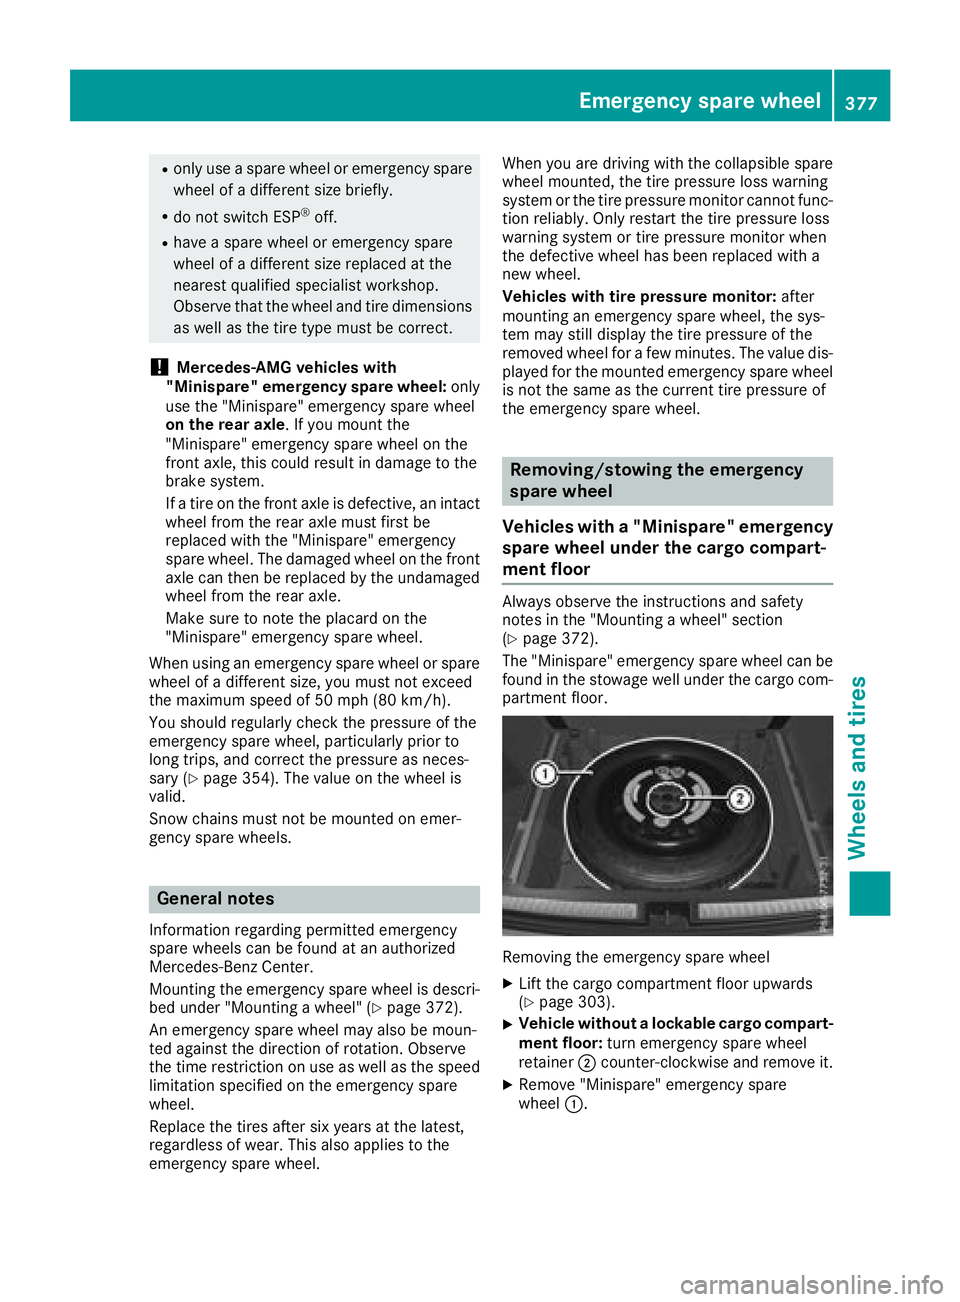
The "Minispare" emergency spare wheel can be
found in the stowage well under the cargo com-
partment floor.
Removing the emergency spare wheel X
Lift the cargo compartment floor upwards
( Y
page 303). X
Vehicle without a lockable cargo compart-
ment floor: turn emergency spare wheel
retainer �D counter-clockwise and remove it. X
Remove "Minispare" emergency spare
wheel �C .Emergency spare wheel 377
Wheels and tires Z
Page 390 of 398
Model Capacity
GLE 550 4MATIC
Mercedes-AMG
GLE 63 4MATIC
Mercedes-AMG
GLE 63 S 4MATIC 9.0 US qt (8.5 l)
Al l ot her models
7.4 US qt (7.0 l)
Ad ditives
! Do not use any additives in the engine oil.
This could damage the engine.
Brake fluid
G WARNING
The brake fluid constantly absorbs moisture
from the air. This lowers the boiling point of
the brake fluid. If the boiling point of the brake
fluid is too low, vapor pockets may form in the
brake system when the brakes are applied
hard. This would impair braking efficiency.
There is a risk of an accident.
You should have the brake fluid renewed at
the specified intervals.
Comply with the important safety notes for ser-
vice products when handling brake fluid
( Y
page 383).
Only use brake fluid approved for Mercedes-
Benz according to MB-Freigabe or MB-Approval
331.0.
Information about approved brake fluid can be
obtained at any qualified specialist workshop or
on the Internet at
http://bevo.mercedes-benz.com .
i Have the brake fluid regularly replaced at a
qualified specialist workshop in accordance
with the replacement intervals and the
replacement confirmed in the service report. Coolant
Important safety notes
G WARNING
If antifreeze comes into contact with hot com-
ponents in the engine compartment, it may
ignite. There is a risk of fire and injury.
Let the engine cool down before you add anti-
freeze. Make sure that antifreeze is not spilled
next to the filler neck. Thoroughly clean the
antifreeze from components before starting
the engine.
! Only add coolant that has been premixed
with the desired antifreeze protection. You
could otherwise damage the engine.
Further information on coolants can be found
in the Mercedes-Benz Specifications for Ser-
vice Products, MB BeVo 310.1, e.g. on the
Internet at
http://bevo.mercedes-benz.com . Or con-
tact a qualified specialist workshop.
! Always use a suitable coolant mixture, even
in countries where high temperatures prevail.
Otherwise, the engine cooling system is not
sufficiently protected from corrosion and
overheating.
i Have the coolant regularly replaced at a
qualified specialist workshop and the replace-
ment confirmed in the service report.
Comply with the important safety notes for ser-
vice products when handling coolant
( Y
page 383).
The coolant is a mixture of water and anti-
freeze/corrosion inhibitor. It is responsible for
the following: R
anti-corrosion protection R
antifreeze protection R
raising the boiling point
If the coolant has antifreeze protection down to
-35 ‡ ( -37 †), the boiling point of the coolant
during operation is approximately 266 ‡
(130 †).388
Service products and filling capacities
Technical data