2018 MERCEDES-BENZ G-CLASS turn signal
[x] Cancel search: turn signalPage 231 of 294

onds. Then let go for 2 seconds, press again
and hold for 2 seconds.
XRepeat this sequence on transmitter button
Bon remote control Auntil the frequency
signal is established.
XIf the setup procedure is successful, indicator
lamp :flashes once slowly and goes out
after a few seconds.
If indicator lamp :does not flash slowly and
then go out: repeat the programming process
for the corresponding button on the rear-view
mirror. When doing so, vary the distance
between remote control Aand the rear-view
mirror.
The required distance between remote con-
trol Aand the integrated garage door opener
depends on the garage door drive system.
Several attempts might be necessary. You
should test every position for at least
20 seconds before trying another position.
The required distance between remote control
A and the integrated garage door opener
depends on the garage door drive system. Sev-
eral attempts might be necessary. You should
test every position for at least 25 seconds
before trying another position.
Problems when programming
If you have problems when programming the
integrated remote control, please note the fol-
lowing:
RCheck the transmitter frequency used by
garage door drive remote control Aand
whether it is supported. The transmitter fre-
quency can usually be found on the back of
remote control Afor the garage door drive.
The integrated remote control is compatible
with devices that have units which operate in
the frequency range of 280 to 390 MHz.
RReplace the batteries in remote control A.
This increases the probability of remote con-
trol Asending a strong and precise signal to
the integrated remote control on the rear-
view mirror.
RWhen programming, hold remote control A
at varying distances and angles from the
transmitter button that you are programming.
Try various angles at a distance between 2and
12 inches (5to 30 cm) or at the same angle
but at varying distances.
RIf a further remote control Ais available for
the same garage door drive, repeat the same
programming steps with this remote control A. Before performing these steps, make sure
that new batteries have been installed in
garage door drive remote control A.
RNote that some remote controls only transmit
for a limited amount of time (the indicator
lamp on the remote control goes out). Press
button Bon remote control Aagain before
transmission ends.
RAlign the antenna cable of the garage door
opener unit. This can improve signal trans-
mission.
Opening/closing the garage door
Once programmed, the integrated remote con-
trol will assume the function of the garage door
system's remote control. Please also read the
operating instructions for the garage door sys-
tem.
XTurn the SmartKey to position in the ignition
lock 2(Ypage 105).
XPress one of buttons ;to? on the integra-
ted remote control in the rear-view mirror that
is programmed to operate the garage door.
Garage door system with fixed code: indicator
lamp :lights up continuously.
Garage door system with rolling code: indica-
tor lamp :flashes briefly and then lights up
for approximately two seconds. This is repea-
ted for up to 20 seconds.
The transmitter will transmit a signal for as
long as the transmitter button is being
pressed. The transmission will be halted after a maximum of 20 seconds and indicator
lamp :will flash. Press the transmitter but-
ton again if necessary.
XPress button ;,=or? again if necessary.
Clearing the memory
Make sure that you clear the memory of the
integrated garage door opener before selling the
vehicle.
XTurn the SmartKey to position 2
(Ypage 105) in the ignition lock.
XPress and hold transmitter buttons ;and ?
for approximately 20 seconds until indicator
lamp :flashes rapidly.
The memory of the integrated garage door
opener in the rear-view mirror is cleared.
Features229
Stowage and features
Z
Page 241 of 294

!Do not park your vehicle for a long period of
time directly after cleaning, particularly after
cleaning the wheel rim with wheel cleaner.
Wheel cleaner can lead to the increased cor-
rosion of the brake discs and pads. Therefore,
drive for a few minutes after cleaning. By
heating up the brakes, the brake discs and
pads dry. The vehicle can then be parked for a
long period of time.
Cleaning the windows
GWARNING
You could become trapped by the windshield wipers if they start moving while cleaning the
windshield or wiper blades. There is a risk of
injury.
Always switch off the windshield wipers and
the ignition before cleaning the windshield or
wiper blades.
!Do not use dry cloths, abrasive products,
solvents or cleaning agents containing sol-
vents to clean the inside of the windows. Do
not touch the insides of the windows with
hard objects, e.g. an ice scraper or ring. There
is otherwise a risk of damaging the windows.
!Clean the water drainage channels of the
windshield and the rear window at regular
intervals. Deposits such as leaves, petals and pollen may under certain circumstances pre-
vent water from draining away. This can lead
to corrosion damage and damage to elec-
tronic components.
XClean the inside and outside of the windows
with a damp cloth and a cleaning product that
is recommended and approved by Mercedes-
Benz.
Cleaning wiper blades
GWARNING
You could become trapped by the windshield wipers if they start moving while cleaning the
windshield or wiper blades. There is a risk of
injury.
Always switch off the windshield wipers and
the ignition before cleaning the windshield or
wiper blades.
!Do not pull the wiper blade. Otherwise, the
wiper blade could be damaged.
!Do not clean wiper blades too often and do
not rub them too hard. Otherwise, the graph-
ite coating could be damaged. This could
cause wiper noise.
!Hold the wiper arm securely when folding
back. The windshield could be damaged if the
wiper arm smacks against it suddenly.
XFold the windshield wiper arms away from the
windshield.
XCarefully clean the wiper blades with a damp
cloth.
XFold the windshield wiper arms back again
before switching on the ignition.
Cleaning the exterior lighting
!Only use cleaning agents or cleaning cloths
which are suitable for plastic light lenses.
Unsuitable cleaning agents or cleaning cloths
could scratch or damage the plastic light len- ses.
XClean the plastic lenses of the exterior light-
ing using a wet sponge and a mild cleaning
agent, e.g. Mercedes-Benz car shampoo or
cleaning cloths.
Cleaning the mirror turn signals
!Only use cleaning agents or cleaning cloths
that are suitable for plastic lenses. Unsuitable
cleaning agents or cleaning cloths could
scratch or damage the plastic lenses of the
mirror turn signals.
XClean the plastic lenses of the mirror turn sig-
nals in the exterior mirror housing using a wet
sponge and mild cleaning agent, e.g.
Mercedes-Benz car shampoo or cleaning
cloths.
Cleaning the sensors
!If you clean the sensors with a power
washer, make sure that you keep a distance
of at least 11.8 in (30 cm) between the vehicle
and the power washer nozzle. Information
about the correct distance is available from
the equipment manufacturer.
Care239
Maintenance and care
Z
Page 255 of 294

XWhen the vehicle is stationary, depress the
brake pedal and keep it depressed.
XShift the transfer case to positionNeutral
(Ypage 150).
XShift the automatic transmission to position
i.
XLeave the SmartKey in position 2in the igni-
tion lock.
XRelease the brake pedal.
XRelease the parking brake.
XSwitch on the hazard warning lamps
(Ypage 88).
In order to signal a change of direction when
towing the vehicle with the hazard warning
lamps switched on, use the combination switch
as usual. In this case, only the indicator lamps
for the direction of travel flash. After resetting
the combination switch, the hazard warning
lamp starts flashing again.
iThe automatic transmission can only
change gear when the battery has sufficient
charge.
If you cannot shift the automatic transmission
to position i, the propeller shafts to the
driven axles must be removed.
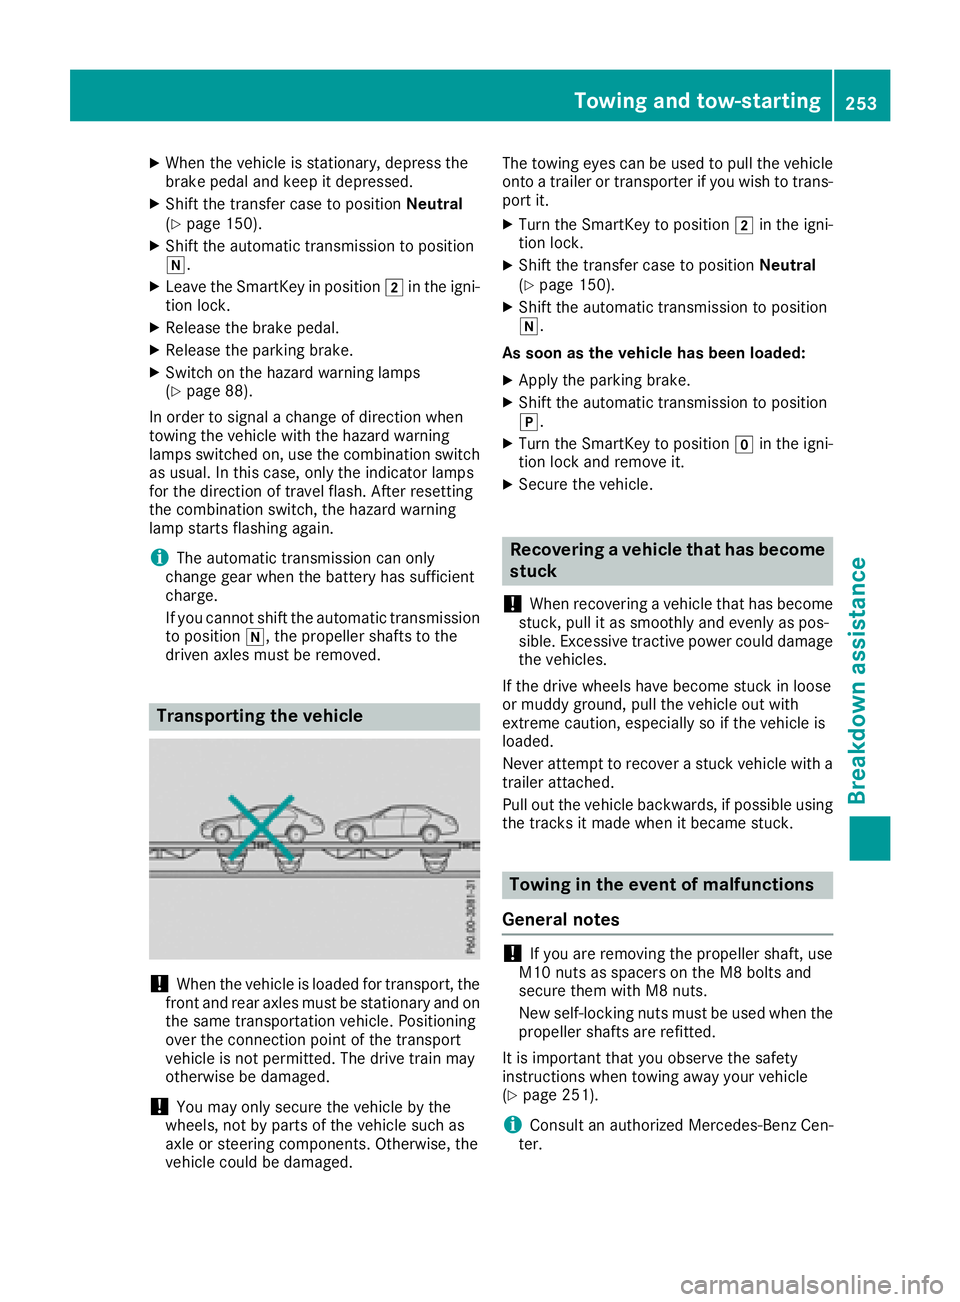
Transporting the vehicle
!When the vehicle is loaded for transport, the
front and rear axles must be stationary and on the same transportation vehicle. Positioning
over the connection point of the transport
vehicle is not permitted. The drive train may
otherwise be damaged.
!You may only secure the vehicle by the
wheels, not by parts of the vehicle such as
axle or steering components. Otherwise, the
vehicle could be damaged. The towing eyes can be used to pull the vehicle
onto a trailer or transporter if you wish to trans-
port it.
XTurn the SmartKey to position 2in the igni-
tion lock.
XShift the transfer case to position Neutral
(Ypage 150).
XShift the automatic transmission to position
i.
As soon as the vehicle has been loaded:
XApply the parking brake.
XShift the automatic transmission to position
j.
XTurn the SmartKey to position gin the igni-
tion lock and remove it.
XSecure the vehicle.
Recovering a vehicle that has become
stuck
!
When recovering a vehicle that has become
stuck, pull it as smoothly and evenly as pos-
sible. Excessive tractive power could damage
the vehicles.
If the drive wheels have become stuck in loose
or muddy ground, pull the vehicle out with
extreme caution, especially so if the vehicle is
loaded.
Never attempt to recover a stuck vehicle with a
trailer attached.
Pull out the vehicle backwards, if possible using the tracks it made when it became stuck.
Towing in the event of malfunctions
General notes
!If you are removing the propeller shaft, use
M10 nuts as spacers on the M8 bolts and
secure them with M8 nuts.
New self-locking nuts must be used when the
propeller shafts are refitted.
It is important that you observe the safety
instructions when towing away your vehicle
(
Ypage 251).
iConsult an authorized Mercedes-Benz Cen-
ter.
Towing and tow-starting253
Breakdown assistance
Z