2018 MERCEDES-BENZ G-CLASS turn signal
[x] Cancel search: turn signalPage 92 of 294

the Xenon bulb and touch the electrical con-
tacts. There is a risk of fatal injury.
Never touch the parts or the electrical con-
tacts of the Xenon bulb. Always have work onthe Xenon bulbs carried out at a qualified spe-
cialist workshop.
GWARNING
Bulbs, lamps and connectors can get very hot
when operating. If you change a bulb, you
could burn yourself on these components.
There is a risk of injury.
Allow these components to cool down before
changing a bulb.
Do not use a bulb if it has been dropped or if its glass tube has been scratched.
The bulb may explode if:
Ryou touch it
Rit is hot
Ryou drop it
Ryou scratch it
Use bulbs only in closed lamps that have been
designed for this purpose. Only install spare
bulbs of the same type and the specified volt-
age.
Marks on the glass tube reduce the service life
of the bulbs. Do not touch the glass tube with
your bare hands. If necessary, clean the glass
tube when cold with alcohol or spirit and rub it
off with a lint-free cloth.
Protect bulbs from moisture during operation.
Do not allow bulbs to come into contact with
liquids.
Xenon bulbs and LED modules: in addition to
the Xenon bulbs, there are LED modules which
you cannot change yourself.
Have the following bulbs replaced at a qualified
specialist workshop:
RHigh-mounted brake lamp
RAdditional turn signals in the exterior mirrors
RParking lamps/standing lamps (front)
RHigh-beam/low-beam headlamps (Xenon
headlamps)
RDaytime running lamps
RLicense plate lamp
RSide marker lamps
iIndividual segments of the license plate
lamp LEDs may fail without a display message
appearing in the multifunction display. Regu-
larly check the license plate lamp. If neces-
sary, visit a qualified specialist workshop.
You can replace the following bulbs:
RTurn signal lamp (front)
RBrake/tail lamp
RTurn signal lamp (rear)
RTail lamps/standing lamps
RBackup lamp
RRear fog lamp
Replace only the bulbs listed (
Ypage 90).
Have the bulbs that you cannot change yourself
replaced at a qualified specialist workshop.
If you require assistance replacing bulbs, con-
sult a qualified specialist workshop.
If the new bulb still does not light up, consult a
qualified specialist workshop.
Headlamps and lights are an important aspect of
vehicle safety. You must therefore make sure
that these function correctly at all times. Have
the headlamp setting checked regularly.
Overview of bulb types
Front bulbs
You can replace the following bulbs. The bulb
type can be found in the legend.
:Turn signal lamp: 1156 NA
Rear bulbs
You can replace the following bulbs. The bulb
type can be found in the legend.
90Replacing bulbs
Lights and windshield wiper s
Page 93 of 294
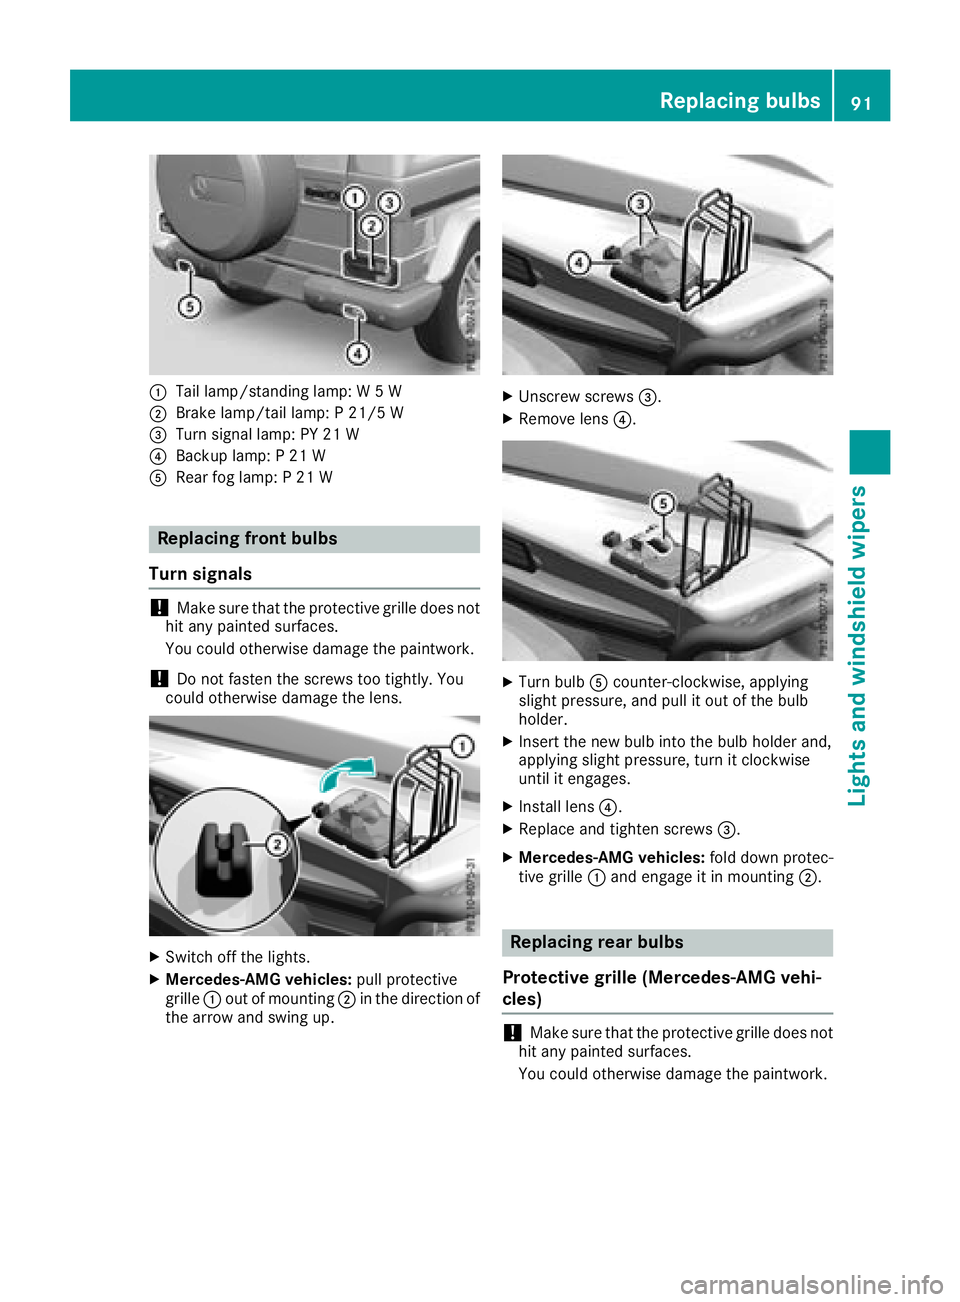
:Tail lamp/standing lamp: W 5 W
;Brake lamp/tail lamp: P 21/5 W
=Turn signal lamp: PY 21 W
?Backup lamp: P 21 W
ARear fog lamp: P 21 W
Replacing front bulbs
Turn signals
!Make sure that the protective grille does not
hit any painted surfaces.
You could otherwise damage the paintwork.
!Do not fasten the screws too tightly. You
could otherwise damage the lens.
XSwitch off the lights.
XMercedes-AMG vehicles: pull protective
grille :out of mounting ;in the direction of
the arrow and swing up.
XUnscrew screws =.
XRemove lens?.
XTurn bulbAcounter-clockwise, applying
slight pressure, and pull it out of the bulb
holder.
XInsert the new bulb into the bulb holder and,
applying slight pressure, turn it clockwise
until it engages.
XInstall lens ?.
XReplace and tighten screws =.
XMercedes-AMG vehicles:fold down protec-
tive grille :and engage it in mounting ;.
Replacing rear bulbs
Protective grille (Mercedes-AMG vehi-
cles)
!Make sure that the protective grille does not
hit any painted surfaces.
You could otherwise damage the paintwork.
Replacing bulbs91
Lights and windshield wipers
Z
Page 94 of 294
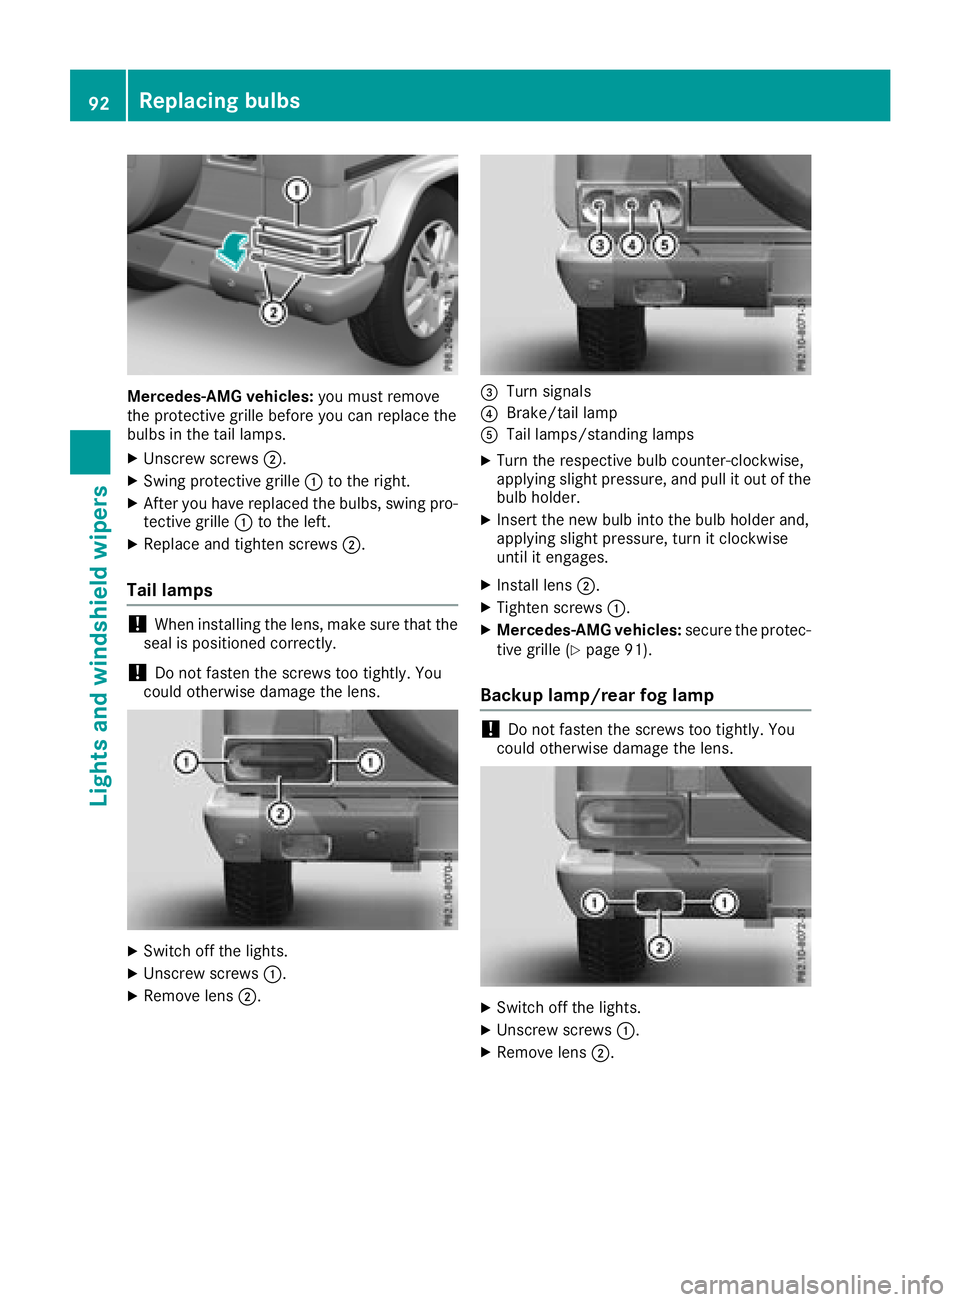
Mercedes-AMG vehicles:you must remove
the protective grille before you can replace the
bulbs in the tail lamps.
XUnscrew screws ;.
XSwing protective grille :to the right.
XAfter you have replaced the bulbs, swing pro-
tective grille :to the left.
XReplace and tighten screws ;.
Tail lamps
!When installing the lens, make sure that the
seal is positioned correctly.
!Do not fasten the screws too tightly. You
could otherwise damage the lens.
XSwitch off the lights.
XUnscrew screws :.
XRemove lens;.
=Turn signals
?Brake/tail lamp
ATail lamps/standing lamps
XTurn the respective bulb counter-clockwise,
applying slight pressure, and pull it out of the
bulb holder.
XInsert the new bulb into the bulb holder and,
applying slight pressure, turn it clockwise
until it engages.
XInstall lens;.
XTighten screws :.
XMercedes-AMG vehicles: secure the protec-
tive grille (Ypage 91).
Backup lamp/rear fog lamp
!Do not fasten the screws too tightly. You
could otherwise damage the lens.
XSwitch off the lights.
XUnscrew screws :.
XRemove lens;.
92Replacing bulbs
Lights and windshield wipers
Page 139 of 294

You can also activate DISTRONIC PLUS when
stationary. The lowest speed that can be set is
20 mph (30 km/h).
XBriefly pull the cruise control lever towards
you?, up :or down ;.
DISTRONIC PLUS is activated.
Activating at the current speed/last
stored speed
GWARNING
If you call up the stored speed and it differs
from the current speed, the vehicle acceler-
ates or decelerates. If you do not know the
stored speed, the vehicle could accelerate or brake unexpectedly. There is a risk of an acci-
dent.
Pay attention to the road and traffic condi-
tions before calling up the stored speed. If you
do not know the stored speed, store the
desired speed again.
XBriefly pull the cruise control lever towards
you ?.
XRemove your foot from the accelerator pedal.
DISTRONIC PLUS is activated. The first time it
is activated, the current speed is stored. Oth-
erwise, it sets the vehicle speed to the previ-
ously stored value.
Driving with DISTRONIC PLUS
Pulling away and driving
XIf you want to pull away with DISTRONIC
PLUS: remove your foot from the brake pedal.
XBriefly pull the cruise control lever towards
you?.
or
XAccelerate briefly.
The vehicle pulls away and adapts its speed to that of the vehicle in front. If no vehicle is
detected in front, your vehicle accelerates to
the stored speed.
The vehicle can also pull away when it is facing
an unidentified obstacle or is driving on a differ- ent line from another vehicle. The vehicle then
brakes automatically.
If DISTRONIC PLUS does not detect a vehicle in
front, the system operates like a cruise control.
If DISTRONIC PLUS detects that the vehicle in
front is driving slower, your vehicle brakes. In this way, the specified minimum distance you
have selected is maintained.
If DISTRONIC PLUS detects a faster-moving
vehicle in front, it increases the driving speed to
the set speed.
If you depress the brake, DISTRONIC PLUS is
deactivated unless your vehicle is stationary.
Selecting the drive program
DISTRONIC PLUS supports a sporty driving style
when you have selected the
Sdriving program
(
Ypage 116). Acceleration behind the vehicle in
front or to the set speed is then noticeably more dynamic. If you have selected drive program Eor
C (Mercedes-AMG vehicles), the vehicle accel-
erates more gently. This setting is recommen-
ded in stop-start traffic.
Changing lanes
If you change to the passing lane, DISTRONIC
PLUS supports you when:
Ryou are driving faster than 40 mph (60 km/h)
RDISTRONIC PLUS is maintaining the distance
to a vehicle in front
Ryou switch on the appropriate turn signal
RDISTRONIC PLUS does not detect a danger of
collision
If these conditions are fulfilled, your vehicle is
accelerated. Acceleration will be interrupted if
changing lanes takes too long or if the distance
between your vehicle and the vehicle in front
becomes too small.
When changing lanes, DISTRONIC PLUS moni-
tors the left lane on left-hand drive vehicles and
the right lane on right-hand drive vehicles.
Stopping
GWARNING
When leaving the vehicle, even if it is braked
only by DISTRONIC PLUS, it could roll away if:
Rthere is a malfunction in the system or in
the voltage supply.
RDISTRONIC PLUS has been deactivated
with the cruise control lever, e.g. by a vehi-
cle occupant or from outside the vehicle.
Rthe electrical system in the engine com-
partment, the battery or the fuses have
been tampered with.
Driving systems137
Driving and parking
Z
Page 142 of 294
DISTRONIC PLUS is automatically deactivated
if:
Ryou apply the parking brake
Ryou are driving slower than 15 mph (25 km/h)
and there is no vehicle in front, or if the vehicle
in front is no longer detected
RESP®intervenes or you deactivate ESP®
Rthe automatic transmission is in positionj,
k ori
Ryou pull the cruise control lever towards you
in order to pull away and the front-passenger
door or one of the rear doors is open
Rthe vehicle slips
If DISTRONIC PLUS is deactivated, an intermit-
tent warning tone sounds and the DISTRONIC
PLUSOffmessage appears in the multifunction
display for approximately five seconds.
Tips for driving with DISTRONIC PLUS
Pay particular attention in the following traffic
situations:
RCornering, entering and exiting a bend: the
ability of DISTRONIC PLUS to detect vehicles
when cornering is limited. Your vehicle may
brake unexpectedly or late.
RDriving on a different line: DISTRONIC PLUS
may not detect vehicles which are not driving
in the middle of their lane. The distance to the
vehicle in front will be too short.
ROther vehicles changing lane: DISTRONIC
PLUS has not detected the vehicle cutting in
yet. The distance to this vehicle will be too
short.
RNarrow vehicles: DISTRONIC PLUS does not
detect the vehicle in front on the edge of the
road because of its narrow width. The dis-
tance to the vehicle in front will be too short.
RObstacles and stationary vehicles:
DISTRONIC PLUS does not brake for obsta-
cles or stationary vehicles. If, for example, the detected vehicle turns a corner and reveals an
obstacle or stationary vehicle, DISTRONIC
PLUS will not brake for these.
RCrossing vehicles: DISTRONIC PLUS may mis-
takenly detect vehicles that are crossing your
lane. Activating DISTRONIC PLUS at traffic
lights with crossing traffic, for example, could
cause your vehicle to pull away uninte
ntion-
ally.
In such situations, brake if necessary.
DISTRONIC PLUS is then deactivated.
Blind Spot Assist
General notes
Blind Spot Assist monitors the areas on either
side of the vehicle that are not visible to the
driver with two lateral, rear-facing radar sen-
sors. A warning lamp lights up in the exterior
mirrors and draws your attention to vehicles
detected in the monitored area. If you then
switch on the corresponding turn signal to
change lane, you will also receive an optical and
audible warning.
Blind Spot Assist supports you from a speed of
approximately 20 mph (30 km/h).
Important safety notes
GWARNING
Blind Spot Assist does not react to:
Rvehicles overtaken too closely on the side,
placing them in the blind spot area
Rvehicles which approach with a large speed
differential and overtake your vehicle
As a result, Blind Spot Assist may not give
warnings in such situations. There is a risk of
an accident.
Always observe the traffic conditions care-
fully, and maintain a safe lateral distance.
Blind Spot Assist is only an aid. It may fail to
detect some vehicles and is no substitute for
attentive driving. Always ensure that there is
sufficient distance to the side for other road
users and obstacles.
iUSA only:
This device has been approved by the FCC as
a "Vehicular Radar System". The radar sensor
is intended for use in an automotive radar
system only. Removing, tampering with, or
altering the device will void any warranties,
and is not permitted by the FCC. Do not tam-
per with, alter, or use in any non-approved
way.
Any unauthorized modification to this device
could void the user’s authority to operate the
equipment.
140Driving system s
Driving an d parking
Page 144 of 294
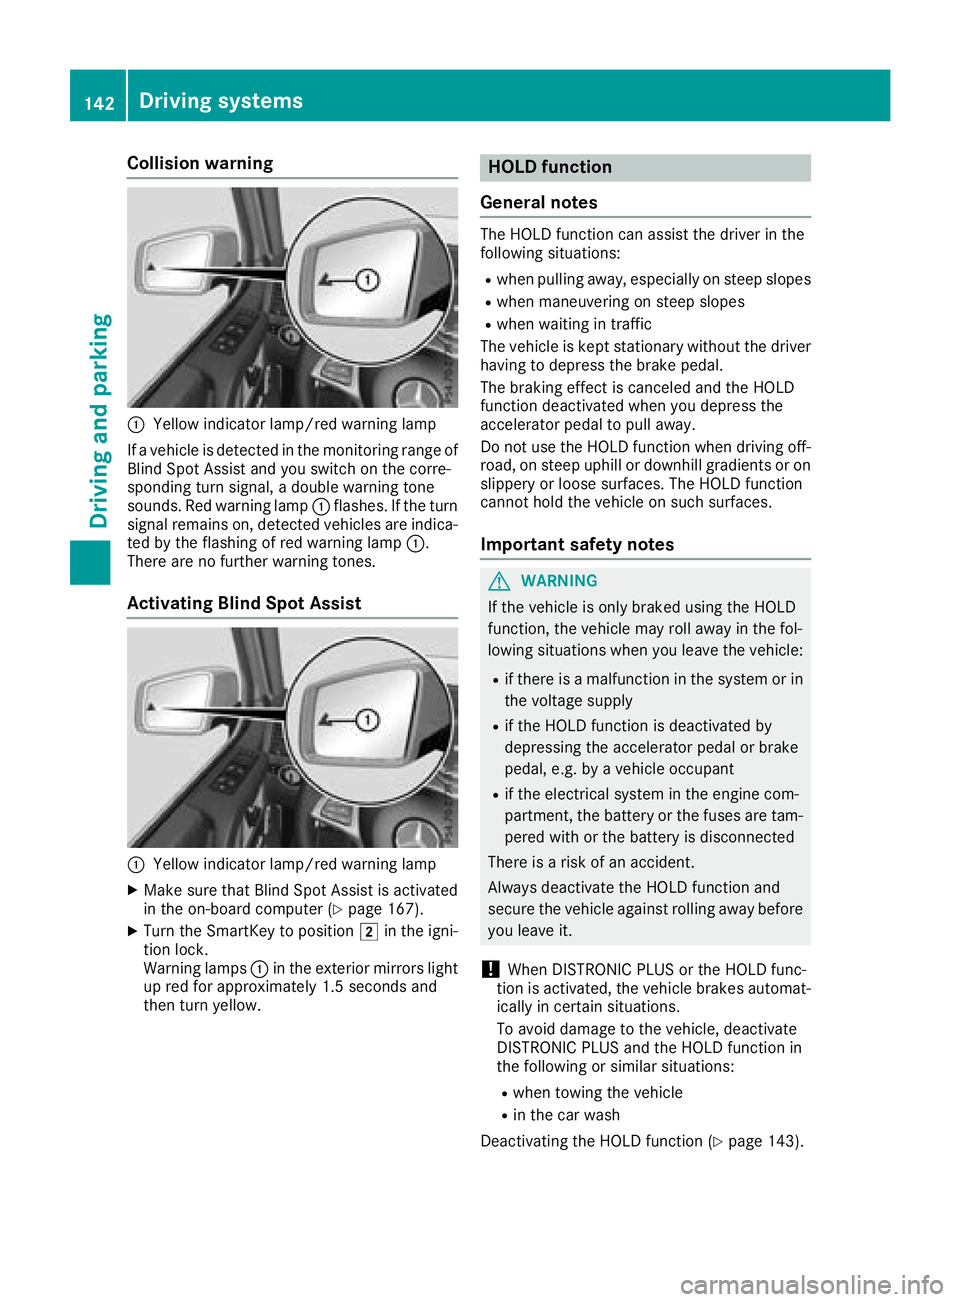
Collision warning
:Yellow indicator lamp/red warning lamp
If a vehicle is detected in the monitoring range of
Blind Spot Assist and you switch on the corre-
sponding turn signal, a double warning tone
sounds. Red warning lamp :flashes. If the turn
signal remains on, detected vehicles are indica-
ted by the flashing of red warning lamp :.
There are no further warning tones.
Activating Blind Spot Assist
:Yellow indicator lamp/red warning lamp
XMake sure that Blind Spot Assist is activated
in the on-board computer (Ypage 167).
XTurn the SmartKey to position 2in the igni-
tion lock.
Warning lamps :in the exterior mirrors light
up red for approximately 1.5 seconds and
then turn yellow.
HOLD function
General notes
The HOLD function can assist the driver in the
following situations:
Rwhen pulling away, especially on steep slopes
Rwhen maneuvering on steep slopes
Rwhen waiting in traffic
The vehicle is kept stationary without the driver having to depress the brake pedal.
The braking effect is canceled and the HOLD
function deactivated when you depress the
accelerator pedal to pull away.
Do not use the HOLD function when driving off-
road, on steep uphill or downhill gradients or on
slippery or loose surfaces. The HOLD function
cannot hold the vehicle on such surfaces.
Important safety notes
GWARNING
If the vehicle is only braked using the HOLD
function, the vehicle may roll away in the fol-
lowing situations when you leave the vehicle:
Rif there is a malfunction in the system or in the voltage supply
Rif the HOLD function is deactivated by
depressing the accelerator pedal or brake
pedal, e.g. by a vehicle occupant
Rif the electrical system in the engine com-
partment, the battery or the fuses are tam-
pered with or the battery is disconnected
There is a risk of an accident.
Always deactivate the HOLD function and
secure the vehicle against rolling away before
you leave it.
!When DISTRONIC PLUS or the HOLD func-
tion is activated, the vehicle brakes automat-
ically in certain situations.
To avoid damage to the vehicle, deactivate
DISTRONIC PLUS and the HOLD function in
the following or similar situations:
Rwhen towing the vehicle
Rin the car wash
Deactivating the HOLD function (
Ypage 143).
142Driving systems
Driving and parking
Page 159 of 294
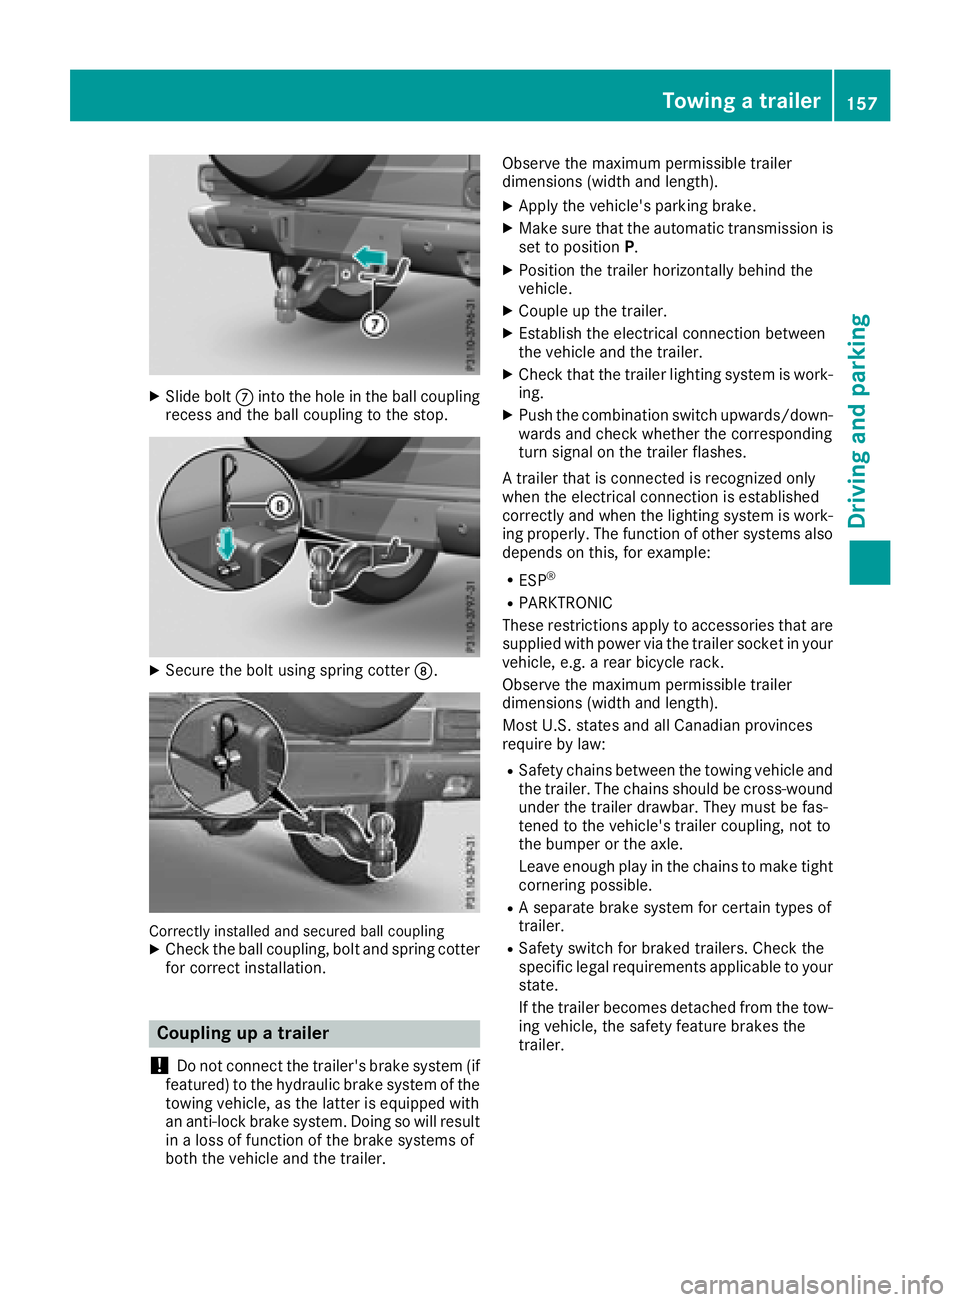
XSlide boltCinto the hole in the ball coupling
recess and the ball coupling to the stop.
XSecure the bolt using spring cotter D.
Correctly installed and secured ball couplingXCheck the ball coupling, bolt and spring cotter
for correct installation.
Coupling up a trailer
!
Do not connect the trailer's brake system (if
featured) to the hydraulic brake system of the
towing vehicle, as the latter is equipped with
an anti-lock brake system. Doing so will result
in a loss of function of the brake systems of
both the vehicle and the trailer. Observe the maximum permissible trailer
dimensions (width and length).
XApply the vehicle's parking brake.
XMake sure that the automatic transmission is
set to position
P.
XPosition the trailer horizontally behind the
vehicle.
XCouple up the trailer.
XEstablish the electrical connection between
the vehicle and the trailer.
XCheck that the trailer lighting system is work-
ing.
XPush the combination switch upwards/down-
wards and check whether the corresponding
turn signal on the trailer flashes.
A trailer that is connected is recognized only
when the electrical connection is established
correctly and when the lighting system is work-
ing properly. The function of other systems also
depends on this, for example:
RESP®
RPARKTRONIC
These restrictions apply to accessories that are
supplied with power via the trailer socket in your
vehicle, e.g. a rear bicycle rack.
Observe the maximum permissible trailer
dimensions (width and length).
Most U.S. states and all Canadian provinces
require by law
:
RSafety chains between the towing vehicle and
the trailer. The chains should be cross-wound
under the trailer drawbar. They must be fas-
tened to the vehicle's trailer coupling, not to
the bumper or the axle.
Leave enough play in the chains to make tight
cornering possible.
RA separate brake system for certain types of
trailer.
RSafety switch for braked trailers. Check the
specific legal requirements applicable to your
state.
If the trailer becomes detached from the tow-
ing vehicle, the safety feature brakes the
trailer.
Towing a trailer157
Driving and parking
Z
Page 230 of 294
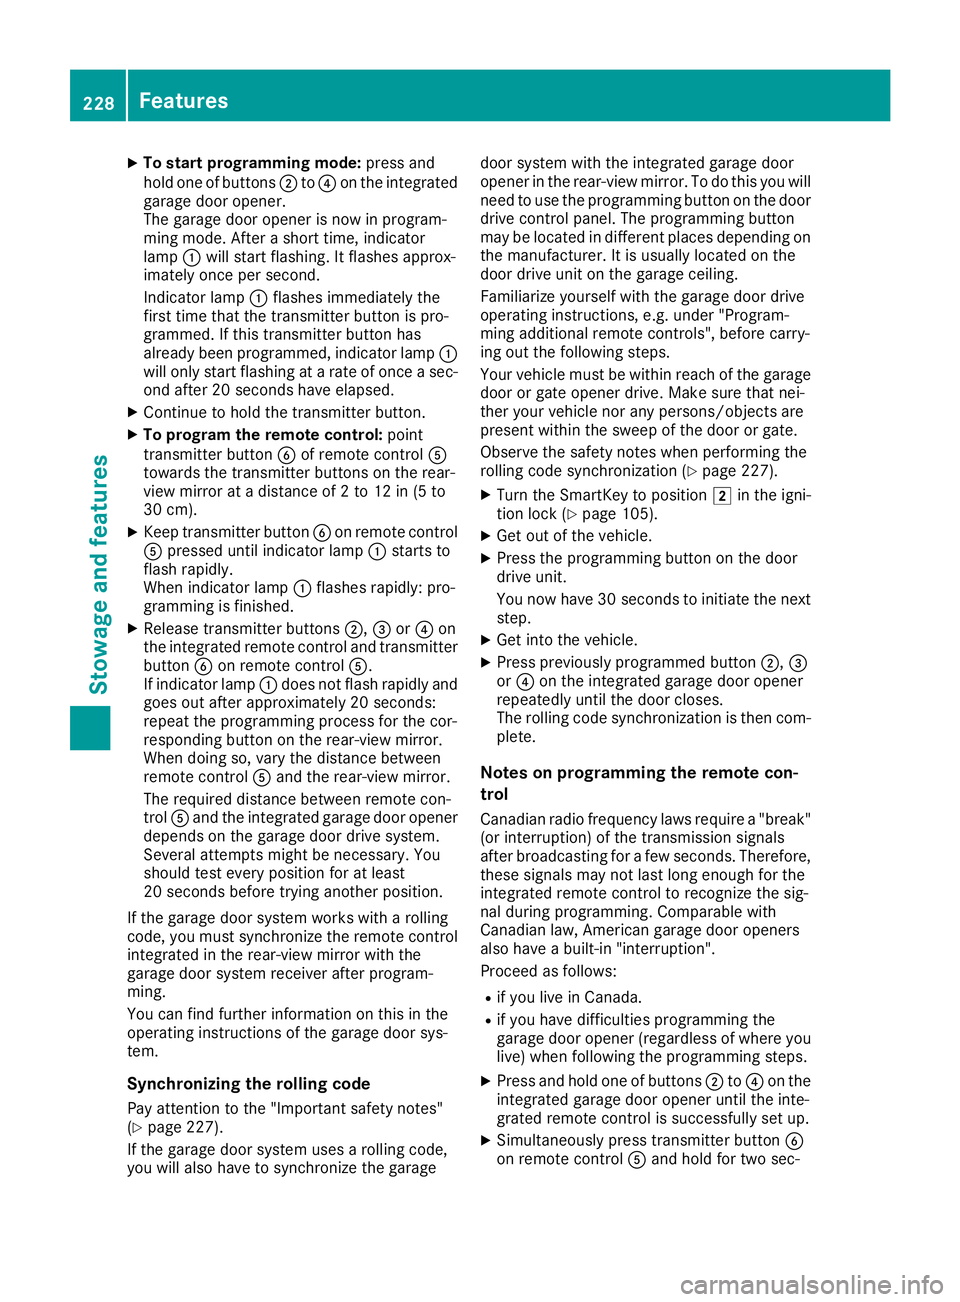
XTo start programming mode:press and
hold one of buttons ;to? on the integrated
garage door opener.
The garage door opener is now in program-
ming mode. After a short time, indicator
lamp :will start flashing. It flashes approx-
imately once per second.
Indicator lamp :flashes immediately the
first time that the transmitter button is pro-
grammed. If this transmitter button has
already been programmed, indicator lamp :
will only start flashing at a rate of once a sec-
ond after 20 seconds have elapsed.
XContinue to hold the transmitter button.
XTo program the remote control: point
transmitter button Bof remote control A
towards the transmitter buttons on the rear-
view mirror at a distance of 2 to 12 in (5 to
30 cm).
XKeep transmitter button Bon remote control
A pressed until indicator lamp :starts to
flash rapidly.
When indicator lamp :flashes rapidly: pro-
gramming is finished.
XRelease transmitter buttons ;,=or? on
the integrated remote control and transmitter
button Bon remote control A.
If indicator lamp :does not flash rapidly and
goes out after approximately 20 second s:
repeat the programming process for the cor-
responding button on the rear-view mirror.
When doing so, vary the distance between
remote control Aand the rear-view mi
rror.
The required distance between remote con-
trol Aand the integrated garage door opener
depends on the garage door drive system.
Several attempts might be necessary. You
should test every position for at least
20 seconds before trying another position.
If the garage door system works with a rolling
code, you must synchronize the remote control
integrated in the rear-view mirror with the
garage door system receiver after program-
ming.
You can find further information on this in the
operating instructions of the garage door sys-
tem.
Synchronizing the rolling code
Pay attention to the "Important safety notes"
(Ypage 227).
If the garage door system uses a rolling code,
you will also have to synchronize the garage door system with the integrated garage door
opener in the rear-view mirror. To do this you will
need to use the programming button on the door
drive control panel. The programming button
may be located in different places depending on
the manufacturer. It is usually located on the
door drive unit on the garage ceiling.
Familiarize yourself with the garage door drive
operating instructions, e.g. under "Program-
ming additional remote controls", before carry-
ing out the following steps.
Your vehicle must be within reach of the garage
door or gate opener drive. Make sure that nei-
ther your vehicle nor any persons/objects are
present within the sweep of the door or gate.
Observe the safety notes when performing the
rolling code synchronization (
Ypage 227).
XTurn the SmartKey to position
2in the igni-
tion lock (Ypage 105).
XGet out of the vehicle.
XPress the programming button on the door
drive unit.
You now have 30 seconds to initiate the next
step.
XGet into the vehicle.
XPress previously programmed button ;,=
or ? on the integrated garage door opener
repeatedly until the door closes.
The rolling code synchronization i
s then com-
plete.
Notes on programming the remote con-
trol
Canadian radio frequency laws require a "break"
(or interruption) of the transmission signals
after broadcasting for a few seconds. Therefore,
these signals may not last long enough for the
integrated remote control to recognize the sig-
nal during programming. Comparable with
Canadian law, American garage door openers
also have a built-in "interruption".
Proceed as follows:
Rif you live in Canada.
Rif you have difficulties programming the
garage door opener (regardless of where you
live) when following the programming steps.
XPress and hold one of buttons ;to? on the
integrated garage door opener until the inte-
grated remote control is successfully set up.
XSimultaneously press transmitter button B
on remote control Aand hold for two sec-
228Features
Stowage and features