2018 MERCEDES-BENZ G-CLASS check oil
[x] Cancel search: check oilPage 169 of 294

Dialinganumber from th ephone book
XPress th e= or; buttonon th esteerin g
whee lto selec tth eTelmenu.
XPress 9, :ora to switch to th e
phone book.
XAuthoriz eaccess to th ephone boo kon th e
phone .
XPress th e9 or: buttonto selec tth e
desire dname.
or
XTo star trapi dscrolling: press and hol d9
or : forlonger than on esecond.
Rapid scrollin gstops when you release th e
butto nor reach th een dof th elist .
XIf only one telephon enumber is stored for
a name :press th e6 ora buttonto
start dialing .
or
XIf ther eis more than one number for a
particular name :press th e6 ora
butto nto display th enumbers.
XPress th e9 or: buttonto selec tth e
number you wan tto dial.
XPress th e6 ora buttonto start dialing .
or
XTo exit th ephone book :press th e~ or
% button.
Redialing
The on-boar dcompute rsaves th elast names or
number sdiale din th eredial memory.
XPress th e= or; buttonon th esteerin g
whee lto selec tth eTelmenu.
XPress th e6 buttonto switch to th eredial
memory.
XPress th e9 or: buttonto selec tth e
desire dnam eor number .
XPress the6 ora buttonto start dialing .
or
XTo exit th eredial memory :press th e~
or % button.
Assistance menu
Introduction
In th eDriveAssistmenu, you hav eth efollow -
in g options:
RDisplayin gth eassistanc egraphi c
(Ypage 167)
RActivating/deactivatin gBlin dSpot Assis t
(Ypage 167)
Displaying th eassistance graphic
XPress th e= or; buttonon th esteerin g
whee lto selec tth eDriveAssistmenu.
XPress 9or: to selec tAssistanc eGraphic.
XPressa.
The DISTRONIC PLU Sdistanc edisplay
appears in th emultifunction display.
Activating/deactivating Blind Spot
Assis t
XPress th e= or; buttonon th esteerin g
whee lto selec tth eDriveAssistmenu.
XPress th e9 or: buttonto selec t
Blind Spo tAssist.
XPress a.
The curren tselection appears .
XTo activate/deactivate :press th ea but-
to nagain .
Fo rfurther information about Blind Spot Assist,
see (
Ypage 140).
Service menu
In th eServ.menu, you hav eth efollowin g
options:
RCallin gup display messages (Ypage 174)
RChecking thetire pressure electronically
(Ypage 264)
RCallin gup th eservic edue dat e
(Ypage 236)
RChecking th eengin eoil level (Ypage 232)
Menus and submenus167
On-board computer and displays
Z
Page 184 of 294
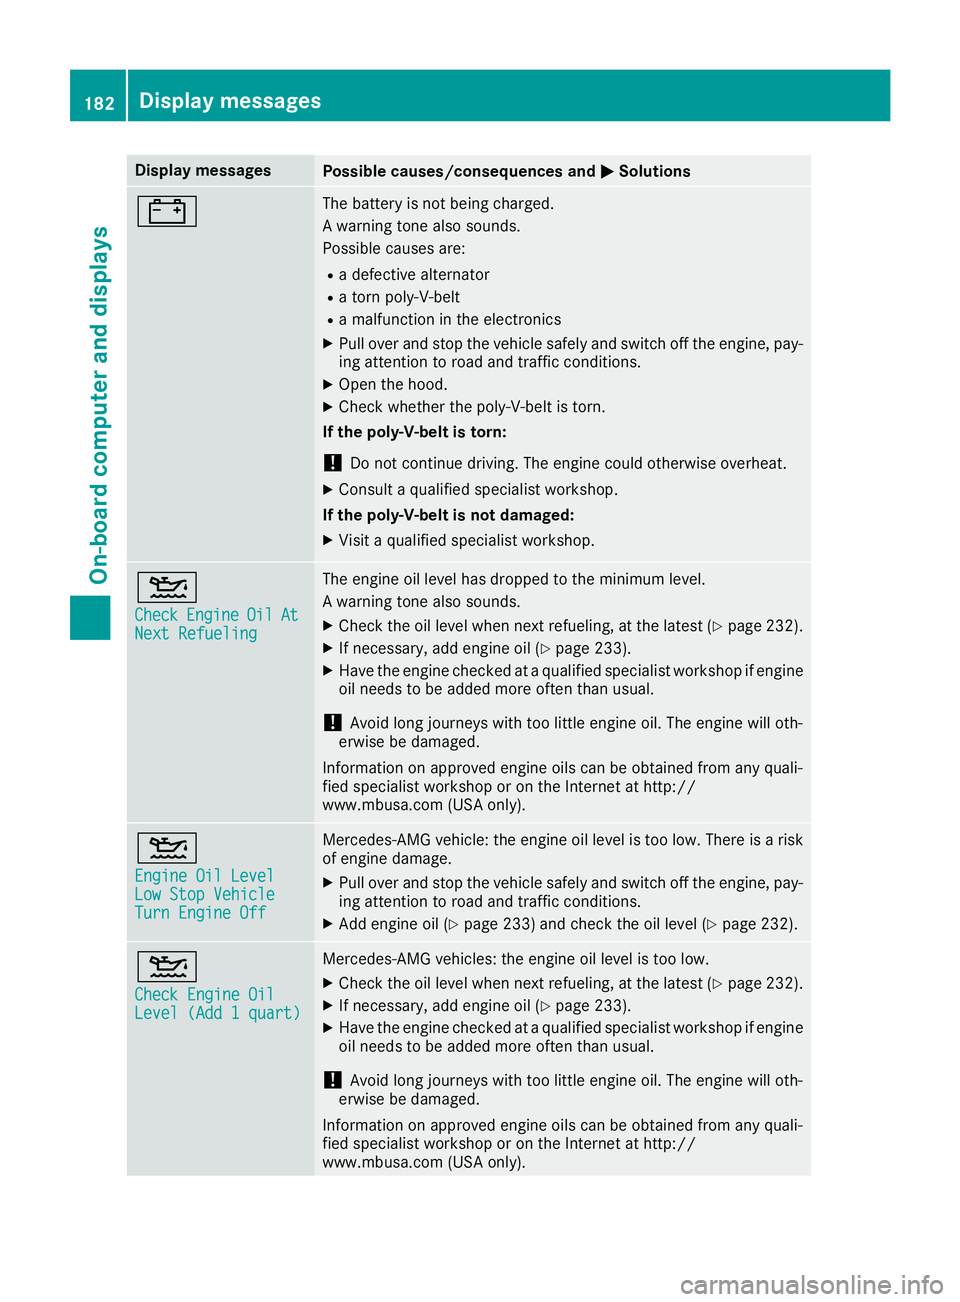
Display messagesPossible causes/consequences andMSolutions
#The battery is notbein gcharged.
A warning tone also sounds.
Possibl ecauses are:
Radefective alternato r
Ratorn poly-V-belt
Ramalfunction in th eelectronics
XPull ove rand stop th evehicl esafely and switch off th eengine, pay-
ing attention to roa dand traffic conditions.
XOpe nth ehood.
XChec kwhether th epoly-V-belt is torn .
If th epoly-V-belt is torn:
!Do no tcontinu edriving. The engin ecould otherwise overheat.
XConsult aqualified specialist workshop .
If th epoly-V-belt is not damaged :
XVisitaqualified specialist workshop .
4
CheckEngineOilAtNextRefueling
The engin eoil level has dropped to th eminimum level.
A warning tone also sounds.
XChec kth eoil level when next refueling, at th elatest (Ypage 232).
XIf necessary, add engin eoil (Ypage 233).
XHav eth eengin echecke dat aqualified specialist workshop if engin e
oil needs to be added mor eoften than usual.
!Avoid lon gjourneys wit hto olittl eengin eoil. The engin ewill oth-
erwise be damaged.
Information on approve dengin eoils can be obtained from any quali-
fie dspecialist workshop or on th eInternet at http:/ /
www.mbusa.com (US Aonly).
4
Engine Oil LevelLow Sto pVehicl eTurnEngine Off
Mercedes-AMG vehicle: th eengin eoil level is to olow. There is aris k
of engin edamage.
XPull ove rand stop th evehicl esafely and switch off th eengine, pay-
ing attention to roa dand traffic conditions.
XAd dengin eoil (Ypage 233) and chec kth eoil level (Ypage 232).
4
Check Engine OilLevel (Ad d 1quart)
Mercedes-AMG vehicles: th eengin eoil level is to olow.
XChec kth eoil level when next refueling, at th elatest (Ypage 232).
XIf necessary, add engin eoil (Ypage 233).
XHav eth eengin echecke dat aqualified specialist workshop if engin e
oil needs to be added mor eoften than usual.
!Avoid lon gjourneys wit hto olittl eengin eoil. The engin ewill oth-
erwise be damaged.
Information on approve dengin eoils can be obtained from any quali-
fie dspecialist workshop or on th eInternet at http:/ /
www.mbusa.com (US Aonly).
182Display messages
On-board computer and displays
Page 185 of 294
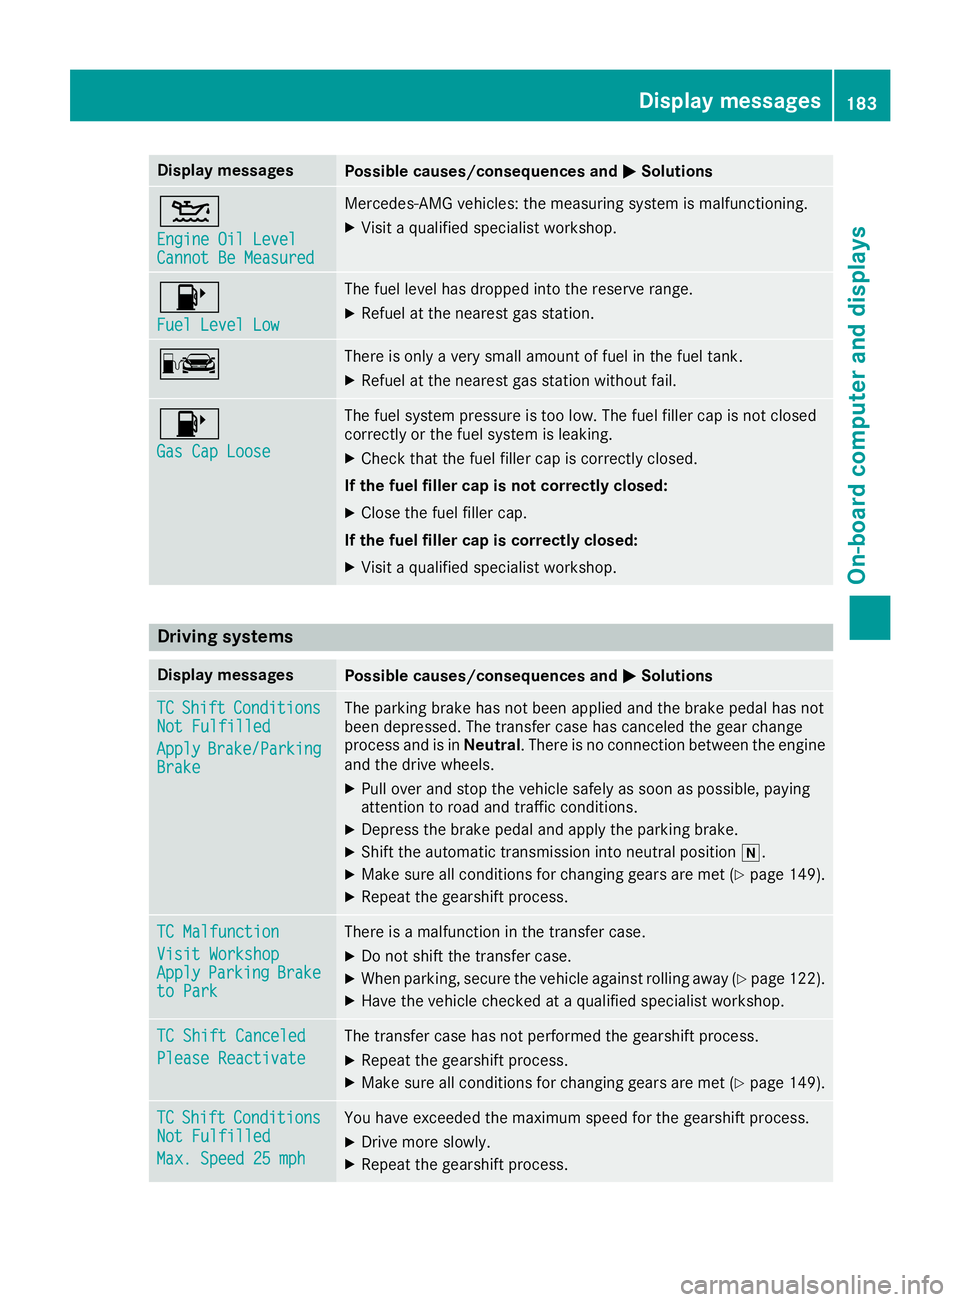
Display messagesPossible causes/consequences andMSolutions
4
Engine Oil LevelCannot Be Measured
Mercedes-AMG vehicles: themeasurin gsystem is malfunctioning .
XVisitaqualified specialist workshop .
8
FuelLevel Low
The fuel level has dropped int oth ereserv erange.
XRefue lat th eneares tgas station .
CThere is only aver ysmall amount of fuel in th efuel tank.
XRefue lat th eneares tgas station without fail .
8
Gas Cap Loose
The fuel system pressur eis to olow. The fuel filler cap is no tclosed
correctl yor th efuel system is leaking .
XCheckthat th efuel filler cap is correctl yclosed .
If th efuel filler cap is not correctl yclosed :
XCloseth efuel filler cap .
If th efuel filler cap is correctl yclosed :
XVisitaqualified specialist workshop .
Driving systems
Display messagesPossible causes/consequences and MSolutions
TCShiftConditionsNot Fulfilled
ApplyBrake/Parkin gBrake
The parking brak ehas no tbeen applie dand th ebrak epedal has no t
been depressed. The transfer cas ehas canceled th egear chang e
process and is in Neutral.There is no connection between th eengin e
and th edrive wheels.
XPull ove rand stop th evehicl esafely as soo nas possible, payin g
attention to roa dand traffic conditions.
XDepress th ebrak epedal and apply th eparking brake.
XShift th eautomatic transmission int oneutral position i.
XMakesur eall condition sfor changing gear sare met (Ypage 149).
XRepeat th egearshift process.
TC Malfunction
Visit WorkshopApplyParkin gBraketo Park
There is amalfunction in th etransfer case.
XDo no tshift th etransfer case.
XWhe nparking ,secure th evehicl eagainst rollin gaway (Ypage 122).
XHaveth evehicl echecke dat aqualified specialist workshop .
TC Shift Canceled
Please Reactivate
The transfer casehas no tperformed th egearshift process.
XRepeat th egearshift process.
XMak esur eall condition sfor changing gear sare met (Ypage 149).
TCShiftCondition sNot Fulfilled
Max.Speed 25 mph
You hav eexceeded th emaximum speed for th egearshift process.
XDrive mor eslowly.
XRepeat th egearshift process.
Display messages18 3
On-board computer and displays
Z
Page 233 of 294

The hood release lever is located in the footwell
on the left-hand side of the vehicle when viewedin the direction of travel.
XMake sure that the windshield wipers are
turned off.
XPull release lever :on the hood.
The hood is released.
XLift the hood slightly.
XPush the handle of hood catch ;in the direc-
tion of the arrow and lift the hood.
The hood is opened and held open automati-
cally by the gas-filled strut.
Closing the hood
XLower the hood and let it fall from a height of
approximately 8 in (20 cm).
XCheck that the hood has engaged properly.
If the hood can be raised slightly, it is not
properly engaged. Open it again and close it
with a little more force.
Radiator
Do not cover up the radiator, such as with a
thermal mat or insect protection cover. Other-
wise, the values of the European on-board diag- nostics may be affected. Some of these read-
ings are required by law and must be accurate at
all times.
Engine oil
Important safety notes
GWARNING
Certain components in the engine compart-
ment, such as the engine, radiator and parts
of the exhaust system, can become very hot.
Working in the engine compartment poses a
risk of injury.
Where possible, let the engine cool down and touch only the components described in the
following.
GWARNING
The engine compartment contains moving
components. Certain components, such as
the radiator fan, may continue to run or start
again suddenly when the ignition is off. There is a risk of injury.
If you need to do any work inside the engine
compartment:
Rswitch off the ignition
Rnever reach into the area where there is a
risk of danger from moving components,
such as the fan rotation area
Rremove jewelry and watches
Rkeep items of clothing and hair, for exam-
ple, away from moving parts
GWARNING
If engine oil comes into contact with hot com- ponents in the engine compartment, it may
ignite. There is a risk of fire and injury.
Make sure that engine oil is not spilled next to
the filler neck. Let the engine cool down and
thoroughly clean the engine oil off the com-
ponents before starting the engine.
Engine compartment231
Maintenance and care
Z
Page 234 of 294

GWARNING
Opening the hood when the engine is over-
heated or when there is a fire in the engine
compartment could expose you to hot gases
or other service products. There is a risk of
injury.
Let an overheated engine cool down before
opening the hood. If there is a fire in the
engine compartment, keep the hood closed
and contact the fire department.
Notes on the oil level
Depending on your driving style, the vehicle
consumes up to 0.9 US qt (0.8 liters) of oil per
600 mile s(1000 km). The oil consumption may
be higher than this when the vehicle is new or if you frequently drive at high engine speeds.
Depending on the engine, the oil dipstick may be
in a different location.
When checking the oil level:
Rpark the vehicle on a level surface
Rthe engine should be switched off for approx-
imately five minutes if the engine is at normal
operating temperature
Rif the engine is not at normal operating tem-
perature, e.g. if the engine was only started
briefly, wait approximately 30 minutes before
carrying out the measurement
Checking the oil level using the oil dip-
stick
Example: engine compartment
On the G 63 AMG, the oil level can be checked
using the oil dipstick.
XPull oil dipstick :out of the dipstick guide
tube.
XWipe off oil dipstick :.
XSlowly slide oil dipstick :into the guide tube
to the stop and take it out again after approx-
imately three seconds.
If the level is between MIN mark =and MAX
mark ;, the oil level is correct.
XIf the oil level has dropped to MIN mark =or
below, add 1.1 US qt (1.0 l)of engine oil.
On all other models, the on-board computer
must be used to check the engine oil level.
Checking the oil level using the on-
board computer
G 550: the oil level can only be checked using
the on-board computer.
XMake sure that the SmartKey is in position 2
in the ignition lock.
XPress 9or: on the steering wheel to
select the following message: Measuring
EngineOilLevelAccurateOnlyWhenVehicle Is Level
The measurement takes a few seconds. You will
see one of the following messages in the multi-
function display:
REngine Oil Level OK
RAdd1.1litersEng.OilatNextRefu‐eling
XAdd oil if necessary.
If the engine is at normal operating temperature and the Reduce Engine Oil Level
display
appears, too much oil has been added.
XHave excess oil siphoned off.
If the For Engine Oil Level Ignition
Must Be Onmessage appears:
XTurn the SmartKey to position 2in the igni-
tion lock (Ypage 105).
If the Need More Time to Check Engine
Oil Levelmessage appears:
XIf the engine is at normal operating tem-
perature: repeat the measurement after
approximately five minutes.
XIf the engine is not at normal operating
temperature: e.g. if the engine was only star-
ted briefly, repeat the measurement after
approximately 30 minutes.
232Engine compartment
Maintenance and care
Page 237 of 294

Example: adding liquid to the windshield
washer system
XTo open:pull cap:upwards by the tab and
open.
XAdd the premixed washer fluid.
XTo close: press cap :onto the filler neck
until it engages.
The washer fluid reservoir is used for both the
windshield washer system and the headlamp
cleaning system.
If the washer fluid level drops below the recom-
mended minimum of 3.7 US qt (3.5 l), a message
appears in the multifunction display prompting
you to add washer fluid (
Ypage 191).
Further information on washer fluid
(
Ypage 287).
Brake fluid level
!If you notice that the brake fluid level in the
brake fluid reservoir has fallen to the MIN
mark or less, check the brake system imme-
diately for leaks. Also check the thickness of
the brake linings. Visit a qualified specialist
workshop immediately.
Do not add brake fluid. This does not correct
the error.
Only check the brake fluid level when the vehicle
is stationary and on a level surface. The brake
fluid level is correct if the level is between MAX
mark :and MIN mark ;on the brake fluid
reservoir.
Maintenance
Service interval display
Service messages
You can obtain up-to-date information concern-
ing the servicing of your vehicle from a qualified
specialist workshop, e.g. an authorized
Mercedes-Benz Center or at
http://www.mbusa.com (USA only).
The ASSYST service interval display informs you
of the next service due date.
If a service due date has been exceeded, you
also hear a warning tone.
The multifunction display shows a service mes-
sage for several seconds, e.g.:
Service A In 999,999 km
Service A in .. Days
Service A Due
Service A Exceeded 999,999 km
Service A Exceeded .. Days
Maintaining the time-dependent service sched-
ule:
XBefore disconnecting the battery, note down
the service due date displayed.
or
XAfter reconnecting the battery, subtract the
battery disconnection periods from the ser-
vice date shown on the display.
The service interval display should not be con-
fused with the 4engine oil level display.
The symbol and the letter indicate which type of
service is due:
¯ Minor service A
±
Major service B
The ASSYST service interval display does not
take into account any periods of time during
which the battery is disconnected.
Maintenance235
Maintenance and care
Z
Page 238 of 294
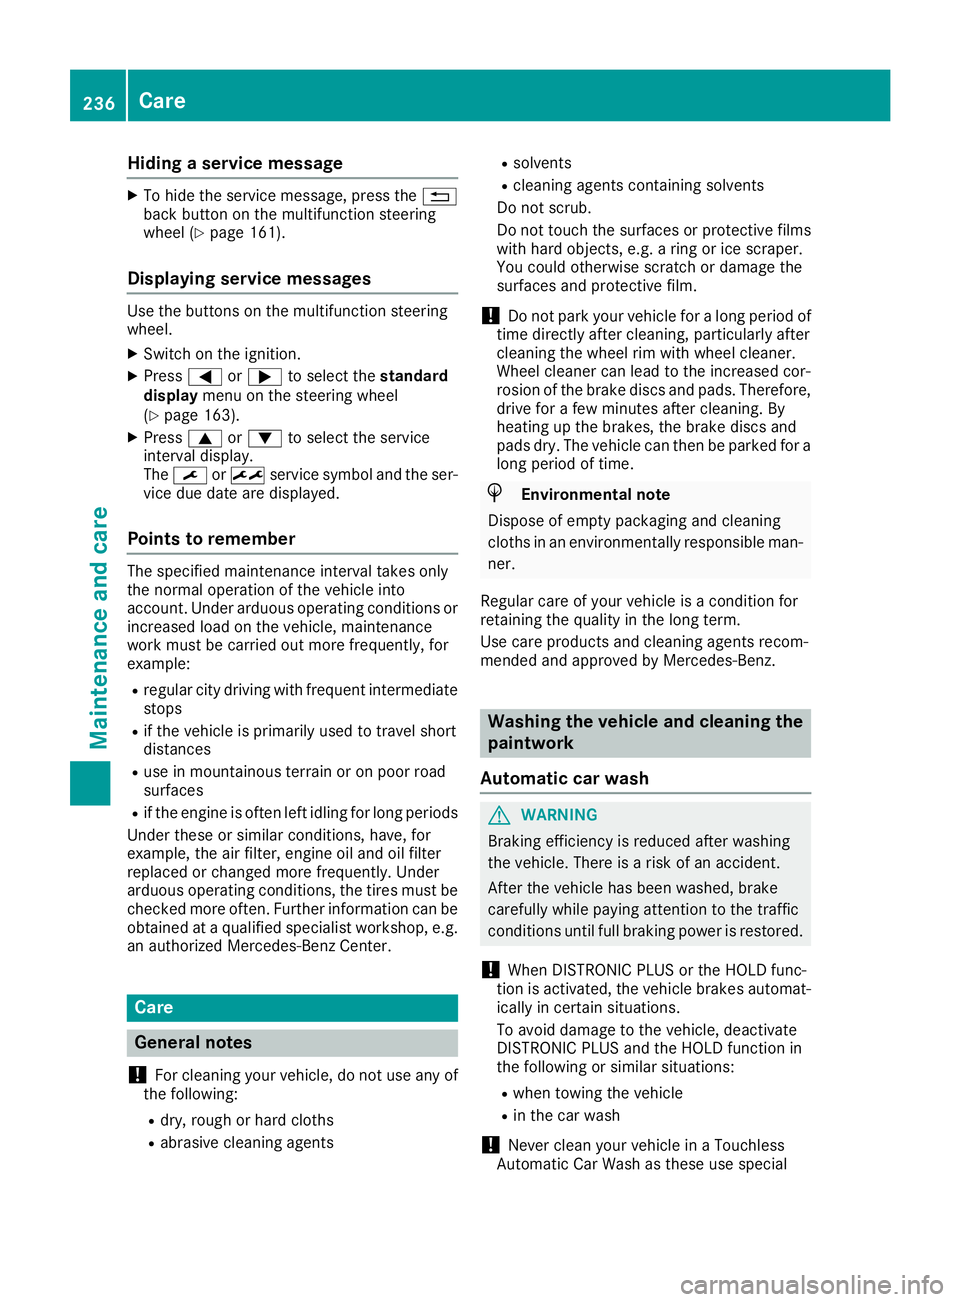
Hiding a service message
XTo hide the service message, press the%
back button on the multifunction steering
wheel (
Ypage 161).
Displaying service messages
Use the buttons on the multifunction steering
wheel.
XSwitch on the ignition.
XPress =or; to select the standard
display menu on the steering wheel
(
Ypage 163).
XPress 9or: to select the service
interval display.
The ¯ or± service symbol and the ser-
vice due date are displayed.
Points to remember
The specified maintenance interval takes only
the normal operation of the vehicle into
account. Under arduous operating conditions or
increased load on the vehicle, maintenance
work must be carried out more frequently, for
example:
Rregular city driving with frequent intermediate
stops
Rif the vehicle is primarily used to travel short
distances
Ruse in mountainous terrain or on poor road
surfaces
Rif the engine is often left idling for long periods
Under these or similar conditions, have, for
example, the air filter, engine oil and oil filter
replaced or changed more frequently. Under
arduous operating conditions, the tires must be
checked more often. Further information can be obtained at a qualified specialist workshop, e.g.
an authorized Mercedes-Benz Center.
Care
General notes
!
For cleaning your vehicle, do not use any of
the following:
Rdry, rough or hard cloths
Rabrasive cleaning agents
Rsolvents
Rcleaning agents containing solvents
Do not scrub.
Do not touch the surfaces or protective films
with hard objects, e.g. a ring or ice scraper.
You could otherwise scratch or damage the
surfaces and protective film.
!Do not park your vehicle for a long period of
time directly after cleaning, particularly after
cleaning the wheel rim with wheel cleaner.
Wheel cleaner can lead to the increased cor-
rosion of the brake discs and pads. Therefore,
drive for a few minutes after cleaning. By
heating up the brakes, the brake discs and
pads dry. The vehicle can then be parked for a
long period of time.
HEnvironmental note
Dispose of empty packaging and cleaning
cloths in an environmentally responsible man-
ner.
Regular care of your vehicle is a condition for
retaining the quality in the long term.
Use care products and cleaning agents recom-
mended and approved by Mercedes-Benz.
Washing the vehicle and cleaning the
paintwork
Automatic car wash
GWARNING
Braking efficiency is reduced after washing
the vehicle. There is a risk of an accident.
After the vehicle has been washed, brake
carefully while paying attention to the traffic
conditions until full braking power is restored.
!When DISTRONIC PLUS or the HOLD func-
tion is activated, the vehicle brakes automat-
ically in certain situations.
To avoid damage to the vehicle, deactivate
DISTRONIC PLUS and the HOLD function in
the following or similar situations:
Rwhen towing the vehicle
Rin the car wash
!Never clean your vehicle in a Touchless
Automatic Car Wash as these use special
236Care
Maintenance and care
Page 242 of 294
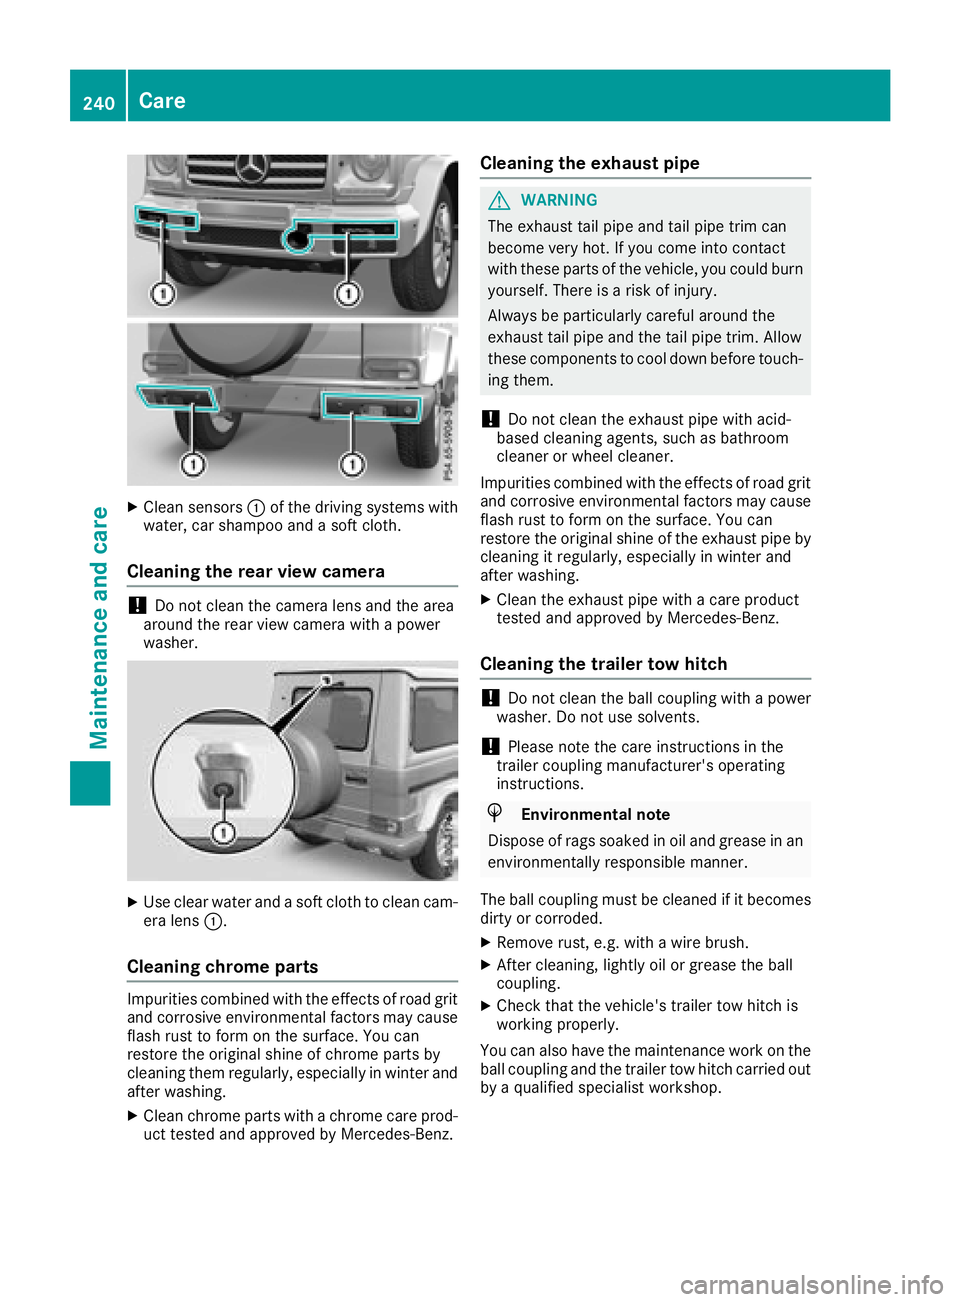
XClean sensors:of the driving systems with
water, car shampoo and a soft cloth.
Cleaning the rear view camera
!Do not clean the camera lens and the area
around the rear view camera with a power
washer.
XUse clear water and a soft cloth to clean cam- era lens :.
Cleaning chrome parts
Impurities co mbinedwit h the effects of road grit
and corrosive environmental factors may cause flash rust to form on the surface. You can
restore the original shine of chrome parts by
cleaning them regularly, especially in winter and
after washing.
XClean chrome parts with a chrome care pro d-
uct tested and approved byMercedes-Benz.
Cleaning the exhaust pipe
GWARNING
The exhaust tail pipeand tail pipetrim can
become very hot. Ifyou come into contact
wit h these parts of the vehicle, you could burn
yourself. There isa risk of injury.
Always be particularly careful around the
exhaust tail pipeand the tail pipetrim. Allow
these components to cool downbefore touch-
ing them.
!Do not clean the exhaust pipe with acid-
based cleaning agents, such as bathroom
cleaner or wheel cleaner.
Impurities co mbined with the effects of road grit
and corrosive environmental factors may cause
flash rust to form on the surface. You can
restore the original shine of the exhaust pipeby
cleaning it regularly, especially in winter and
after washing.
XClean the exhaust pipe with a care product
tested and approved byMercedes-Benz.
Cleaning the trailer tow hitch
!Do not clean the ball coupling with a power
washer. Do not use solvents.
!Please note the care instructions in the
trailer coupling manufacturer's operating
instructions.
HEnvironm entalnote
Dispose of rags soaked in oil and grease in an
environmentally responsible manner.
The ball coupling must becleaned if it becomes
dirt y or corroded.
XRemove rust, e.g. with a wire brush.
XAfter cleaning, lightly oil or grease the ball
coupling.
XCheck that the vehicle's trailer tow hitch is
working properly.
You can also have the maintenance work on the
ball coupling and the trailer tow hitch carried out
by a qualified specialist workshop.
240Care
Maintenance and care