Page 98 of 506
#Toremo ve:fo ld seat cushion 2vertically
upwards and remo veit from seat cushion
guide 1.
#Toinstall: push seat cushion 2into seat
cushion guide 1at a slight angle from the
re ar 3.
#Fold seat cushion 2back into its starting
position 4until it engages. Fo
lding back thefo lding bench seat
#Pull the seat cushion upwards bytab1 and
fo ld it back into its starting position until it
engages.
96 Seats and stowing
Page 113 of 506
Overview ofthe tie-down eyes
1Tie-down eyes
Re lated topic:
Loading guidelines (
→page 101).
Overview of bag hoo ks
&
WARNING Risk of injury when using bag
hooks with heavy objects
The bag hooks cannot restra in heavy objects
or items of luggage.
Objects or items of luggage could be throw n
around and thereby hit vehicle occupants
when braking or abruptly changing direc‐
tions.
#Only hang light objects on the bag
hooks.
#Ne ver hang hard, sharp-edged or fragile
objects on the bag hooks.
The bag hook can bear a maximum load of
6.6 lbs (3 kg). Do not use it tosecure a load.1Bag hook
% Obser vethe no tes on loading theve hicle
(
→page 101).
EA SY-PAC K load-secu ring kit
Note s onthe EAS Y-PA CK load-securing kit
The EA SY-PAC K load-securing kit allows youto
use your cargo co mpartment for a variet yof pur‐
Seats and stowing 111
Page 115 of 506

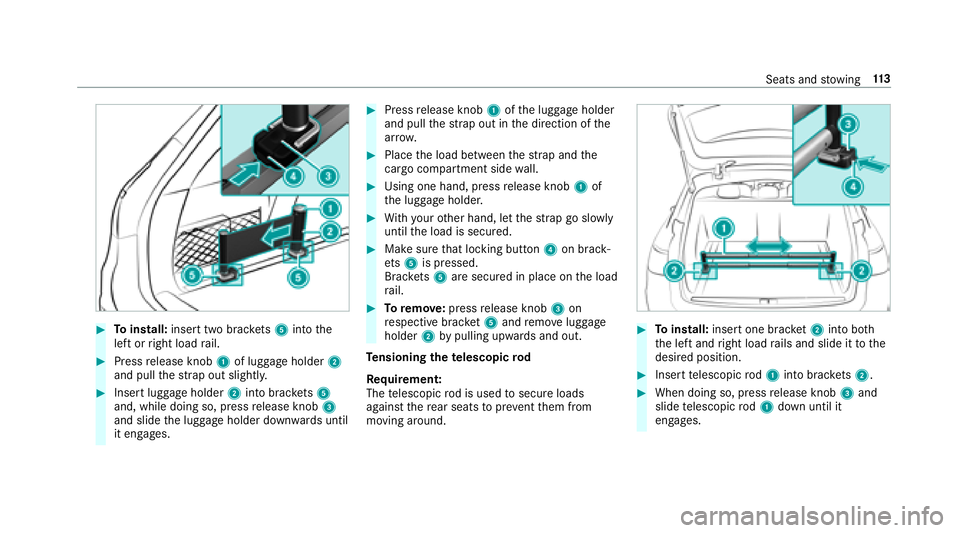
#Toinstall: insert two brac kets 5 into the
left or right load rail.
#Press release knob 1of luggage holder 2
and pull thest ra p out slightl y.
#Insert luggage holder 2into brac kets 5
and, while doing so, press release knob 3
and slide the luggage holder down wards until
it engages.
#Press release knob 1ofthe luggage holder
and pull thest ra p out in the direction of the
ar row .
#Place the load between thest ra p and the
cargo compart ment sidewall.
#Using one hand, press release knob 1of
th e luggage holder.
#Wi th your other hand, let thest ra p go slowly
until the load is secured.
#Make sure that locking button 4on brack‐
et s5 is pressed.
Brac kets 5 are secured in place on the load
ra il.
#To remo ve:press release knob 3on
re spective brac ket5 and remo veluggage
holder 2bypulling upwards and out.
Te nsioning thete lescopic rod
Re quirement:
The telescopic rod is used tosecure loads
against there ar seats topreve ntthem from
moving around.
#To install: insert one brac ket2 into bo th
th e left and right load rails and slide it tothe
desired position.
#Insert telescopic rod1 into brac kets 2.
#When doing so, press release knob 3and
slide telescopic rod1 down until it
engages.
Seats and stowing 11
3
Page 118 of 506
Openingthe cup holder in there ar armrest
* NO
TEDama getothe cup holder
When there ar armrest is folded back the cup
holder could become damaged.
#Only fold there ar armrest back when
th e cup holder is closed.
#To open: press on cup holder 1or2.
#To fold in or out: place orremo vea con‐
ta iner from cup holder 1or2.
Ashtra y and cigar ette lighter
Using the ashtr ayinthe front center console
* NO
TEDama getothestow age compart‐
ment under the ashtr ay
Thestow age compartment under the ashtray
is not heat resis tant and could be damage d if
yo ure st a lit cigar ette on it.
#Make sure that the ashtr ayis fully
engaged.
#To open: pushthe co ver of the ashtr ay
upwards on its right 2or left side.
#Toremo vethe inser t:press insert 1
upwards slightly and pull it out upwards.
#To install the inser t:press insert 1into
th e holder until the insert engages.
11 6
Seats and stowing
Page 119 of 506

Usingthere ar passenger co mpartment ash‐
tr ay
#To open: pull co ver2 out byits top handle
edge.
#To remo vethe inser t:push ribbing 3from
th e left side and pull insert 1upwards and
out.
#To install the inser t:ins tall inse rt1 from
abo veand press down into the holder until it
engages.
Using the cigar ette lighter
&
WARNING ‑ Risk of fire and injury from
hot cigar ette lighter
Yo u can burn yourself ifyo uto uch the hot
heating element or the soc ket of the ciga‐
re tte lighter.
In addition, flammable materials may ignite
if:
Ryo udr op the hot cigar ette lighter
Rach ild holds the hot cigar ette lighter to
objects, forex ample
#Alw ays hold the cigar ette lighter bythe
knob.
#Alw ays make sure that the cigar ette
lighter is out of reach of children.
#Ne ver lea vechildren unatte nded inthe
ve hicle.
Re quirement:RThe ignition is switched on.
#Press in cigar ette lighter 1.
The cigar ette lighter will pop out automati‐
cally when the heating element is red-hot.
Soc kets
12 V sock etinthe front center console
Re quirement:ROnly connect devices up toa maximum of
18 0wa tts (15 A).
Seats and stowing 11
7
Page 121 of 506

Usingthe11 5 V soc ket in the rear passenger
co mp artment
&
DANG ER Risk of fata l injury due todam‐
aged connecting cables or soc kets
If a suitable device is connected, the11 5 V
soc ket will be car rying a high voltage. If the
connecting cable or the11 5 V soc ket is
pulled out of the trim or is damaged or wet,
yo u could receive an electric shoc k.
#Only use dry and damage-free connect‐
ing cables.
#Whenthe ignition is switched off,
ensure that the11 5 V soc ket is dr y.
#Ifth e11 5 V soc ket is damage d orgets
pulled out of the paneling, immediately
ha ve the soc ketch ecked or replaced at
a qu alified specialized workshop.
#Ne ver plug the connecting cable into a
11 5 V soc ketth at is damaged or has
been pulled out of the trim.
&
DANG ER Risk of fata l injury due toincor‐
re ct handling of the soc ket
Yo u could receive an electric shock:
Rifyo ure ach into the soc ket.
Rifyo u insert unsuitable devices or objects
into the soc ket.
#Only connect suitable devices tothe
soc ket.
Re quirements:ROnly connect devices with a suitable plug
which con form sto thest andards specific to
th e count ryyou are in.
ROnly connect device s uptoa maximum of
15 0wa tts.
RDo not use multiple soc ket outlets.
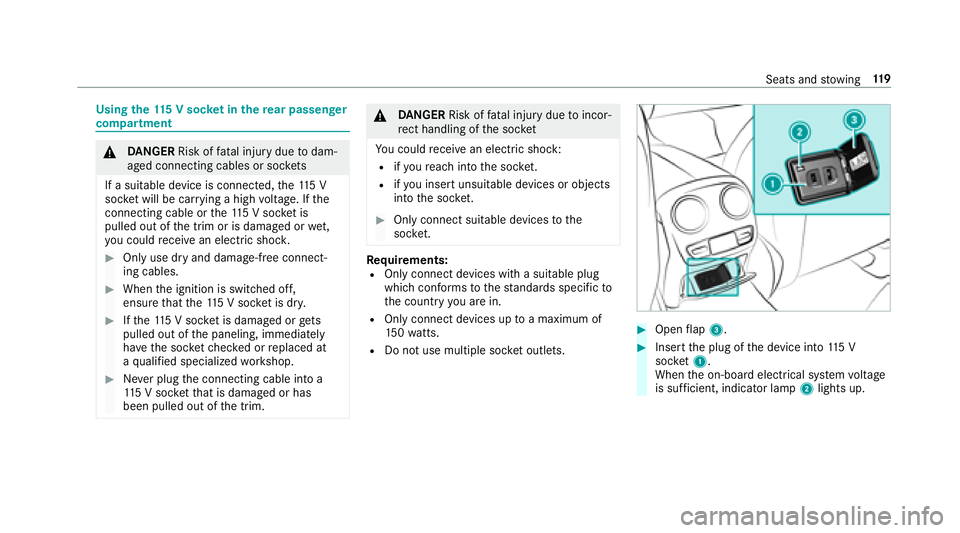
#Open flap 3.
#Insert the plug of the device into 115 V
soc ket1.
When the on-board electrical sy stem voltage
is suf ficient, indicator la mp2lights up.
Seats and stowing 11
9
Page 125 of 506

Exterior lighting
Lighting systems and your responsibility
The various lighting sy stems of theve hicle are
only aids. The driver of theve hicle is responsible
fo r cor rect vehicle illumination in accordance
with the pr evailing light and visibility conditions,
legal requirements and traf fic situation.
Light switch
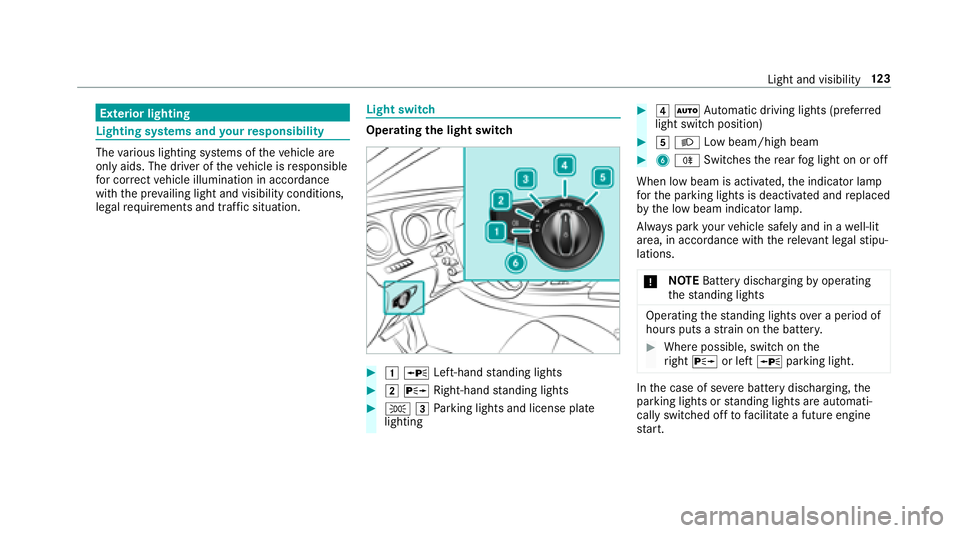
Opera ting the light switch
#1W Left-hand standing lights
#2 X Right-hand standing lights
#T 3Parking lights and license plate
lighting
#4 Ã Automatic driving lights (prefer red
light switch position)
#5 L Low beam/high beam
#6R Switches there ar fog light on or off
When low beam is activated, the indicator lamp
fo rth e parking lights is deactivated and replaced
by the low beam indicator lamp.
Alw ays park your vehicle safely and in a well-lit
area, in accordance with there leva nt le galst ipu‐
lations.
* NO
TEBattery discharging byoperating
th est anding lights
Operating thest anding lights over a period of
hours puts a stra in on the batter y.
#Where possible, switch on the
ri ght X or left Wparking light.
Inthe case of se vere battery discharging, the
parking lights or standing lights are automati‐
cally switch ed offtofacilitate a futu reengine
st art.
Light and visibility 12
3
Page 126 of 506

Theexterior lighting (e xcept parking and stand‐
ing lights) switch es off automatically when the
driver's door is opened.
Au tomatic driving lights
The pa rking lights, low beam and daytime run‐
ning lights are switched on au tomatically
depending on the ignition status, whe ther the
engine is running and on the ambient light.
&
WARNING Risk of accident when the low
beam is switched off in poor visibility
When the light switch is set toÃ, the low
beam may not be switched on automatically
if th ere is fog, snow or other causes of poor
visibility such as spr ay.
#In such cases, turn the light switch to
L.
The automatic driving lights are only an aid. You
are responsible forve hicle lighting. Ac
tivating/deactivating the rear fog light
Re quirement:
RThe light switch is in theL orà posi‐
tion.
#Press the R button.
Please obser vethe count ry-specific la wsonthe
use of rear fog lamps.
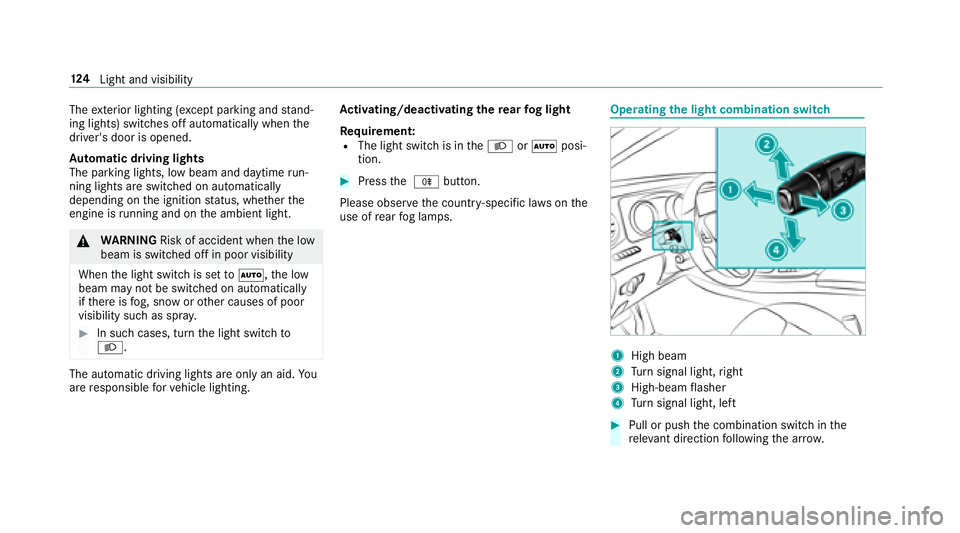
Operating the light combination switch
1High beam
2Turn signal light, right
3High-beam flasher
4Tu rn signal light, left
#Pull or push the combination switch in the
re leva nt di rection following the ar row.
12 4
Light and visibility