2018 MERCEDES-BENZ E-CLASS WAGON jump start
[x] Cancel search: jump startPage 350 of 506

Wear saf etygl asses.
Ke ep children away.
Obser vethis Opera tor's Manual.
If yo udo not intend touse theve hicle over an
ex tended pe riod of time:
RAc tivate standby mode, or
RConnect the battery toa batte rycharge r
appr ovedby Mercedes-Benz, or
RConsult a qualified specialist workshop to
disconnect the battery
St arting assist ance andcharging the12 V
battery
Ve hicles with a lithium-ion battery
#When charging the battery and during start‐
ing assis tance, al ways use the jump-s tart
connection point in the engine compartment.
* NO
TEDama getothe battery from over‐
vo ltage
When charging using a batte rycharge r with‐
out a maximum charging voltage, the battery
or the on-board electronics may be damaged.
#Only use battery charge rs with a maxi‐
mum charging voltage of 14.4 V.
* NO
TEShor tening the service life of the
battery bycharging the battery at low
te mp eratures
Charging the battery at very low temp era‐
tures may shor tenth e service life of the bat‐
te ry and ha vea negative ef fect on starting.
#Do not charge the battery at very low
te mp eratures.
All other vehicles
#When charging the battery and during start‐
ing assis tance, al ways use the jump-s tart
connection point in the engine compartment.
* NO
TEDamaging the battery thro ugh
ove rvoltage
When charging using a batte rycharge r with‐
out a maximum charging voltage, the battery
or theve hicle electronics may be damaged.
#Only use battery charge rs with a maxi‐
mum charging voltage of 14.8 V.
&
WARNING Risk ofexplosion from hydro‐
ge nga s igniting
A battery generates hydrogen gas during the
ch arging process. If there is a short circuit or
spar ksstart toform ,th ere is a danger of the
hy drogen gas igniting.
34 8
Breakdown assis tance
Page 351 of 506

#Make surethat the positive term inal of
th e connected battery does not come
into conta ct withvehicle parts.
#Ne ver place me tal objects or tools on a
batter y.
#When connecting and disconnecting the
batter y,yo u must observ eth e descri‐
bed order forth e battery clamps.
#When giving starting assis tance, al ways
make sure that you only connect bat‐
te ry term inals with identical polarity.
#During starting assis tance, you must
observ eth e described order for con‐
necting and disconnecting the jumper
cables.
#Do not connect or disconnect the bat‐
te ry cla mp s while the engine is running.
&
WARNING Risk ofexplosion during
ch arging process and starting assis tance
During thech arging process and starting
assis tance, the battery may release an explo‐
sive gas mixture.
#Av oid fire , open flames, creating spar ks
and smoking.
#Make sure that there is suf ficient venti‐
lation du ring thech arging process and
during starting assis tance.
#Do not lean over a batter y.
Ifth e indicator/warning lamps in the instrument
clus ter do not light up at low temp eratures, it is
ve ry likely that the dischar ged battery has fro‐
zen.
& WARNING Risk ofexplosion from a fro‐
zen battery
A dischar ged battery may freeze at temp era‐
tures slightly abo veor below freezing point.
During starting assis tance or battery charg‐
ing, batte rygas may be released.
#Alw aysth aw a frozen batte ryout firs t
before charging it or per form ing start‐
ing assis tance.
The service li feof a battery that has been
th awe d may be dramatically shor tened. It is
recommended that you ha veathaw ed bat‐
te ry checked at a qualified specialist workshop.
All vehicles
* NO
TEDama gecaused bynumerous or
ex tended attem ptsto start the engine
Nume rous or extended attem ptsto start the
engine may damage the catalytic con verter
due tonon-combu sted fuel.
#Av oid numerous and extended attem pts
to start the engine.
Obser vethefo llowing points during starting
assis tance and when charging the battery:
ROnly use undamaged jumper cable/charging
cables with a suf ficient cross-section and
insula tedte rm inal clamps.
RNon- insulated parts of thete rm inal clamps
must not come into con tact wi thother me tal
parts while the jumper cable/charging cable
is connected tothe battery/jump-s tart con‐
nection point.
Breakdown assis tance 34
9
Page 352 of 506

RThe jumper cable/charging cable must not
come into contact with any parts which may
movewhen the engine is running.
RAlw ays make sure that nei ther you nor the
battery is elect rostatically charge d.
RKe ep away from fire and open flames.
RDo not lean overth e batter y.
RWhencharging: only use battery charge rs
te sted and appr oved byMercedes-Benz and
re ad the battery charge r's operating instruc‐
tions before charging the batter y.
Obser vethe additional following points during
st arting assis tance:
RSt arting assis tance may only be pr ovided
using batteries with a nominal voltage of
12 V.
RThe vehicles must not touch.
RGa soline engine: Onlyaccept starting assis‐
ta nce if the engine and exhaust sy stem are
cold.
#Secure theve hicle byapplying the electric
parking brake.
#Au tomatic transmission: Shiftthe trans‐
mission toposition j.
#Make sure that the ignition and all electrical
consumers are switched off.
#Open the hood.
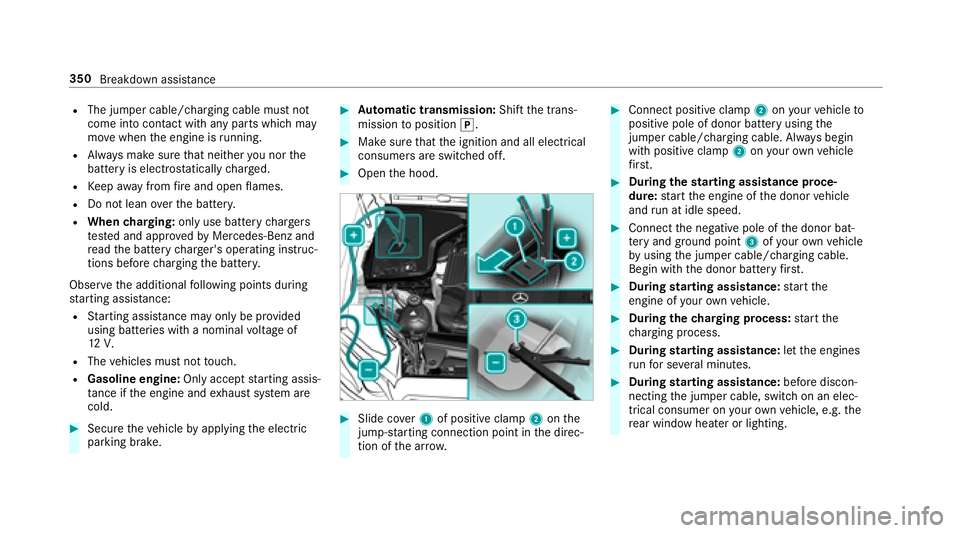
#Slide co ver1 of positive clamp 2onthe
jump-s tarting connection point in the direc‐
tion of the ar row.
#Connect positive clamp 2onyour vehicle to
positive pole of donor battery using the
jumper cable/charging cable. Alw ays begin
with positive clamp 2onyour ow nve hicle
fi rs t.
#Du ring thest arting assist ance proce‐
dure: start the engine of the donor vehicle
and run at idle speed.
#Connect the negative pole of the donor bat‐
te ry and ground po int3 ofyour ow nve hicle
by using the jumper cable/charging cable.
Begin with the donor battery firs t.
#Du ring starting assist ance:start the
engine of your ow nve hicle.
#During thech arging process: start the
ch arging process.
#During starting assist ance:letthe engines
ru nfo r se veral minutes.
#During starting assist ance:before discon‐
necting the jumper cable, switch on an elec‐
trical consumer on your ow nve hicle, e.g. the
re ar wind owheater or lighting.
350
Breakdown assis tance
Page 353 of 506

Whenthest arting assis tance/charging process
is compl ete:
#Fir st,re mo vethe jumper cable/charging
cable from ground point 3and negative
pole of the donor batter y,then from positive
clamp 2and positive pole of the donor bat‐
te ry. Begin each time with the conta cts on
yo ur ow nve hicle firs t.
#Af terre moving the jumper cable/charging
cable, close co ver1 of positive clamp 2.Yo
u can obtain fur ther information on starting
assis tance at any qualified specialist workshop.
To w starting or towing away
Perm itted towing me thods
Mercedes-Benz recommends transporting your
ve hicle in the case of a breakdown, rath er than
to wing it away. *
NO
TEDama getotheve hicle due to tow‐
ing away incor rectly
#Obser vethe instructions and no tes on
to wing away.
Breakdown assis tance 351
Page 473 of 506

Automatic engine stop (ECO start/
sto p function) .......................................... 149
Au tomatic front passen ger air bag
shu toff
see Front passenger air bag shutoff
Au tomatic lateral support adjustment
Setting ................................................... 90
Au tomatic mir rorfo lding function
Swit ching on/off ................................ .135
Au tomatic transmission
DIRECT SELECT le ver ........................... 151
Drive program display .......................... 151
Drive programs .................................... 150
DY NA MIC SELECT switch .................... 150
Engaging drive position ....................... 153
Engaging reve rsege ar ........................ .152
Kickdown ............................................. 154
Manual gear shifting ............................ 153
Selecting pa rkposition ........................ 153
Shifting toneutral ................................ 152
St eering wheel gearshift paddles ........ 153
Tr ansmission position display .............. 151
Tr ansmission positions ........................ .151B
Bag hook ................................................... 111
BA S (Brake Assist Sy stem) .................... .167
Battery Key........................................................ 58
Batter y(vehicle)
Chargin g.............................................. 34 8
Jump- starting ...................................... 348
No tes .................................................. 346
Belt see Seat belts
Blind Spot Assist .....................................2 08
Ac tivating/deactivating .......................2 10
Fu nction .............................................. 208
Sy stem limitations .............................. .208
Blo wer
see Climate control
Blue tooth
®
Ac tivating/deactivating .......................2 49
Setting up an Internet connection ....... 298
Settings ............................................... 248
Switching profile (DUN/PAN) .............. 299 Blue
tooth
®audio
Ac tivating .............................................3 16
De-authorizing (de-regis tering) the
device .................................................. 316
Information .......................................... 313
Overview ..............................................3 14
Searc hingfor a track ........................... 316
Searc hingfor and au thorizing the
device ...................... .....
.......................
315
Selecting a music pl ayer ..................... .316
Switching device via NFC ..................... 316
Brake Assist System
see BAS (Brake Assist System)
Brake fluid
No tes ................................................... 397
Brake forc e distribution
EBD (electronic brake forc e distribu‐
tion) ..................................................... 170
Brakes ABS (Anti-lock Braking Sy stem) ........... 166
BA S (Brake Assist System) .................. .167
Driving tips .......................................... 146
EBD (electronic brake forc e distribu‐
tion) ..................................................... 170
Index 47
1
Page 487 of 506

iPhone®
see Apple CarPlay™
J
Jack Storage location ..................................3 83
Jump-start connection ............................ 348
Jump-starting see Ju mp-sta rt connection
K
Ke y
Battery .................................................. 58
Energy consump tion .............................. 57
KEYLESS-GO Locking theve hicle ................................ 61
Problem .................................................6 2
Unlocking setting .................................. .57
Unlocking theve hicle ............................. 61
Kic kdow n................................................ .154
Using ................................................... 154
Knee airbag ................................................ 38
L
Labeling (ti res)
see Tire labeling
Laden ........................................................ .111
Bag hook .............................................. 111
Ro ofrack ............................................. 114
St ow age space unde rneath the cargo
compartment floor ...............................1 14
Ti e-down eyes ...................................... 111
Laden see EA SY-PAC K load-securing kit
Lamp see Interior lighting
Lamp (In stru ment Displ ay)
see Warning/indicator lamps
Lane Keeping Assist
see Active Lane Keeping Assist
Language Notes .................................................. 252
Setting .................................................2 52
LA TC H-type (ISOFIX) child seat
attachment
Installing ................................................ 50 No
tes ..................................................... 49
Le vel control sy stem
see AIR BODY CONTROL
Light switch Overview .............................................1 23
Lighting .................................................... 127
Lighting see Lights
Lights ................................................ 123, 127
Ad aptive Highbeam Assist .................. .126
Ad justing the instrument lighting ......... 218
Au tomatic driving lights ....................... 124
Comb ination switch
............................. 124
Corn
e ri ng light function ....................... 125
Hazard warning lights .......................... 125
High beam ........................................... 124
High-beam flasher .............................. .124
Light switch ......................................... 123
Low beam ............................................ 123
Pa rking lights ...................................... .123
Re ar fog light ....................................... 124
Re sponsibility for lighting sy stems ...... .123
Setting the sur round lighting .............. .127
St anding lights .................................... .123
Index 485