2018 MERCEDES-BENZ E-CLASS WAGON maintenance
[x] Cancel search: maintenancePage 336 of 506
RThe blowerfo rth eve ntilation/heating is
switched off.
RThe windshield wiper switch is in position
g.
RIn car washes with a towing mechanism: neu‐
tral iis engaged.
RThe SmartK eyis at a dis tance of at least
10 ft(3 m) away from theve hicle, otherwise
th eta ilgate could open unin tentionally.
% If, af terth e car wash, youre mo vethewa x
from the windshield and wiper rubber, this
will pr event smearing and reduce wiper
noise.
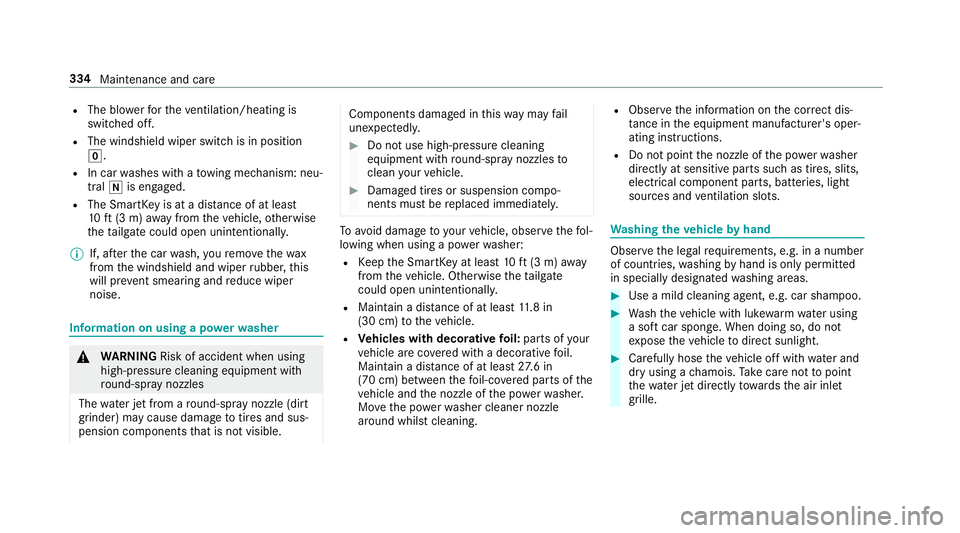
Information on using a po werwa sher
&
WARNING Risk of accident when using
high-pressure cleaning equipment wi th
ro und-s pray nozzles
The wate r jet from a round-s pray nozzle (dirt
grinder) may cause damage totires and sus‐
pension components that is not visible.
Components damaged in this wa yma yfa il
unexpec tedly.
#Do not use high-pressure cleaning
equipment wi thround-spr aynozzles to
clean your vehicle.
#Damaged tires or suspension compo‐
nents must be replaced immediatel y.
Toavo id damage to yourvehicle, obser vethefo l‐
lowing when using a po werwa sher:
RKeep the SmartK eyat least 10ft(3 m) away
from theve hicle. Otherwise theta ilgate
could open unin tentional ly.
RMaintain a dis tance of at least 11.8 in
(30 cm) totheve hicle.
RVe hicles with deco rative foil: parts of your
ve hicle are co vered with a decorative foil.
Maintain a dis tance of at least 27.6 in
(70 cm) between thefo il-c ove red parts of the
ve hicle and the nozzle of the po werwa sher.
Mo vethe po werwa sher cleaner nozzle
around whilst cleaning.
RObser vethe information on the cor rect dis‐
ta nce in the equipment manufacturer's oper‐
ating instructions.
RDo not point the nozzle of the po werwa sher
directly at sensitive parts such as tires, slits,
electrical component parts, batteries, light
sources and ventilation slot s.
Washing the vehicle byhand
Obser vethe legal requirements, e.g. in a number
of countries, washing byhand is only permitted
in specially designated washing areas.
#Use a mild cleaning agent, e.g. car shampoo.
#Wa shtheve hicle with luk ewarmwate r using
a soft car sponge. When doing so, do not
ex pose theve hicle todirect sunlight.
#Carefully hose theve hicle off with water and
dry using a chamois. Take care not topoint
th ewate r jet directly towa rdsth e air inlet
grille.
334 Maintenance and care
Page 337 of 506
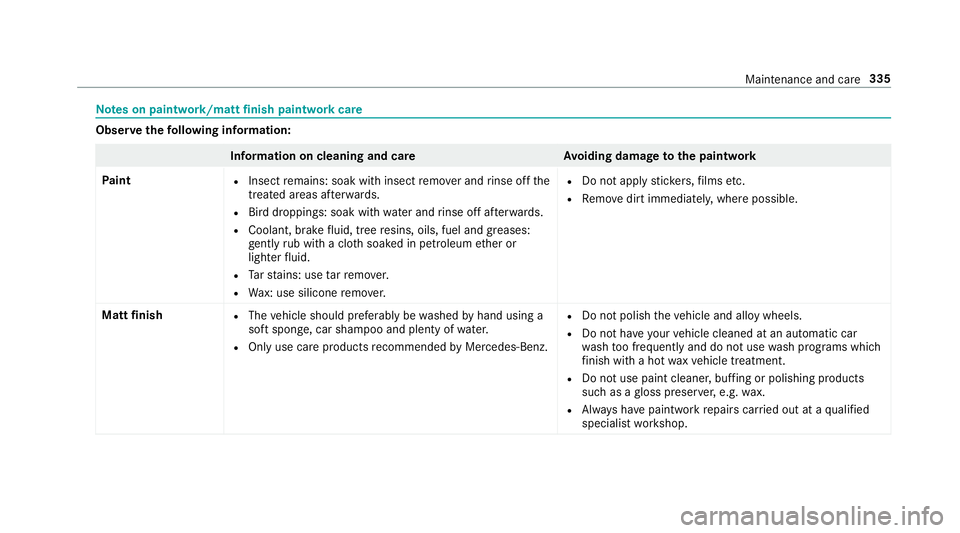
Notes on paintwo rk/matt finish paintwork care
Observethefo llowing information:
Information on cleaning and car eAvoiding damage tothe paintwork
Pa int
RInsect remains: soak with insect remo ver and rinse off the
trea ted areas af terw ards.
RBird droppings: soak with water and rinse off af terw ards.
RCoolant, brake fluid, tree resins, oils, fuel and greases:
ge ntly rub with a clo thsoaked in petroleum ether or
lighter fluid.
RTa rst ains: use tarre mo ver.
RWa x: use silicone remo ver.
RDo not apply sticke rs,fi lms etc.
RRe mo vedirt immediately, where possible.
Matt finish
RThe vehicle should preferably be washed byhand using a
soft sponge, car shampoo and plenty of water.
ROnly use care products recommended byMercedes-Benz.
RDo not polish theve hicle and alloy wheels.
RDo not ha veyour vehicle cleaned at an automatic car
wa sh too frequently and do not use wash programs which
fi nish wi tha hot waxve hicle treatment.
RDo not use paint cleaner, buf fing or polishing products
such as agloss preser ver,e.g. wax.
RAlw ays ha vepaintwork repairs car ried out at a qualified
specialist workshop.
Maintenance and care 335
Page 338 of 506
Notes on care of vehicle parts
&
WARNING Risk of entrapment if the
windshield wipers are switch ed on while
th e windshield is being cleaned
If th e windshield wipers are set in motion
while you are cleaning the windshield or
wiper blades, you can betrapped bythe
wiper arm.
#Alw ays switch off the windshield wipers
and the ignition before cleaning the
windshield or wiper blades.
& WARNING Risk of burn s fromtailpipes
and tailpipe trim
The tailpipe and tailpipe trim can become
ve ry hot. If you come into contact withth ese
parts of theve hicle, you could burn yourself.
#Alw ays be particular lycareful around
th eta ilpipe and theta ilpipe trim.
#Allow theve hicle parts tocool down
before youto uch them.
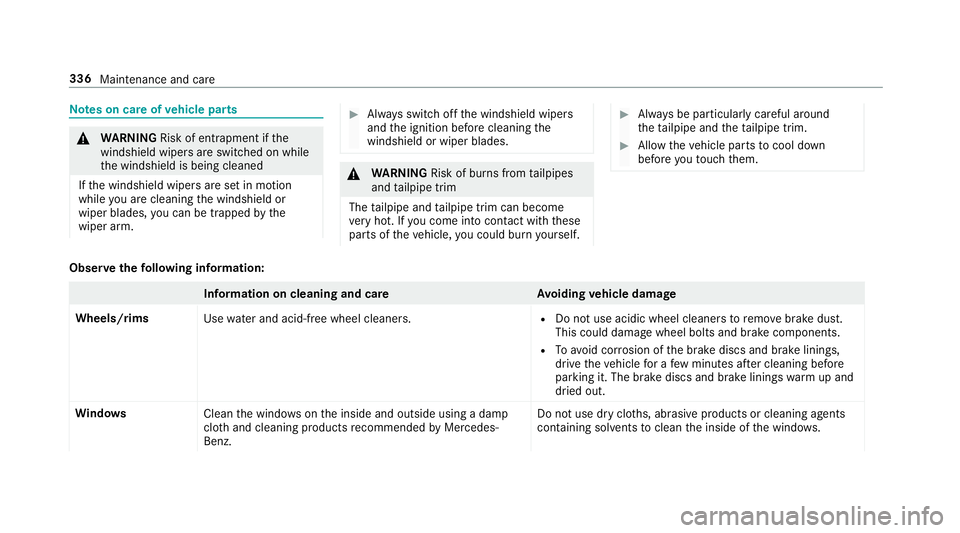
Obser vethefo llowing information:
Information on cleaning and car eAvoiding vehicle damage
Wheels/rims Usewate r and acid-free wheel cleaners.
RDo not use acidic wheel cleaners toremo vebrake dust.
This could damage wheel bolts and brake components.
RTo avoid cor rosion of the brake discs and brake linings,
drive theve hicle for a few minutes af ter cleaning before
parking it. The brake discs and brake linings warm up and
dried out.
Wi ndo ws
Cleanthe windo wsonthe inside and outside using a damp
clo thand cleaning products recommended byMercedes-
Benz. Do not use dry clo
ths, abrasive products or cleaning agents
containing sol vents toclean the inside of the windo ws.
336
Maintenance and care
Page 339 of 506
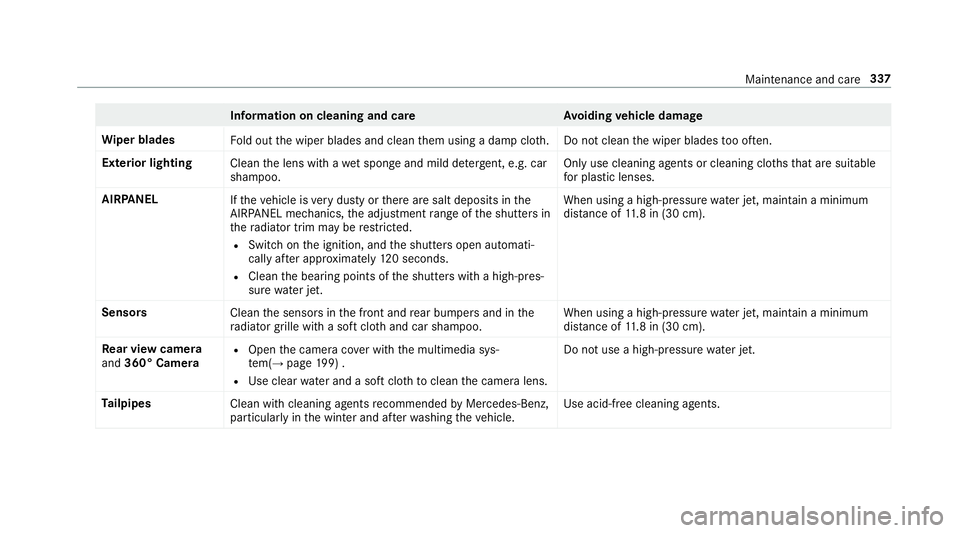
Information on cleaning and careAvoiding vehicle damage
Wi per blades
Fold out the wiper blades and clean them using a damp clo th.D o not clean the wiper blades too of ten.
Ex terior lighting
Cleanthe lens with a wet sponge and mild de terg ent, e.g. car
shampoo. Only use cleaning agents or cleaning clo
thsth at are suitable
fo r plast ic lenses.
AIRPANEL Ifth eve hicle is very dusty or there are salt deposits in the
AIRPA NEL mechanics, the adjustment range of the shutters in
th era diator trim may be restricted.
RSwitch on the ignition, and the shutters open automati‐
cally af ter app roxima tely 12 0 seconds.
RClean the bearing points of the shutters with a high-pres‐
sure water jet. When using a high-pre
ssurewater jet, maintain a minimum
dis tance of 11.8 in (30 cm).
Senso rs
Cleanthe sensors in the front and rear bumpers and in the
ra diator grille with a soft clo thand car shampoo. When using a high-pressure
water jet, maintain a minimum
dis tance of 11.8 in (30 cm).
Re ar view camera
and 360° Camera
ROpen the camera co ver with the multimedia sys‐
te m(→pa ge 199) .
RUse clear water and a soft clo thtoclean the camera lens. Do not use a high-pressure
water jet.
Ta ilpipes
Clean with cleaning agent sre commend
edbyMercedes-Benz,
particular lyin the winter and af terwa shing theve hicle. Use acid-free cleaning agents.
Maintenance and care
337
Page 340 of 506

Notes on care of the interior
&
WARNING Risk of injury from plastic
parts breaking off af terth e use of sol‐
ve nt-based care products
Ca reand cleaning products con taining sol‐
ve nts can cause surf aces inthe cockpit to
become porous.
When the airbags are deplo yed, plastic parts
may break away.
#Do not use any care or cleaning prod‐
ucts containing sol vents toclean the
cockpit.
& WARNING Risk of injury or death from
bleached seat belts
Bleaching or dyeing seat belts can se verely
we aken them.
This can, forex ample, cause seat belts to
te ar or fail in an accident.
#Ne ver bleach or dye seat belts.
Observethefo llowing information:
Information on cleaning and car eAvoiding vehicle damage
Seat belts Clean withwarm wate r and soap solution.
RDo not use chemical cleaning agents.
RDo not dry seat belts byheating them toove r17 6 °F
(80 °C) or exposing them todirect sunlight.
Display Cleanthe sur face carefully wi tha micro fiber clo thand
TFT/LCD display cleaner.
RSwit choff the display and allow tocool.
RDo not use any other cleaning products.
Plastic trim
RClean with a damp microfiber clo th.
RIfth e trim is very dirty: use a cleaning agent recommen‐
ded byMercedes-Benz.
RDo not apply sticke rs,fi lms etc.
RDo not allow cosmetics, insect repellent or sun cream to
come in contact wi th the plastic trim.
338
Maintenance and care
Page 341 of 506
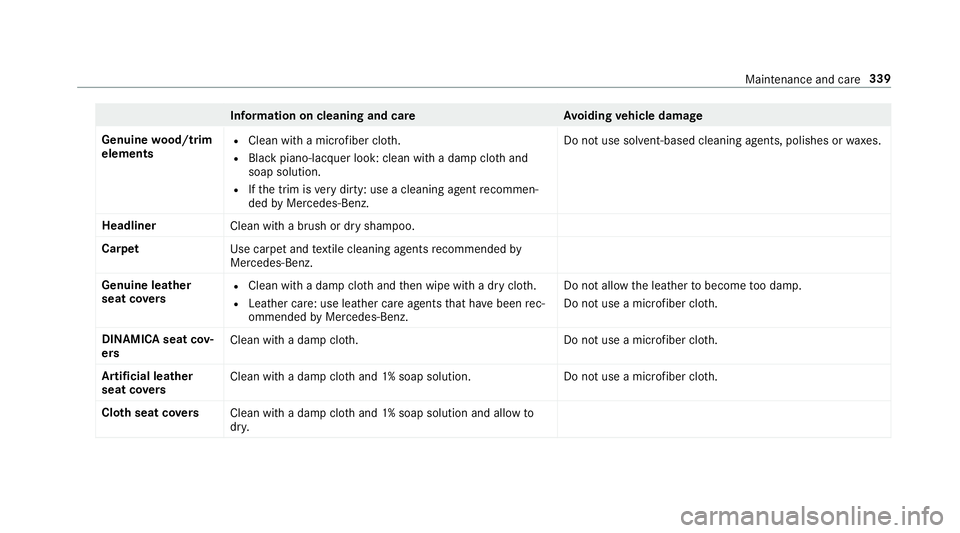
Information on cleaning and careAvoiding vehicle damage
Genuine wood/t rim
elements
RClean wi tha micro fiber clo th.
RBla ckpiano-lac quer look: clean with a damp clo thand
soap solution.
RIf th e trim is very dirty: use a cleaning agent recommen‐
ded byMercedes-Benz. Do not use solvent-based cleaning agents, polishes or
waxes.
Headliner Clean with a brush or dry shampoo.
Carpet Use carpet andtextile cleaning agents recommended by
Mercedes-Benz.
Genuine leather
seat co vers
RClean with a damp clo thand then wipe with a dry clo th.
RLeather care: use leath er care agentsthat ha vebeen rec‐
ommended byMercedes-Benz. Do not allow
the leather tobecome too damp.
Do not use a microfiber clo th.
DINAMIC Asea tcov‐
er s Clean wit
h adam pclo th.D o not use a microfiber cloth.
Ar tificial leather
seat co vers Clean
with a damp clo thand 1% soap solution.D o not use a microfiber cloth.
Clo thseat co vers
Cleanwith a damp clo thand 1% soap solution and allow to
dr y.
Maintenance and care 339
Page 367 of 506

Further related subjects:
RNo tes on tire pressure (→page 361)
RTire pressure table (→page 363)
RTire and Loading Info rmation placard
(→page 367)
Ti re pressure moni toring sy stem
Fu nction of the tire pressure moni toring sys‐
te m
&
DANG ER Risk of accident due toincor‐
re ct tire pressure
Every tire, including the spare (if pr ovided),
should be checked when cold at least once a
month and inflated tothe pressure recom‐
mended bytheve hicle manufacturer (see
Ti re and Loading Info rmation placard on the
B-pillar on the driver ’sside or the tire pres‐
sure label on the inside of the fuel filler flap
of your vehicle). If your vehicle has tires of a
dif fere nt size than the size indicated on the
Ti re and Loading Info rmation placard or the
tire pressure table, you need todeterm ine
th e proper tire pressure forth ose tires.
As an added saf etyfe ature, your vehicle has
been equipped with a tire pressure monitor‐
ing sy stem (TPMS) that illuminates a low tire
pressure indicator lamp when one or more of
yo ur tires are signif icantly underinflated.
Ac cording ly, if the low tire pressure indicator
lamp lights up, you should stop and check
yo ur tires as soon as possible, and inflate
th em tothe proper pressure. Driving on a
significantly underinflated tire causes the tire
to ove rheat and can lead totire failure.
Un derinflation also increases fuel consump‐
tion and reduces tire tread life, and may
af fect theve hicle's handling and braking abil‐
ity. Please no tethat the TPMS is not a substi‐
tute for proper tire maintenance, and it is the
driver's responsibility tomaintain cor rect tire
pressure, even if underinflation has not
re ached the le velto trig ger illumination of
th e TPMS low tire pressure indicator lamp.
Yo ur vehicle has also been equipped with a
TPMS malfunction indicator toindicate whenthe sy stem is not operating proper ly. The
TPMS malfunction indica tor is combined with
th e low tire pressure indicator lamp. When
th e sy stem de tects a malfunction, the indica‐
to r lamp will flash for app roxima tely a minute
and then remain continuously illumina ted.
This sequence will continue upon subsequent
ve hicle start-ups as long as the malfunction
ex ists.
When the malfunction indicator is illumina‐
te d, the sy stem may not be able todetect or
signal low tire pressure as intended. TPMS
malfunctions may occur for a variet yof rea‐
sons, including the ins tallation of incompati‐
ble replacement or alternate tires or wheels
on theve hicle that pr eventthe TPMS from
functioning properly.
Alw aysch eck the TPMS malfunction warning
lamp af terre placing one or more tires or
wheels on your vehicle toensure that the
re placement or alternate tires and wheels
allow the TPMS tocontinue tofunction prop‐
erly.
Wheels and tires 365
Page 488 of 506

Turn signal light ................................... 124
Limited Warranty
Ve hicle .................................................. 26
Limiting the opening angle (tailgate) ...... 69
Live Traf fic Information
Displaying subscri ption information .... .274
Displ aying the tra ffic map .................... 274
Displ aying traf fic incidents .................. 275
Extending a subscription ...................... 274
Issuing hazard alert s ........................... 275
Load index (tires) .................................... .375
Load-bea ring capacity (tires) .................375
Loading Definitions .......................................... .377
Loading guidelines .................................. 101
Loading information table ...................... 367
Loads Securing .............................................. 101
Locking/unlocking .................................... 64
KEYLESS-GO .......................................... 61
Un locking and opening doors from
th e inside ............................................... 61Low beam
Swit ching on/off ................................ .123
Lu bricant additives
see Additives
Lu ggage
Securing ...
...........................................
101
Lu mbar support
see Lumbar support (4-w ay)
Lu mbar support (4-w ay).......................... .87
M
Maintenance Vehicle ................................................... 21
Maintenance see ASS YST PLUS
Making a call via theove rhead con‐
trol panel
Mercedes-Benz mbrace
®(USA) .......... .294
Malfunction Restra int sy stem ................................... 32
Malfunction message see Display message Map
................................................... 274, 276
Av oiding an area ..................................2 78
Av oiding an area (o verview) ................ .278
Changing an area ................................ 279
Del eting an area .................................. 279
Displ aying the compass ....................... 280
Displaying the map version .................. 278
Displ aying the next intersecting
st re et ................................................... 278
Displ aying the satellite map ............... .280
Display ingthe traf fic map .................... 274
Displ aying weather information .......... .281
Map data ............................................. 280
Moving ................................................ 277
Overview ..............................................2 76
Selecting POI symbols ......................... 277
Selecting text information ................... 278
Selecting the map orientation ............ .277
Se tting
the map scale ..
........................276
Setting the map scale automatically ... .280
Up dating .............................................. 279
Map and compass Overview .............................................. 276
Massage prog ram
Selecting the front seats ....................... 92
486
Index