2018 MERCEDES-BENZ CLS heating
[x] Cancel search: heatingPage 101 of 334
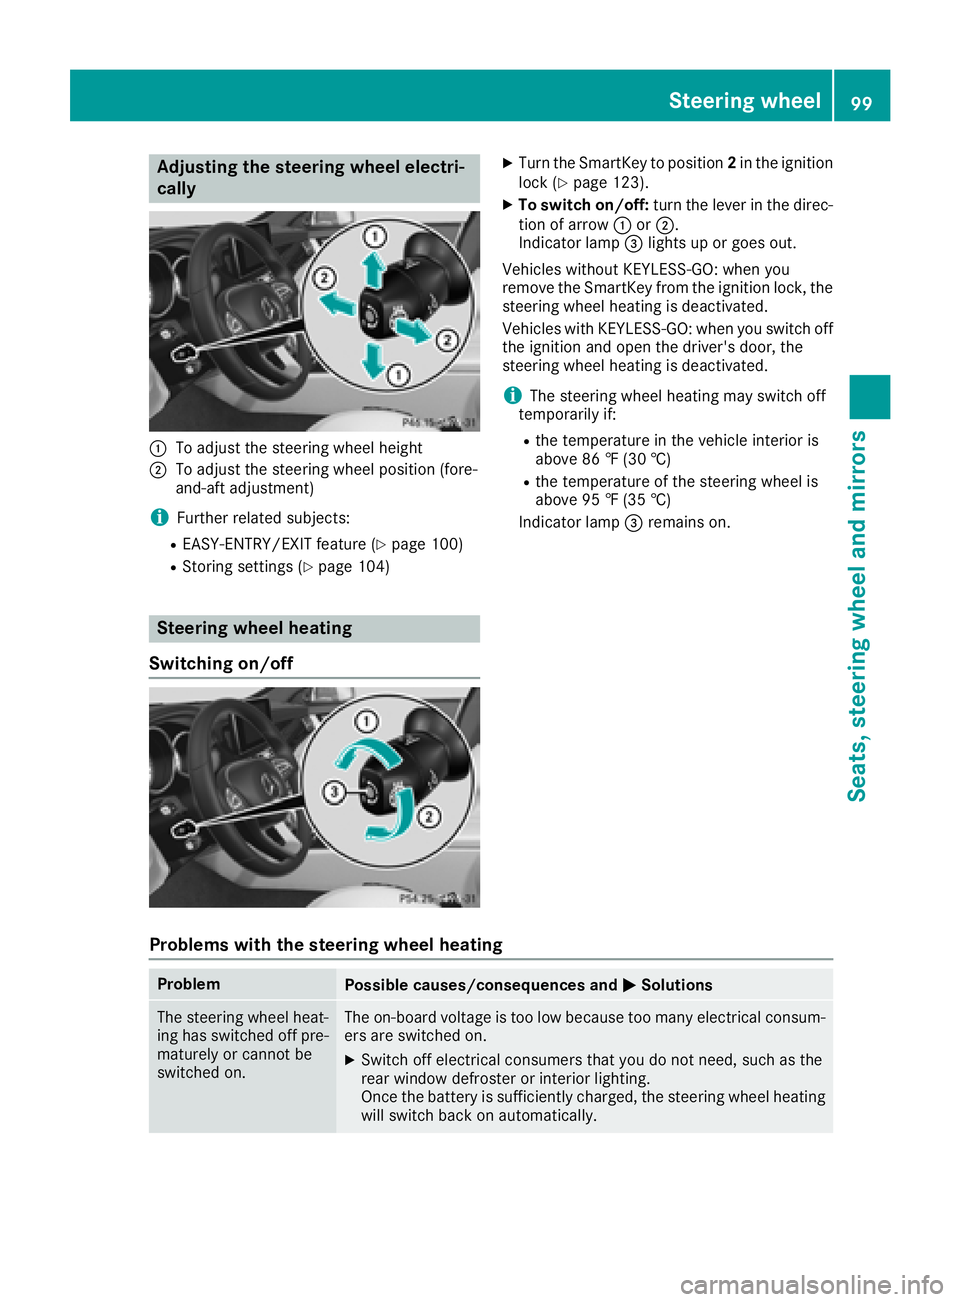
Adjusting the steering wheel elect ri -
cally
�C
To adjust th e steering whee l height�D
To adjust th e steering whee l position (fore-
and-af t adjustment)
i Further relate d subjects :R
EASY-ENTRY/EXIT feature ( Y
page 100)R
Storing setting s ( Y
page 104)
Steering wheel heating
Switching on/off X
Turn th e SmartKey to position 2 in th e ignition
loc k ( Y
page 123). X
To switch on/off: tur n th e lever in th e direc -
tion of arrow �C or �D .
Indicato r lamp �
Page 122 of 334
Problems with the rear window defroster Problem
Possible causes/consequences and �P Solutions
The rear window
defroster has deactiva-
ted prematurely or can-
not be activated. The battery has not been sufficiently charged. X
Switch off any consumers that are not required, e.g. reading lamps,
interior lighting or the seat heating.
When the battery is sufficiently charged, the rear window defroster
can be activated again.
Switching air-recirculation mode
on/off
General notes You can deactivate the flow of fresh air if
unpleasant odors are entering the vehicle from
outside. The air already inside the vehicle will
then be recirculated.
If you switch on air-recirculation mode, the win-
dows can fog up more quickly, in particular at
low temperatures. Only use air-recirculation
mode briefly to prevent the windows from fog-
ging up.
Activating/deactivating X
Turn the SmartKey to position 2 in the ignition
lock ( Y
page 123).X
To activate: press the �r button.
The indicator lamp in the �r button lights
up.
Dual-zone automatic climate control: air-recir-
culation mode is automatically activated at high
outside temperatures.
3-zone automatic climate control: air-recircula-
tion mode is automatically activated at high lev-
els of pollution or at high outside temperatures.
When air-recirculation mode is activated auto-
matically, the indicator lamp above the �r
button does not light up. Outside air is added
after approximately 30 minutes. X
To deactivate: press the �r button.
The indicator lamp in the �r button goes
out. Air-recirculation mode deactivates automati-
cally: R
after approximately five minutes at outside
temperatures below approximately 41 ‡
(5 †) R
after approximately five minutes if cooling
with air dehumidification is deactivated R
after approximately 30 minutes at outside
temperatures above approximately 41 ‡
(5 †) if the "Cooling with air dehumidifica-
tion" function is activated
Switching the residual heat on or off
General notes The residual heat function is only available with
3-zone automatic climate control.
It is possible to make use of the residual heat of
the engine to continue heating the vehicle for
approximately 30 minutes after the engine has
been switched off. The heating time depends on
the set interior temperature.
Activating/deactivating X
Turn the SmartKey to position 0 in the ignition
lock or remove it ( Y
page 123).X
To switch on: press the �K button.
The indicator lamp in the �K button lights
up.
If the residual heat function is activated, the
windows may fog up on the inside.
The blower will run at a low speed regardless of
the airflow setting.
If you activate the residual heat function at high
temperatures, only the ventilation will be acti-
vated. The blower runs at medium speed.120
Operating the climate control systems
Climate control
Page 140 of 334
Problems with the transmission Problem
Possible causes/consequences and �P Solutions
The transmission has
problems shifting gear. The transmission is losing oil. X
Have the transmission checked at a qualified specialist workshop
immediately.
7G-TRONIC:
The acceleration ability
is deteriorating.
The transmission no lon-
ger changes gear. The transmission is in emergency mode.
It is only possible to shift into second gear and reverse gear.X
Stop the vehicle. X
Shift the transmission to position P .X
Switch off the engine. X
Wait at least ten seconds before restarting the engine. X
Shift the transmission to position D or R .
If D is selected, the transmission shifts into second gear; if R is
selected, the transmission shifts into reverse gear. X
Have the transmission checked at a qualified specialist workshop
immediately.
9G-TRONIC:
The acceleration ability
is deteriorating.
The transmission no lon-
ger changes gear. The transmission is in emergency mode.
It is only partly possible to engage the gears or the transmission is in
position N . X
Stop the vehicle. X
Shift the transmission to position P .X
Switch off the engine. X
Wait at least ten seconds before restarting the engine. X
Shift the transmission to position D or R .X
Have the transmission checked at a qualified specialist workshop
immediately.
Transfer case This section is only valid for vehicles with 4-
wheel drive (4MATIC). Power is always trans-
mitted to both axles.
! Performance tests may only be carried out
on a 2-axle dynamometer. The brake system
or transfer case could otherwise be damaged.
Contact a qualified specialist workshop for a
performance test.
! Vehicles with 4MATIC must not be towed
with either the front or the rear axle raised, as
doing so will damage the transmission. Refueling
Important safety notes
G WARNING
Fuel is highly flammable. If you handle fuel
incorrectly, there is a risk of fire and explo-
sion.
You must avoid fire, open flames, creating
sparks and smoking. Switch off the engine
and, if applicable, the auxiliary heating before
refueling.
G WARNING
Fuel is poisonous and hazardous to health.
There is a risk of injury.138
Refueling
Driving and parking
Page 147 of 334
change dynamically at the beginning of the
journey. On longer journeys, there are fewer
changes. For more dynamic changes, carry
out a manual reset.
For further information on the ECO display, see
( Y
page 191).
Braking
Important safety notes
G WARNING
If you shift down on a slippery road surface in
an attempt to increase the engine's braking
effect, the drive wheels could lose their grip.
There is an increased danger of skidding and
accidents.
Do not shift down for additional engine brak-
ing on a slippery road surface.
Downhill gradients
! On long and steep gradients, you must
reduce the load on the brakes by shifting to a
lower gear in good time. This allows you to
take advantage of the engine's braking effect.
This helps you to avoid overheating the
brakes and wearing them out excessively.
When you take advantage of engine braking, a
drive wheel may not turn for some time, e.g.
on a slippery road surface. This could cause
damage to the drive train. This type of damage
is not covered by the Mercedes-Benz war-
ranty.
Change into a lower gear in good time on long
and steep downhill gradients. This is especially
important if the vehicle is laden.
Heavy and light loads
G WARNING
If you rest your foot on the brake pedal while
driving, the braking system can overheat. This
increases the stopping distance and can even
cause the braking system to fail. There is a
risk of an accident.
Never use the brake pedal as a footrest. Never
depress the brake pedal and the accelerator
pedal at the same time. ! Depressing the brake pedal constantly
results in excessive and premature wear to
the brake pads.
If the brakes have been subjected to a heavy
load, do not stop the vehicle immediately, but
drive on for a short while. This allows the airflow
to cool the brakes more quickly.
Wet roads If you have driven for a long time in heavy rain
without braking, there may be a delayed reac-
tion from the brakes when braking for the first
time. This may also occur after the vehicle has
been washed or driven through deep water.
You have to depress the brake pedal more
firmly. Maintain a greater distance from the
vehicle in front.
After driving on a wet road or having the vehicle
washed, brake firmly while paying attention to
the traffic conditions. This will warm up the
brake discs, thereby drying them more quickly
and protecting them against corrosion.
Limited braking performance on salt-
treated roads If you drive on salted roads, a layer of salt resi-
due may form on the brake discs and brake
pads. This can result in a significantly longer
braking distance. R
In order to prevent any salt build-up, apply the
brakes occasionally while paying attention to
the traffic conditions. R
Carefully depress the brake pedal and the
beginning and end of a journey. R
Maintain a greater distance to the vehicle
ahead.
Servicing the brakes
! The brake fluid level may be too low, if: R
if the red brake warning lamp lights up in
the instrument cluster and R
you hear a warning tone while the engine is
running
Observe additional warning messages in the
multifunction display.
The brake fluid level may be too low due to
brake pad wear or leaking brake lines. Driving tips 145
Driving and parking Z
Page 255 of 334
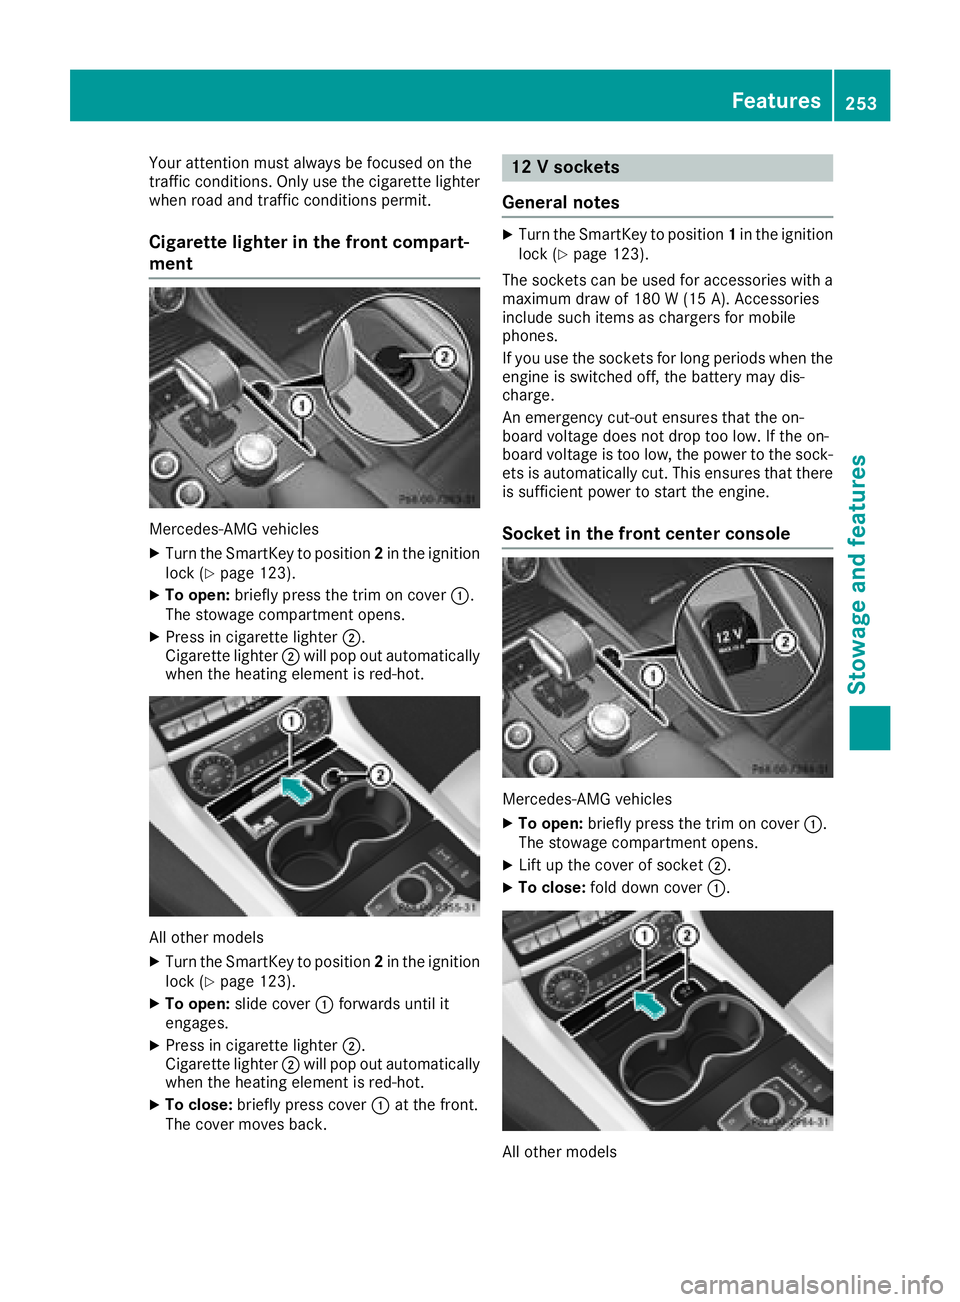
Your attention must always be focused on the
traffic conditions. Only use the cigarette lighter
when road and traffic conditions permit.
Cigarette lighter in the front compart-
ment
Mercedes-AMG vehicles X
Turn the SmartKey to position 2 in the ignition
lock ( Y
page 123).X
To open: briefly press the trim on cover �C .
The stowage compartment opens. X
Press in cigarette lighter �D .
Cigarette lighter �D will pop out automatically
when the heating element is red-hot.
All other models X
Turn the SmartKey to position 2 in the ignition
lock ( Y
page 123).X
To open: slide cover �C forwards until it
engages. X
Press in cigarette lighter �D .
Cigarette lighter �D will pop out automatically
when the heating element is red-hot. X
To close: briefly press cover �C at the front.
The cover moves back. 12 V sockets
General notes X
Turn the SmartKey to position 1 in the ignition
lock ( Y
page 123).
The sockets can be used for accessories with a
maximum draw of 180 W (15 A). Accessories
include such items as chargers for mobile
phones.
If you use the sockets for long periods when the
engine is switched off, the battery may dis-
charge.
An emergency cut-out ensures that the on-
board voltage does not drop too low. If the on-
board voltage is too low, the power to the sock-
ets is automatically cut. This ensures that there
is sufficient power to start the engine.
Socket in the front center console
Mercedes-AMG vehicles X
To open: briefly press the trim on cover �C .
The stowage compartment opens. X
Lift up the cover of socket �D .X
To close: fold down cover �C .
All other models Features 253
Stowage and features Z
Page 273 of 334
After the vehicle has been washed, brake
carefully while paying attention to the traffic
conditions until full braking power is restored.
! When DISTRONIC PLUS or the HOLD func-
tion is activated, the vehicle brakes automat-
ically in certain situations.
To avoid damage to the vehicle, deactivate
DISTRONIC PLUS and the HOLD function in
the following or similar situations: R
when towing the vehicle R
in the car wash
! Never clean your vehicle in a Touchless
Automatic Car Wash as these use special
cleaning agents. These cleaning agents can
damage the paintwork or plastic parts.
! Make sure that: R
the side windows and the sliding sunroof
are fully closed. R
the ventilation/heating is switched off (the
OFF button has been pressed). R
the windshield wiper switch is at position 0 .R
the 360° camera or rear view camera is
switched off.
The vehicle may otherwise be damaged.
! In car washes with a towing mechanism,
make sure that the automatic transmission is
in transmission position N , otherwise the
vehicle could be damaged. R
Vehicles with a SmartKey:
Do not remove the SmartKey from the igni-
tion lock. Do not open the driver's door or
front-passenger door whe n the engine is
swi tched off. Otherwise, the automatic
transmission selects park position P auto-
matically and locks the wheels. You can
prevent this by shifting the automatic trans-
mission to N beforehand.R
Vehicles with KEYLESS-GO:
Do not open the driver's door or front-
passenger door when the engine is
switched off. Otherwise, the automatic
transmission selects park position P auto-
matically and locks the wheels.
Observe the following to make sure that the
automatic transmission stays in position N : X
Make sure the vehicle is stationary and the
ignition is switched off. X
Turn the SmartKey to position 2 in the ignition
lock ( Y
page 123).
Use the SmartKey instead of the Start/Stop
button on vehicles with KEYLESS-GO. X
Depress and hold the brake pedal. X
Shift the automatic transmission to position
N . X
Release the brake pedal. X
Release the electric parking brake. X
Switch off the ignition and leave the SmartKey
in the ignition lock.
You can wash the vehicle in an automatic car
wash from the very start.
If the vehicle is very dirty, pre-wash it before
cleaning it in an automatic car wash.
After using an automatic car wash, wipe off wax
from the windshield and the wipe r b lades. This
w ill prevent smears and reduce wiping noises
caused by residue on the windshield.
Washing by hand In some countries, washing by hand is only
allowed at specially equipped washing bays.
Observe the legal requirements in each country. X
Do not use hot water and do not wash the
vehicle in direct sunlight. X
Use a soft sponge to clean. X
Use a mild cleaning agent, such as a car
shampoo approved by Mercedes-Benz. X
Thoroughly hose down the vehicle with a gen-
tle jet of water. X
Do not point the water jet directly towards the
air inlet. X
Use plenty of water and rinse out the sponge
frequently. X
Rinse the vehicle with clean water and dry
thoroughly with a chamois. X
Do not let the cleaning agent dry on the paint-
work.
Carefully remove all deposits of road salt as
soon as possible when driving in winter.
Power washers
G WARNING
The water jet from a circular jet nozzle (dirt
blasters) can cause invisible exterior damage Care 271
Maintenance and care Z
Page 275 of 334
! Do not use wash programs with a hot wax
treatment under any circumstances.
Observe these notes if your vehicle has a clear
matte finish. This will help you to avoid damage
to the paintwork due to incorrect treatment.
These notes also apply to light alloy wheels with
a clear matte finish.
The vehicle should ideally be washed by hand
using a soft sponge, car shampoo and plenty of
water.
Use only insect remover and car shampoo from
the range of recommended and approved
Mercedes-Benz care products.
Cleaning the vehicle parts
Cleaning the wheels
G WARNING
The water jet from a circular jet nozzle (dirt
blasters) can cause invisible exterior damage
to the tires or chassis components. Compo-
nents damaged in this way may fail unexpect-
edly. There is a risk of an accident.
Do not use power washers with circular jet
nozzles to clean the vehicle. Have damaged
tires or chassis components replaced imme-
diately.
! Do not use acidic wheel cleaning products
to remove brake dust. This could damage
wheel bolts and brake components.
! Do not park your vehicle for a long period of
time directly after cleaning, particularly after
cleaning the wheel rim with wheel cleaner.
Wheel cleaner can lead to the increased cor-
rosion of the brake discs and pads. Therefore,
drive for a few minutes after cleaning. By
heating up the brakes, the brake discs and
pads dry. The vehicle can then be parked for a
long period of time.
Cleaning the windows
G WARNING
You could become trapped by the windshield
wipers if they start moving while cleaning the
windshield or wiper blades. There is a risk of
injury. Always switch off the windshield wipers and
the ignition before cleaning the windshield or
wiper blades.
! Do not use dry cloths, abrasive products,
solvents or cleaning agents containing sol-
vents to clean the inside of the windows. Do
not touch the insides of the windows with
hard objects, e.g. an ice scraper or ring. There
is otherwise a risk of damaging the windows.
! Clean the water drainage channels of the
windshield and the rear window at regular
intervals. Deposits such as leaves, petals and
pollen may under certain circumstances pre-
vent water from draining away. This can lead
to corrosion damage and damage to elec-
tronic components. X
Clean the inside and outside of the windows
with a damp cloth and a cleaning product that
is recommended and approved by Mercedes-
Benz.
Cleaning wiper blades
G WARNING
You could become trapped by the windshield
wipers if they start moving while cleaning the
windshield or wiper blades. There is a risk of
injury.
Always switch off the windshield wipers and
the ignition before cleaning the windshield or
wiper blades.
! Do not pull the wiper blade. Otherwise, the
wiper blade could be damaged.
! Do not clean wiper blades too often and do
not rub them too hard. Otherwise, the graph-
ite coating could be damaged. This could
cause wiper noise.
! Hold the wiper arm securely when folding
back. The windshield could be damaged if the
wiper arm smacks against it suddenly. X
Fold the windshield wiper arms away from the
windshield. X
Carefully clean the wiper blades with a damp
cloth. X
Fold the windshield wiper arms back again
before switching on the ignition. Care 273
Maintenance and care Z
Page 278 of 334
! To retain the natural appearance of the
leather, observe the following cleaning
instructions: R
Clean genuine leather covers carefully with
a damp cloth and then wipe the covers
down with a dry cloth. R
Make sure that the leather does not
become soaked. It may otherwise become
rough and cracked. R
Only use leather care agents that have
been tested and approved by Mercedes-
Benz. You can obtain these from a qualified
specialist workshop.
Seat covers of other materials
! Observe the following when cleaning: R
clean artificial leather covers with a cloth
moistened with a solution containing 1%
detergent (e.g. dish washing liquid). R
clean cloth covers with a microfiber cloth
moistened with a solution containing 1%
detergent (e.g. dish washing liquid). Rub
carefully and always wipe entire seat sec-
tions to avoid leaving visible lines. Leave
the seat to dry afterwards. Cleaning results
depend on the type of dirt and how long it
has been there. R
clean DINAMICA covers with a damp cloth.
Make sure that you wipe entire seat sec-
tions to avoid leaving visible lines.
Cleaning the seat belts
G WARNING
Seat belts can become severely weakened if
bleached or dyed. This could cause the seat
belts to tear or fail, for instance, in the event of
an accident. This poses an increased risk of
injury or fatal injury.
Never bleach or dye the seat belts.
! Do not clean the seat belts using chemical
cleaning agents. Do not dry the seat belts by
heating at temperatures above 176 ‡( 80 †)
or in direct sunlight. X
Use clean, lukewarm water and soap solution. Cleaning the headliner and carpets X
Headliner: if it is very dirty, use a soft brush or
dry shampoo. X
Carpets: use the carpet and textile cleaning
agents recommended and approved by
Mercedes-Benz.276
Care
Maintenance and care