2018 MERCEDES-BENZ CLA ESP
[x] Cancel search: ESPPage 295 of 326
R
wear excessively and/or unevenly R
have an adverse effect on fuel consumption
Overinflated tires
G WARNING
Tires with excessively high pressure can burst
becaus et he ya re damaged mor ee asily by
road debris ,p otholes etc .Ina ddition, they
also suffer fro mi rregular wear, which can
severely impair th eb raking properties and the
driving characteristics. Ther eisar isk of an
accident.
Avoid tir ep ressures that are too high in all the
tires, including th es pare wheel.
Overinflated tires may: R
increase th eb raking distanceR
adversely affect handling R
wear excessively and/or unevenly R
have an adverse effect on ride comfort R
be mor es usceptible to damage
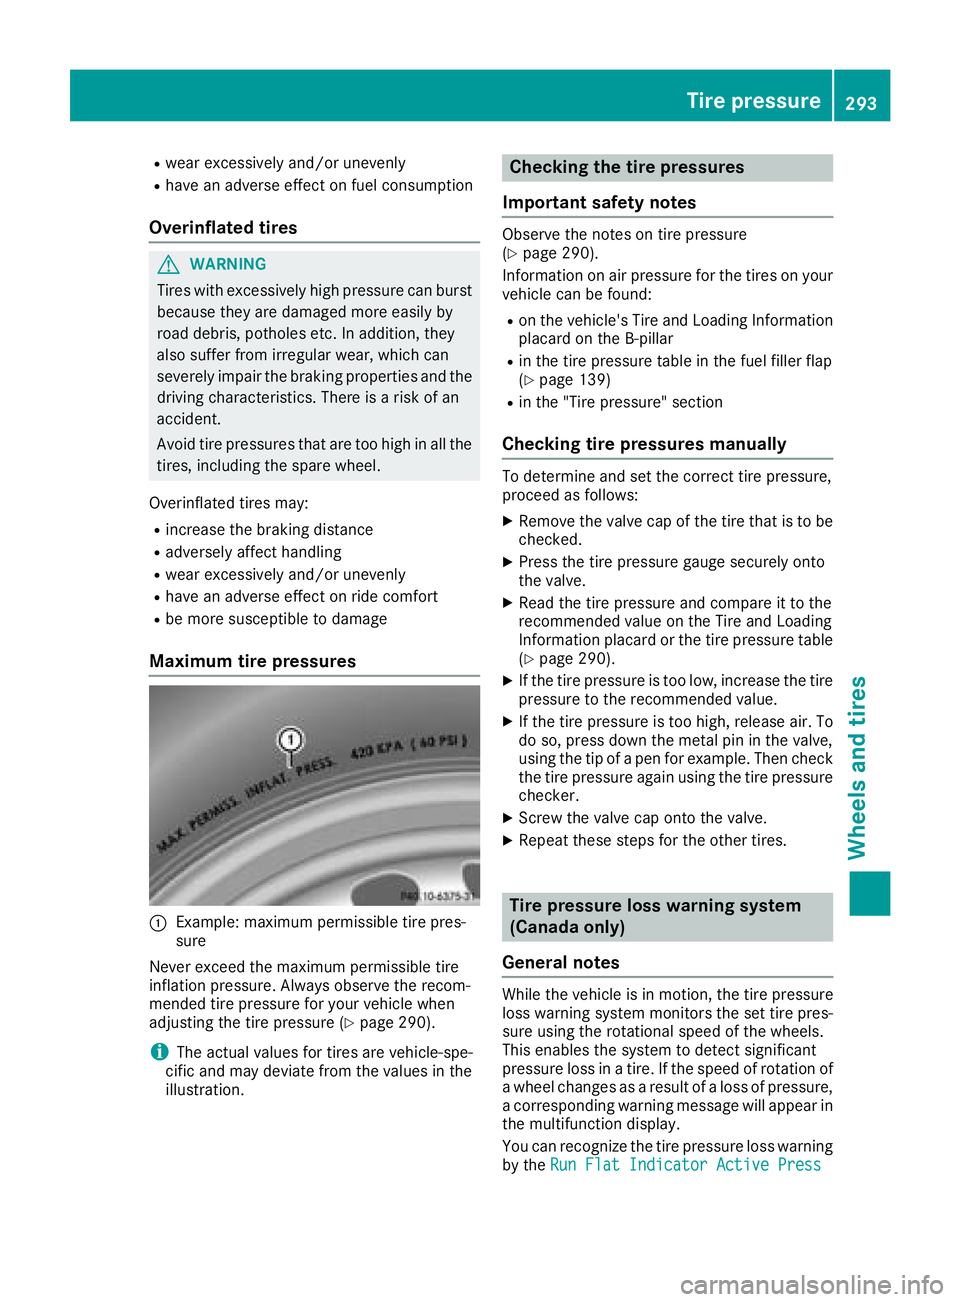
Maximu mt ir ep re ssures
�C
Example: maximum permissible tir ep res-
sure
Never exceed th em aximum permissible tire
inflatio np ressure. Always observe th er ecom-
mended tir ep ressure for your vehicle when
adjustin gt he tir ep ressure ( Y
page 290).
i The actual values for tires are vehicle-spe-
cific and may deviat ef ro mt he values in the
illustration. Checking th et ir ep re ssures
Important safety notes Observe th en otes on tir ep ressure
( Y
page 290).
Information on air pressure for th et ires on your
vehicle can be found: R
on th ev ehicle's Tire and Loadin gI nf ormation
placar dont he B-pillar R
in th et ir ep ressure table in th ef uel filler flap
( Y
page 139) R
in th e" Tire pressure" section
Checking tir ep re ssures manuallyTo determine and set th ec orrec tt ir ep ressure,
proceed as follows: X
Remov et he valve cap of th et ir et ha tistob e
checked. X
Pres st he tir ep ressure gauge securely onto
th ev alve. X
Read th et ir ep ressure and compare it to the
recommended value on th eT ire and Loading
Information placar dort he tir ep ressure table
( Y
page 290). X
If th et ir ep ressure is too low, increase th et ire
pressure to th er ecommended value. X
If th et ir ep ressure is too high, releas ea ir. To
do so, pres sd own th em etal pin in th ev alve,
using th et ip of ap en for example. Then check
th et ir ep ressure again using th et ir ep ressure
checker. X
Screw th ev alve cap ont ot he valve.X
Repeat these steps for th eo ther tires.
Tir ep re ssur el oss warning system
(Canada only)
General notes While th ev ehicle is in motion, th et ir ep ressure
loss warning system monitors th es et tir ep res-
sure using th er otational speed of th ew heels.
This enables th es ystem to detect significant
pressure loss in at ire. If th es peed of rotation of
aw heel changes as ar esult of al oss of pressure,
ac orresponding warning message will appear in
th em ultifunction display.
You can recognize th et ir ep ressure loss warning
by the Run Flat Indicato rA ctive PressTir ep re ssure 293
Wheels and tires Z
Page 296 of 326
'OK' to Restart message in the multifunction
displa yint he Serv. menu. Information on the
message displa yc an be found in the "Restarting
the tire pressure loss warning" section
( Y
page 294).
Important safety notes The tire pressure warning system does not warn
you of an incorrectly set tire pressure. Observe
the notes on the recommended tire pressure
( Y
page 290).
The tire pressure loss warning does not replace
the need to regularly check the tire pressure. An
even loss of pressure on several tires at the
same time cannot be detected by the tire pres-
sure loss warning system.
The tire pressure monitor is not able to warn you
of as udden loss of pressure, e.g. if the tire is
penetrated by af oreign object. In the event of a
sudden loss of pressure, bring the vehicle to a
halt by braking carefully .A void abrupt steering
movements.
The function of the tire pressure loss warning
system is limited or delayed if: R
snow chains are mounted on your vehicle's
tires. R
road conditions are wintry. R
you are driving on sand or gravel. R
you adopt av ery sporty driving style (corner-
ing at high speeds or driving with high rates of
acceleration). R
you are driving with ah eavy load (in the vehi-
cle or on the roof)
Restarting the tire pressure loss warn-
ing system Restart the tire pressure loss warning system if
you have: R
changed the tire pressure R
changed the wheels or tires R
mounted new wheels or tires X
Before restarting, make sure that the tire
pressures are set properly on all four tires for
the respective operating conditions.
The recommended tire pressure can be found
on the Tire and Loading Information placard
on the B-pillar. Additionally ,at ire pressure
table is attached to the fuel filler flap. The tire
pressure loss warning system can only give
reliable warnings if you have set the correct tire pressure. If an incorrect tire pressure is
set, these incorrect value sw ill be monitored.X
Also observe the notes in the section on tire
pressures ( Y
page 290). X
Make sure that the SmartKey is in position �H
in the ignition lock ( Y
page 122).X
Press �Y or �e on the steering wheel to
select the Serv. menu.X
Press the �c or �d button to select
Tire Pressure . X
Press the �v button.
The Run Flat Indicator Active Press
'OK' to Restart message appears in the
multifunction display.
If you wish to confirm the restart: X
Press the �v button.
The Tire Pressure Now OK? message
appears in the multifunction display. X
Press the �c or �d button to select Yes .X
Press the �v button.
The Run Flat Indicator Restarted mes-
sage appears in the multifunction display.
After at each-in period, the tire pressure loss
warning system will monitor the set tire pres-
sures of all four tires.
If you wish to cance lt he restart:X
Press the �8 button.
or X
If the Tire Pressure Now OK? message
appears, press the �c or �d button to
select Cancel . X
Press the �v button.
The tire pressure value ss tored at the last
restart will continue to be monitored.
Tire pressure monitor (Canada only)
General notes If at ire pressure monitor is installed, the vehi-
cle's wheels have sensors that monitor the tire
pressures in all four tires. The tire pressure mon-
itor warns you if the pressure drops in one or
more of the tires. The tire pressure monitor only
functions if the corresponding sensors are
installed in all wheels.
Information on tire pressures is displayed in the
multifunction display. After af ew minutes of
driving, the current tire pressure of each tire is294
Tire pressure
Wheels and tires
Page 297 of 326
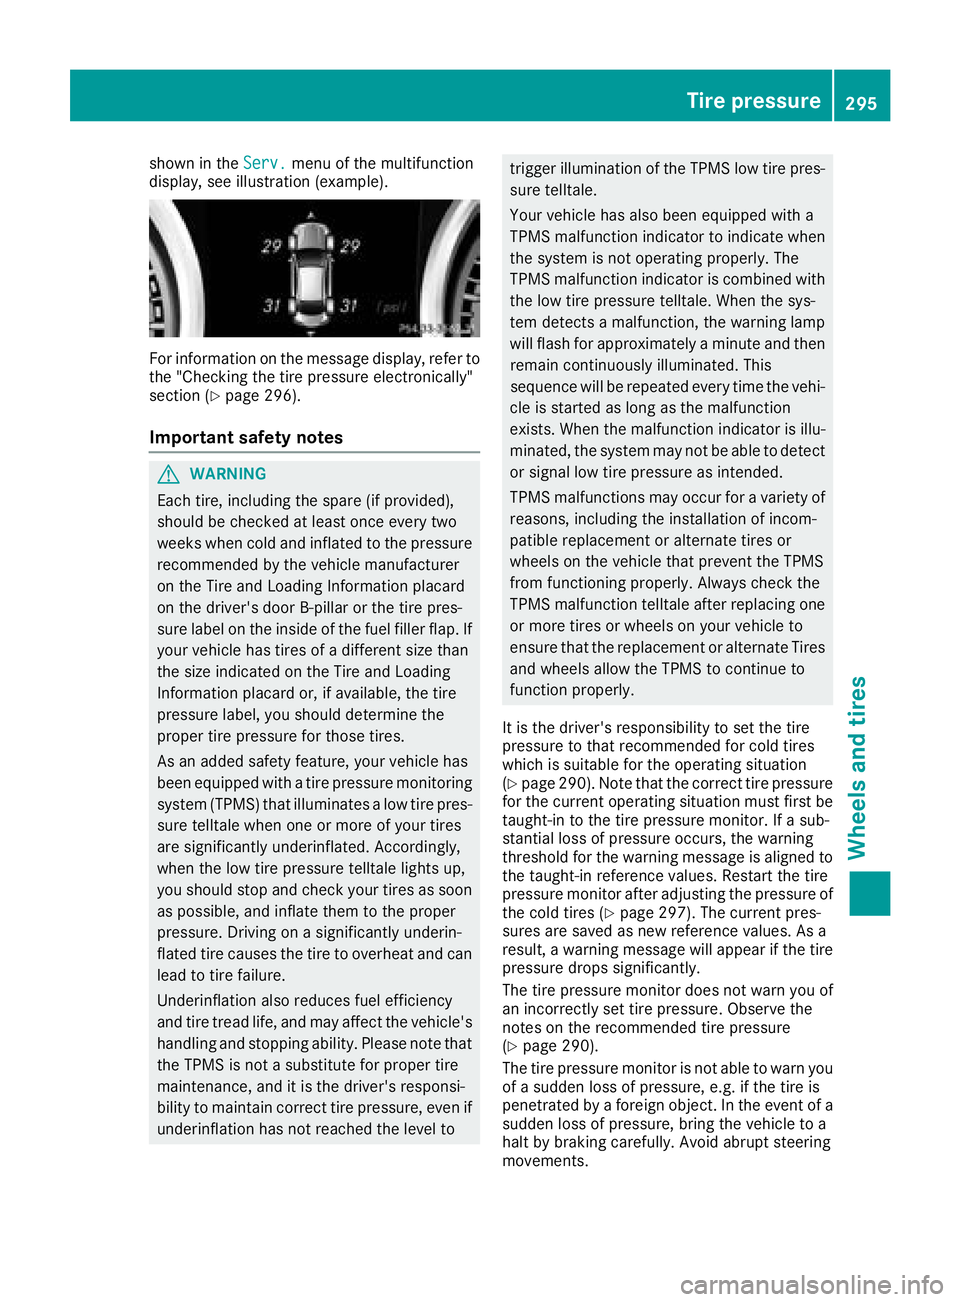
shown in the Serv. menu of the multifunction
display, see illustration (example).
For information on the message display, refer to
the "Checking the tire pressure electronically"
section ( Y
page 296).
Important safety notes
G WARNING
Each tire, including the spare (if provided),
should be checked at least once every two
weeks when cold and inflated to the pressure
recommended by the vehicle manufacturer
on the Tire and Loading Information placard
on the driver's door B-pillar or the tire pres-
sure label on the inside of the fuel filler flap. If
your vehicle has tires of ad ifferent size than
the size indicated on the Tire and Loading
Information placard or, if available, the tire
pressure label ,y ou should determine the
proper tire pressure for those tires.
As an added safety feature, your vehicle has
been equipped with at ire pressure monitoring
system (TPMS) that illuminates al ow tire pres-
sure telltale when one or more of your tires
are significantly underinflated. Accordingly,
when the low tire pressure telltale lights up,
you should stop and check your tires as soon
as possible ,a nd inflate them to the proper
pressure. Driving on as ignificantly underin-
flated tire causes the tire to overheat and can
lead to tire failure.
Underinflation also reduces fuel efficiency
and tire tread life, and may affect the vehicle's
handling and stopping ability. Please note that
the TPMS is not as ubstitute for proper tire
maintenance, and it is the driver's responsi-
bility to maintain correct tire pressure, even if
underinflation has not reached the level to trigger illumination of the TPMS low tire pres-
sure telltale.
Your vehicle has also been equipped with a
TPMS malfunction indicator to indicate when
the system is not operating properly. The
TPMS malfunction indicator is combined with
the low tire pressure telltale. When the sys-
tem detects am alfunction, the warning lamp
will flash for approximately am inute and then
remain continuously illuminated. This
sequence will be repeated every time the vehi-
cle is started as long as the malfunction
exists. When the malfunction indicator is illu-
minated, the system may not be able to detect
or signal low tire pressure as intended.
TPMS malfunctions may occur for av ariety of
reasons, including the installation of incom-
patible replacement or alternate tires or
wheels on the vehicle that prevent the TPMS
from functionin gp roperly. Always check the
TPMS malfunction telltale after replacing one
or more tires or wheels on your vehicle to
ensure that the replacement or alternate Tires
and wheels allow the TPMS to continue to
function properly.
It is the driver's responsibility to set the tire
pressure to that recommended for cold tires
which is suitable for the operating situation
( Y
page 290). Note that the correct tire pressure
for the current operating situation must first be
taught-in to the tire pressure monitor. If as ub-
stantial loss of pressure occurs, the warning
threshold for the warning message is aligned to
the taught-in reference values. Restart the tire
pressure monitor after adjusting the pressure of
the cold tires ( Y
page 297). The current pres-
sures are saved as new reference values. As a
result, aw arning message will appea rift he tire
pressure drops significantly.
The tire pressure monitor does not warn you of
an incorrectly set tire pressure. Observe the
notes on the recommended tire pressure
( Y
page 290).
The tire pressure monitor is not able to warn you
of as udden loss of pressure, e.g. if the tire is
penetrated by af oreign object. In the event of a
sudden loss of pressure, bring the vehicle to a
halt by braking carefully .A void abrupt steering
movements. Tire pressure 295
Wheels and tires Z
Page 299 of 326
Restarting the tire pressure monitor Whe ny ou restart the tire pressure monitor, all
existing warning messages are deleted and the
warning lamps go out. The monitor uses the cur-
rentl ys et tire pressures as the reference values
for monitoring. In most cases, the tire pressure
monitor will automaticall yd etect the new refer-
ence value sa fte ry ou have changed the tire
pressure. However, yo uc an also set reference
value sm anually as described here. The tire
pressure monitor then monitors the new tire
pressure values. X
Set the tire pressure to the value recommen-
ded for the corresponding driving situation on
the Tire and Loading Information placard on
the driver' ss id eB -pillar ( Y
page 290).
Yo uc an find more tire pressure value sf or
various operating conditions in the tire pres-
sure table inside the fue lf ille rf lap
( Y
page 139). X
Make sure that the tire pressure is correct on
al lf ou rw he els.X
Make sure that the SmartKey is in position �H
in the ignition lock ( Y
page 122).X
Press �Y or �e on the steering wheel to
select the Serv. menu.X
Press the �c or �d button to select
Tire Pressure .X
Press the �v button.
The multifunction display shows the current
tire pressure for each tire or the Tire pres‐
sure will be displayed after driving
af ew minutes message.X
Press the �d button.
The multifunction display shows the Use
Current Pressure sasN ew Reference
Values message.
If you wish to confirm the restart: X
Press the �v button.
The Tire Press. Monitor Restarted mes-
sage appears in the multifunction display.
After driving for af ew minutes, the system
checks whethe rt he current tire pressures are
within the specified range. The new tire pres-
sures are then accepted as reference values
and monitored.
If you wish to cance lt he restart:X
Press the �8 button.
The tire pressure value ss tore datt he last
restart will continu etobem onitored. Radio type approval for the tire pres-
sure monitor Country Radio type approval number
USA FCC ID: MRXMW2433A
FCCIC ID:MRXGG4 Thi sd evice
complies with part 15 of the FCC
rules and with license exempt
RSS standard sofI ndustry Can-
ada. Operation is subject to the
following conditions .( 1) This
device may not cause harmful
interference, and (2) Thi sd evice
mus ta ccept any interference
received, including interference
that may cause undesired oper-
ation. Le present apparei le st
conforme d'industri eC an ada
applicables au xa pp ereils radio
exempts de licence. L'exploita-
tion est authorisee au xd eu xc on-
ditions suivantes. (1) .L 'appareil
ne doi tp as produire de brouil-
lage, et (2) L'autisatue rdel 'ap-
parei ld oi ta ccepter tou tb rouil-
lage radioelectriqu es ubi, meme
si le brouillag ee st susceptible
d'e nc ompromettre le fonc-
tionnement. WARNING :C ha nges
or modifications not expressively
approved by the party responsi-
bl ef or compliance could voi dt he
users authority to operate the
equipment. The term "IC:" before
the radio certification number
only signifies Canad at echnical
specifications were met.
FCC ID:MRXMC34MA4 This
device complies with part 15 of
the FCC rules and with license
exempt RSS standard sofI ndus-
try Canada. Operation is subject
to the following conditions .( 1)
Thi sd evice may not cause harm-
ful interference, and (2) This
device mus ta ccept any interfer-
ence receive d, i ncluding interfer-
e nce that may cause undesired
operation. Le present appareil
est conforme d'industri eC an ada
applicables au xa pp ereils radio
exempts de license .L 'exploita-
tion est authorisee au xd eu xc on-
ditions suivantes. (1) .L 'appareilTire pressure 297
Wheel sa nd tires Z
Page 300 of 326
Country Radio type approval number
ne doit pas produire de brouil-
lage, et (2) L'autisatuer de l'ap-
pareil doit accepter tout brouil-
lage radioelectrique subi, meme
si le brouillage est susceptible
d'en compromettre le fonc-
tionnement. WARNING: Changes
or modifications not expressively
approved by th ep art yr esponsi-
ble for compliance could void the
users authorit yt oo perate the
equipment .T he ter m" IC: "b efore
th er adio certification number
onl ys ignifies Canada technical
specifications were met.
Canada IC: 2546A-MW2433A
IC:2546A-GG4 This devic ec om-
plies with part 15 of th eF CC
rules and with licens ee xempt
RSS standards of Industry Can-
ada. Operatio niss ubject to the
following conditions. (1) This
devic em ay not cause harmful
interference, and (2) This device
must accept any interference
received ,i ncludin gi nterference
that may cause undesire do per-
ation. Le present appareil est
conforme d'industrie Canada
applicables aux appereils radio
exempt sdel icense. L'exploita-
tio ne st authorisee aux deux con-
dition ss uivantes .( 1). L'appareil
ne doit pas produire de brouil-
lage, et (2) L'autisatuer de l'ap-
pareil doit accepter tout brouil-
lage radioelectrique subi, meme
si le brouillage est susceptible
d'en compromettre le fonc-
tionnement. WARNING: Changes
or modifications not expressively
approved by th ep art yr esponsi-
ble for compliance could void the
users authorit yt oo perate the
equipment .T he ter m" IC: "b efore
th er adio certification number
onl ys ignifies Canada technical
specifications were met.
IC: 2546A-MC34MA4 Loading th ev ehicle
Instruction labels for tires and loads
G WARNING
Overloade dt ires can overheat ,c ausing a
blowout .O verloade dt ires can also impair the
steerin ga nd driving characteristic sa nd lead
to brak ef ailure. Ther eisar isk of accident.
Observe th el oad rating of th et ires. The load
rating must be at least half of th eG AWR of
your vehicle .N ever overload th et ires by
exceedin gt he maximum load.
Two instruction labels on your vehicle show the
maximum possible load.
(1) The Tire and Loadin gI nf ormation placar di s
on th eB -p illar on th ed river' ss ide. The Tire
and Loadin gI nf ormation placar ds hows the
maximum permissible number of occu-
pant sa nd th em aximum permissible vehicle
load. It also contain sd etails of th et ir es izes
and corresponding pressures for tires
mounted at th ef actory.
(2) The vehicle identification plat eisont he B-
pillar on th ed river' ss ide. The vehicle iden-
tification plat ei nform sy ou of th eg ross
vehicle weight rating .Itism ade up of the
vehicle weight ,a ll vehicle occupants, the
fuel and th ec argo. You can also fin di nfor-
mation about th em aximum gross axle
weight rating on th ef ront and rear axle.
The maximum gross axle weight rating is
th em aximum weight that can be carried by
one axle (front or rear axle) .N ever exceed
th em aximum load or th em aximum gross
axle weight rating for th ef ront or rear axle.
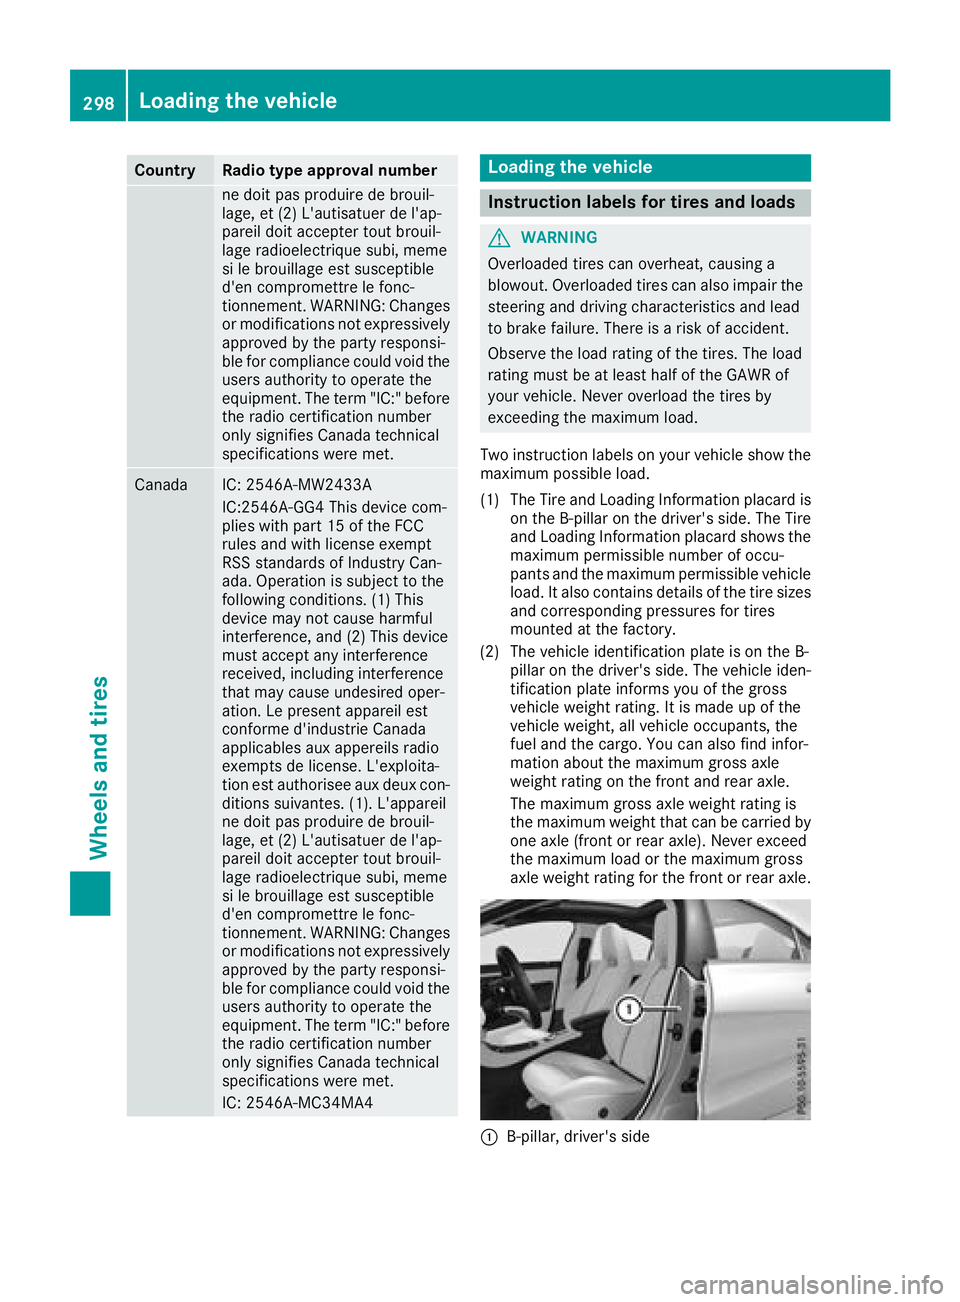
�C
B-pillar ,d river' ss ide298
Loading th ev ehicle
Wheels and tires
Page 304 of 326
Observe the legally required minimum tire tread
depth ( Y
page 288). Winter tires can reduce the
braking distance on snow-covered surfaces in
comparison with summer tires. The braking dis-
tance is still much further than on surfaces that
are not icy or covered with snow. Take appro-
priate care when driving.
Further information on winter tires (M+S tires)
( Y
page 289).
Temperature
G WARNING
The temperature grade for this tire is estab-
lished for at ire that is properly inflated and
not overloaded .E xcessive speed, underinfla-
tion, or excessive loading, either separately or
in combination, can cause excessive heat
build-up and possible tire failure.
The temperature grades are A( the highest), B,
and C, representing the tire's resistance to the
generation of heat and its ability to dissipate
heat when tested under controlled conditions
on as pecified indoor laboratory test wheel. Sus-
tained high temperature can cause the material
of the tire to degenerate and reduce tire life, and
excessive temperature can lead to sudden tire
failure. The grade Cc orresponds to al evel of
performance which all passenger car tires must
meet under the Federal Motor Vehicle Safety
Standard No. 109. Grades Ba nd Ar epresent
higher levels of performance on the laboratory
test wheel than the minimum required by law. Tire labeling
Overview
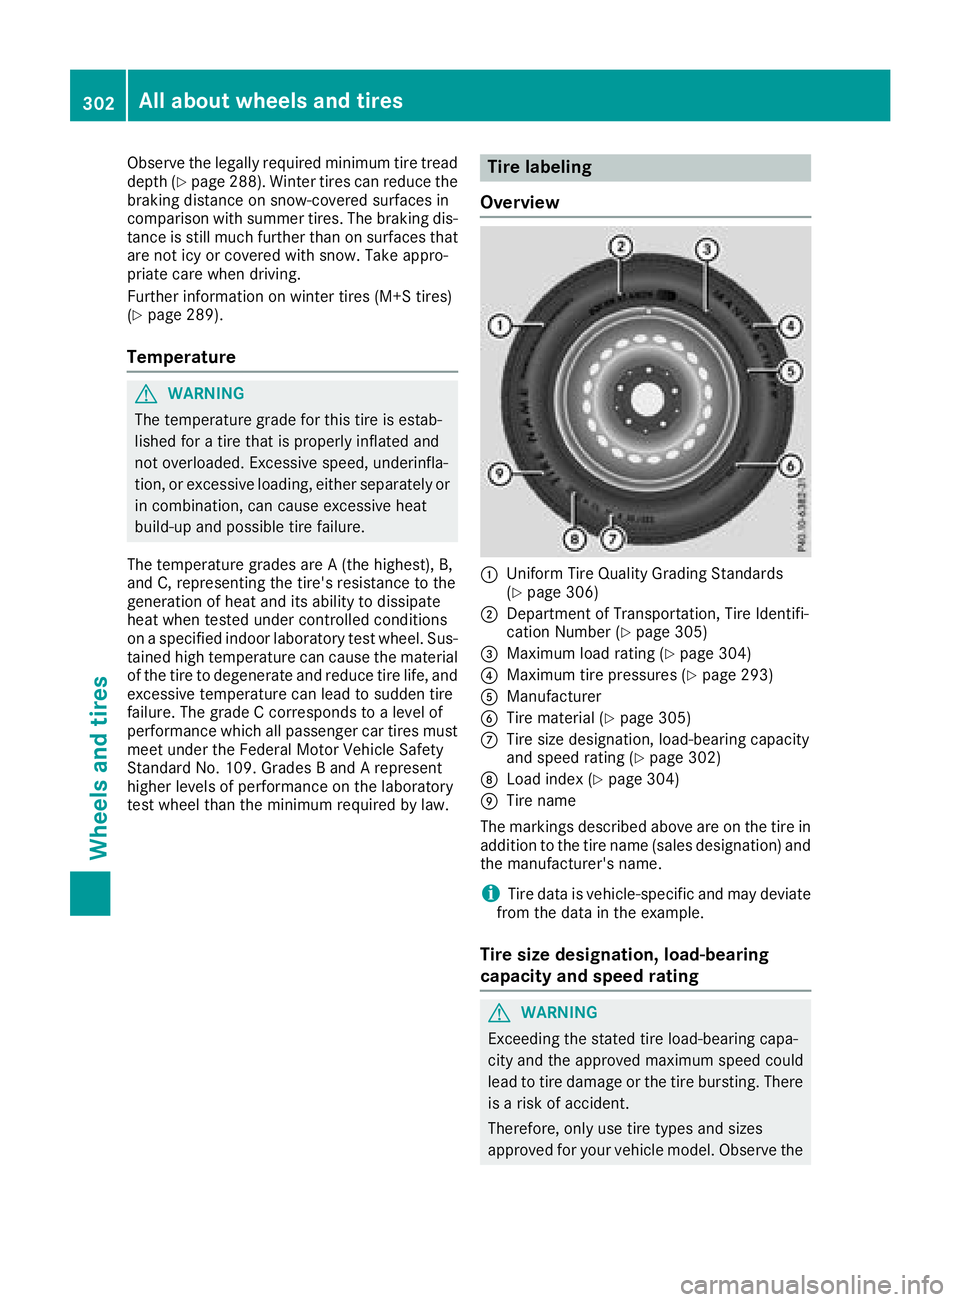
�C
Uniform Tire Quality Grading Standards
( Y
page 306)�D
Department of Transportation, Tire Identifi-
cation Number ( Y
page 305)�
Page 310 of 326
Tire-mounting tools should not be used near
the valve. This could damage the electronic
components.
Only have tires changed at aq ualified spe-
cialist workshop.
Observe the instructions and safety notes in the
"Changing aw heel" section ( Y
page 307).
The wear pattern sont he front and rear tires
differ, depending on the operating conditions.
Rotate the wheels before ac lear wear pattern
has formed on the tires. Fron tt ires typically
wear more on the shoulders and the rear tires in
the center.
On vehicles that have the same size front and
rear wheels, you can rotat et he wheels accord-
ing to the intervals in the tire manufacturer's
warranty book in your vehicle documents. If no
warranty book is available, the tires should be
rotated every 3,000 to 6,000 miles (5,000 to
10,00 0k m) .D ependin gont ire wear, this may
be required earlier. Do not change the direction
of wheel rotation.
Clean the contact surfaces of the wheel and the
brake disc thoroughly every time aw heel is rota-
ted. Check the tire pressure and, if necessary,
restart the tire pressure loss warning system
(Canada only) or the tire pressure monitor (USA
only).
Direction of rotation Tires with as pecified direction of rotation have
additional benefits ,e .g. if there is ar isk of hydro-
planing. These advantages can only be gained if
the tires are installed corresponding to the
direction of rotation.
An arrow on the sidewall of the tire indicates its
correc td irection of rotation.
Storing wheels Stor ew heels that are not being used in ac ool,
dry and preferably dark place. Protec tt he tires
from oil, grease, gasoline and diesel. Mounting aw heel
Preparing the vehicle X
Stop the vehicle on solid, non-slippery and
level ground. X
Apply the electric parking brake manually. X
Bring the front wheels into the straight-ahead
position. X
Shift the transmission to position �] .X
Switch off the engine. X
Vehicles without KEYLESS-GO: remove the
SmartKey from the ignition lock. X
Vehicles with KEYLESS-GO start-function
or KEYLESS-GO: open the driver's door.
The vehicle electronics are now in position
�
Page 313 of 326
bolts to come loose. As ar esult, you could
lose aw heel while driving .T here is ar isk of
accident.
Never oil or grease wheel bolts. In the event of
damage to the threads, contact aq ualified
specialist workshop immediately. Have the
damaged wheel bolts or hub threads
replaced/renewed. Do not continue driving.
G WARNING
If you tighten the wheel bolts or wheel nuts
when the vehicle is raised, the jack could tip
over. There is ar isk of injury.
Only tighten the wheel bolts or wheel nuts
when the vehicle is on the ground.
Always pay attention to the instructions and
safety notes in the "Changing aw heel" section
( Y
page 307).
Only use wheel bolts that have been designed
for the wheel and the vehicle. For safety rea-
sons, Mercedes-Benz recommends that you
only use wheel bolts which have been approved
for Mercedes-Benz vehicles and the respective
wheel.
! To preven td amage to the paintwork, hold
the wheel securely against the wheel hub
while screwin gint he first wheel bolt.
X
Clean the wheel and wheel hub contact sur-
faces. X
Place the new wheel on the wheel hub and
push it on. X
Tighten the wheel bolts until they are finger-
tight. Lowering the vehicle
G WARNING
The wheels could work loose if the wheel nuts
and bolts are not tightened to the specified
tightenin gt orque. There is ar isk of accident.
Have the tightenin gt orque immediately
checked at aq ualified specialist workshop
after aw heel is changed. X
Place the ratchet wrenc ho nt ot he hexagon
nut of the jack so that the letters AB are visi-
ble. X
Turn the ratchet wrenc hu ntil the vehicle is
onc ea gain standing firmly on the ground. X
Place the jack to one side.
X
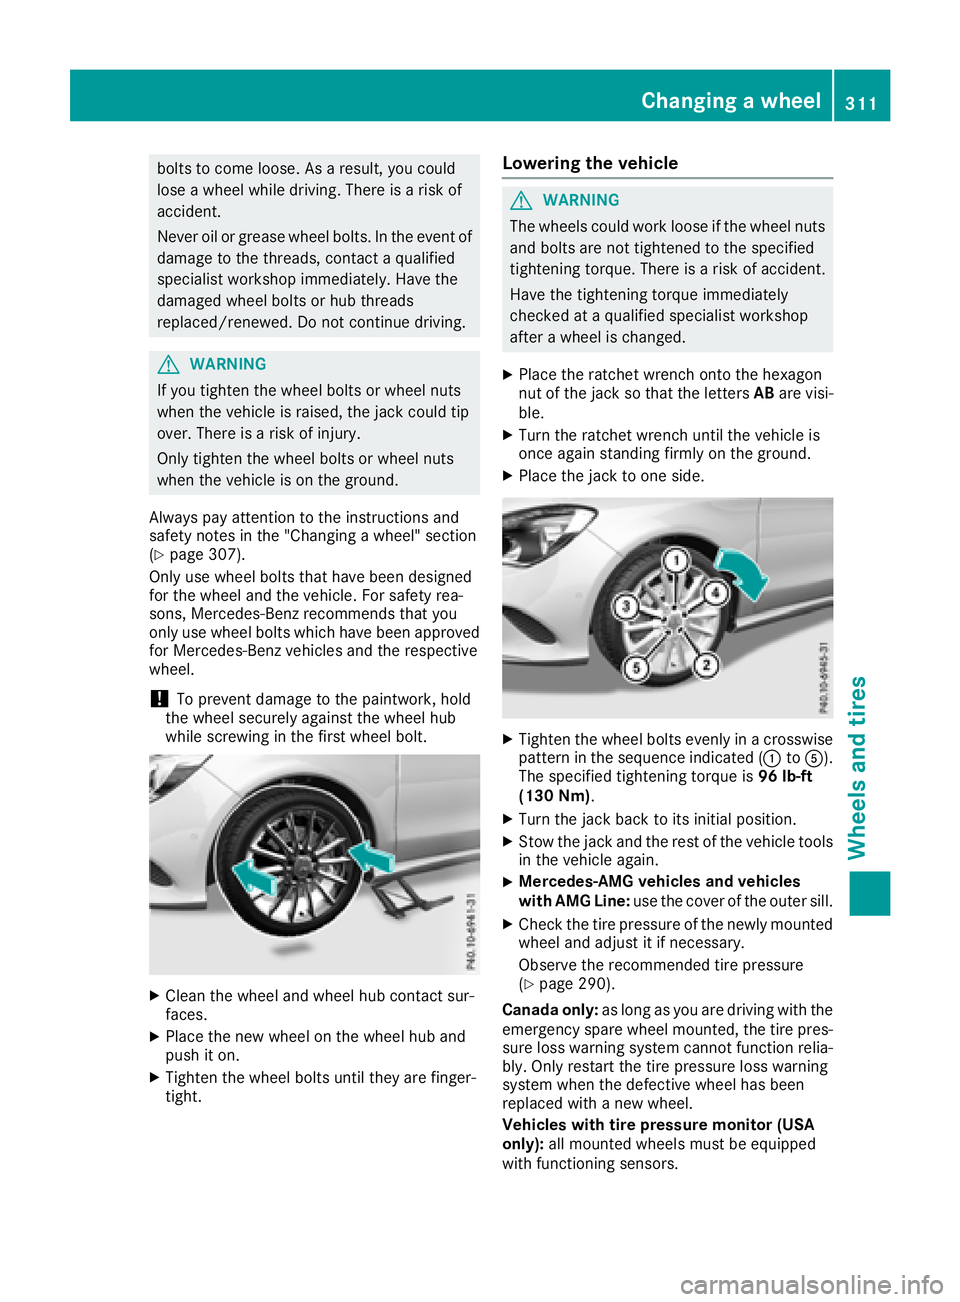
Tighten the wheel bolts evenly in ac rosswise
pattern in the sequence indicated ( �C to �