2018 MERCEDES-BENZ CLA COUPE mirror
[x] Cancel search: mirrorPage 98 of 326
Mirrors
Rear-view mirror
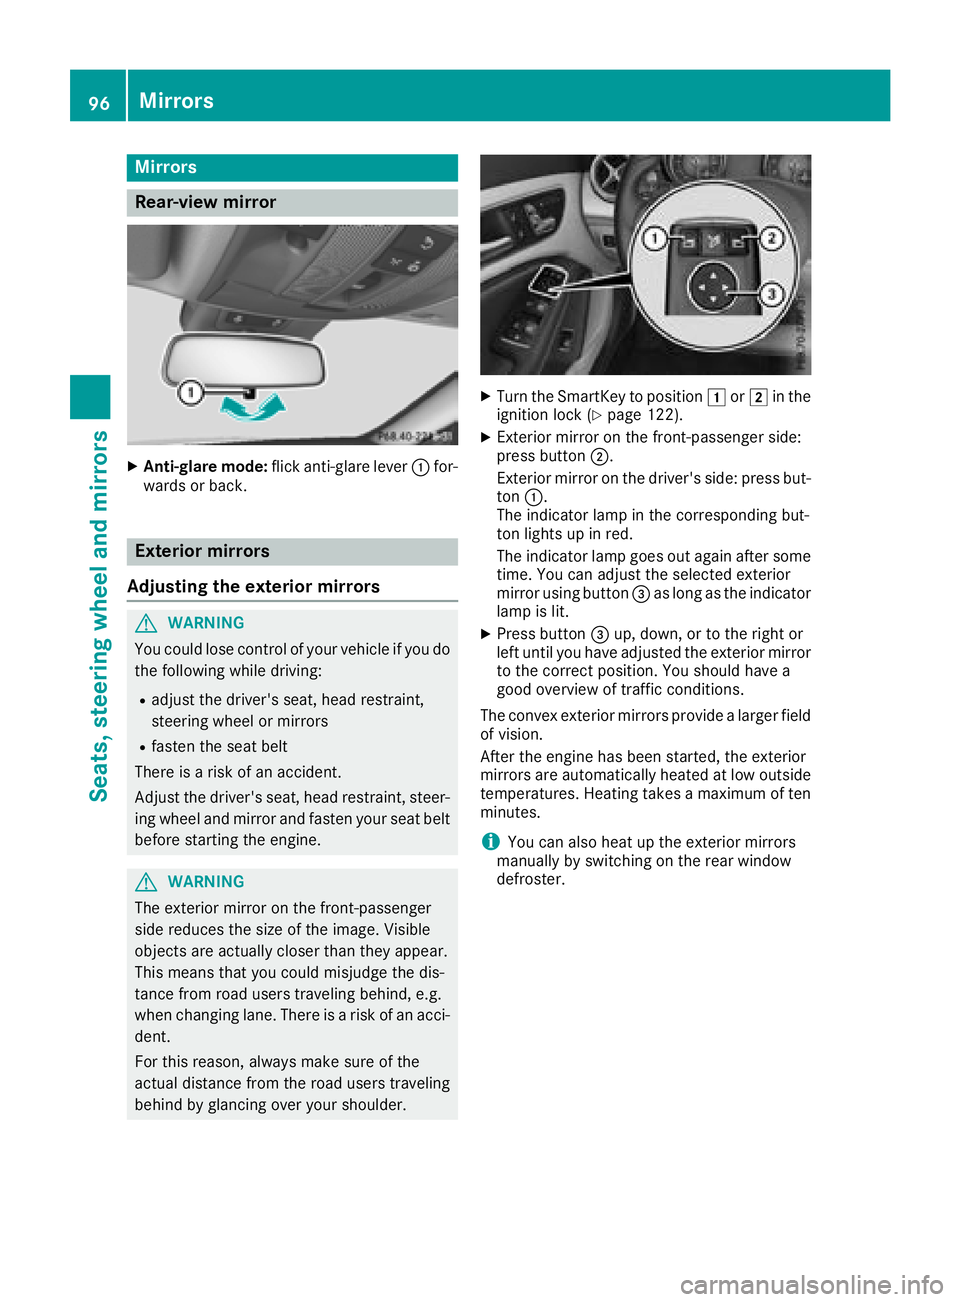
XAnti-glare mode:flick anti-glare lever :for-
wards or back.
Exterior mirrors
Adjusting the exterior mirrors
GWARNING
You coul dlose control of you rvehicleify ou do
the following while driving:
Radjust the driver's seat, headr estraint,
steering wheelorm irrors
Rfasten the seat belt
There is arisk of an accident.
Adjust the driver's seat, headr estraint, steer-
ing wheela nd mirror and fasten you rseat belt
before starting the engine.
GWARNING
The exterior mirror on the front-passenger
side reduces the size of the image. Visible
objects are actually closer than they appear.
This means that you coul dmisjudge the dis-
tance from road users traveling behind, e.g.
when changing lane .There is arisk of an acci-
dent.
For this reason, alway smake sure of the
actua ldistance from the road users traveling
behind by glancing over you rshoulder.
XTurn the SmartKey to position 1or2 in the
ignitio nlock (Ypage1 22).
XExterior mirror on the front-passenger side:
press button ;.
Exterior mirror on the driver's side:p ress but-
ton :.
The indicator lamp in the corresponding but-
ton lights up in red.
The indicator lamp goes out again after some
time. You can adjust the selected exterior
mirror using button =as long as the indicator
lamp is lit.
XPress button =up, down, or to the right or
left until you have adjusted the exterior mirror
to the correct position. You should have a
good overview of traffic conditions.
The convex exterior mirrors provide alarger field
of vision.
After the engine has been started, the exterior
mirrors are automatically heated at low outside
temperatures. Heating takes amaximu moften
minutes.
iYou can als oheatu pthe exterior mirrors
manually by switching on the rear window
defroster.
96Mirrors
Seats, steering wheel and mirrors
Page 99 of 326
Folding theexterior mirrors in or out
electrically
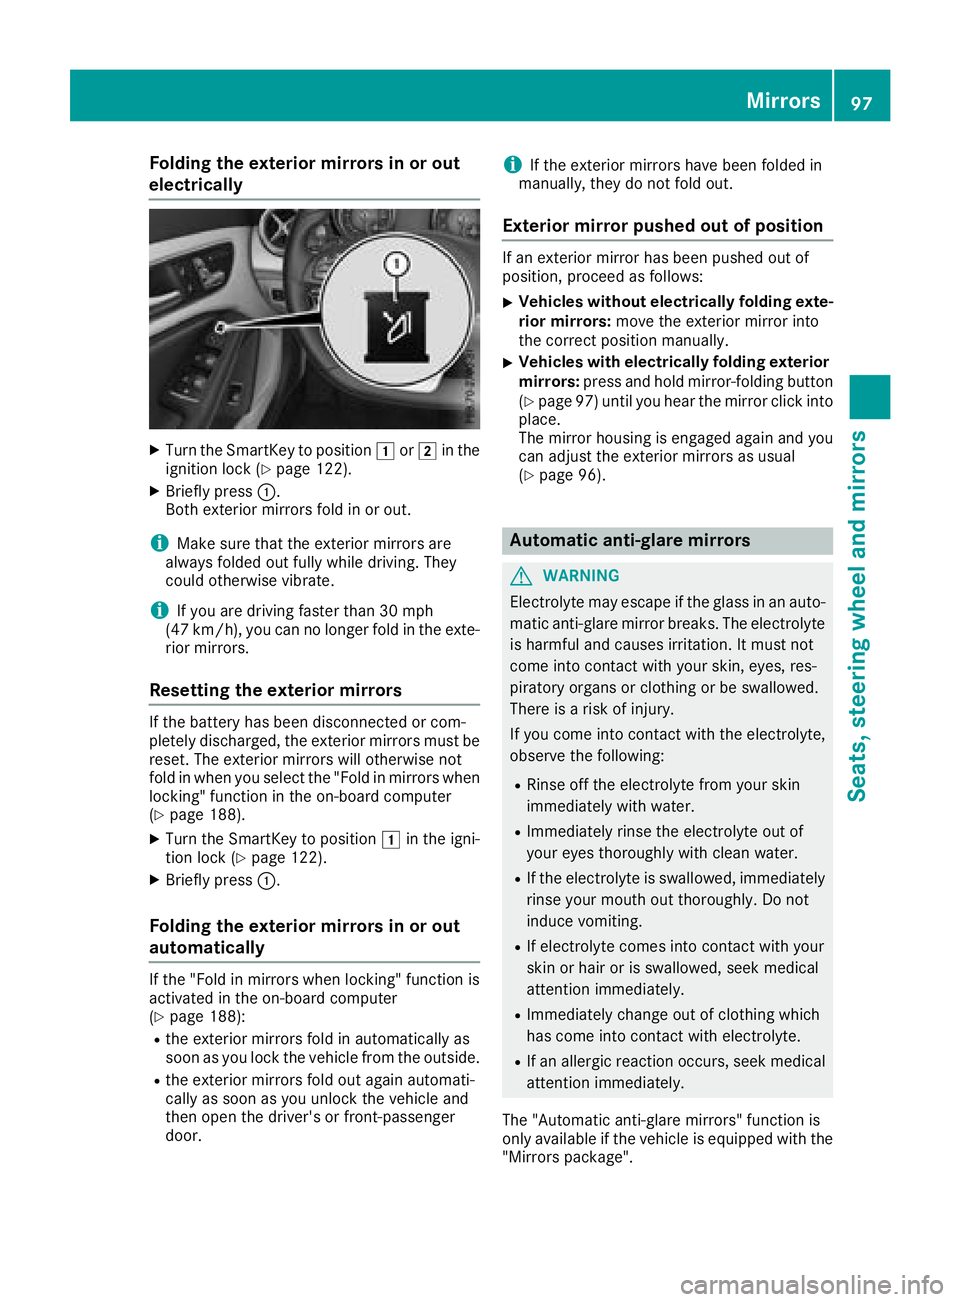
XTurn th eSma rtKey to position 1or2 in th e
ignition loc k(Ypage 122).
XBriefly press :.
Both exterio rmirror sfoldinoro ut.
iMak esure that th eexter iorm irror sare
always folded out fully while driving .They
could otherwise vibrate .
iIf you are driving fastertha n30m ph
(47 km/h), you can no longer fol dintheexte -
rio rm irrors.
Resetting th eexterior mirrors
If th ebattery has been disconnected or com-
pletely discharged, th eexter iorm irror smust be
reset .The exterio rmirror swill otherwise no t
fol dinw hen you select th e"Fold in mirror swhen
locking" function in th eon-bo ard computer
(
Ypage 188).
XTurn th eSmartKey to position 1in th eigni-
tion loc k(Ypage 122).
XBriefly press :.
Folding theexterior mirrors in or out
automatically
If th e"Fold in mirror swhen locking" function is
activated in th eon-bo ard computer
(
Ypage 188):
Rth ee xter iorm irror sfoldina utomatically as
soo nasy ou loc kthe vehicl efromt heoutside .
Rthee xter iorm irror sfoldo ut again automati-
call yass oonasy ou unlock th evehicl eand
then open th edriver' sorf ront-pa ssenger
door .
iIf theexter iorm irror shave been folded in
manually, they do no tfoldo ut.
Exterior mirror pushed out of position
If an exterio rmirror has been pushed out of
position ,procee dasfollows :
XVehicles without electricall yfolding exte-
rior mirrors :mov ethe exterio rmirror int o
th ec orre ct position manually.
XVehicles with electricall yfolding exterior
mirrors :press and hold mirror-foldin gbutto n
(
Ypage 97 )until yo uhearthe mirror click into
place.
The mirror housing is engaged agai nand you
can adjus tthe exterio rmirrors as usual
(
Ypage 96).
Automati canti-glare mirrors
GWARNING
Electrolyte maye scape if the glassinanauto-
matic anti-glare mirror breaks .The electrolyte
is harmfula nd causes irritation. It must not
come into contact with your skin, eyes, res-
piratory organs or clothing or be swallowed.
There is ariskofi njury.
If yo ucome into contact with the electrolyte,
observe the following:
RRinse off the electrolyte from your skin
immediatelyw ithw ater.
RImmediately rins ethe electrolyte outo f
your eyes thoroughl ywithc lean water.
RIf the electrolyte is swallowed, immediately
rins eyourm outh outt horoughly. Do not
induce vomiting.
RIf electrolyte comesi nto contact with your
skinorh airoriss wallowed, seekm edical
attentio nimmediately.
RImmediately change outofc lothing which
hasc ome into contact with electrolyte.
RIf an allergicr eactionoccurs, see kmedical
attentio nimmediately.
The "Automatic anti-glare mirrors"f unctionis
onlya vailable if the vehicl eisequippe dwitht he
"Mirrors package".
Mirrors97
Seats, steering wheel andmirrors
Z
Page 100 of 326
The rear-view mirror and the exterior mirror on
the driver's side automatically go into anti-glare
mode if:
Rthe ignition is switched on and
Rincident light from headlamps strikes the sen-
sor in the rear-view mirror
The mirrors do not go into anti-glare mode if
reverse gear is engaged or if the interior lighting
is switched on.
Parking position for the exterior mir-
ror on the front-passenger side
Setting and storing the parking position
You can set the front-passenger side exterior
mirror such that you can see the rear wheel on
that side as soon as you engage reverse gear.
You can store this position.
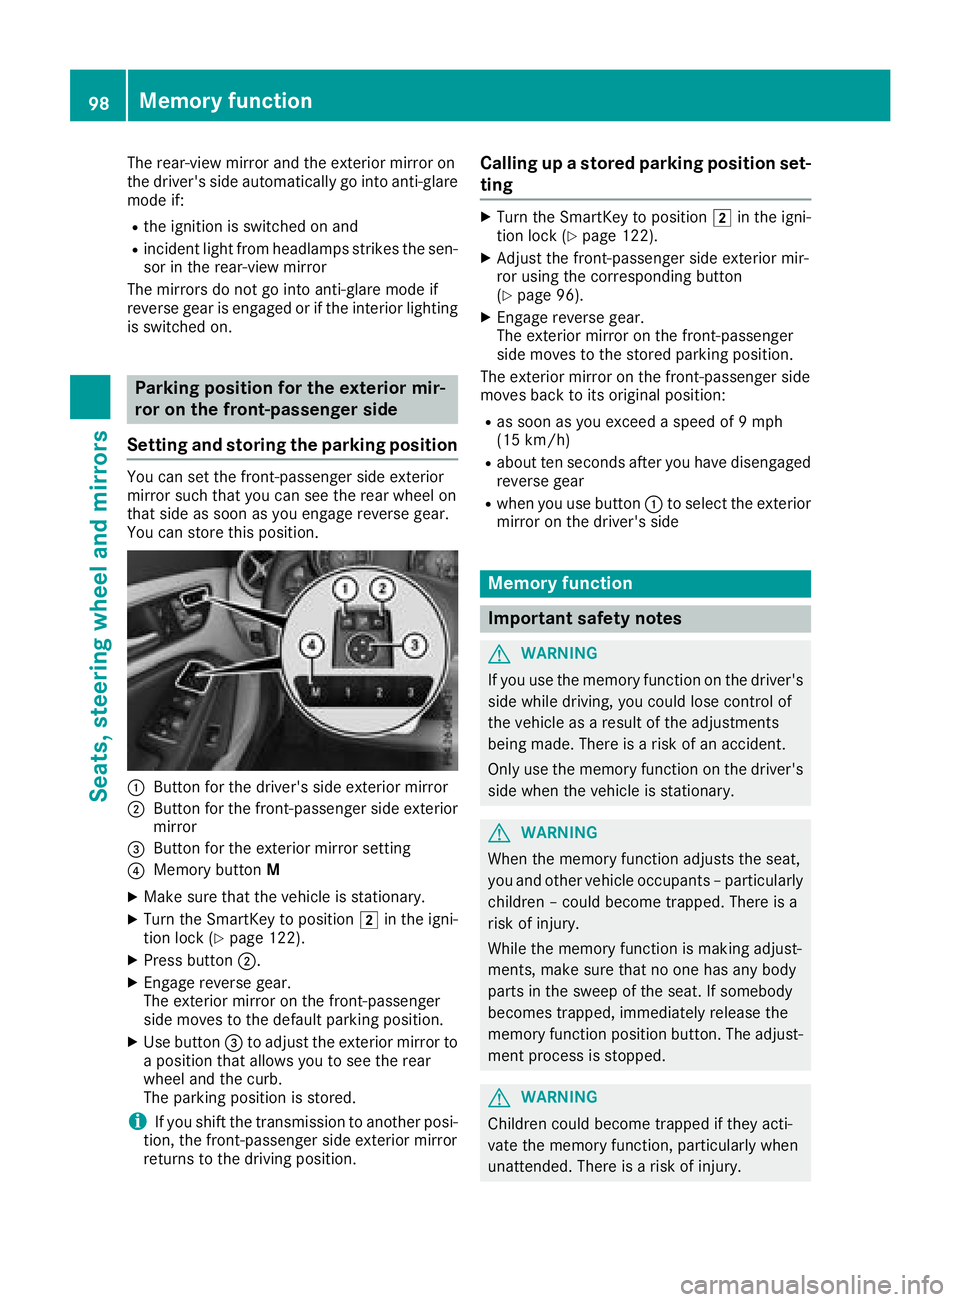
:Button for the driver's side exterior mirror
;Button for the front-passenger side exterior
mirror
=Button for the exterior mirror setting
?Memory button M
XMake sure that the vehicle is stationary.
XTurn the SmartKey to position 2in the igni-
tion lock (Ypage 122).
XPress button ;.
XEngage reverse gear.
The exterior mirror on the front-passenger
side moves to the default parking position.
XUse button=to adjust the exterior mirror to
ap osition that allows you to see the rear
wheel and the curb.
The parking position is stored.
iIf you shift the transmission to another posi-
tion, the front-passenger side exterior mirror
return stothe driving position.
Calling up astored parking position set-
ting
XTurn the SmartKey to position 2in the igni-
tion lock (Ypage 122).
XAdjust the front-passenger side exterior mir-
ror using the corresponding button
(
Ypage 96).
XEngage reverse gear.
The exterior mirror on the front-passenger
side moves to the stored parking position.
The exterior mirror on the front-passenger side
moves back to its original position:
Ras soon as you exceed aspeed of 9mph
(15 km/h)
Rabout ten seconds after you have disengaged
reverse gear
Rwhen you use button :to select the exterior
mirror on the driver's side
Memory function
Important safety notes
GWARNING
If you use the memory function on the driver's side while driving, you could lose control of
the vehicle as aresult of the adjustments
being made. There is arisk of an accident.
Only use the memory function on the driver's
side when the vehicle is stationary.
GWARNING
When the memory function adjusts the seat,
you and other vehicle occupants–p articularly
children –could become trapped. There is a
risk of injury.
While the memory function is making adjust-
ments, make sure that no one has any body
parts in the sweep of the seat. If somebody
becomes trapped, immediately release the
memory function position button .The adjust-
ment process is stopped.
GWARNING
Children could become trapped if they acti-
vate the memory function, particularly when
unattended. There is arisk of injury.
98Memory function
Seats, steering wheel and mirrors
Page 101 of 326
When leaving the vehicle, alwaystake the
SmartKey with you and lock the vehicle. Never
leave children unsupervised in the vehicle.
The memory function can be used at any time,
e.g. even when the SmartKey is not in the igni-
tion lock.
Storing settings
With the memory function, you can store up to
three differents ettings, e.g. for three different
people.
The following settings are stored as asingle
memory preset:
Rseat and backres tposition
Rdriver's side: position of the exterior mirrors
on the driver's and front-passenger sides
XAdjust the seat (Ypage 92).
XAdjust the exterior mirror on the driver's side
(Ypage 96).
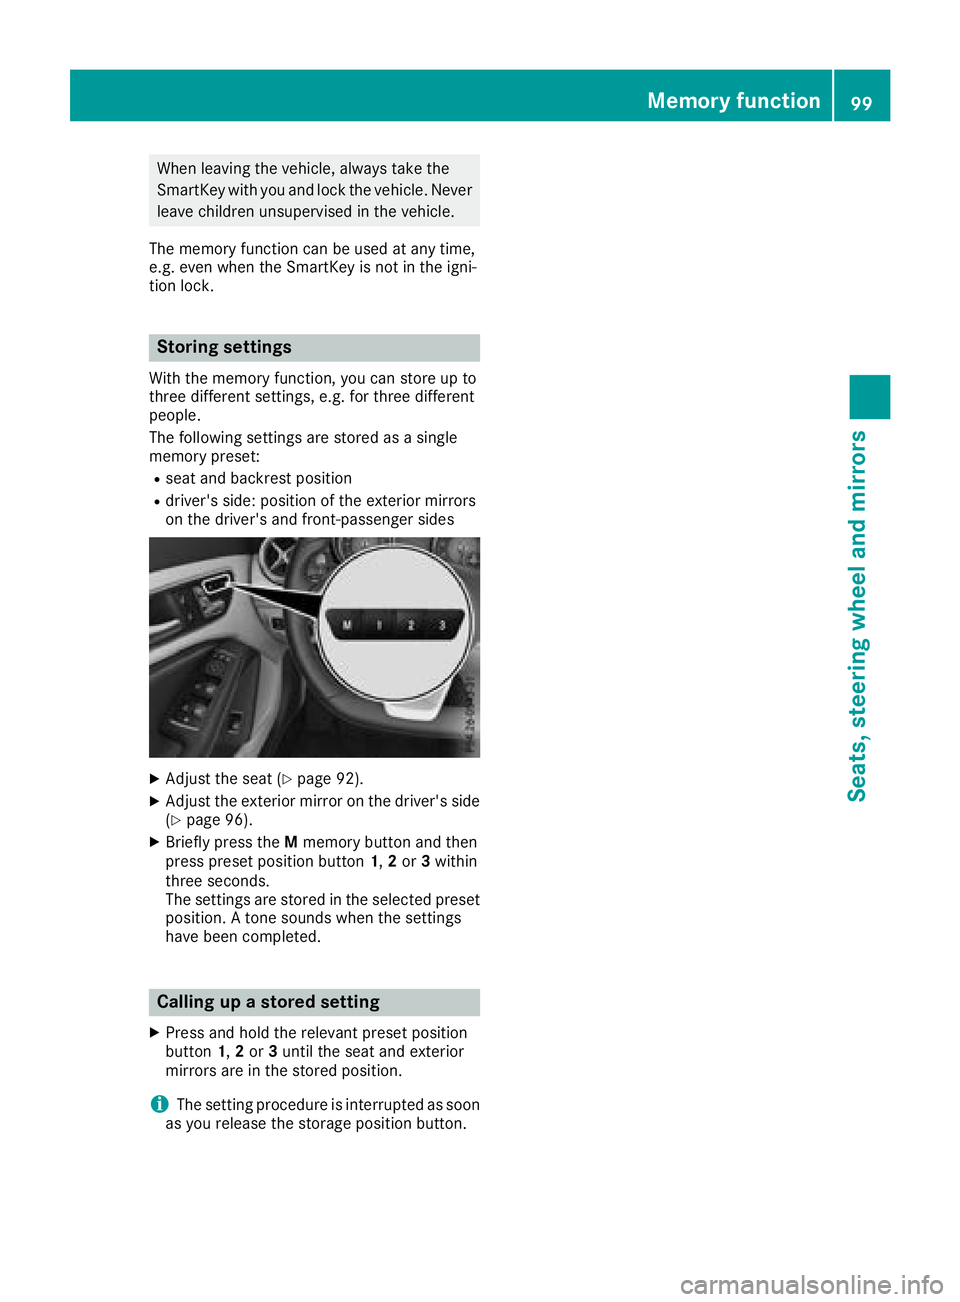
XBriefly press the Mmemory button and then
press preset position button 1,2or 3within
three seconds.
The settings are stored in the selected preset
position. Atones ounds when the settings
have been completed.
Calling up astored setting
XPress and hold the relevant preset position
button 1,2or 3until the seat and exterior
mirrors are in the stored position.
iThe setting procedure is interrupted as soon
as you release the storage position button.
Memoryf unction99
Seats, steering wheel and mirrors
Z
Page 169 of 326
XTo exitaparking spaceu sing Parking
Pilot: press the abutton on the multi-
functio nsteering wheel.
The ParkingP ilot Active Accelerate
and BrakeObserveSurroundingsmes-
sage appears in the multifunctio ndisplay.
XLet go of the multifunctio nsteering wheel.
XPull away ,being ready to brake at al ltimes. Do
not exceed amaximu mspeed of approx-
imately6m ph (10 km/h )whene xiting apark-
ing space. Otherwise, Parking Pilo tisc an-
celed immediately.
XDepending on the message or as required,
shift the transmission to position hork.
Parking Pilo timmediatelys teers in the other
direction. The ParkingPilot Active
Acceleratea nd BrakeObserveSur‐roundingsmessage appears in the multi-
functio ndisplay.
iYo uw illa chieve the best results by waiting
for the steering procedur etocomplete before
pulling away.
If yo ubacku pa fteractivation, the steering
whee lism ovedtot he straight-ahea dposi-
tion.
XDriv eforward sand reverse as prompte dby
the Parking Assist PARKTRONIC warning dis-
plays, severa ltime sifn ecessary.
Once yo uhavee xited the parking space com-
pletely, the steering whee lismovedtot he
straight-ahea dposition. Youh earat one and the
Parking
PilotFinishedmessage appears in
the multifunctio ndisplay .You will then have to
steera nd merge into traffic on your own. Park-
ing Assist PARKTRONIC is stil lavailable .You can
take overt he steering before the vehicl ehas
exited the parking space completely. Thi sis
useful, for exampl ewheny ou recognize thatiti s
already possibl etopullo ut of the parking space.
Canceling Parking Pilot
XStop the movement of the multifunction
steering whee lorsteeryours elf.
Parking Pilo tisc ancele dimmediately. The
Parking
PilotCanceledmessage appears
in the multifunctio ndisplay.
or
XPress the PARKTRONIC button (Ypage 163).
Parking Assist PARKTRONIC is switched off
and Parking Pilo tisi mmediatelyc anceled.
The ParkingP ilot Canceled
message
appears in the multifunctio ndisplay. Parking Pilo
tisc ancele dautomaticall ywhen:
Rthe electri cparking brake is engaged
Rtransmission position jis selected
Rparking using Parking Pilo tisnol onger pos-
sible
Ryo ua re driving faster than6 mph (10 km/h)
Rawheel spins, ESP®intervene sorfails.In
such cases the ÷warning lamp lights up in
the instrument cluster
Aw arning tone sounds. The parking symbo ldis-
appears and the multifunctio ndisplay shows the
ParkingP ilot Canceled
message.
Whe nParking Pilo tisc anceled, yo umusts teer
and brake agai nyours elf.
If as ystem malfunctio noccurs, the vehicl eis
braked to astandstill .Todrive on, depress the
accelerato ragain .
Rear view camera
General notes
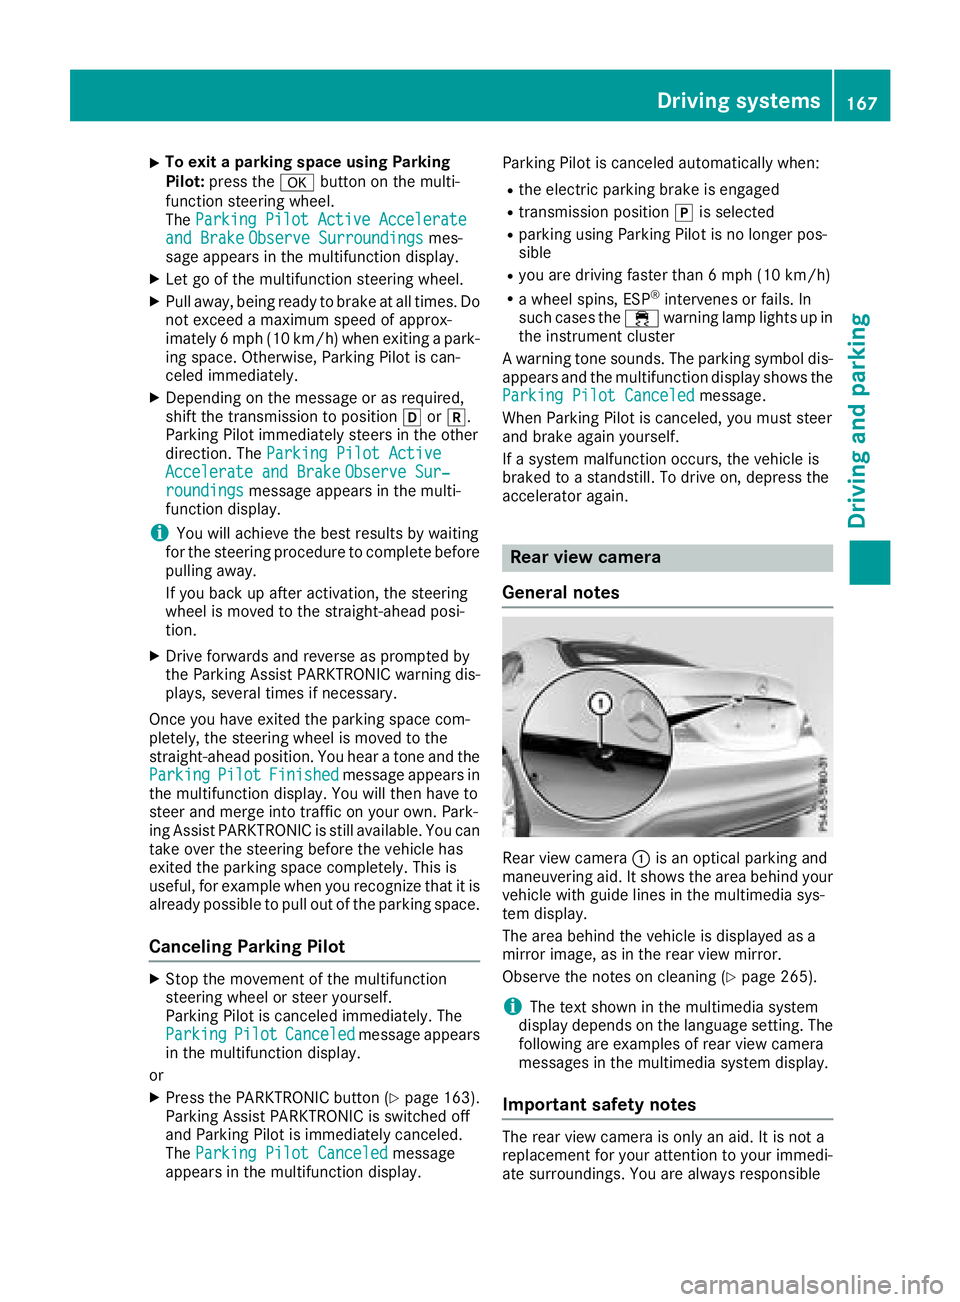
Rear vie wcamera :is an optica lparking and
maneuvering aid. It shows the are abehin dyour
vehicl ewithg uide lines in the multimedia sys-
tem display.
The are abehin dthe vehicl eisdisplayed as a
mirror image, as in the rearv iewm irror.
Observe the notes on cleaning (
Ypage 265).
iThe text shown in the multimedia system
display depends on the languag esetting. The
following are examples of rearv iewc amera
messages in the multimedia system display.
Important safety notes
The rearv iewc amera is onlyana id.Itisn ot a
replacement for your attentio ntoyourimmedi-
ate surroundings. Yo uare always responsible
Driving systems167
Driving an dparking
Z
Page 170 of 326
for safe maneuvering and parking. Make sure
that there are no persons, animals or objects in
the maneuvering area while maneuvering and
parking in parking spaces.
Under the following circumstances, the rear
view camera willnot function, or wil lfunction in
al imited manner:
Rif the trunk lid is open
Rin heavy rain, snow or fog
Rat night or in very dark places
Rif the camera is exposedtov ery bright light
Rif the area is lit by fluorescent bulbs or LED
lighting (the display may flicker)
Rif there isasudden change in temperature,
e.g. when driving into aheated garage in win-
ter
Rif the camera lens is dirty or obstructed.
Observe the notes on cleaning
(
Ypag e265)
Rif the rear of you rvehicleisd amaged. In this
case, have the camera position and setting
checked at aqualified specialist workshop
The fieldofv ision and other functions of the rear
view camera may be restricted due to additional
accessories on the rear of the vehicle( e.g.
license plate holder, rear bicycle rack).
Activating/deactivating the rear view
camera
XTo activate: make sure that the SmartKey is
in position 2in the ignition lock.
XMake sure that the Activation byRgearfunction is selected in the multimedias ystem;
see the Digita lOperator's Manual.
XEngage reverse gear.
The area behind the vehicleiss hownwith
guide lines in the multimedias ystem display.
The image from the rear view camera is avail-
abl ethroughoutt he maneuvering process.
To deactivate: the rear view camera deacti-
vates if you shift the transmission to jor after
driving forwards ashort distance.
Messages in the multimedia system dis-
play
The rear view camera may show adistorted view
of obstacles, show them incorrectly or not at all.
The rear view camera does not show objects in
the following positions:
Rvery close to the rear bumper
Runder the rear bumper
Rin close range above the handl eonthe trunk
lid
!Objects not at ground levelm ay appear to
be further away than they actually are, e.g.:
Rthe bumper of aparked vehicle
Rthe drawbar of atrailer
Rthe bal lcoupling of atrailer tow hitch
Rthe rear section of an HGV
Ras lanted post
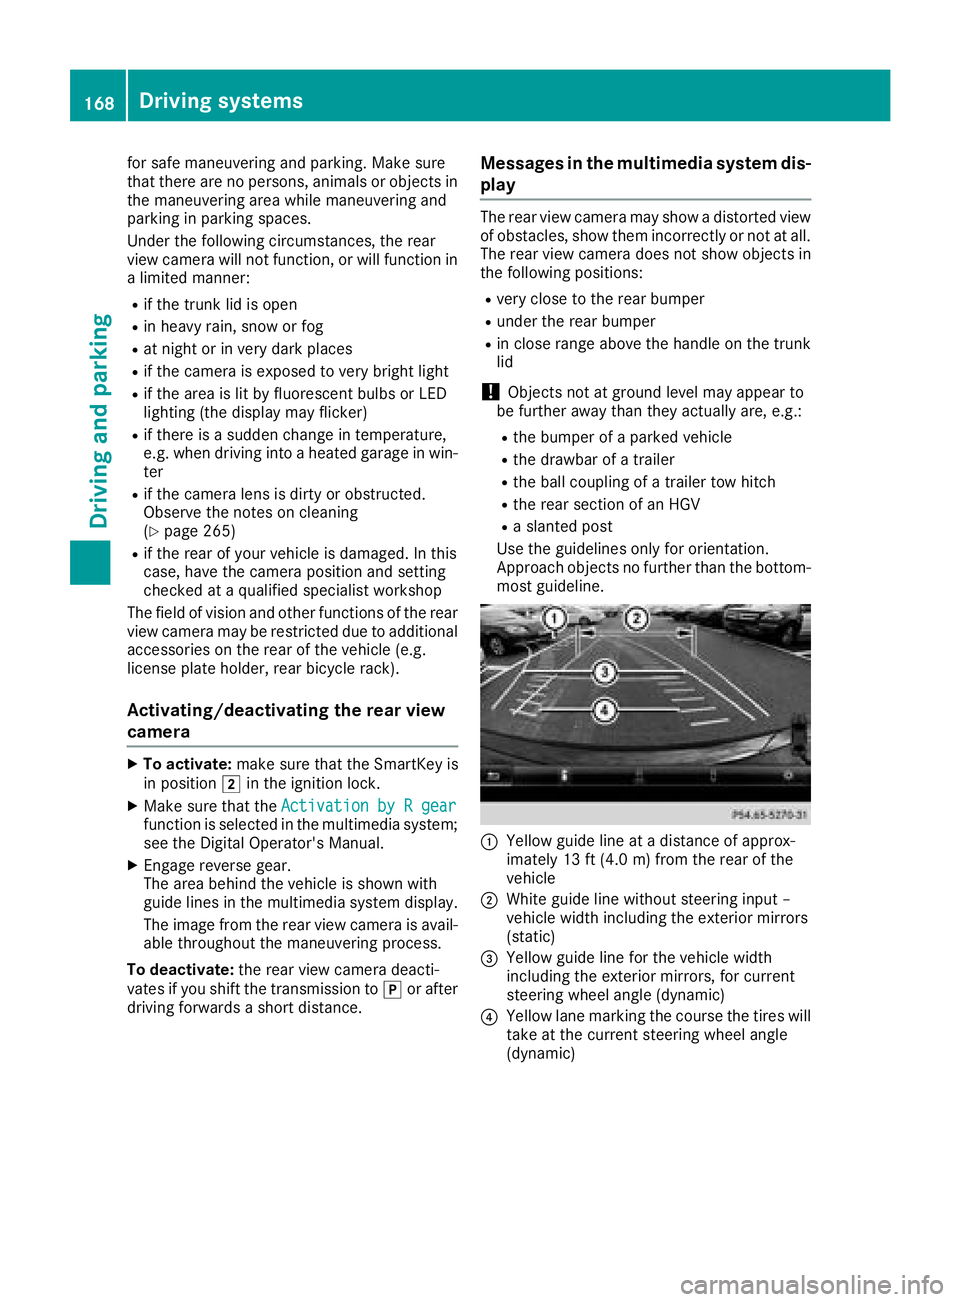
Use the guidelines only for orientation.
Approach objects no further than the bottom-
most guideline.
:Yellow guide line at adistance of approx-
imately 13 ft (4.0 m) from the rear of the
vehicle
;White guide line without steering input–
vehiclew idth including the exterior mirrors
(static)
=Yellow guide line for the vehiclew idth
including the exterior mirrors, for current
steering wheela ngle (dynamic)
?Yellow lane marking the course the tires will
take at the current steering wheela ngle
(dynamic)
168Driving systems
Driving and parking
Page 171 of 326
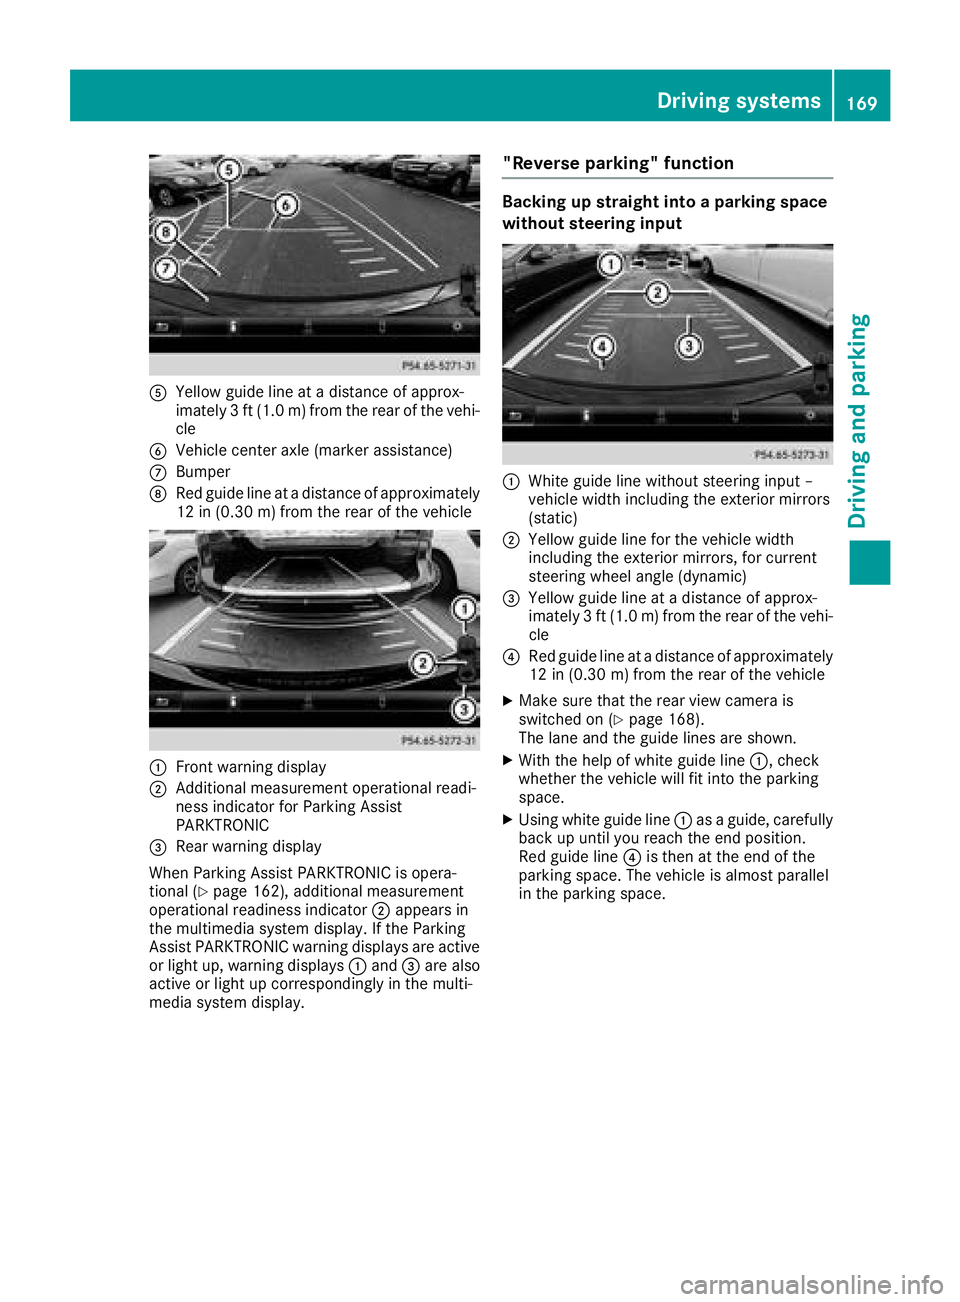
AYellow guide line atadistance of approx-
imately 3ft(1.0m)f rom the rear of the vehi-
cle
BVehicle center axle (marker assistance)
CBumper
DRed guide line at adistance of approximately
12 in (0.3 0m)from the rear of the vehicle
:Front warnin gdisplay
;Additional measurement operational readi-
ness indicator for Parking Assist
PARKTRONIC
=Rear warnin gdisplay
When Parking Assist PARKTRONIC is opera-
tional (
Ypage 162),a dditional measurement
operational readiness indicator ;appears in
the multimedia syste mdisplay. If the Parking
Assist PARKTRONIC warnin gdisplays are active
or light up, warnin gdisplays :and =are also
active or light up correspondingly in the multi-
media syste mdisplay.
"Reverse parking" function
Backing up straight into aparkin gspace
withou tsteering input
:Whiteg uide line without steeringi nput –
vehicle width including the exterior mirrors
(static)
;Yellow guide line for the vehicle width
including the exterior mirrors, for current
steeringw heel angle (dynamic)
=Yellow guide line at adistance of approx-
imately 3ft(1.0m )from the rear of the vehi-
cle
?Red guide line at adistance of approximately
12 in (0.30 m) from the rear of the vehicle
XMake sure that the rear view camer ais
switched on (Ypage 168).
The lane and the guide lines are shown.
XWith the help of white guide line :,check
whether the vehicle will fit int othe parking
space.
XUsingw hite guide line :asag uide, carefully
back up until you reach the end position.
Red guide line ?is the natthe end of the
parking space. The vehicle is almost parallel
in the parking space.
Driving systems169
Driving and parking
Z
Page 172 of 326
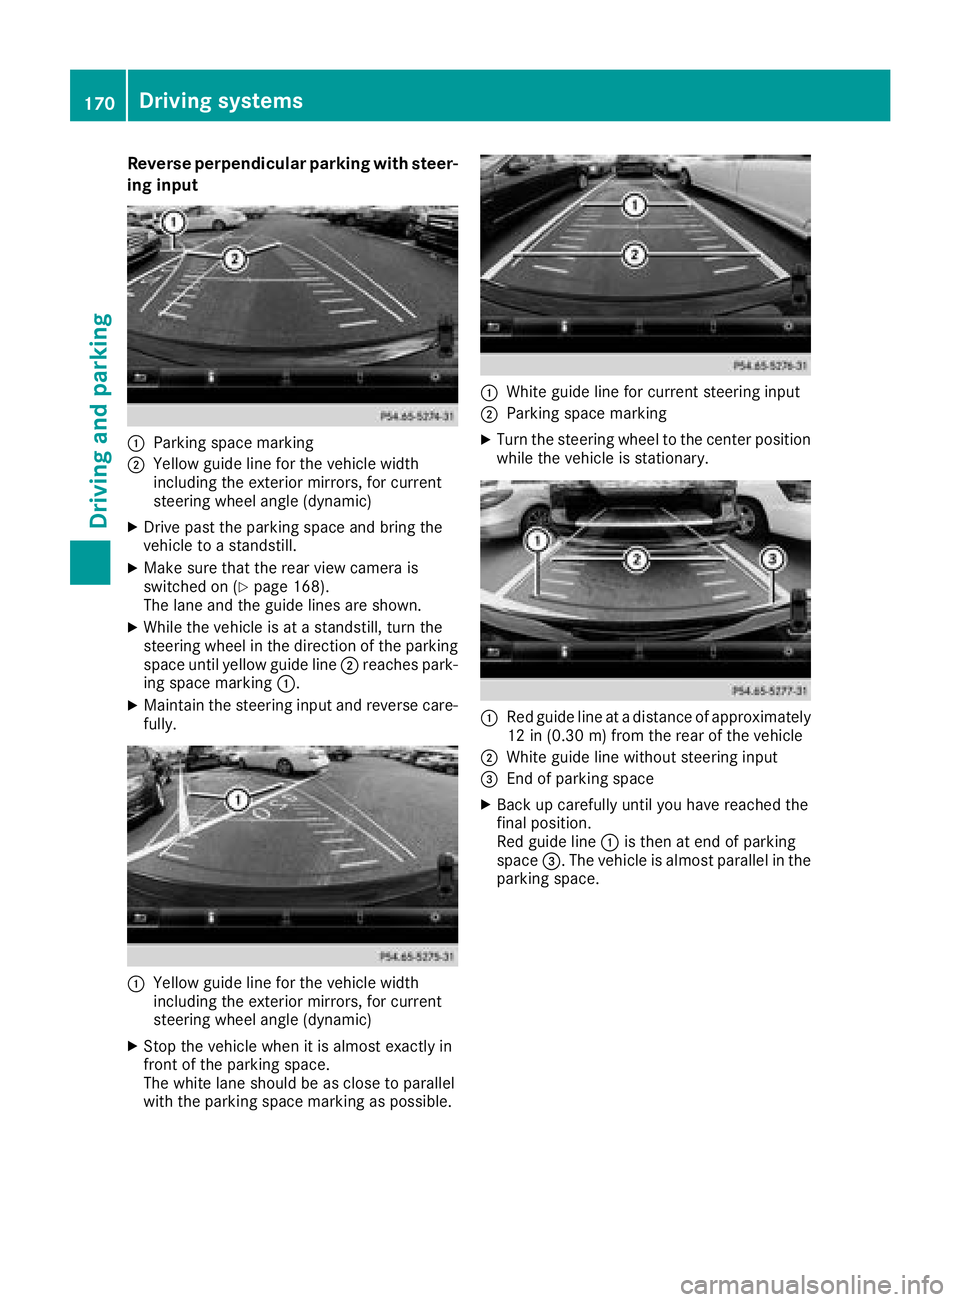
Reverse perpendicular parkingwiths teer-
in gi np ut
:Parking space marking
;Yellow guid elinef or the vehicle width
including the exterior mirrors, for current
steering wheel angle (dynamic)
XDrive past the parking space and bring the
vehicle to astandstill.
XMake sure that the rearv iewc amera is
switched on (Ypage 168).
The lane and the guid elines are shown.
XWhile the vehicle is at astandstill, turn the
steering wheel in the direction of the parking
space unti lyello wguide line;reaches park-
ing space marking :.
XMaintain the steering input and reverse care-
fully.
:Yellow guidelinef or the vehicle width
including the exterior mirrors, for current
steering wheel angle (dynamic)
XStop the vehicle whe nitisalmost exactly in
front of the parking space.
The white lane shoul dbeasclose to parallel
with the parking space marking as possible.
:White guid elinef or current steering input
;Parking space marking
XTurn the steering wheel to the center position
while the vehicle is stationary.
:Re dg uide line at adistance of approximately
12 in (0.30 m) fromthe rearofthe vehicle
;White guid elinew ithou tsteering input
=End of parking space
XBac kupcarefull yuntilyou have reache dthe
final position.
Re dg uide line:is thenate nd of parking
space =.The vehicl eisalmostp aralle linthe
parking space.
170Driving system s
Driving an dparking