2018 MERCEDES-BENZ CLA COUPE warning
[x] Cancel search: warningPage 102 of 326
Exteriorlighting
General notes
For reasonsofs afety, Mercedes-Ben zrecom-
mends that you driv ewith th elightss witched on
even durin gthe daytime. In somec ountries,
operatio noftheheadlamps varies due to legal
requirement sand self-imposedo bligations.
Settingthe exterio rlighting
Settin goptions
Exterior lighting can be set usingt he:
Rlight switch
Rcombinatio nswitch (Ypage 101)
Ron-board compute r(Ypage 187)
Light switch
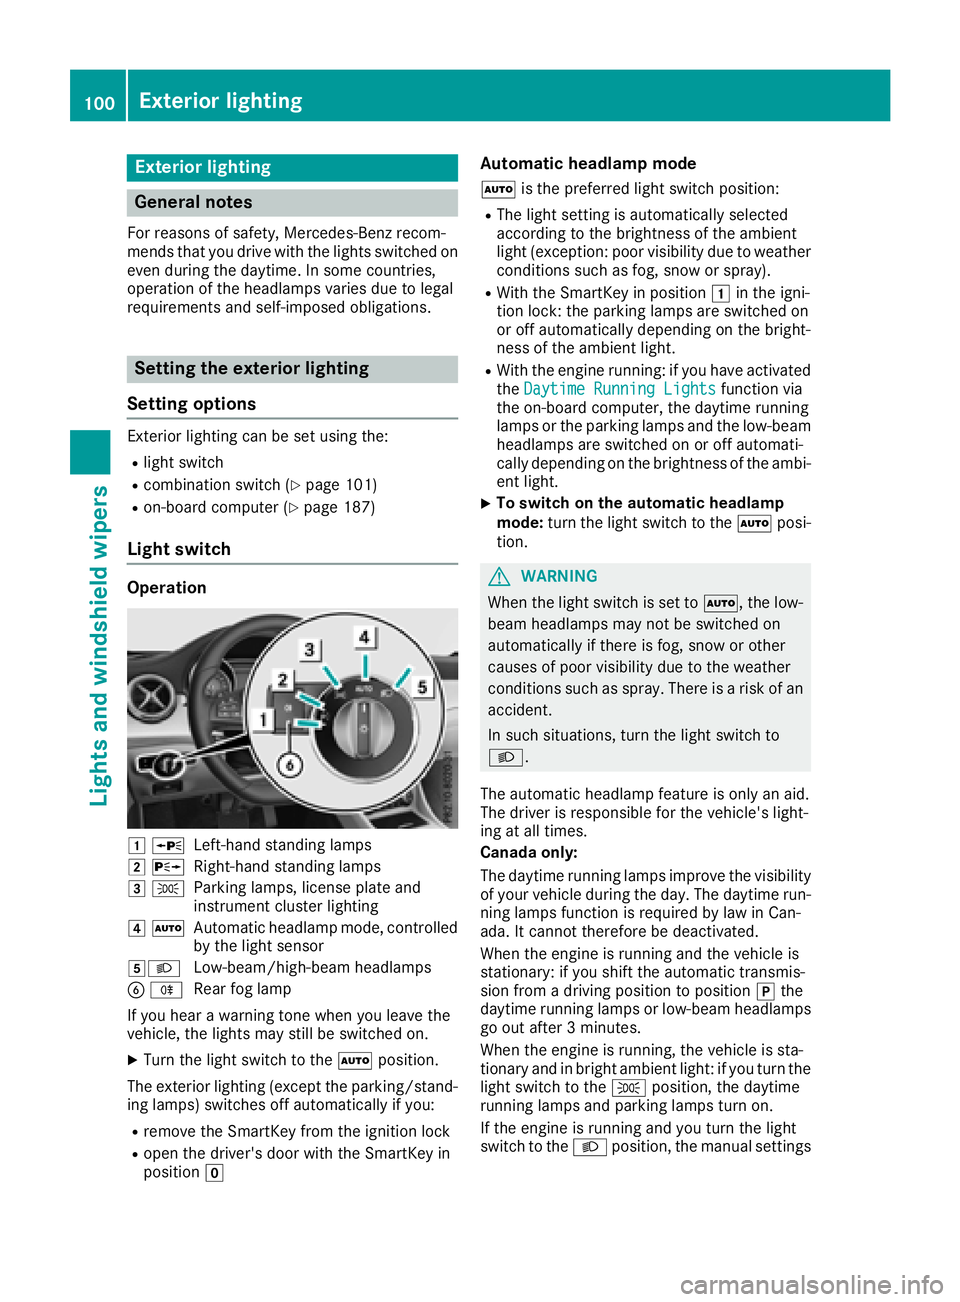
Operation
1WLeft-hands tanding lamps
2 XRight-hand standing lamps
3TParking lamps ,licens eplatea nd
instrumen tcluste rlighting
4 ÃAutomatic headlampm ode, controlled
by th elight sensor
5LLow-beam/high-beam headlamps
B RRear fog lamp
If you hear awarning tone when you leave the
vehicle ,the lightsm ay still be switched on.
XTurn thelight switch to the Ãposition.
The exteriorl ighting (excep tthe parking/stand-
ing lamps )switches off automaticall yifyou:
Rremove th eSmartKey from th eignition lock
Ropen th edriver'sd oor with th eSmartKey in
position g
Automatic headlamp mode
Ãis thepreferred light switch position:
RThe light settin gisautomaticall yselected
according to th ebrightnes softheambient
light (exception: poor visibilityd ue to weather
conditionss uchasfog,sno wors pray).
RWiththeSmartKey in position 1in th eigni-
tio nlock: th eparking lamps are switched on
or off automaticall ydependingont hebright-
nes soft heambient light.
RWitht heengine running: if you have activated
the DaytimeR unningLightsfunction via
th eo n-board computer, th edaytime running
lamps or th eparking lamps and th elow-beam
headlamps are switched on or off automati-
cally dependingont hebrightnes softheambi-
ent light.
XTo switch on th eautomatic headlamp
mode: turnthe light switch to the Ãposi-
tion.
GWARNING
When th elight switch is set to Ã,thelow-
beam headlamps may no tbeswitched on
automaticall yifthere is fog ,sno woro ther
causes of poor visibilityd ue to theweather
conditionss uchasspray. Thereisar isk of an
accident.
In suchs ituations,tur nt he light switch to
L.
The automatic headlampf eature is only an aid.
The driver is responsible for th evehicle's light-
ing at all times.
Canada only:
The daytime runnin glamps improve th evisibility
of your vehicle durin gthe day. The daytime run-
nin glamps function is required by law in Can-
ada. It canno tthe refore be deactivated.
When th eengine is runnin gand th evehicle is
stationary: if you shiftt heautomatic transmis-
sion from adriving position to position jthe
daytime runnin glamps or low-beam headlamps
go out after 3minutes.
When th eengine is running, th evehicle is sta-
tionar yand in bright ambient light:ify ou turnthe
light switch to the Tposition,t hedaytime
runnin glamps and parking lamps tur non.
If th eengine is runnin gand you tur nthe light
switch to the Lposition,t hemanual settings
100Exterior lighting
Lightsa nd windshield wipers
Page 104 of 326
XTo switchoff the high-beam headlamps:
move the combinatio nswitch back to its nor-
malp osition.
The blue Kindicator lamp in the instru-
ment cluster goe sout.
Vehicles with Adaptive Highbeam Assist:
when Adaptive Highbeam Assist is active, it
controls activation and deactivation of the
high-bea mheadlamps (
Ypage 102).
XTo switc honthe high-beam flasher: pull
the combinatio nswitch in the direction of
arrow =.
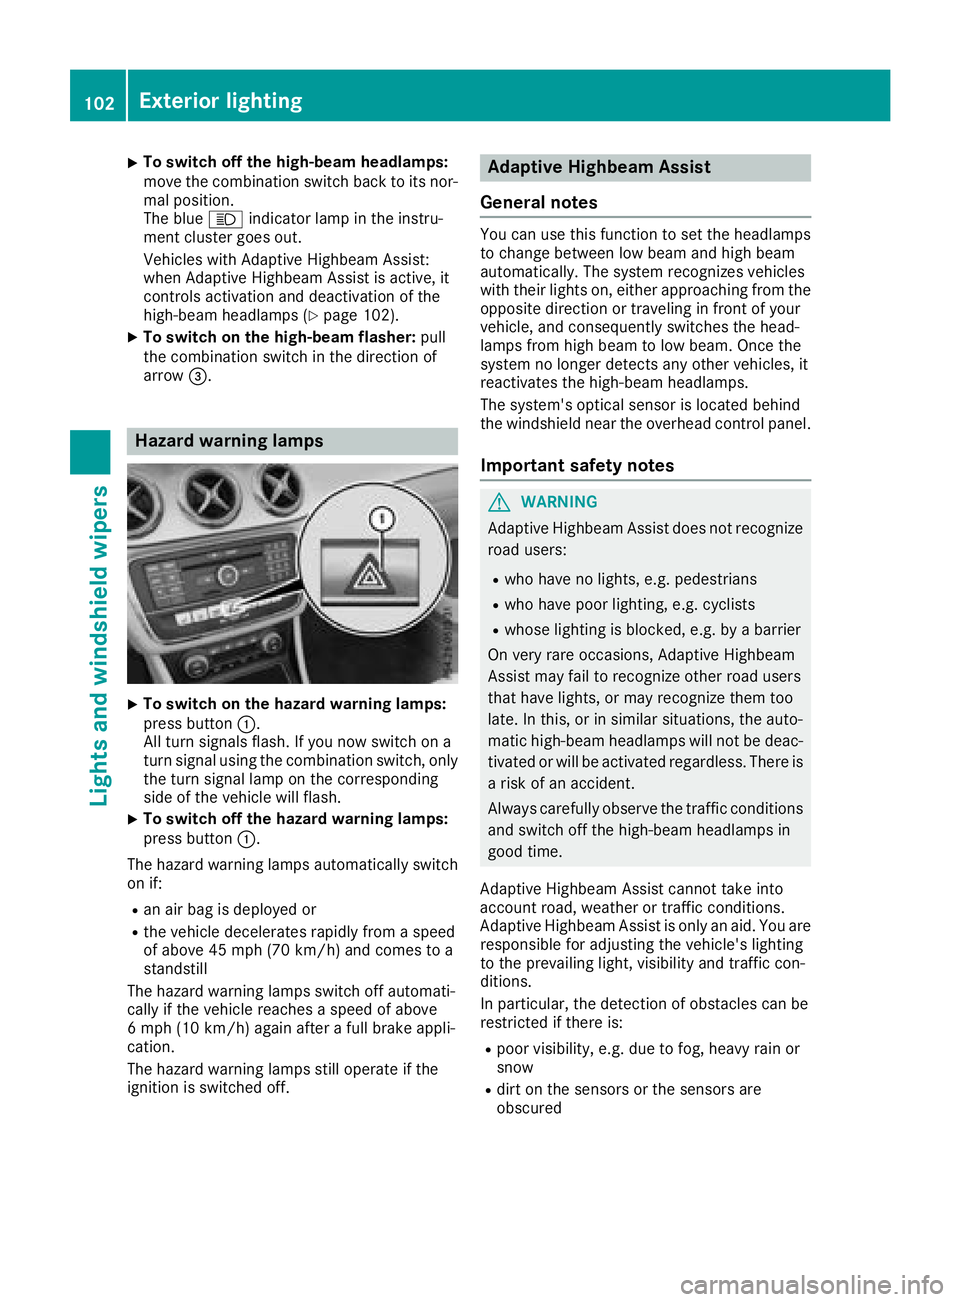
Hazard warning lamps
XTo switc honthe hazard warning lamps:
press button :.
All turn signals flash. If yo unow switch on a
turn signalu sing the combinatio nswitch ,only
the turn signall ampont he corresponding
side of the vehicl ewillf lash.
XTo switc hoff the hazard warning lamps:
press button :.
The hazard warning lamps automaticall yswitch
on if:
Ran ai rbag is deployed or
Rthe vehicl edecelerates rapidly from aspeed
of above 45 mph (70 km/h )and comestoa
standstill
The hazard warning lamps switch off automati-
cally if the vehicl ereachesas peed of above
6m ph (10 km/h )again afteraf ullb rake appli-
cation.
The hazard warning lamps stil lope rate if the
ignition is switched off.
Adaptiv eHighbeam Assist
General notes
Yo uc an us ethisf unctio ntoset the headlamps
to change between lo wbeama nd high beam
automatically. The system recognizes vehicles
with thei rlights on, either approaching from the
opposite direction or traveling in front of your
vehicle, and consequentlys witches the head-
lamps from high beam to lo wbeam. Once the
system no longer detects any otherv ehicles, it
reactivates the high-bea mheadlamps.
The system's optica lsensor is locate dbehin d
the windshield nea rthe overhead controlp anel.
Important safety notes
GWARNING
Adaptive Highbeam Assist does not recognize
roadu sers:
Rwh oh avenol ights ,e.g.p edes trians
Rwhoh avep oorlighting, e.g .cyclists
Rwhose lighting is blocked, e.g .byab arrier
On very rar eoccasions, Adaptive Highbeam
Assist mayf ailtor ecognize othe rroadu sers
thath avel ights ,orm ayrecognize them too
late. In this, or in similar situations, the auto-
matic high-bea mheadlamps will not be deac-
tivated or will be activate dregardless. There is
ar iskofana ccident.
Alway scarefull yobserve the traffic conditions
and switch off the high-bea mheadlamps in
goo dtime.
Adaptive Highbeam Assist canno ttake into
account road, weather or traffic conditions.
Adaptive Highbeam Assist is onlyana id.Y ou are
responsibl efor adjusting the vehicle's lighting
to the prevailing light, visibility and traffic con-
ditions.
In particular, the detection of obstacle scan be
restricte difthereis:
Rpoor visibility ,e.g.d ue to fog,h eavy rainor
snow
Rdirt on the sensors or the sensors are
obscured
102Exterior lighting
Lights and windshield wiper s
Page 110 of 326
Replacing the wiper blades
Important safety notes
GWARNING
If the windshield wiper sbegin to move while
yo ua re changing the wiper blades, yo ucould
be trapped by the wiper arm .There is arisko f
injury.
Alway sswitch off the windshield wiper sand
ignition before changing the wiper blades.
!To avoid damaging the wiper blades, make
sure that yo utouch only the wiper arm of the
wiper.
!Nevero pent he hoodifaw indshield wiper
arm hasb eenf olded away from the wind-
shield.
Neverf oldawindshield wiper arm withouta
wiper blad ebacko nto the windshield.
Holdt he windshield wiper arm firmly when
yo uc hange the wiper blade. If yo urelease the
windshield wiper arm withoutaw iper blade
and it falls onto the windshield ,the windshield
may be damaged by the force of the impact.
Mercedes-Benz recommendst hat youhave
the wiper blades changed at aquali fied spe-
cialist workshop.
Changin gthe windshield wiper blades
Removin gthe wiper blades
XVehicles without KEYLESS-GO or KEY-
LESS-GOs tart function: remove the Smart-
Key from the ignition lock.
XVehicles with KEYLESS-GO or KEYLESS-
GO start function: switch off the engine.
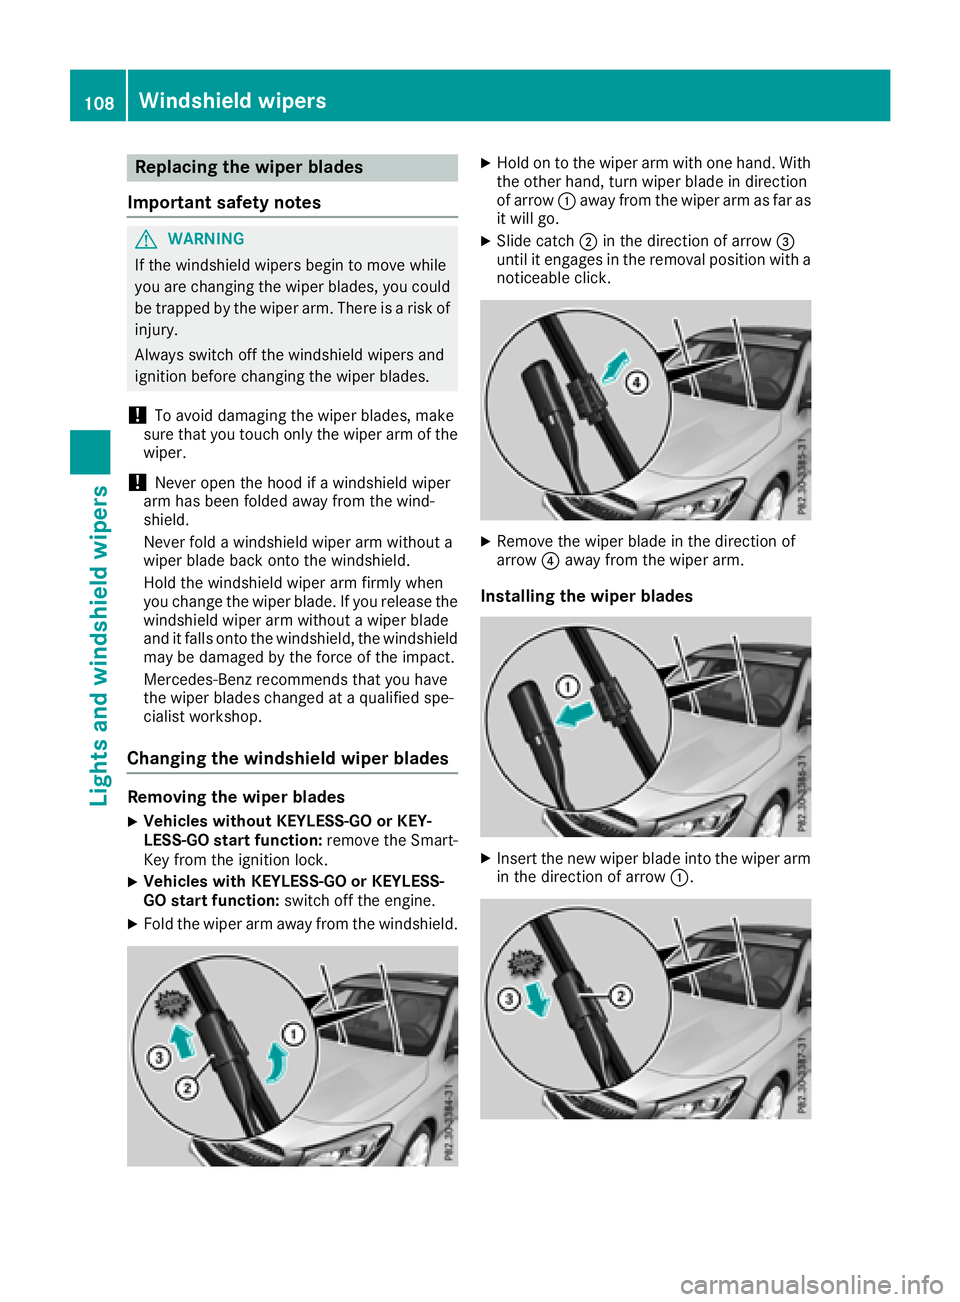
XFoldthe wiper arm away from the windshield.
XHoldontot he wiper arm with one hand. With
the otherh and, turn wiper blad eindirection
of arrow :away from the wiper arm as far as
it will go.
XSlide catch ;in the direction of arrow =
unti lite ngages in the removal position with a
noticeable click.
XRemove the wiper blad einthe direction of
arrow ?away from the wiper arm.
Installing the wiper blades
XInsert the new wiper blad einto the wiper arm
in the direction of arrow :.
108Windshieldwipers
Lights and windshield wipers
Page 122 of 326

iIf you activate the residual heat function at
high temperatures, only the ventilation willb e
activated. The blower runs at mediums peed.
iYou cannot use the ventilation to cool the
vehicle interior to atemperature lowert han
the outsidet emperature.
Activating/deactivating
XTurn the SmartKey to position gin the igni-
tion lock or remove it (Ypage 122).
XPress the Ìbutton.
The indicator lamp in the Ìbutton lights
up or goes out.
The indicator lamp in the button indicates that
the respective function is activated.
iResidualh eat is deactivated automatically:
Rafter approximately 30 minutes
Rwhen the ignition is switched on
Rif the battery voltage drops
Air vents
Important safety notes
GWARNING
Very hot or very cold air can flow from the air
vents. This could resultinb urns or frostbite in
the immediate vicinity of the air vents. There
is ar isk of injury.
Make sure that all vehicle occupants always
maintain asufficient distance to the air out-
lets. If necessary ,redirect the airflow to
another area of the vehicle interior.
In order to ensure the direct flow of fresh air
through the air vents into the vehicle interior,
please observe the following notes:
Rkeep the air inlet between the windshield and
the hood free of blockages, such as ice, snow or leaves.
Rnever cover the air vents or air intake grilles in
the vehicle interior.
iFor optimal climate control in the vehicle,
open the air vents completely and set the
adjusters to the central position.
Setting the air vents
:Side window defroster vent
;Side air vent
XTo open aside air vent: turn the adjuster in
side air vent ;to the left.
XTo close aside air vent: turn the adjuster in
side air vent ;clockwise as far as it willg o.
iThe center and rear air vents are adjusted in
the same way.
120Airv ents
Climate control
Page 123 of 326
Notesonb reaking-in anew vehicle
Important safety notes
Thes ensors ystemofs omedriving and driving
safety systems adjusts automaticall ywhile a
certai ndistance is being driven after the vehicle
ha sb eend elivere dorafter repairs. Full system
effectiveness is not reachedu ntilthe end of this
teach-inp rocedure.
New and replaced brake pads and discs only
reach their optimum braking effect after several hundred kilometers of driving. Compensate for
thi sb yapplyin ggreate rforce to the brake pedal.
The first 1000 miles (150 0km)
Them orey ou look after the engine when it is
new ,the mor esatisfied yo uwillbew ithi ts per-
formance in the future.
RYo us houl dtherefore drive at varying vehicle
and engine speeds for the first 1000 miles
(1500 km).
RAvoi dheavy loads, e.g .driving at full throttle,
during thi speriod.
RChang egearing oodt ime, befor ethe tach-
ometer needl eisÔ of the wa ytothe red area
of the tachometer.
RDo not manuall yshift to alower gear to brake
the vehicle.
RTry to avoi ddepressing the accelerator pedal
beyond the point of resistanc e(kickdown).
RIdeally ,for the first 1000 mile s(1500 km),
driv einp rogram E.
Addition al breaking-in note sfor Mercedes-AMG
vehicles:
RDo no tdrivef aster than 85 mph (14 0km/ h)
for th efirst 1,000 miles (1,500 km).
ROnly allow th eengine to reac hamaximum
engine speedof4 ,500 rpm briefly.
RChange gear in good time.
Afte r1,000 miles (1,500 km), you can increase
th ee ngine speedg radually and brin gthe vehicle
to full speed.
You shoulda lso observethese note sonbreak-
ing-in if th eengine or part softhedriv etrain on
your vehicle have been replaced.
Always observ ethe maximum permissible
speed.
Driving
Important safety notes
GWARNING
Object sinthedriver'sf ootwell can restrict the
pedal travel or obstruc tadepressedp edal.
The operatin gand road safety of th evehicle is
jeopardized. Thereisar isk of an accident.
Makes ure that all object sinthevehicle are
stowed correctly, and that they canno tenter
th ed river'sf ootwell. Install th efloormats
securely and as specified in orde rtoensure
sufficient clearance for th epedals.Don otuse
loosef loormats and do no tplace floormats on
to pofo neanother.
GWARNING
Unsuitable footwear can hinder correc tusage
of th epedals,e .g.:
Rshoesw ith thick soles
Rshoeswith high heels
Rslippers
Thereisar isk of an accident.
Wear suitable footwear to ensure correct
usage of th epedals.
GWARNING
If you switch off th eignition while driving,
safety-relevan tfunctionsa re only available
with limitations ,ornotat all. This coul daffect,
for example, th epower steering and th ebrake
boostin geffect .You will require considerably
moree ffort to steer and brake. Thereisar isk
of an accident.
Do no tswitch off th eignition while driving.
GWARNING
If th eparking brak ehas no tbeen fully
released when driving ,the parking brak ecan:
Roverheat and caus eafire
Rlose its hold function.
Thereisar isk of fireand an accident. Release
th ep arking brak efully before driving off.
Driving121
Driving and parking
Z
Page 125 of 326
operates independently of the ECO start/stop
automatic engine switch-off function.
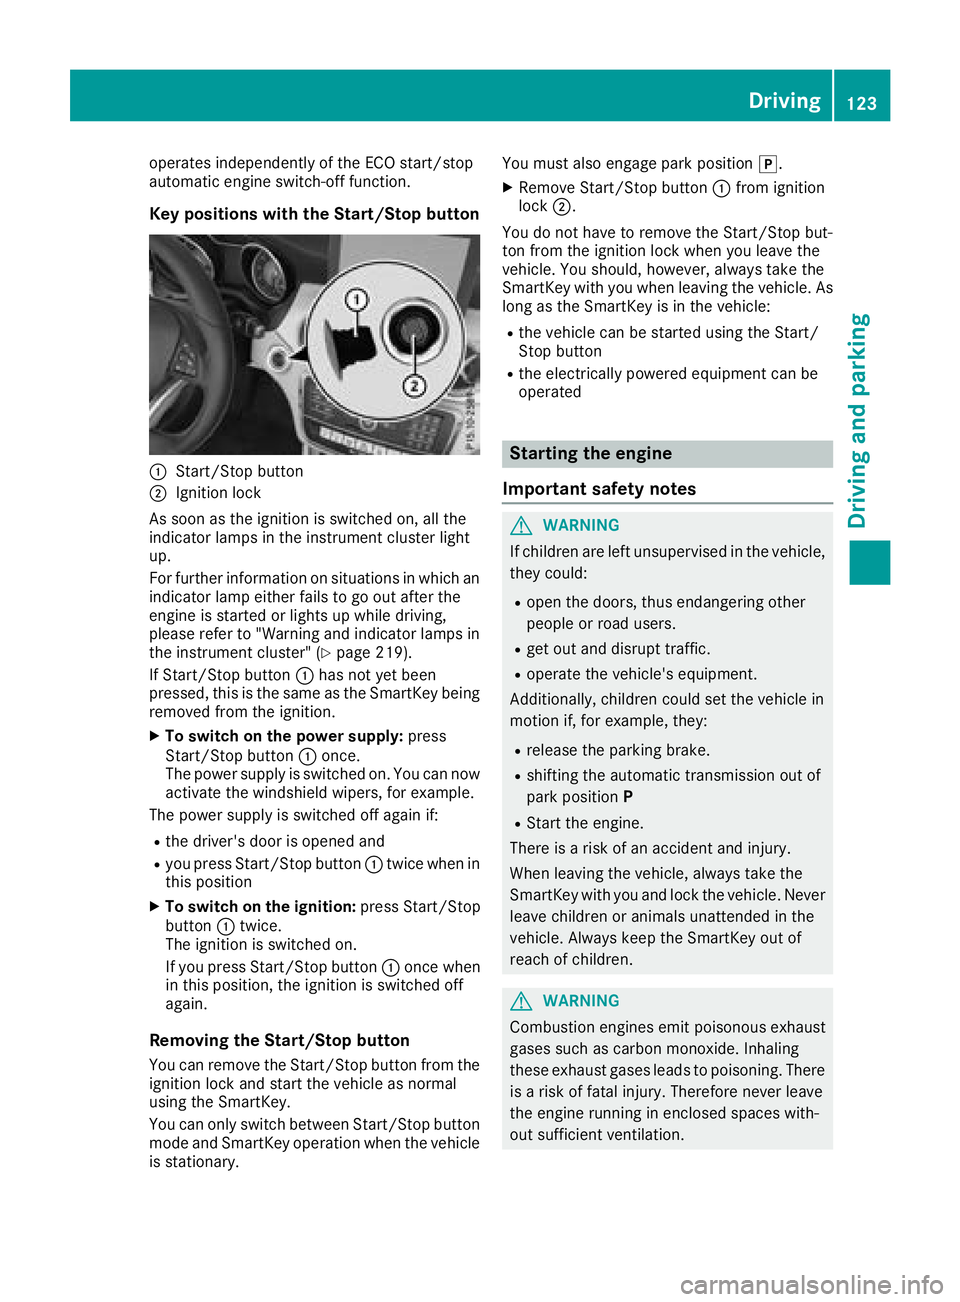
Key positions with the Start/Stop button
:Start/Stop button
;Ignition lock
As soon as the ignition is switched on, all the
indicator lamps in the instrument cluster light
up.
For further information on situations in which an indicator lamp either fails to go out after the
engine is started or lights up while driving,
please refer to "Warning and indicator lamps in
the instrument cluster" (
Ypage 219).
If Start/Stop button :has not yet been
pressed, this is the same as the SmartKey being
removed from the ignition.
XTo switch on the power supply: press
Start/Stop button :once.
The power supply is switched on. You can now
activate the windshield wipers, for example.
The power supply is switched off again if:
Rthe driver's door is opened and
Ryou press Start/Stop button :twice when in
this position
XTo switch on the ignition: press Start/Stop
button :twice.
The ignition is switched on.
If you press Start/Stop button :once when
in this position, the ignition is switched off
again.
Removing the Start/Stop button
You can remove the Start/Stop button from the ignition lock and start the vehicle as normal
using the SmartKey.
You can only switch between Start/Stop button
mode and SmartKey operation when the vehicle
is stationary. You must also engage park position
j.
XRemove Start/Stop button:from ignition
lock ;.
You do not have to remove the Start/Stop but-
ton from the ignition lock when you leave the
vehicle. You should, however, alwayst ake the
SmartKey with you when leaving the vehicle. As
long as the SmartKey is in the vehicle:
Rthe vehicle can be started using the Start/
Stop button
Rthe electrically powered equipment can be
operated
Starting the engine
Important safety notes
GWARNING
If children are left unsupervised in the vehicle,
they could:
Ropen the doors, thus endangering other
people or road users.
Rget out and disrupt traffic.
Roperate the vehicle's equipment.
Additionally, children could set the vehicle in
motion if, for example, they:
Rrelease the parking brake.
Rshifting the automatic transmission out of
park position P
RStart the engine.
There is arisk of an accident and injury.
When leaving the vehicle, alwayst ake the
SmartKey with you and lock the vehicle. Never
leave children or animals unattended in the
vehicle. Always keep the SmartKey out of
reach of children.
GWARNING
Combustion engines emit poisonous exhaust
gases such as carbon monoxide. Inhaling
these exhaust gases leads to poisoning. There
is ar isk of fatal injury. Therefore never leave
the engine runningine nclosed spaces with-
out sufficient ventilation.
Driving123
Driving and parking
Z
Page 126 of 326
GWARNING
Flammable materials introduced through
environmental influence or by animals can
ignite if in contact with the exhaust system or
parts of the engine that heatu p. There isarisk
of fire.
Carry out regular checks to make sure that
there are no flammable foreignm aterials in
the engine compartment or in the exhaust
system.
General notes
During acold start, the engine runs at higher
speeds to enabl ethe catalytic converter to
reach its operating temperature. The sound of
the engine may change during this time.
Automatic transmission
XShift the transmission to position j
(Ypage1 30).
The transmission position display in the mul-
tifunction display shows P(
Ypage1 30).
iYou can start the engine in transmission
position jand i.
Starting procedure with the SmartKey
To start the engine using the SmartKey instead
of the Start/Stop button, pul lthe Start/Stop
button out of the ignitio nlock.
XTurn the SmartKey to position 3in the igni-
tion lock (Ypage1 22) and release it as soon
as the engine is running.
Starting procedure with the Start/Stop
button
The Start/Stop button can be used to start the
vehiclem anually without inserting the SmartKey
into the ignitio nlock. The Start/Stop button
must be inserted in the ignitio nlock and the
SmartKey must be in the vehicle. This mode for
starting the engine operates independently of
the ECO start/stop automatic engine start func-
tion.
You can start the engine if avalidS martKey is in
the vehicle. Switch off the engine and always
take the SmartKey with you when leaving the vehicle, even if you only leave it for
ashort time.
Pay attention to the important safety notes.
XDepress the brake pedala nd keep it
depressed.
XPress the Start/Stop button once
(Ypag e122).
The engine starts.
Starting procedure via smartphone
Observe the important safety notes on starting
the engine (Ypag e123).
You can als ostart you rengine via you rsmart-
phone from outside the vehicle. In this case, the
previousl yselected climate control setting is
activated. In this way you can cool or heat the
interior of the vehicleb efore starting the jour-
ney.
Only start the engine via you rsmartphone if it is
safe to start and run the engine where you rvehi-
cle is parked.
Observe the legals tipulations in the area where
you rvehicleisp arked.Engine start via smart-
phone may be limited to certain countries or
regions.
You can execute amaximu moftwo consecutive
starting attempts via you rsmartphone. If you
insert the SmartKey into the ignitio nlock, you
can carry out two more starting attempts.
Once you have started the engine, you can
switch the engine off via you rsmartphone at any
time.
You can only start the engine via you rsmart-
phone if:
Rthe SmartKey is in the ignitio nlock
Rpark position jis selected
Rthe accelerator pedalisn ot depressed
Rthe anti-theft alarm system is not activated
Rthe panicalarm is not activated
Rthe hazard warning lamp sare switched off
Rthe hood is closed
Rthe doors are closed and locked
Rthe windows and sliding sunroof are closed
Also make sure that:
Rthe fuel tank is sufficiently filled
Rthe starter battery is sufficiently charged
GWARNING
Limbs coul dbecrushedortrappe difthe
engine is started unintentionally during ser-
124Driving
Driving and parking
Page 127 of 326
vice or maintenance work. There isarisk of
injury.
Always secure the engine against uninten-
tional starting before carrying out mainte-
nance or repair work.
Make sure that the engine cannot be started via
you rsmartphone before carrying out mainte-
nance or repairs. You can prevent an engine
start via you rsmartphone, for example, if you:
Rswitch on the hazard warning lamps
Rdo not lock the doors
Ropen the hood
Pulling away
General notes
GWARNING
If the engine speedisa bove the idling speed
and you engage transmission position Dor R,
the vehiclec ould pullawa ysuddenly.T here is
ar isk of an accident.
When engaging transmission position Dor R,
alway sfirmly depress the brake pedala nd do
not simultaneously accelerate.
Depress the accelerator carefully when pulling
away.
The vehiclel ocks centrally once you have pulled
away. The locking knobs in the doors drop down.
You can open the doors from the insid eatany
time.
You can als odeactivate the automatic locking
feature (
Ypag e187).
It is possible to shift the transmission from posi-
tion jto the desired position only if you
depress the brake pedal. Only then can the
parking lock be deactivated.
All vehicles (except Mercedes-AMG vehi-
cles): if you do not depress the brake pedal, the
DIRECT SELECT lever can still be moved but the parking lock remains engaged.
Mercedes-AMG vehicles: if you do not depress
the brake pedal, the selector lever can still be
moved but the parking lock remains engaged.
At transmission flui dtemperatures below Ò4‡
(Ò20†), you can only shift out of position jinto another transmission position when the engine
is running.
iUpshifts take place at highere
ngine speeds
after acold start. This helpst he catalytic con-
verter to reach its operating temperature
more quickly.
Information on the automatic release of the
electric parking brake (
Ypag e143).
Hill start assist
Hill start assist helpsy ou when pulling away
forward or in reverse on an uphill gradient. It
holdst he vehiclef oras hort time after you have
removed you rfoot from the brake pedal. This
gives you enoug htime to move you rfoot from
the brake pedaltot he accelerator pedala nd to
depress it before the vehicleb egins to roll.
GWARNING
After ashort time, hill start assist wil lnolon-
ger brake you rvehiclea nd it coul droll away.
There is arisk of an accident and injury.
Therefore, quickly move you rfoot from the
brake pedaltot he accelerator pedal. Never
leave the vehiclew hen it is held by hill start
assist.
Hill start assist is not active if:
Ryou are pulling awa yonalevel road or on a
downhill gradient.
Rthe transmission is in position i.
Rthe electric parking brake is applied.
RESP®is malfunctioning.
Further information on holding the vehicles ta-
tionary on uphill gradients (
Ypag e134).
ECOs tart/stop function
Introduction
The ECO start/stop function switches the
engine off automatically if the vehicleiss topped
under certain conditions.
The engine starts automatically when the driver
wants to pul lawa ya gain. The ECO start/stop
function thereby helpsy ou to reduce the fuel
consumptio nand emissions of you rvehicle.
Driving125
Driving and parking
Z