2018 MERCEDES-BENZ AMG GT ROADSTER key
[x] Cancel search: keyPage 116 of 409
Driving
St
arting theve hicle St
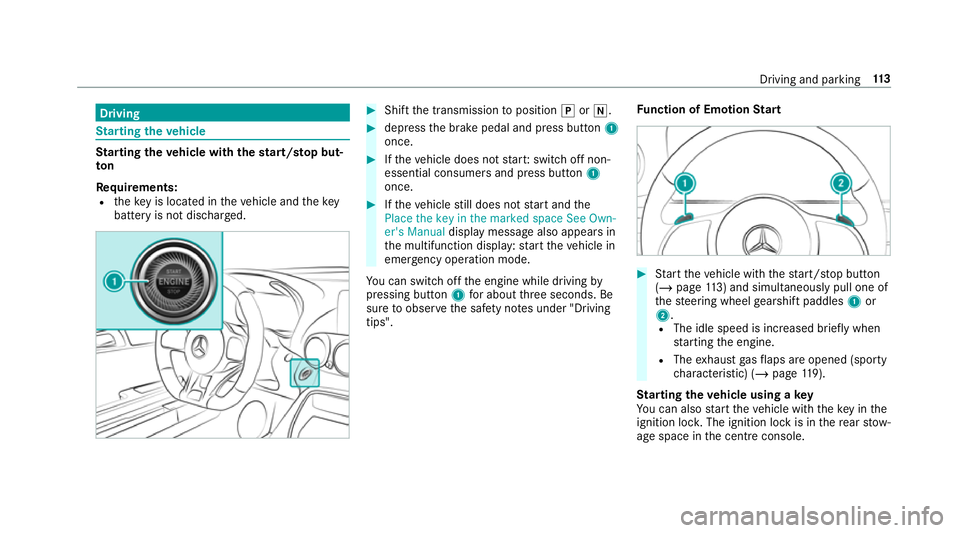
arting theve hicle with thest art/s top but‐
ton
Requ irements:
R theke y is located in theve hicle and thekey
battery is not dischar ged. #
Shift the transmission toposition jori. #
depress the brake pedal and press button 1
once. #
Ifth eve hicle does not star t:switch off non-
essential consumers and press button 1
once. #
Ifth eve hicle still does not start and the
Place the key in the marked space See Own-
er's Manual display message also appears in
th e multifunction display: start theve hicle in
emer gency operation mode.
Yo u can swit choff the engine while driving by
pressing button 1for about thre e seconds. Be
sure toobser vethe saf ety no tes under "Driving
tips". Fu
nction of Emotion Start #
Start theve hicle with thest art/ stop button
(/ page 113) and simultaneous ly pull one of
th esteering wheel gearshift paddles 1or
2.
R The idle speed is inc reased brief ly when
st arting the engine.
R The exhaust gasflaps are opened (spo rty
ch aracteristic) (/ page119).
St arting theve hicle using a key
Yo u can also start theve hicle with theke y in the
ignition loc k.The ignition lock is in there ar stow‐
age space in the cent reconsole. Driving and pa
rking 11 3
Page 117 of 409
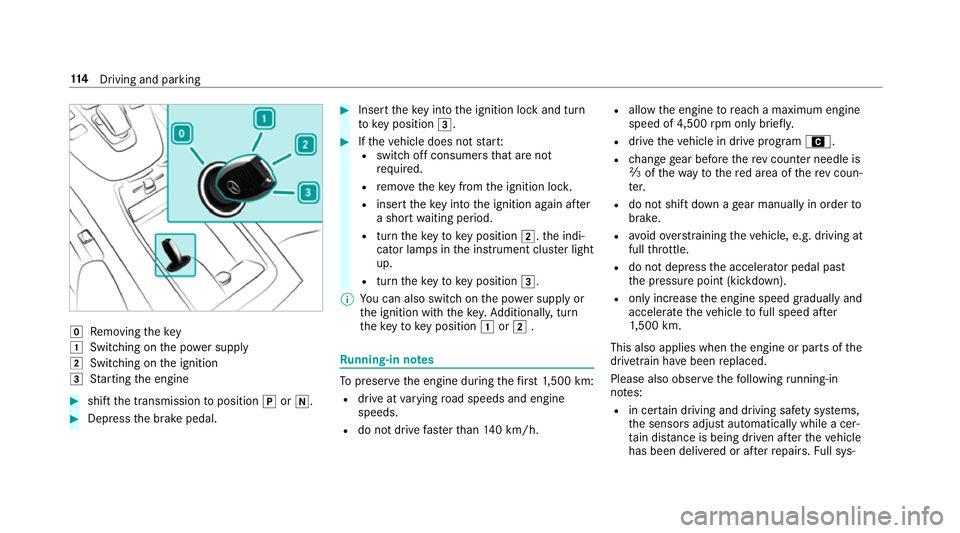
g
Removing thekey
1 Switching on the po wer supp ly
2 Switching on the ignition
3 Starting the engine #
shift the transmission toposition jori. #
Depress the brake pedal. #
Insert theke y in tothe ignition lock and turn
to key position 3. #
Ifth eve hicle does not star t:
R switch off consumers that are not
requ ired.
R remo vetheke y from the ignition loc k.
R inse rttheke y in tothe ignition again af ter
a short waiting period.
R turn theke yto key position 2.the indi‐
cator lamps in the instrument clus ter light
up.
R turn theke yto key position 3.
% You can also swit chon the po wer supp lyor
th e ignition with thekey. Additionall y,turn
th eke yto key position 1or2 . Ru
nning-in no tes To
preser vethe engine during thefirs t1, 500 km:
R drive at varying road speeds and engine
speeds.
R do not drive fasterthan 140 km/h. R
allow the engine toreach a maximum engine
speed of 4,500 rpm on ly brie fly.
R drive theve hicle in drive program A.
R change gear before there v counter needle is
Ô ofthewa yto there d area of there v coun‐
te r.
R do not shift down a gear manually in order to
brake.
R avoidove rstraining theve hicle, e.g. driving at
full thro ttle.
R do not depress the accelera tor pedal past
th e pressure point (kickdown).
R only increase the engine speed gradually and
accelera tetheve hicle tofull speed af ter
1, 500 km.
This also applies when the engine or parts of the
driv etra in ha vebeen replaced.
Please also obser vethefo llowing running-in
no tes:
R in cer tain driving and driving saf ety sy stems,
th e sensors adjust automatically while a cer‐
ta in dis tance is being driven af terth eve hicle
has been delivered or af terre pairs. Full sys‐ 11 4
Driving and pa rking
Page 135 of 409
Count
ryRadio equipment appr oval
number
Mexico RCPGEMU15-0448
Monaco CE
New Zea‐
land R-
NZ
Nor wayCE
Ru ssian
Fe dera‐
tion Not
requ ired
Saudi Ara‐
bia TA
10525
Switzer‐
land CE
South
Africa TA
-20 15/1386 Countr
yRadio equipment appr oval
number
Tu rkey Notrequ ired
Uni ted
Arab Emi‐
ra tes ER4
1849/15
Dealer No: DA35176/14
United
St ates FCC ID: NZLM
UAHL5 Fu
rther information on the declaration of con‐
fo rm ity for wireless vehicle components
(/ page 22). Electric parking brake
Electric parking brake function (applying
automatically) &
WARNING Risk of accident and inju ry
due tochildren left unat tended in the
ve hicle
If ch ildren are left unat tended in theve hicle,
th ey could:
R Open doo rs,th ereby endangering other
persons or road users.
R Get out and be stru ck byoncoming traf‐
fi c.
R Ope rate ve hicle equipment and become
trapped, forex ample.
In addition, thech ildren could also set the
ve hicle in motion, forex ample by:
R Releasing the parking brake.
R Changing the transmission position.
R Starting theve hicle. 13 2
Driving and pa rking
Page 136 of 409
#
Never lea vechildren unat tended in the
ve hicle. #
When leaving theve hicle, alw aysta ke
th eke y with you and lock theve hicle. #
Keep theve hicle key out of reach of
ch ildren. The elect
ric pa rking brake is applied if the trans‐
mission is in position jand one of thefo llow‐
ing conditions is fulfilled:
R The engine is switched off.
R The seat belt tongue is not inser ted in the
seat belt buckle of the driver's seat and the
driver's door is opened.
% Toprev ent application: pull the handle of the
electric parking brake.
In thefo llowing situations, the electric parking
brake is also applied:
R Active Dis tance Assi stDISTRONIC is bringing
th eve hicle toast andstill.
R The HOLD function is keeping theve hicle sta‐
tionar y. R
Active Parking Assist is keeping theve hicle
st ationar y.
This is the case if one of thefo llowing conditions
is also fulfilled:
R The engine is switched off.
R The seat belt tongue is not inser ted in the
seat belt buckle of the driver's seat and the
driver's door is opened.
R There is a sy stem malfunction.
R The po wer supply is insuf ficient.
R The vehicle is stationary for a lengt hyperiod.
When the electric parking brake is applied, the
re d! indicator lamp appears in the instru‐
ment clus ter.
The electric parking brake is not automatically
applied if the engine is switched off bythe ECO
st art/ stop function. Electric parking brake function (releasing
automatically)
The electric parking brake is released when the
fo llowing conditions are fulfilled:
R The engine is running.
R The seat belt tongue is inser ted into the seat
belt buckle of the driver's seat.
R The transmission is in position hork and
yo u depress the accelera tor pedal or you
shift from transmission position jtoh or
k.
If th e seat belt tongue is not inser ted into the
seat belt buckle of the driver's seat, thefo llow‐
ing conditions must be fulfilled:
R The driver's door is closed.
R You mo vethe transmission out of transmis‐
sion position joryou ha veprev iously
driven fasterthan 3 km/h.
When the electric parking brake is released, the
re d! indicator lamp in the instrument clus‐
te r goes out. Driving and parking
13 3
Page 137 of 409
App
lying/releasing the electric pa rking
brake manually
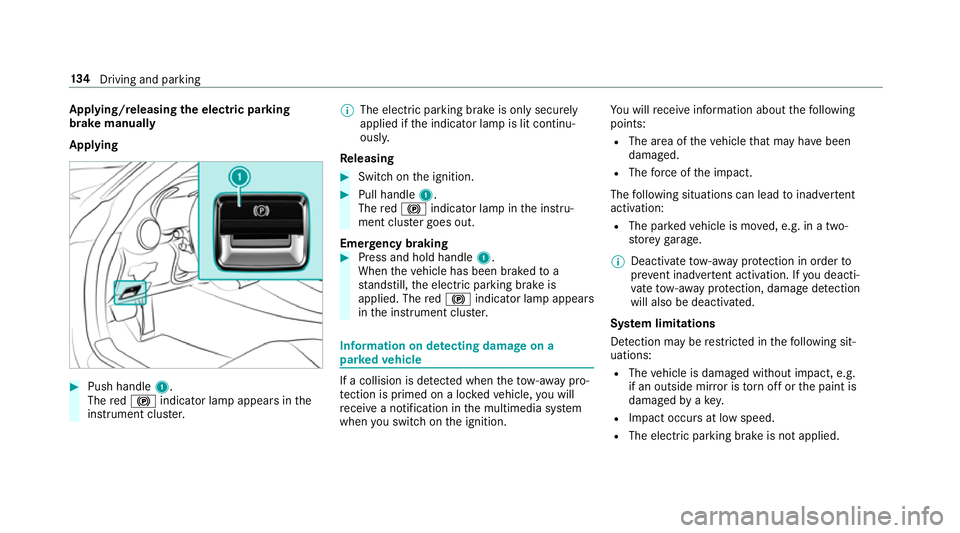
Applying #
Push handle 1.
The red! indicator lamp appears in the
instrument clus ter. %
The electric parking brake is only securely
applied if the indicator lamp is lit continu‐
ously.
Re leasing #
Swit chon the ignition. #
Pull handle 1.
The red! indicator lamp in the instru‐
ment clus ter goes out.
Emer gency braking #
Press and hold handle 1.
When theve hicle has been braked to a
st andstill, the electric parking brake is
applied. The red! indicator lamp appears
in the instrument clus ter. Information on de
tecting dama geon a
pa rked vehicle If a collision is de
tected when theto w- aw ay pro‐
te ction is primed on a loc kedve hicle, you will
re cei vea notification in the multimedia sy stem
when you swit chon the ignition. Yo
u will recei veinformation about thefo llowing
points:
R The area of theve hicle that may ha vebeen
damaged.
R The forc e of the impact.
The following situations can lead toinadver tent
acti vation:
R The pa rked vehicle is mo ved, e.g. in a two-
st or ey garage.
% Deactivate tow- aw ay protection in order to
pr eve nt inadver tent acti vation. If you deacti‐
va te tow- aw ay protection, damage de tection
will also be deactivated.
Sy stem limitations
De tection may be restricted in thefo llowing sit‐
uations:
R The vehicle is damaged without impact, e.g.
if an outside mir ror is torn off or the paint is
damaged byakey.
R Impact occurs at low speed.
R The electric parking brake is not applied. 134
Driving and pa rking
Page 192 of 409
Wi
-Fi Wi
-Fi connection overview
Yo u can use Wi-Fi toestablish a connection with
a Wi -Fi network and toaccess the Internet or
ot her network devices.
The following connection options are available:
R Wi-Fi connection
The Wi-Fi connection toaWi -Fi-capable
device, e.g. the cus tomer's mobile phone or
a ta blet PC is es tablished.
R Multimedia sy stem as a Wi-Fi hotspot
Using this function, a tablet PC or no tebook
can be connec ted, forex ample.
To establish a connection, you can use thefo l‐
lowing me thods:
R WPS PIN
The connection toa secure Wi-Fi network is
made via a PIN.
R WPS PBC
The connection toa secure Wi-Fi network is
made bypressing a button (push button).
R Security key The connection
toa secure Wi-Fi network is
made via a secu rity key.
Setting up Wi-Fi
Requ irements:
R The device tobe connec ted supports one of
th eth re e means of connection described
(/ page 189).
Multimedia sy stem:
4 System 5
ö Connectivity
Ac tivating/deactivating Wi-Fi #
Switch Wi-FionO or off ª.
If Wi-Fi is deactivated ª, communication via
Wi -Fi toall devices is inter rupte d. This also
means that a connection tothe HERMES
communication module cann otbe es tab‐
lished. Then functions such as dynamic route
guidance with Live Traf fic Information are not
av ailable.
Connecting the multimedia sy stem with a
device via Wi-Fi
This function is available if a HERMES communi‐
cation module is not ins talled. The type of connection es
tablished must be
selected on the multimedia sy stem and on the
device tobe connec ted.
% The connection procedure may dif fer
depending on the device. Follow the instruc‐
tions that are shown in the displa y.Fu rther
information (see the manufacturer's operat‐
ing instructions). #
Select Internet settings . #
Select Search for Wi-Fi networks.
Using a security key #
Select a Wi-Fi network in the list. #
Have the security key displa yed on the device
to be connec ted (see the manufacturer's
operating instructions). #
Ente rth is security key on the multimedia sys‐
te m. #
Confirm the entry with¡.
% All devices support a security key as a
means of connection. Multimedia sy
stem 18 9
Page 193 of 409
Using a WPS PIN
#
Highlight a Wi-Fi network in the list. #
Select ¥Connect using WPS PIN input.
The multimedia sy stem generates an eight-
digit PIN. #
Enter this PIN on the device tobe connec ted. #
Confirm the entry.
Using a button
% This function is only available in a Wi-Fi fre‐
qu ency of 2.4 GHz. #
Highlight a Wi-Fi network in the list. #
Select ¥Connect via WPS PBC. #
Select "Connect via WPS PBC" in the options
on the device tobe connec ted. #
Press the WPS button on the device tobe
connec ted. #
Select Continue inthe multimedia sy stem.
Device has already been connected: #
Toautomatically connect: highlight aWi-Fi
network in the list. #
Activate ¥ Connect automaticallyO. #
Toconnect: highlight a Wi-Fi network in the
list. #
Select ¥Connect.
The connection is es tablished again. These
functions are possible when the device has
already been connected totheWi -Fi networ k.
Setting up a Wi-Fi hotspot
Re quirement:
R The vehicle is equipped for business teleph‐
ony
Multimedia sy stem:
4 System 5
ö Connectivity
Configuring the multimedia sy stem as a Wi-
Fi hotspot
The type of connection es tablished depends on
th e device tobe connec ted. The function must
be suppor tedby the multimedia sy stem and by
th e device tobe connec ted. The type of connec‐
tion es tablished must be selected on the multi‐
media sy stem and on the device tobe connec‐
te d. #
Select Set up hotspot. #
Highlight Connect device to vehicle hotspot. #
Togenerate a WPS PIN: select¥Con-
nect using WPS PIN generation. #
Ente rth e PIN shown in the media display on
th e device tobe connec ted and con firm. #
Connect via WPS PIN: select¥Con-
nect using WPS PIN input. #
Select Enter WPS PIN. #
Enterth e PIN that is shown on theex tern al
device's display on the multimedia sy stem. #
Select Continue. #
Toconnect bypressing a button: select
¥ Connect via WPS PBC . #
Press the push button on the device tobe
connec ted. #
Select Continue. #
Toconnect via a security key:select Con-
nect device to vehicle hotspot.
A security key is displa yed. 19 0
Multimedia sy stem
Page 194 of 409
#
Select theve hicle from the device tobe con‐
nec ted. The vehicle is displa yed with the
SSID MB Hotspot XXXXX .#
Enter the security key which is shown in the
media display on the device tobe connec ted. #
Confirm the entry.
Genera ting a new security key: #
Select Set up hotspot . #
Select Generate security key .
A connection will be es tablished with the
newly crea ted security key. #
Tosave a security key:select Save.
When a new security key is sa ved, all existing
Wi -Fi connections are then disconnected. If
th eWi -Fi connections are being re-es tab‐
lished, the new security key must be en tere d. Sy
stem language Note
s onthe sy stem language
This function allo wsyouto determ ine the lan‐
guage forth e menu displa ys. The selected lan‐
guage af fects thech aracters available for entr y. Setting
the sy stem language
Multimedia sy stem:
4 System 5
Language #
Set the language. Setting
the distance unit Multimedia sy
stem:
4 System 5
% Units #
Select kmormi. #
Inthe multifunction display of the Instrument
Displa y,switch theAdditional speedometer
display on O. Data import and
export Data import/export function
The
following functions are possible:
R Trans ferring data from one sy stem or vehicle
to ano ther sy stem or vehicle.
R Creating a bac kup copy of your personal data
and loading it again. R
Protecting your personal data against un wan‐
te dex port with PIN pr otection.
% Please no tethat the NTFS file sy stem is not
suppor ted. The FAT32 file sy stem is recom‐
mended.
Importing/exporting data
* NO
TELoss of da tadue topremature
re mo val #
Do not remo vethe data storage
medium when data is being expor ted.
Mercedes-Benz is not liable for any loss of
data. Re
quirements:
R The vehicle is stationar y.
R The ignition is switched on or theve hicle has
been star ted.
R The SD card is inser ted (/ page 232) or the
USB device is connecte d (/page 235). Multimedia sy
stem 191