Page 161 of 174

RMP3/AAC
RMedia Interface
RBluetooth®audio mode
iFor the best sound, CD or the WAV audio
format is recommended. For data-reduced
media, the AAC")
RVideo DVD (PCM, DTS®and Dolby®Digital
audio formats)
RMP3/AAC
RMedia Interface
RBluetooth®audio mode
iFor the best sound, CD or the WAV audio
format is recommended. For data-reduced
media, the AAC audio format with a data rate
of 320 kbit/s is recommended.
Calling up the sound menu
You can make various sound settings for the
different audio and video sources. It is possible
to set more bass for radio mode than for CD
mode, for example. The respective sound menu
is called up from the menu of the desired mode.
XSwitch to radio mode (Ypage 128).
or
XSwitch to media mode (Ypage 136).
XTo switch to the menu bar: slide 6the con-
troller.
XTo select à: turn and press the controller.
The menu appears with the last setting
accessed, e.g. Equalizer
.
Overview of Burmester
®surround sound sys-
tem
FunctionOptions
EqualizerSets treble, mid-
range and bass
BalanceAdjusts the volume:
left/right
SurroundOptimizes spatial
composition for all
seats
Setting treble, mid-range and bass
XCall up the sound menu (Ypage 159).
XTurn the controller until Equalizeris in the
center.
XSlide 6the controller.
The rotary menus for treble, mid-range and
bass are activated.
XTo switch between the rotary menus: slide
8 or9 the controller.
XTo make the desired Equalizersettings: turn
the controller.
The rotary menus show the set values.
XTo return to the sound menu: slide 5the
controller.
XTo return to media mode: press the %but-
ton.
Setting the balance
Balance adjusts the volume left and right. For
the best sound, setting 0 is recommended.
XCall up the sound menu (Ypage 159).
XTurn the controller until Balanceis brought to
the front and then slide 6the controller.
XTo activate the menu for balance: press the
controller.
XTo adjust the balance: slide 8or9 the
controller.
An image shows the sound focus set.
XTo return to the sound menu: press the %
button.
XTo return to media mode: press the %but-
ton.
Setting surround sound
The Surroundsetting enables a wide-ranging
sound playback.
Activating/deactivating
XCall up the sound menu (Ypage 159).
XTurn the controller until Surroundis in the
center.
XSlide 6the controller.
The left-hand rotary menu to switch surround
sound on and off is activated.
XTo switch on Surround: turn the controller.
XTo exit the menu: press the %button.
Burmester®high-end surround sound
system
General notes
The Burmester®high-end 3D surround sound
system is available for all functions in the radio
and media modes.
Burmester®high-end surround sound system159
Sound
Page 162 of 174

The Burmester®high-end surround sound sys-
tem has a total output of 1000 watts and is
equipped with 11 loudspeakers.
For the best sound, we recommend that the
Automatic Volume Adjustment
function is
deactivated (Ypage 38). For further information
on automatic volume adjustment, see
(
Ypage 38).
If using Bluetooth®audio mode, we recommend
you select the Boostsetting (Ypage 149).
The following modes are available for the
Burmester
®high-end surround sound system:
RRadio
RSatellite radio
RAudio CD
RAudio DVD (MLP, PCM DTS®and Dolby®Dig-
ital audio formats)
RVideo DVD (PCM, DTS®and Dolby®Digital
audio formats)
RMP3/AAC
RMedia Interface
RBluetooth®audio mode
iFor the best sound, CD or the WAV audio
format is recommended. For data-reduced
media, the AAC audio format with a data rate
of 320 kbit/s is recommended.
Calling up the sound menu
You can select different sound settings in radio mode and other media modes. It is possible to
set more bass for radio mode than for CD mode,
for example. The respective sound menu can be
called up from the menu bar of the desired
mode.
XSwitch to radio mode (Ypage 128).
or
XSwitch to media mode (Ypage 136).
XTo switch to the menu bar: slide 6the con-
troller.
XTo select à: turn and press the controller.
The menu appears with the last setting
accessed, e.g. Sound Profile
. Overview of Burmester
®high-end surround
sound system
FunctionOptions
EqualizerSets treble, mid-
range and bass
BalanceAdjusts the volume:
left/right
VIP & BAL selectionOptimizes sound
playback for individ-
ual seats
Sound profileFour defined sound
settings: Pure/
Easy Listening/
Live/ Surround
Setting treble, mid-range and bass
XCall up the sound menu (Ypage 160).
XTurn the controller until Equalizeris in the
center.
XSlide 6the controller.
Rotary menus for treble, mid-range and bass
are activated.
XTo switch between the rotary menus: slide
8 or9 the controller.
XTo make the desired Equalizersettings: turn
the controller.
Rotary menus show the set values.
XTo return to the sound menu: slide 5the
controller.
XTo return to media mode: press the %but-
ton.
Setting the balance
Balance adjusts the volume left and right. For
the best sound, setting 0 is recommended.
XCall up the sound menu (Ypage 160).
XTurn the controller until Balanceis in the
center and slide 6.
XTo activate the menu for balance: press the
controller.
XTo adjust the balance: slide 8or9 the
controller.
An image shows the sound focus set.
160Burmester®high-end surround sound system
Sound
Page 163 of 174

XTo return to the sound menu: press the%
button.
XTo return to media mode: press the %but-
ton.
VIP & BAL selection
For the best sound, the specific seats will need
to be set.
XCall up the sound menu (Ypage 160).
XTurn the controller until VIP & BAL Selec‐tionis in the center and slide 6.
XTo set the desiredVIP & BAL Selection:
turn the controller.
The segment, text and image show the selec-
ted setting.
XTo return to the sound menu: slide 5the
controller.
XTo return to media mode: press the %but-
ton.
Setting the sound profile
Under Sound Profileyou can select from var-
ious predefined sound settings.
Sound profile for
high-end sound sys-
temDescription
PureAudiophile audio
playback without
additional effects
Easy ListeningSubtly mellowed
acoustics for laid-
back listening over
long periods
LiveSpectacular sound
settings with live-per-
formance character-
istics
SurroundEnhanced surround
sound for mono and
stereo recordings
XCall up the sound menu (Ypage 160).
XTurn the controller until Sound Profileis in
the center.
XSlide 6the controller.
The rotary menu to select the sound profile is
activated.
XTo select SoundProfile: turn the controller
until the desired sound profile is activated.
XTo return to the sound menu: slide 5the
controller.
XTo return to media mode: press the %but-
ton.
Burmester®high-end surround sound system161
Sound
Page 164 of 174

Your multimediasyste mequipment
These operatin ginstruction sdescribe all th e
standar dan doptional equipment of your multi-
media system, as available at th etime of going
to press. Country-specifi cdifference sare pos -
sible. Bear in min dthat your vehicle may no t
feature all function sdescribed here. Thi salso
applies to safety-relevan tsystems an dfunc-
tions.
Read th einformation on qualifie dspecialis t
workshop sin th evehicle Operator's Manual.
Weather forecasts
Introduction
Thi sfunction is currentl yno tavailable fo rCan -
ada.
Fo rth ereception of weather forecast svia sat -
ellite radio, you will need aSIRIU SXM Satellite
Weather subscription .
If th emessag eappears alon gwit hth eSIRIU S
telephon ean dID numbers, you will need to hav e
th eweather servic eactivated first .
XTo selectCal lorCancel:turn an dpress th e
controller .
If amobile phone is connecte dto th emulti-
media syste m (
Ypage 90), when you selec t
Cal lacal lis placed to amember of th eSIR-
IU Sservic estaff .The ID number of th eSIRIU S
devic ewill be transferred to th etelephon e
display.
XThi swill be followed by instruction sfrom th e
servic eemployee.
Weather forecast scan be received via th esat -
ellite radio fo rth eUS A(includin gAlask aan d
Hawaii).
The received weather dat acan be displaye das
an information chart (dail yforecast ,five-day
forecast ,detailed information )or on th e
weather map .
The weather dat areceived from th eweather
station is stored fo ron ehour in th emultimedia
system. It can therefore be displaye dagain
immediately after restartin gth eengin e(fo r
example after refueling). Dependin
gon whic hscale has bee nselected,
th eweather map can display th efollowin g
weather dat awit hsymbols :
Rrain radar
Rstormcharacteristics
Rhig han dlow-pressure areas, weather fronts
Rcours eof tropical cyclones (hurricanes,
typhoons )
Rstormwarnings
Rwin ddirection an dspeeds
iThe rain radar canno tbe displaye dfo r
Alaska, Hawaii an dPuerto Rico.
iHurricane: term used to describe th etropi-
cal cyclones that primarily develo pin th e
At lantic, No
rth Pacifi
can dSout hPacifi c
oceans. Awin dspeeds are abov e74 mph
(11 8km/h). Five categorie sare used to clas-
sif yth estrengt hof ahurricane.
Typhoon :term used to describe atropical
cyclon ethat develops in th enorthwestern
Pacific. The win dspeeds are in th ecategory of
a hurricane.
Switching th eSIRIUS Weather display
on/of f
Activating
XTo show th emain function bar: slide5
th econtroller .
XTo select® :turn an dpress th econtroller .
The men ufo rselecting Internet application s
appears .
XTo selec tSIRIUS Weathe r,turn an dpress
th econtroller .
The information chart shows th edaily fore-
cas tat th ecurren tvehicle position .
162Weather forecasts
SIRIUS Weather
Page 165 of 174
 and a forecast for the
next three, six an")
You see the following information:
Rthe date and time of the weather message
received last
Rinformation on the current weather (temper-
ature, cloud coverage) and a forecast for the
next three, six and twelve hours
Rthe current highest temperature and fore-
casts
Rthe current lowest temperature and forecasts
Rthe probability of rain
Switching to the 5-day forecast:
XTo select Current: turn and press the con-
troller.
A menu appears.
XSelect 5-Day.
The information chart displays the forecast
for the next five days in the currently selected
location.
Returning to the current-day forecast:
XTo select 5-Day: turn and press the controller.
A menu appears.
XSelect Current.
The information chart shows the forecast for
the current day again.
Deactivating
XPress %.
Displaying detailed information
Besides the current temperatures, you can dis-
play information such as wind speeds and UV
index.
XTo select Currentor5-Dayin the current-day
or 5-day forecast: turn and press the control-
ler.
A menu appears.
XSelect Info.
The information chart shows detailed infor-
mation for the selected area.
Selecting the area for the weather
forecast
Introduction
You can select the weather forecasts for:
Rthe current vehicle position
Rthe vicinity of the destination
Ra winter sports area
Ran area within the USA
You can select a location in the information
chart (option 1) or in the map (option 2). You can
store frequently selected locations in the mem-
ory (
Ypage 165).
iThe data for the weather forecasts is
received from the weather station nearest to
the selected location.
Weather forecasts163
SIRIUS Weather
Page 166 of 174

Option 1: selecting the area in the infor-
mation chart
XTo selectTownin the information chart: turn
and press the controller.
XTo select the current vehicle position:
select Current Position
from the menu.
The weather data for the current vehicle posi-
tion is received from the nearest weather sta-
tion and automatically displayed.
Requirement for "Near destination": a route to a
destination has been calculated (
Ypage 54).
The menu item is otherwise grayed out.
XTo select the vicinity of the destination:
select Near Destination
from the menu:
turn the controller and press to confirm.
XTo select a winter sports area: selectAt
Ski Areafrom the menu: turn the controller
and press to confirm.
XSelect a state, e.g. Colorado.
XSelect a winter sports area from the menu.
The weather data and other information is
displayed for the winter sports area that has
been selected. The data is supplied by the
nearest weather station.
The information chart shows the following infor-
mation (if available):
Rski slopes/ski lifts
Rsnowboarding and nighttime opening
Rsnow conditions (e.g. snow depth)
Rtemperature
The status of a facility is indicated as follows:
Rgreen check mark - open
Rred cross - closed
Rquestion mark - not known
Example: city list with character bar
Entry limitation: searching for a location using
the character bar is not possible while driving.
XTo search for a location: selectSearch
Areas: turn and press the controller.
XSelect Other StatesorCurrent State(ABC).
Depending on the selection, the list of states
or cities will appear with the character bar.
You can limit the search using the character
bar.
XTo select state/province or city: enter the
first few letters by turning and pressing the
controller.
XTo switch to the list without the character bar:
slide 5the controller or select ¬.
XTo cancel an entry: highlightin the
character bar and press the controller.
Pressing briefly deletes the last letter
entered.
Pressing and holding longer deletes the entire
entry.
XTo select the state/province or city from the
list: turn and press the controller.
After selecting a state (or province) the list of
locations appears.
After selecting a location, the information
chart displays the weather forecast for the
164Weather forecasts
SIRIUS Weather
Page 167 of 174
.
XMove the weather map so that the crosshai")
selected location. The data is supplied by the
nearest weather station.
Option 2: selecting the area in the
weather map
XCall up the weather map (Ypage 165).
XMove the weather map so that the crosshair is
over the desired area (Ypage 165).
XPress the controller.
The information chart shows the weather
forecast for the selected area. The data is
supplied by the nearest weather station.
Memory functions
Storing the area in the weather memory
You can save locations that are called up fre-
quently in ten preset positions (0, 1-9) in the
weather memory.
XIn the weather memory: select the area for
the weather forecast (Ypage 163).
The selected location appears at the top in the status bar.
XTo select Townin the information chart: turn
and press the controller.
XSelect Presets.
XSelect a preset using the controller.
XPress and hold the controller until you hear a
tone.
The area is entered on the selected preset.
Selecting an area from the weather
memory
XDirectly from the weather memory: select
Town
from the information chart: turn and
press the controller.
XSelect Presets.
XSelect the memory position which contains
the location you require.
The weather data for the selected area is dis-
played.
Weather map
Calling up the weather map
XTo select Mapin the information chart: turn
and press the controller.
The weather map is shown on a 500-mi (500-
km) scale. The crosshair highlights the
weather station that supplies the current
weather data.
Moving the weather map
XSlide 4 or1 the controller.
The weather map moves in the corresponding
direction under the crosshair.
Changing the scale
XTurn the controller.
The scale bar appears.
XTurn until the desired scale is set.
Showing/hiding the menu in the
weather map
XTo show: press the controller.
XTo hide:slide5the controller.
Selecting a weather station in the map
XMove the weather map and crosshair to the
desired position (Ypage 165).
XTo show the menu: press the controller.
XTo select Weather Table: press the control-
ler.
The weather data for the selected position is
received from the nearest weather station
and automatically displayed as a current-day
forecast.
Weather forecasts165
SIRIUS Weather
Page 168 of 174

Switching layers on the map on/off
You can switch on different layers, for example
to display the rain radar, weather fronts and the
course of tropical storms on the map.
XDisplay the menu on the weather map
(Ypage 165).
XTo selectView: turn and press the controller.
XSelect a layer.
Switch the display on Oor off ª.
Explanation of the layers on the
weather map
RMenu item Radar Map
Displays the rain radar as a colored area in all
map scales. For an explanation of the colors,
see the legend (
Ypage 168).
RMenu item Storm Characteristics
Displays the characteristics of a storm in all
map scales:
-tornadic storm:
storm cell with strong winds (super cell),
from which a tornado can develop. Torna-
does are also known as twisters.
-cyclone:
storm cells from which a tornadic storm
can develop
-hailstorm
-the likelihood of a hailstorm
RStorm watch areas
Shows areas for which storm advisories have
been issued (red areas). It is shown in map
scales 50 mi (50 km), 200 mi (200 km) and
500 mi (500 km).
RMenu itemAtmospheric Pressure
Shows the position of high and low-pressure
areas (H, L), weather fronts and isobars It is
shown in map scales 200 mi (200 km) and
500 mi (500 km).
RMenu itemTropical Storm Tracking
Shows the direction and speed of propagation
(track) of a tropical storm in all map scales
with information on times and intensity.
RMenu itemWinds
shows the wind direction and wind speed in
map scale of 5 mi (5 km).
Sample displays of weather data in the
map
Displaying the rain radar:
XActivate the Radar Mapdisplay level
(Ypage 166).
The rain radar image is then displayed if
weather data is available.
iYou can call up the legend for the precipita-
tion radar (Ypage 168).
The transparency of the precipitation radar
map display level can be adjusted in five
stages.
Displaying storm characteristics:
XActivate the Storm Characteristicsdis-
play level (Ypage 166).
If weather data is available, the weather map
will then display the storm characteristics.
You can call up the legend for storms
(
Ypage 168).
The following information on a storm cell is
displayed (if available):
Rcharacteristics of the storm cell
Rdate and time of observation (time stamp)
Rdirectional movement speed and path
Propagation speed: the speed at which the
storm cell is advancing.
166Weather forecasts
SIRIUS Weather
 1
1 2
2 3
3 4
4 5
5 6
6 7
7 8
8 9
9 10
10 11
11 12
12 13
13 14
14 15
15 16
16 17
17 18
18 19
19 20
20 21
21 22
22 23
23 24
24 25
25 26
26 27
27 28
28 29
29 30
30 31
31 32
32 33
33 34
34 35
35 36
36 37
37 38
38 39
39 40
40 41
41 42
42 43
43 44
44 45
45 46
46 47
47 48
48 49
49 50
50 51
51 52
52 53
53 54
54 55
55 56
56 57
57 58
58 59
59 60
60 61
61 62
62 63
63 64
64 65
65 66
66 67
67 68
68 69
69 70
70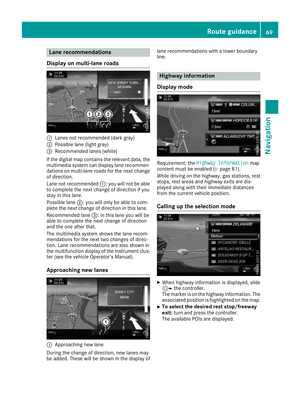 71
71 72
72 73
73 74
74 75
75 76
76 77
77 78
78 79
79 80
80 81
81 82
82 83
83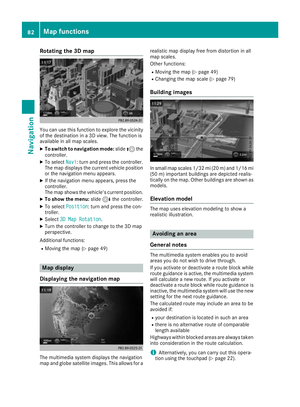 84
84 85
85 86
86 87
87 88
88 89
89 90
90 91
91 92
92 93
93 94
94 95
95 96
96 97
97 98
98 99
99 100
100 101
101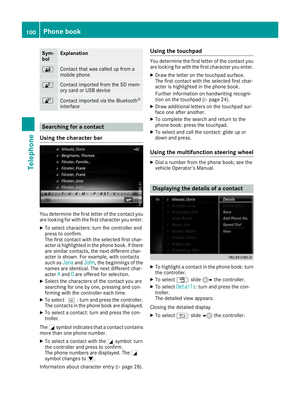 102
102 103
103 104
104 105
105 106
106 107
107 108
108 109
109 110
110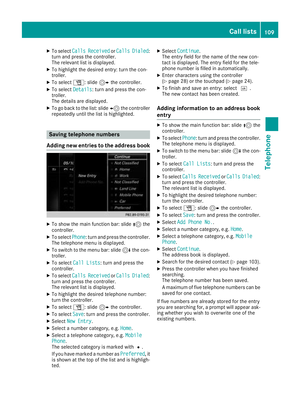 111
111 112
112 113
113 114
114 115
115 116
116 117
117 118
118 119
119 120
120 121
121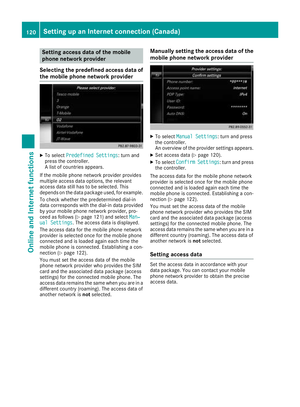 122
122 123
123 124
124 125
125 126
126 127
127 128
128 129
129 130
130 131
131 132
132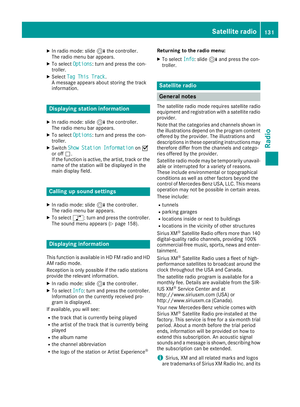 133
133 134
134 135
135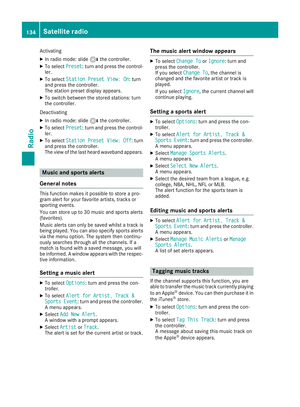 136
136 137
137 138
138 139
139 140
140 141
141 142
142 143
143 144
144 145
145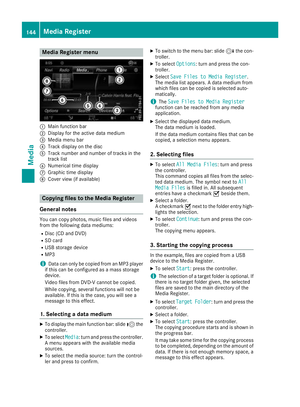 146
146 147
147 148
148 149
149 150
150 151
151 152
152 153
153 154
154 155
155 156
156 157
157 158
158 159
159 160
160 161
161 162
162 163
163 164
164 165
165 166
166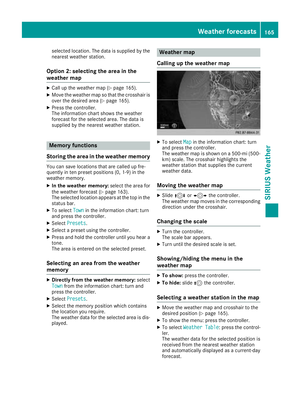 167
167 168
168 169
169 170
170 171
171 172
172 173
173