2018 MERCEDES-BENZ AMG GT COUPE run flat
[x] Cancel search: run flatPage 12 of 294

Emergency Tensioning DevicesActivation ........................................ .51
Emergency unlocking
Tailgate ............................................ 75
Emissions control
Service and warranty information .... 25
Engine
Check Engine warning lamp .......... .199
Display message ............................ 181
ECO start/stop function ................ 108
Engine number ............................... 283
Irregular running ............................ 110
Jump-starting ................................. 251
Starting problems .......................... 110
Starting the engine with the
SmartKey ....................................... 107
Starting with the Start/Stop but-
ton ................................................. 107
Switching off .................................. 123
Tow-starting (vehicle) ..................... 256
Engine electronics
Notes ............................................. 282
Problem (malfunction) ................... 110
Engine oil
Adding ...........................................2 35
Additives ........................................ 286
Checking the oil level ..................... 233
Checking the oil level using the
dipstick .......................................... 233
Checking the oil level using the
on-board computer ........................ 234
Display message ............................ 182
Filling capacity ............................... 286
Notes about oil grades ................... 286
Notes on oil level/consumption .... 233
Temperature (on-board com-
puter) ............................................. 165
Engine oil additives
see Additives (engine oil)
Entering an address
see also Digital Operator's Man-
ual ..................................................2 04
ESC (Electronic Stability Control)
see ESP
®(Electronic Stability Program)
ESP®(Electronic Stability Pro-
gram)
AMG menu (on-board computer) ... 166
Characteristics ....... .......................... 61 Dea
ctivating/activating ................... 61
Deactivating/activating (button
in AMG vehicles) .............................. 62
Display message ............................ 170
Function/notes ................................ 61
General notes .................................. 61
Important safety information ........... 61
Warning lamp ................................. 196
ETS (Electronic Traction System) ....... 61
Exhaust check ................................... 126
Exhaust pipe (cleaning instruc-
tions) ..................................................2 42
Exterior lighting
Cleaning ......................................... 242
see Lights
Exterior mirror
Calling up a stored setting (mem-
ory function) ....................................9 0
Exterior mirrors
Adjusting ........................................ .87
Dipping (automatic) .........................8 8
Folding in/out (automatically) ......... 87
Folding in/out (electrically) ............. 87
Out of position (troubleshooting) ..... 88
Setting ............................................. 87
Storing settings (memory func-
tion) ................................................. 89
Storing the parking position ............. 88
F
Favorites
Overview ........................................ 207
Features ............................................. 216
Filler cap
see Refueling
Flat tire
Changing a wheel/mounting the
spare wheel ................................... 276
Preparing the vehicle ..................... 246
TIREFIT kit ...................................... 247
Floormats ........................................... 231
Frequencies
Mobile phone ................................. 282
Two-way radio ................................ 282
Front-passenger seat
see Seat
10Index
Page 22 of 294
Replacing...................................... .276
Service life ..................................... 259
Sidewall (definition) ....................... 275
Speed rating (definition) ................ 275
Storing ...........................................2 77
Structure and characteristics
(definition) ..................................... 274
Summer tires in winter .................. 260
Temperature .................................. 270
TIN (Tire Identification Number)
(definition) ..................................... 276
Tire bead (definition) ......................2 75
Tire pressure (definition) ................ 275
Tire pressures (recommended) ...... 274
Tire size (data) ............................... 280
Tire size designation, load-bearing
capacity, speed rating .................... 271
Tire tread ....................................... 259
Tire tread (definition) ..................... 275
Total load limit (definition) ............. 276
Traction ......................................... 270
Traction (definition) ....................... 276
Tread wear ..................................... 270
Uniform Tire Quality Grading
Standards ...................................... 269
Uniform Tire Quality Grading
Standards (definition) .................... 274
Wear indicator (definition) ............. 276
Wheel and tire combination ........... 280
Wheel rim (definition) .................... 274
see Flat tire
Tool
see Vehicle tool kit
Touchpad
Changing the station/music
track .............................................. 207
Character suggestions ................... 206
Deleting characters ....................... 206
Entering a space ............................ 206
Entering characters ....................... 206
Gesture control .............................. 206
Handwriting recognition ................ 206
Operating the touchpad ................. 206
Overview ........................................ 206
Quick access for Audio .................. 207
Switching ....................................... 206
Switching input line ....................... 206 Tow-starting
Emergency engine starting ............ 256
To
wing away
Important safety guidelines ........... 254
Installing the towing eye ................ 255
Removing the towing eye ............... 255
Transporting the vehicle ................ 256
With both axles on the ground ....... 255
Towing eye ......................................... 245
Traction system
see ETS (Electronic Traction System)
Traffic reports
see also Digital Operator's Man-
ual .................................................. 204
Transmission
Driving tips .................................... 115
Selector lever ................................ 112
see Automatic transmission
Transmission position display ......... 114
Transmission positions
General notes ................................ 112
Overview ........................................ 113
Transporting the vehicle .................. 256
Trim pieces (cleaning instruc-
tions) .................................................. 243
Trip computer (on-board com-
puter) .................................................. 157
Trip odometer
Calling up ....................................... 156
Resetting (on-board computer) ...... 157
Trunk load (maximum) ...................... 288
Trunk partition .................................. 215
Turn signals
Display message ............................ 180
Switching on/off .............................. 92
Two-way radio
Frequencies ................................... 282
Installation ..................................... 282
Transmission output (maximum) .... 282
Type identification plate
see Vehicle identification plate
U
UnlockingEmergency unlocking ....................... 72
From inside the vehicle (central
unlocking button) ............................. 71
20Index
Page 53 of 294
ProblemPossible causes/consequences andMSolutions
The PASSENGER AIR
BAG OFF indicator lamp
lights up and remains lit,
even though the front-
passenger seat is occu-
pied by an adult or a per-
son of a stature corre-
sponding to that of an
adult.The classification of the person on the front-passenger seat is incor-
rect.
XMake sure the conditions for a correct classification of the person
on the front-passenger seat are met (Ypage 47).
XIf the PASSENGER AIR BAG OFF indicator lamp remains lit, the front-
passenger seat may not be used.
XHave OCS checked as soon as possible at an authorized Mercedes- Benz Center.
The PASSENGER AIR
BAG OFF indicator lamp
does not light up and/or
does not stay on.
The front-passenger seat
is:
Runoccupied
Roccupied by the
weight of a child up to
twelve months old in a
child restraint system
OCS is malfunctioning.
XMake sure there is nothing between the seat cushion and the child
seat.
XMake sure that the entire base of the child restraint system rests on
the seat cushion of the front-passenger seat. The backrest of the
forward-facing child restraint system must lie as flat as possible
against the backrest of the front-passenger seat. If necessary,
adjust the position of the front-passenger seat.
XWhen installing the child restraint system, make sure that the seat belt is tight. Do not pull the seat belt tight using the front-passenger
seat adjustment. This could result in the seat belt and the child
restraint system being pulled too tightly.
XCheck for correct installation of the child restraint system.
Make sure that the head restraint does not apply a load to the child
restraint system. If necessary, adjust the head restraint accord-
ingly.
XMake sure that no objects are applying additional weight onto the
seat.
XIf the PASSENGER AIR BAG OFF indicator lamp remains off and/or
the PASSENGER AIR BAG ON indicator lamp lights up, do not install a child restraint system on the front-passenger seat.
XHave OCS checked as soon as possible at an authorized Mercedes-Benz Center.
Deployment of Emergency Tensioning
Devices and air bags
Important safety notes
GWARNING
The air bag parts are hot after an air bag has
been deployed. There is a risk of injury.
Do not touch the air bag parts. Have a
deployed air bag replaced at a qualified spe-
cialist workshop as soon as possible.
GWARNING
A deployed air bag no longer offers any pro-
tection and cannot provide the intended pro-
tection in an accident. There is an increased
risk of injury.
Have the vehicle towed to a qualified special-
ist workshop in order to have a deployed air
bag replaced.
Mercedes-Benz recommends that you have the
vehicle transported to a qualified specialist
workshop after an accident. Observe the notes
on towing the vehicle away (
Ypage 254).
Occupant safety51
Safety
Z
Page 128 of 294
XConnect the cable providedin the cargo com-
partment to the trick lecharger.
XConnect the trick lecharger to 12 V socket :.
Consult the manufacturer's operating instruc-
tions on how to doso.
The tailgate can be closed, even ifa trick le
charger isconnected. Make sure that the con-
nector for both the connector cables isoutside
of the veh icle.
The connector can then separate ifthe veh icle is
moved, even ifyou forget to disconnect the con-
nector cables. This prevents damaging the
cables and the trick lecharger.
A trick lecharger connected to 12 V socket :
only maintains the current charge level of the
veh icle's electrical system battery. Ifthe veh i-
cle's electrical system battery is discharged, it
needs to becharged with a battery charger.
Driving tips
General driving tips
Important safety notes
GWAR NING
If you switch off the ignition while driving,
safety-relevant functions are only available
wit hlimit ations, or not at all.This could affect,
for example, the power steering and the brake
boosting effect. You willrequire cons iderably
more effort to steer and brake. There isa risk
of an acc ident.
Do not switch off the ignition while driving.
GWARNING
If you operate mob ilecommunication equip-
ment when driving, you may be distracted
from the traff icsituation. You could also lose
control of the veh icle. There isa risk of an
acc iden t.
Only operate th is equipment when the veh icle
is stationary.
Observe the legal requirements for the country
in whic h you are driving. Some jur isdictions pro-
hibit thedriver from using a mob ilephone while
driv ing a veh icle. If
you make a call while driving, always use
hands-free mode. Only operate the telephone
when the traff icsituation permits. Ifyou are
unsure, pull over to a safe location and stop
before operating the telephone.
Bear inmind that at a speed of only 30 mph
(approximately 50 km/h), the vehicle covers a
dist ance of 44 ft (approximately 14 m)per sec-
ond.
Drive sensibly – save fuel
Observe the following tips to save fuel:
XThe tires should always be inflated to the rec-
ommended tire pressure.
XRemove unnecessary loads.
XWarm up the engine at low engine speeds.
XAvoid frequent acceleration or braking.
XHave all service and maintenance work car-
ried out at the specified intervals.
Fuel consumption also increases when driving in
cold weather, in stop-start traffic and in hilly ter-
rain.
Drinking and driving
GWARNING
Drinking and driving and/or taking drugs and driving are very dangerous combinations.
Even a small amount of alcohol or drugs can
affect your reflexes, perceptions and judg-
ment.
The possibility of a serious or even fatal acci-
dent is greatly increased when you drink or
take drugs and drive.
Do not drink or take drugs and drive or allow
anyone to drive who has been drinking or tak-
ing drugs.
Emission control
GWARNING
Combustion engines emit poisonous exhaust
gases such as carbon monoxide. Inhaling
these exhaust gases leads to poisoning. There
is a risk of fatal injury. Therefore never leave
the engine running in enclosed spaces with-
out sufficient ventilation.
126Driving tips
Driving and parking
Page 250 of 294
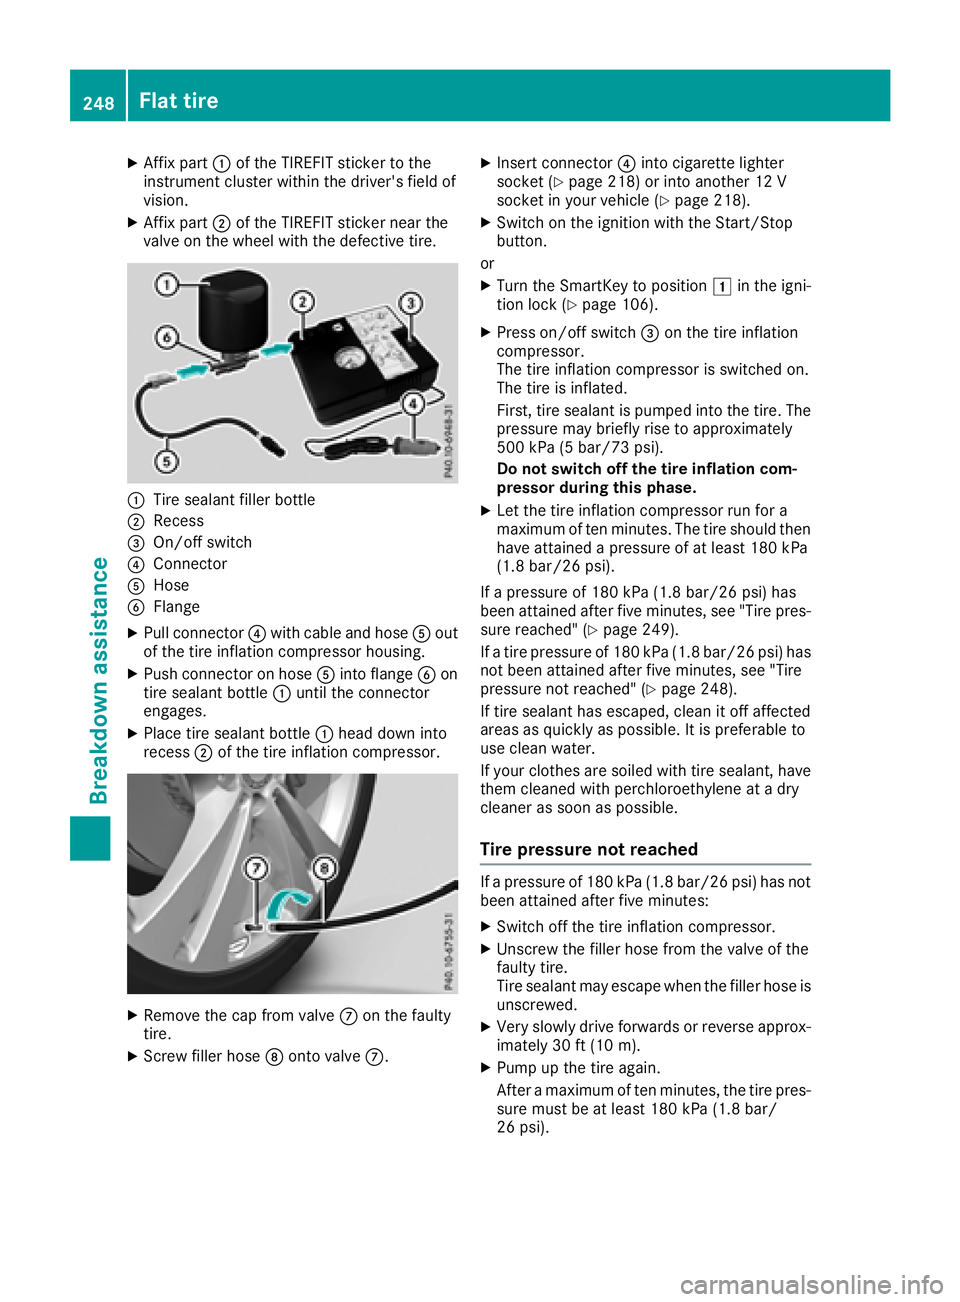
XAffix part:of the TIREFIT sticker to the
instrument cluster within the driver's field of
vision.
XAffix part ;of the TIREFIT sticker near the
valve on the wheel with the defective tire.
:Tire sealant filler bottle
;Recess
=On/off switch
?Connector
AHose
BFlange
XPull connector ?with cable and hose Aout
of the tire inflation compressor housing.
XPush connector on hose Ainto flange Bon
tire sealant bottle :until the connector
engages.
XPlace tire sealant bottle :head down into
recess ;of the tire inflation compressor.
XRemove the cap from valve Con the faulty
tire.
XScrew filler hose Donto valve C.
XInsert connector ?into cigarette lighter
socket (Ypage 218) or into another 12 V
socket in your vehicle (Ypage 218).
XSwitch on the ignition with the Start/Stop
button.
or
XTurn the SmartKey to position 1in the igni-
tion lock (Ypage 106).
XPress on/off switch =on the tire inflation
compressor.
The tire inflation compressor is switched on.
The tire is inflated.
First, tire sealant is pumped into the tire. The
pressure may briefly rise to approximately
500 kPa (5 bar/73 psi).
Do not switch off the tire inflation com-
pressor during this phase.
XLet the tire inflation compressor run for a
maximum of ten minutes. The tire should then
have attained a pressure of at least 180 kPa
(1.8 bar/26 psi).
If a pressure of 180 kPa (1.8 ba r/26 psi) has
been at tained after five minutes, see "Tire pres-
sure reached" (
Ypage 249).
If a tire pressure of 180 kPa (1.8 bar/26 psi) has
not been attained after five minutes, see "Tire
pressure not reached" (
Ypage 248).
If tire sealant has escaped, clean it off affected
areas as quickly as possible. It is preferable to
use clean water.
If your clothes ar e s
oiled with tire sealant, have
them cleaned with perchloroethylene at a dry
cleaner as soon as possible.
Tire pressure not reached
If a pressure of 180 kPa (1.8 bar/26 psi) has not
been attained after five minutes:
XSwitch off the tire inflation compressor.
XUnscrew the filler hose from the valve of the
faulty tire.
Tire sealant may escape when the filler hose is
unscrewed.
XVery slowly drive forwards or reverse approx- imately 30 ft (10 m).
XPump upthe tire again.
After a maximum of ten minutes, the tire pres-
sure must be at least 180 kPa (1.8 ba r/
26 psi) .
248Fla t tire
Breakdown assis tance
Page 260 of 294
Important safety notes
GWARNING
If wheels and tires of th ewrong siz eare used,
th ewhee lbrakes or suspension component s
may be damaged. Ther eis aris kof an acci-
dent.
Always replace wheels and tires wit hthose
that fulfill th especification sof th eoriginal
part .
When replacing wheels, mak esur eto use th e
correct:
Rdesignation
Rmodel
When replacing tires ,mak esur eto use th e
correct:
Rdesignation
Rmanufacturer
Rmodel
GWARNIN G
A flat tire severely impairs th edriving ,steer -
ing and braking characteristics of th evehicle.
Ther eis aris kof accident.
Tires without run-flat characteristics :
Rdo notdriv ewit h a flat tire.
Rimmediately replace th eflat tire wit hyour
emergenc yspar ewhee lor spar ewheel, or
consult aqualified specialist workshop.
Tires wit hrun-flat characteristics :
Rpay attention to theinformation and warn -
ing notice son MOExtended tires (tire swit h
run-flat characteristics).
Accessories that are no tapprove dfor your vehi-
cle by Mercedes-Ben zor are no tbein gused cor-
rectl ycan impair th eoperating safety.
Before purchasing and usin gnon-approve d
accessories, visit aqualified specialist work-
sho pand inquire about :
Rsuitability
Rlegal stipulation s
Rfactory recommendation sInformation on th
esizes and types of wheels and
tires for your vehicl ecan be foun dunder
"Wheel/tire combinations" (
Ypage 280).
Tir epressur einformation can be found:
Ron th eTir eand Loading Information placard
on th eB-pillar on th edriver' sside
(
Ypage 266)
Rin th etire pressur etable in th efuel filler flap
(Ypage 121)
Rin th e"Tir epressure" section
Operation
Information on driving
Chec kth etire pressur ewhen th evehicl eis
heavily laden and adjust prio rto atrip.
While driving ,pay attention to vibrations, noises
and unusual handlin gcharacteristics ,e.g. pull-
ing to on eside .This may indicat ethat th e
wheels or tires are damaged. If you suspec tthat
a tire is defective, reduce your spee dimmedi-
ately. Stop th evehicl eas soo nas possible to
chec kth ewheels and tires for damage. Hidden
tire damag ecould also be causing th eunusual
handlin gcharacteristics .If you fin dno sign sof
damage, hav eth etires and wheels checke dat a
qualified specialist workshop.
When parking your vehicle, mak esur ethat th e
tires do no tget deformed by th ecur bor other
obstacles. If they canno tbe avoided, driv eove r
obstacles suc has curbs slowly and at an obtuse
angle. Otherwise, you may damag eth ewheels
or tires .
Notes on high performance tires
GWARNIN G
Due to th especial tire tread in combination
wit hth eoptimized rubber compound ,there is
an increased ris kof hydroplaning and skid-
din gon damp or wet road surfaces. In addi-
tion ,tire traction is significantly reduce dat
low outside temperatures and low tire-oper -
ating temperatures .Ther eis aris kof an acci-
dent.
Activat eES P
®and adapt your driving style. At
outside temperatures belo w50 ‡(10 †), use
M+S tires.
258Operation
Wheels and tires
Page 263 of 294
RLocal regulations may restrict the use of snow
chains. Observe the appropriate regulations if
you wish to mount snow chains.
Rdo not exceed the maximum permissible
speed of 31 mph (50 km/h).
You may wish to deactivate ESP
®(Ypage 62)
when pulling away with snow chains mounted.
You can thereby allow the wheels to spin in a
controlled manner, achieving an increased driv-
ing force (cutting action).
Tire pressure
Tire pressure specifications
Important safety notes
GWARNING
Underinflated or overinflated tires pose the
following risks:
Rthe tires may burst, especially as the load
and vehicle speed increase.
Rthe tires may wear excessively and/or
unevenly, which may greatly impair tire
traction.
Rthe driving characteristics, as well as steer-
ing and braking, may be greatly impaired.
There is a risk of an accident.
Follow recommended tire inflation pressures
and check the pressure of all the tires includ-
ing the spare wheel:
Rmonthly, at least
Rif the load changes
Rbefore beginning a long journey
Runder different operating conditions, e.g.
off-road driving
If necessary, correct the tire pressure.
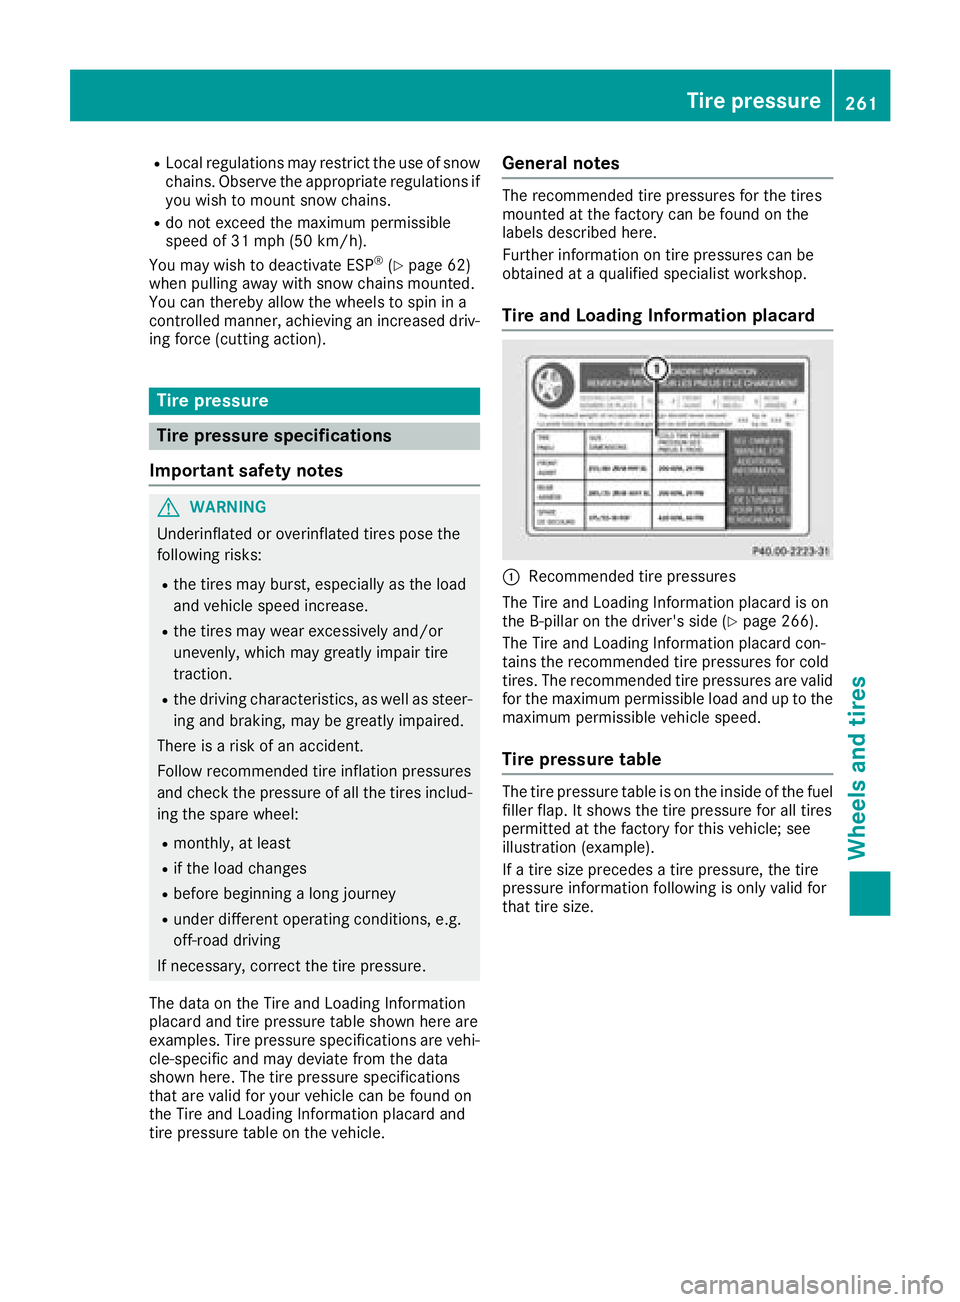
The data on the Tire and Loading Information
placard and tire pressure table shown here are
examples. Tire pressure specifications are vehi-
cle-specific and may deviate from the data
shown here. The tire pressure specifications
that are valid for your vehicle can be found on
the Tire and Loading Information placard and
tire pressure table on the vehicle.
General notes
The recommended tire pressures for the tires
mounted at the factory can be found on the
labels described here.
Further information on tire pressures can be
obtained at a qualified specialist workshop.
Tire and Loading Information placard
:Recommended tire pressures
The Tire and Loading Information placard is on
the B-pillar on the driver's side (
Ypage 266).
The Tire and Loading Information placard con-
tains the recommended tire pressures for cold
tires. The recommended tire pressures are valid
for the maximum permissible load and up to the
maximum permissible vehicle speed.
Tire pressure table
The tire pressure table is on the inside of the fuel
filler flap. It shows the tire pressure for all tires
permitted at the factory for this vehicle; see
illustration (example).
If a tire size precedes a tire pressure, the tire
pressure information following is only valid for
that tire size.
Tire pressure261
Wheels and tires
Z
Page 283 of 294
!For safety reasons, Mercedes-Benz recom-
mends that you only use tires and wheels
which have been approved by Mercedes-Benz
specifically for your vehicle.
These tires have been specially adapted for
use with the control systems, such as ABS or
ESP
®, and are marked as follows:
RMO = Mercedes-Benz Original
RMOE = Mercedes-Benz Original Extended
(tires featuring run-flat characteristics)
RMO1 = Mercedes-Benz Original (only cer-
tain AMG tires)
Mercedes-Benz Original Extended tires may
only be used on wheels that have been spe-
cifically approved by Mercedes-Benz.
Only use tires, wheels or accessories tested
and approved by Mercedes-Benz. Certain
characteristics, e.g. handling, vehicle noise
emissions or fuel consumption, may other-
wise be adversely affected. In addition, when
driving with a load, tire dimension variations
could cause the tires to come into contact
with the bodywork and axle components. This
could result in damage to the tires or the vehi- cle.
Mercedes-Benz accepts no liability for dam-
age resulting from the use of tires, wheels or
accessories other than those tested and
approved.
Information on tires, wheels and approved
combinations can be obtained from any quali-
fied specialist workshop.
!Retreaded tires are neither tested nor rec-
ommended by Mercedes-Benz, since previ-
ous damage cannot always be detected on
retreaded tires. As a result, Mercedes-Benz
cannot guarantee vehicle safety if retreaded
tires are mounted. Do not mount used tires if
you have no information about their previous
usage.
The recommended pressures for various oper-
ating conditions can be found:
Ron the Tire and Loading Information placard
on the B-pillar on the driver's side
Rin the tire pressure table in the fuel filler flap
Observe the notes on recommended tire pres-
sures under various operating conditions
(
Ypage 261).
Check tire pressures regularly, and only when
the tires are cold. Comply with the maintenance recommendations of the tire manufacturer in
the vehicle document wallet.
Notes on equipping the vehicle:
RAlways mount tires of the same size across an
axle (left/right)
RAlways mount the same type of tires on all
wheels at a given time (summer tires, winter
tires)
Exception: it is permissible to install a differ-
ent type or make in the event of a flat tire.
Wheel and tire combinations281
Wheels and tires
Z