2018 MERCEDES-BENZ AMG GT COUPE fuel pressure
[x] Cancel search: fuel pressurePage 23 of 294

USB devicesConnecting to the Media Inter-
face .............................................. .212
V
Vanity mirror (in the sun visor) ........217
Vehicle
Correct use ...................................... 28
Data acquisition ............................... 29
Display message ............................ 188
Electronics ..................................... 282
Equipment ....................................... 25
Individual settings .......................... 163
Limited Warranty .............................2 9
Loading .......................................... 266
Locking (in an emergency) ............... 72
Locking (SmartKey) .......................... 65
Lowering ........................................ 280
Maintenance .................................... 26
Operating safety .............................. 27
Parking .......................................... 122
Parking for a long period ................ 125
Pulling away ................................... 107
Raising ........................................... 277
Reporting problems ......................... 28
Securing from rolling away ............ 277
Towing away .................................. 254
Transporting .................................. 256
Unlocking (in an emergency) ........... 72
Unlocking (SmartKey) ...................... 65
Vehicle data ................................... 288
Vehicle battery
see Battery (vehicle)
Vehicle data
Trunk load (maximum) ................... 288
Vehicle dimensions ........................... 288
Vehicle emergency locking ................ 72
Vehicle identification number
see VIN
Vehicle identification plate .............. 282
Vehicle maintenance
see ASSYST PLUS
Vehicle tool kit .................................. 245
Ventilation
see Climate control
Video
Operating the DVD ......................... 161 see also Digital Operator's Man-
ual .................................................. 204
VIN
Seat ............................................... 283
Type plate ...................................... 282W
Warning and indicator lampsABS ................................................ 196
Active Brake Assist ........................ 201
Brakes ........................................... 195
Check Engine ................................. 199
Coolant .......................................... 199
Distance warning ........................... 201
ESP
®.............................................. 196
ESP®OFF ....................................... 197
Fuel tank ........................................ 199
Overview .......................................... 34
Parking brake ................................ 198
PASSENGER AIR BAG ...................... 40
Reserve fuel ................................... 199
Restraint system ............................ 198
Seat belt ........................................ 193
SPORT handling mode ................... 198
Steering ......................................... 203
Tire pressure monitor .................... 202
Warranty .............................................. 25
Washer fluid
Display message ............................ 191
Weather display (COMAND)
see also Digital Operator's Man-
ual .................................................. 204
Wheel and tire combinations
Tires ............................................... 280
Wheel bolt tightening torque ........... 280
Wheel chock ...................................... 277
Wheels
Changing a wheel .......................... 276
Checking ........................................ 259
Cleaning ......................................... 241
Important safety notes .................. 258
Information on driving .................... 258
Interchanging/changing ................ 276
Mounting a new wheel ................... 279
Mounting a wheel .......................... 277
Notes on sport tires ....................... 258
Removing a wheel .......................... 279
Index21
Page 26 of 294
Protecting the environment
General notes
HEnvironmental note
Daimler's declared policy is one of compre-
hensive environmental protection.
The objectives are for the natural resources
that form the basis of our existence on this
planet to be used sparingly and in a manner
that takes the requirements of both nature
and humanity into account.
You too can help to protect the environment
by operating your vehicle in an environmen-
tally responsible manner.
Fuel consumption and the rate of engine,
transmission, brake and tire wear are affected by these factors:
Roperating conditions of your vehicle
Ryour personal driving style
You can influence both factors. You should
bear the following in mind:
Operating conditions:
Ravoid short trips as these increase fuel con-
sumption.
Ralways make sure that the tire pressures
are correct.
Rdo not carry any unnecessary weight.
Rremove roof racks once you no longer need
them.
Ra regularly serviced vehicle will contribute
to environmental protection. You should
therefore adhere to the service intervals.
Ralways have service work carried out at a
qualified specialist workshop.
Personal driving style:
Rdo not depress the accelerator pedal when
starting the engine.
Rdo not warm up the engine when the vehicle
is stationary.
Rdrive carefully and maintain a safe distance
from the vehicle in front.
Ravoid frequent, sudden acceleration and
braking.
Rchange gear in good time and use each gear
only up to Ôof its maximum engine speed.
Rswitch off the engine in stationary traffic.
Rkeep an eye on the vehicle's fuel consump-
tion.
Environmental concerns and recom-
mendations
Wherever the Operator's Manual requires you to
dispose of materials, first try to regenerate or re-
use them. Observe the relevant environmental
rules and regulations when disposing of materi-
als. In this way you will help to protect the envi-
ronment.
Genuine Mercedes-Benz parts
HEnvironmental note
Daimler AG also supplies reconditioned major
assemblies and parts which are of the same
quality as new parts. They are covered by the
same Limited Warranty entitlements as new
parts.
!Air bags and Emergency Tensioning Devi-
ces, as well as control units and sensors for
these restraint systems, may be installed in
the following areas of your vehicle:
Rdoors
Rdoor pillars
Rdoor sills
Rseats
Rcockpit
Rinstrument cluster
Rcenter console
Do not install accessories such as audio sys-
tems in these areas. Do not carry out repairs or welding. You could impair the operating
efficiency of the restraint systems.
Have aftermarket accessories installed at a
qualified specialist workshop.
You could jeopardize the operating safety of
your vehicle if you use parts, tires and wheels as
well as accessories relevant to safety which
have not been approved by Mercedes-Benz. This
could lead to malfunctions in safety-relevant
24Genuine Mercedes-Benz parts
Introduction
Page 31 of 294
The following text is published as required of
manufacturers under Title 49, Code of U.S. Fed-
eral Regulations, Part 575 pursuant to the
"National Traffic and Motor Vehicle Safety Act of
1966".
If you believe that your vehicle has a defect
which could cause a crash or could cause injury
or death, you should immediately inform the
National Highway Traffic Safety Administration
(NHTSA) in addition to notifying Mercedes-Benz USA, LLC.
If NHTSA receives similar complaints, it may
open an investigation, and if it finds that a safety
defect exists in a group of vehicles, it may order
a recall and remedy campaign. However, NHTSA
cannot become involved in individual problems
between you, your dealer, or Mercedes-Benz
USA, LLC.
To contact NHTSA, you may call the Vehicle
Safety Hotline toll-free at 1-888-327-4236
(TTY: 1-800-424-9153); go tohttp://
www.safercar.gov; or write to: Administrator,
NHTSA, 400 Seventh Street, SW., Washington,
DC 20590.
You can also obtain other information about
motor vehicle safety at:
http://www.safercar.gov
Limited Warranty
!
Observe the notes in this Operator's Manual
regarding the correct operation of your vehi-
cle and possible damage to the vehicle. Dam-
age to the vehicle which is caused by violation
of these notes is not covered by the
Mercedes-Benz implied warranty or the new
or used-vehicle warranty.
QR code for rescue card
The QR codes are secured in the fuel filler flap
and on the opposite side on the B-pillar. In the
event of an accident, rescue services can use
the QR code to quickly find the appropriate res- cue card for your vehicle. The current rescue
card contains the most important information
about your vehicle in a compact form, e.g. the
routing of the electric cables.
You can find more information under
www.mercedes-benz.de/qr-code.
Data stored in the vehicle
Information from electronic control
units
There are electronic control units installed in
your vehicle. Some of these are necessary for
your vehicle to operate safely, while some offer
support during driving (driver assistance sys-
tems). In addition, your vehicle offers comfort
and entertainment functions that are also made
possible by electronic control units.
Electronic control units contain data storage
systems that can temporarily or permanently
save technical information concerning the vehi-
cle's condition, component stress and mainte-
nance requirements as well as technical events
and malfunctions.
This information generally documents the con-
dition of a component, a module, a system or the
surroundings, for example:
Roperating states of system components (e.g.
fill levels, battery status, tire pressure)
Rstatus messages concerning the vehicle or its
individual components (e.g. wheel rpm/
speed, deceleration, lateral acceleration, indi-
cation of whether seat belts are fastened)
Rmalfunctions and defects in important system
components (e.g. lights, brakes)
Rinformation about events leading to vehicle
damage
Rsystem responses in special driving situations
(e.g. air bag deployment, intervention of sta-
bility control systems)
Rambient conditions (e.g. temperature, rain
sensor)
In addition to performing the actual control unit function, these data are used by manufacturers
to detect and rectify malfunctions and to opti-
mize vehicle functions. Most of these data are
volatile and processed only in the vehicle itself.
Only a small part of the data is stored in event or malfunction memories.
When you use services, the technical data from
the vehicle can be read out by service network
employees or third parties. Services can include
repair services, maintenance processes, war-
ranty cases and quality assurance measures.
The data is read out via the legally prescribed
diagnostics connection in the vehicle. The rele-
vant offices in the service network or third par-
ties collect, process and use the data. These
data document the vehicle's technical states,
Data stored in the vehicle29
Introduction
Z
Page 110 of 294
GWARNING
After a short time, hill start assist will no lon-
ger brake your vehicle and it could roll away.
There is a risk of an accident and injury.
Therefore, quickly move your foot from the
brake pedal to the accelerator pedal. Never
leave the vehicle when it is held by hill start
assist.
Hill start assist is not active if:
Ryou are pulling away on a level road or on a
downhill gradient
Rthe transmission is in position i
Rthe electric parking brake is applied
RESP®is malfunctioning
Rear axle steering
General notes
Depending on the speed, rear axle steering
adapts the track of the rear axle to the position
of the front wheels. Together with the steering
angle of the front wheels, this results in greater
mobility and stability than on vehicles without
rear axle steering.
Rear axle steering has the following character-
istics:
Rreduced steering effort and turning circle,
resulting in reduced parking effort.
Rimproved driving stability, e.g. on curves.
Rthe vehicle has more direct steering. Control
of the vehicle is thereby increased.
ECO start/stop function
Introduction
The ECO start/stop function switches the
engine off automatically if the vehicle is stopped
under certain conditions.
The engine starts automatically when the driver
wants to pull away again. The ECO start/stop
function thereby helps you to reduce the fuel
consumption and emissions of your vehicle.
Important safety notes
GWARNING
If the engine is switched off automatically and
you exit the vehicle, the engine is restarted
automatically. The vehicle may begin moving.
There is a risk of accident and injury.
If you wish to exit the vehicle, always turn off
the ignition and secure the vehicle against
rolling away.
General notes
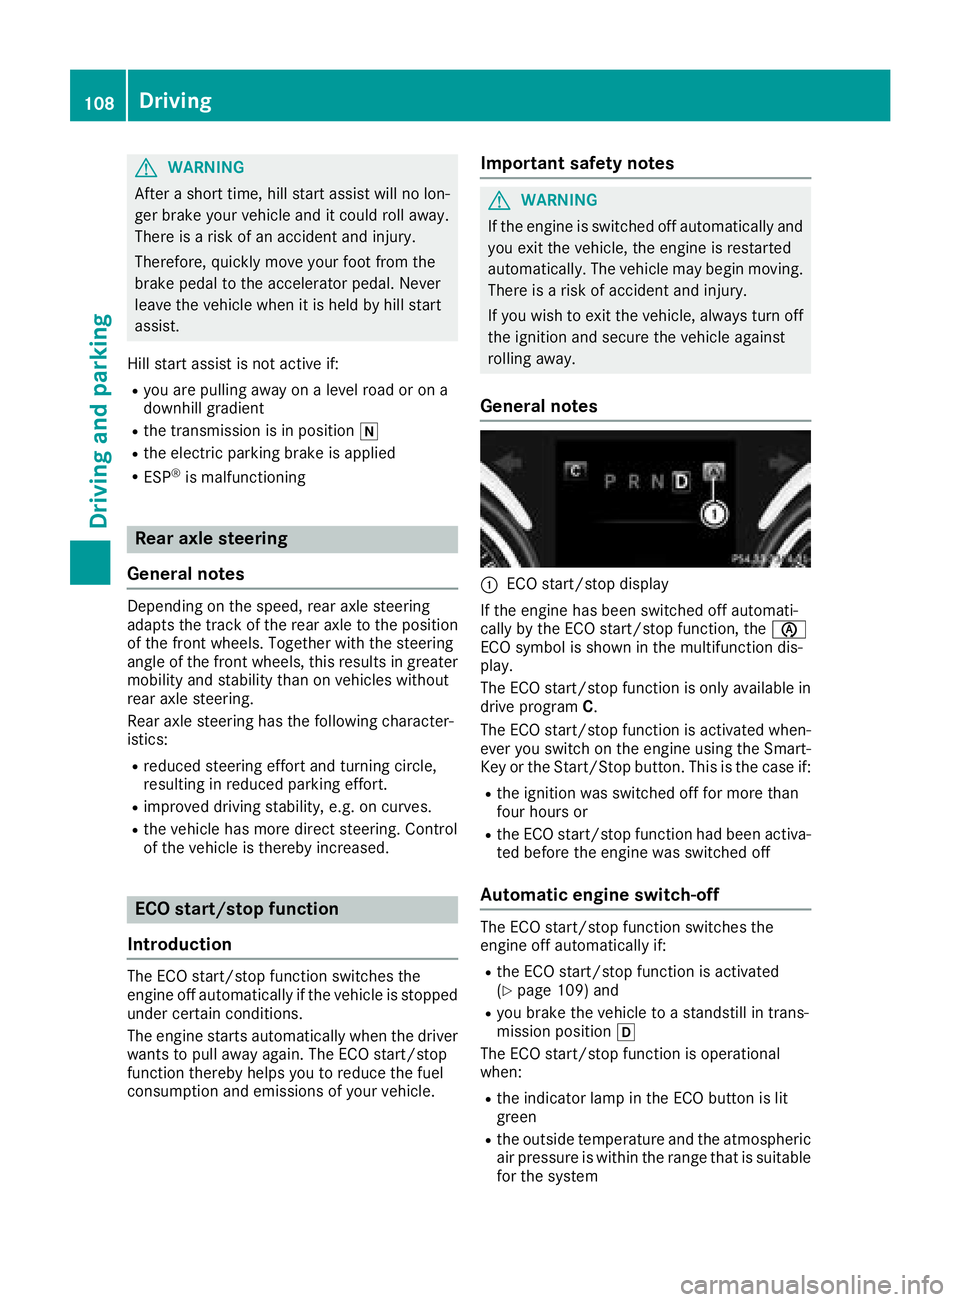
:ECO start/stop display
If the engine has been switched off automati-
cally by the ECO start/stop function, the è
ECO symbol is shown in the multifunction dis-
play.
The ECO start/stop function is only available in drive program C.
The ECO start/stop function is activated when-
ever you switch on the engine using the Smart-
Key or the Start/Stop button. This is the case if:
Rthe ignition was switched off for more than
four hours or
Rthe ECO start/stop function had been activa-
ted before the engine was switched off
Automatic engine switch-off
The ECO start/stop function switches the
engine off automatically if:
Rthe ECO start/stop function is activated
(Ypage 109) and
Ryou brake the vehicle to a standstill in trans-
mission position h
The ECO start/stop function is operational
when:
Rthe indicator lamp in the ECO button is lit
green
Rthe outside temperature and the atmospheric
air pressure is within the range that is suitable
for the system
108Driving
Driving and parking
Page 123 of 294
!Use a filter when adding fuel from a fuel can.
The fuel lines and/or the fuel injection system
could otherwise be blocked by particles from
the fuel can.
If you overfill the fuel tank, fuel could spray out
when the fuel pump nozzle is removed.
For further information on fuel and fuel quality
(
Ypage 283).
Refueling
General information
Pay attention to the important safety notes
(Ypage 120).
If you unlock/lock the vehicle from the outside, the fuel filler flap also unlocks/locks.
The position of the fuel filler cap is displayed
8 in the instrument cluster. The arrow next
to the filling pump indicates the side of the vehi-
cle.
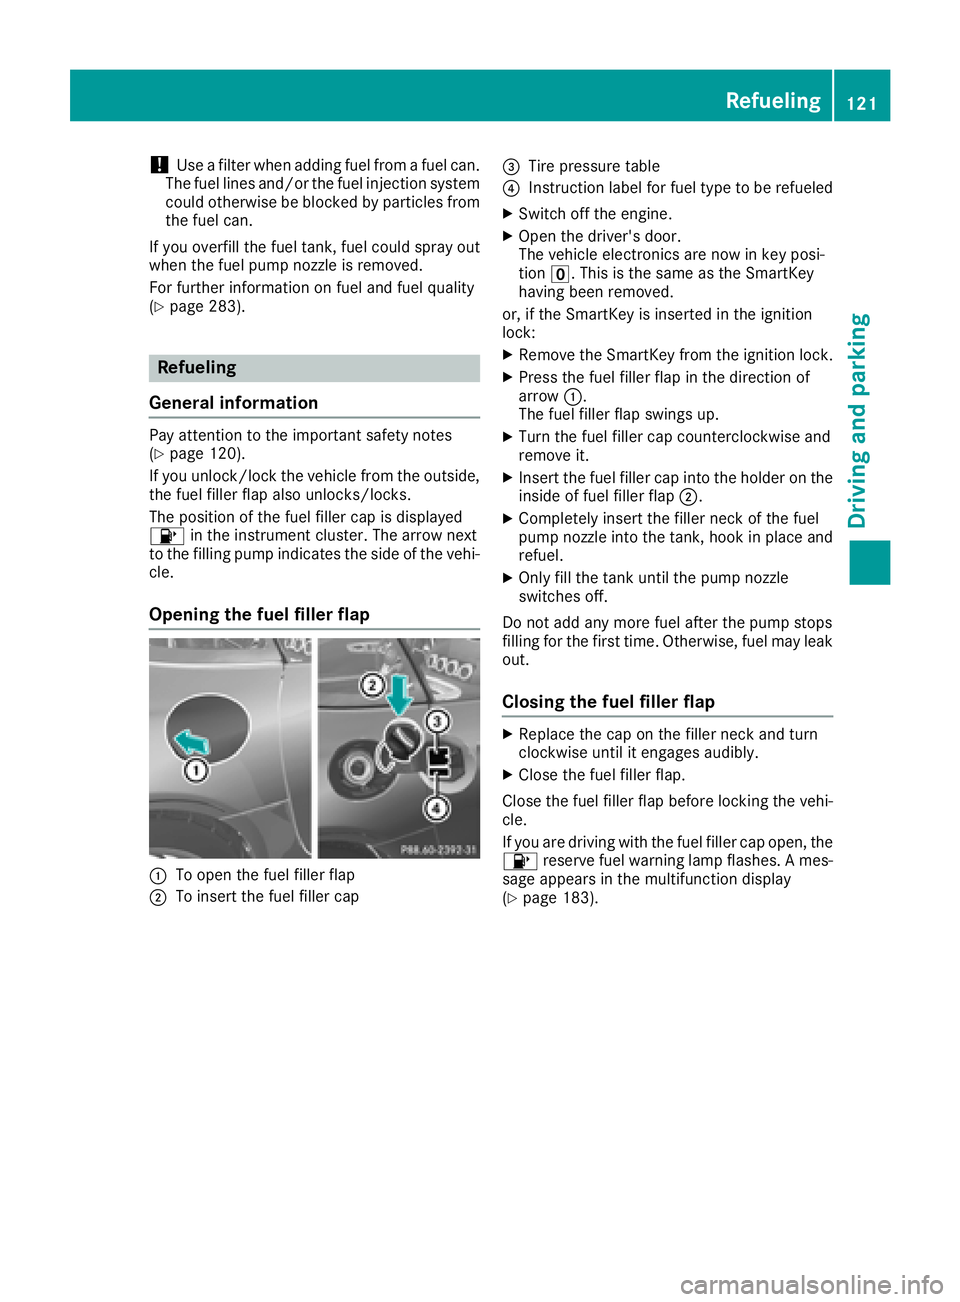
Opening the fuel filler flap
:To open the fuel filler flap
;To insert the fuel filler cap
=Tire pressure table
?Instruction label for fuel type to be refueled
XSwitch off the engine.
XOpen the driver's door.
The vehicle electronics are now in key posi-
tion u. This is the same as the SmartKey
having been removed.
or, if the SmartKey is inserted in the ignition
lock:
XRemove the SmartKey from the ignition lock.
XPress the fuel filler flap in the direction of
arrow :.
The fuel filler flap swings up.
XTurn the fuel filler cap counterclockwise and
remove it.
XInsert the fuel filler cap into the holder on the
inside of fuel filler flap ;.
XCompletely insert the filler neck of the fuel
pump nozzle into the tank, hook in place and
refuel.
XOnly fill the tank until the pump nozzle
switches off.
Do not add any more fuel after the pump stops
filling for the first time. Otherwise, fuel may leak
out.
Closing the fuel filler flap
XReplace the cap on the filler neck and turn
clockwise until it engages audibly.
XClose the fuel filler flap.
Close the fuel filler flap before locking the vehi-
cle.
If you are driving with the fuel filler cap open, the 8 reserve fuel warning lamp flashes. A mes-
sage appears in the multifunction display
(
Ypage 183).
Refueling121
Driving and parking
Z
Page 128 of 294
XConnect the cable providedin the cargo com-
partment to the trick lecharger.
XConnect the trick lecharger to 12 V socket :.
Consult the manufacturer's operating instruc-
tions on how to doso.
The tailgate can be closed, even ifa trick le
charger isconnected. Make sure that the con-
nector for both the connector cables isoutside
of the veh icle.
The connector can then separate ifthe veh icle is
moved, even ifyou forget to disconnect the con-
nector cables. This prevents damaging the
cables and the trick lecharger.
A trick lecharger connected to 12 V socket :
only maintains the current charge level of the
veh icle's electrical system battery. Ifthe veh i-
cle's electrical system battery is discharged, it
needs to becharged with a battery charger.
Driving tips
General driving tips
Important safety notes
GWAR NING
If you switch off the ignition while driving,
safety-relevant functions are only available
wit hlimit ations, or not at all.This could affect,
for example, the power steering and the brake
boosting effect. You willrequire cons iderably
more effort to steer and brake. There isa risk
of an acc ident.
Do not switch off the ignition while driving.
GWARNING
If you operate mob ilecommunication equip-
ment when driving, you may be distracted
from the traff icsituation. You could also lose
control of the veh icle. There isa risk of an
acc iden t.
Only operate th is equipment when the veh icle
is stationary.
Observe the legal requirements for the country
in whic h you are driving. Some jur isdictions pro-
hibit thedriver from using a mob ilephone while
driv ing a veh icle. If
you make a call while driving, always use
hands-free mode. Only operate the telephone
when the traff icsituation permits. Ifyou are
unsure, pull over to a safe location and stop
before operating the telephone.
Bear inmind that at a speed of only 30 mph
(approximately 50 km/h), the vehicle covers a
dist ance of 44 ft (approximately 14 m)per sec-
ond.
Drive sensibly – save fuel
Observe the following tips to save fuel:
XThe tires should always be inflated to the rec-
ommended tire pressure.
XRemove unnecessary loads.
XWarm up the engine at low engine speeds.
XAvoid frequent acceleration or braking.
XHave all service and maintenance work car-
ried out at the specified intervals.
Fuel consumption also increases when driving in
cold weather, in stop-start traffic and in hilly ter-
rain.
Drinking and driving
GWARNING
Drinking and driving and/or taking drugs and driving are very dangerous combinations.
Even a small amount of alcohol or drugs can
affect your reflexes, perceptions and judg-
ment.
The possibility of a serious or even fatal acci-
dent is greatly increased when you drink or
take drugs and drive.
Do not drink or take drugs and drive or allow
anyone to drive who has been drinking or tak-
ing drugs.
Emission control
GWARNING
Combustion engines emit poisonous exhaust
gases such as carbon monoxide. Inhaling
these exhaust gases leads to poisoning. There
is a risk of fatal injury. Therefore never leave
the engine running in enclosed spaces with-
out sufficient ventilation.
126Driving tips
Driving and parking
Page 242 of 294
XUse plenty of water and rinse out the sponge
frequently.
XRinse the vehicle with clean water and dry
thoroughly with a chamois.
XDo not let the cleaning agent dry on the paint-work.
Carefully remove all deposits of road salt as
soon as possible when driving in winter.
Power washers
GWARNING
The water jet from a circular jet nozzle (dirt
blasters) can cause invisible exterior damage
to the tires or chassis components. Compo-
nents damaged in this way may fail unexpect-
edly. There is a risk of an accident.
Do not use power washers with circular jet
nozzles to clean the vehicle. Have damaged
tires or chassis components replaced imme-
diately.
!Always maintain a distance of at least
11.8 in (30 cm) between the vehicle and the
power washer nozzle. Information about the
correct distance is available from the equip-
ment manufacturer.
Move the power washer nozzle around when
cleaning your vehicle.
Do not aim directly at any of the following:
Rtires
Rdoor gaps, roof gaps, joints, etc.
Relectrical components
Rbattery
Rplug-type couplings
Rlights
Rseals
Rtrim
Rventilation slots
Damaged seals or electrical components can
lead to leaks or failures.
!Vehicles with decorative foil: parts of your
vehicle are covered with decorative foil. Main-
tain a distance of at least 27.5 in (70 cm)
between the foil-wrapped parts of the vehicle
and the nozzle of the high pressure cleaner.
Information about the correct distance is
available from the equipment manufacturer. Move the power washer nozzle around when
cleaning your vehicle.
The water temperature of the high-pressure
cleaner must not exceed 140 °F (60 °C).
!If the SmartKey is within the rear detection
range of KEYLESS-GO, the following situa-
tions, for example, could lead to the uninten-
tional opening of the tailgate:
Rwhen using an automatic car wash
Rwhen using a power washer
Make sure that the SmartKey is at least 10 ft (3 m) away from the vehicle.
Cleaning the paintwork
!Do not affix:
Rstickers
Rfilms
Rmagnetic plates or similar items
to painted surfaces. You could otherwise
damage the paintwork.
Scratches, corrosive deposits, areas affected by corrosion and damage caused by inadequate
care cannot always be completely repaired. In
such cases, visit a qualified specialist workshop.
XRemove dirt immediately, where possible,
while avoiding rubbing too hard.
XSoak insect remains with insect remover and
rinse off the treated areas afterwards.
XSoak bird droppings with water and rinse off
the treated areas afterwards.
XRemove coolant, brake fluid, tree resin, oils,
fuels and greases by rubbing gently with a
cloth soaked in petroleum ether or lighter
fluid.
XUse tar remover to remove tar stains.
XUse silicone remover to remove wax.
If water no longer forms "beads" on the paint
surface, use the paint care products recommen-
ded and approved by Mercedes-Benz. This is the
case approximately every three to five months,
depending on the climate conditions and the
care product used.
If dirt has penetrated the paint surface or if the
paint has become dull, the paint cleaner recom-
mended and approved by Mercedes-Benz
should be used.
Do not use these care products in the sun or on
the hood while the hood is hot.
240Care
Maintenance and care
Page 251 of 294
GWARNING
If the required tire pressure is not reached
after the specified time, the tire is too badly
damaged. The tire sealant cannot repair the
tire in this instance. Damaged tires and a tire
pressure that is too low can significantly
impair the vehicle's braking and driving char-
acteristics. There is a risk of accident.
Do not continue driving. Contact a qualified
specialist workshop.
Tire pressure reached
GWARNING
A tire temporarily sealed with tire sealant
impairs the driving characteristics and is not
suitable for higher speeds. There is a risk of
accident.
You should therefore adapt your driving style
accordingly and drive carefully. Do not exceed the specified maximum speed with a tire that
has been repaired using tire sealant.
The maximum permissible speed for a tire
sealed with tire sealant is 50 mph (80 km/h).
The upper part of the TIREFIT sticker must be
affixed to the instrument cluster in the driver's
field of vision.
!Residue from the tire sealant may come out
of the filler hose after use. This could cause
stains.
Therefore, place the filler hose in the plastic
bag which contained the TIREFIT kit.
HEnvironmental note
Have the used tire sealant bottle disposed of
professionally, e.g. at a qualified specialist
workshop.
If a tire pressure of 180 kPa (1.8 bar/26 psi) has
been attained after five minutes:
XSwitch off the tire inflation compressor.
XUnscrew the filler hose from the valve of the
faulty tire.
Tire sealant may escape when the filler hose is
unscrewed.
XStow the tire sealant bottle and the tire infla-
tion compressor.
XPull away immediately.
XStop after driving for approximately ten
minutes and check the tire pressure with the
tire inflation compressor.
The tire pressure must now be at least
130 kPa (1.3 bar/19 psi).
GWARNING
If the required tire pressure is not reached
after driving for a short period, the tire is too
badly damaged. The tire sealant cannot repair
the tire in this instance. Damaged tires and a
tire pressure that is too low can significantly
impair the vehicle's braking and driving char-
acteristics. There is a risk of accident.
Do not continue driving. Contact a qualified
specialist workshop.
iIn cases such as the one mentioned above,
contact an authorized Mercedes-Benz Cen-
ter. Or call 1-800-FOR-MERCedes (in the
USA) or 1-800-387-0100 (in Canada).
XCorrect the tire pressure if it is still at least
130 kPa (1.3 bar/19 psi). See the Tire and
Loading Information placard on the driver's
side B-pillar or the tire pressure table in the
fuel filler flap for values.
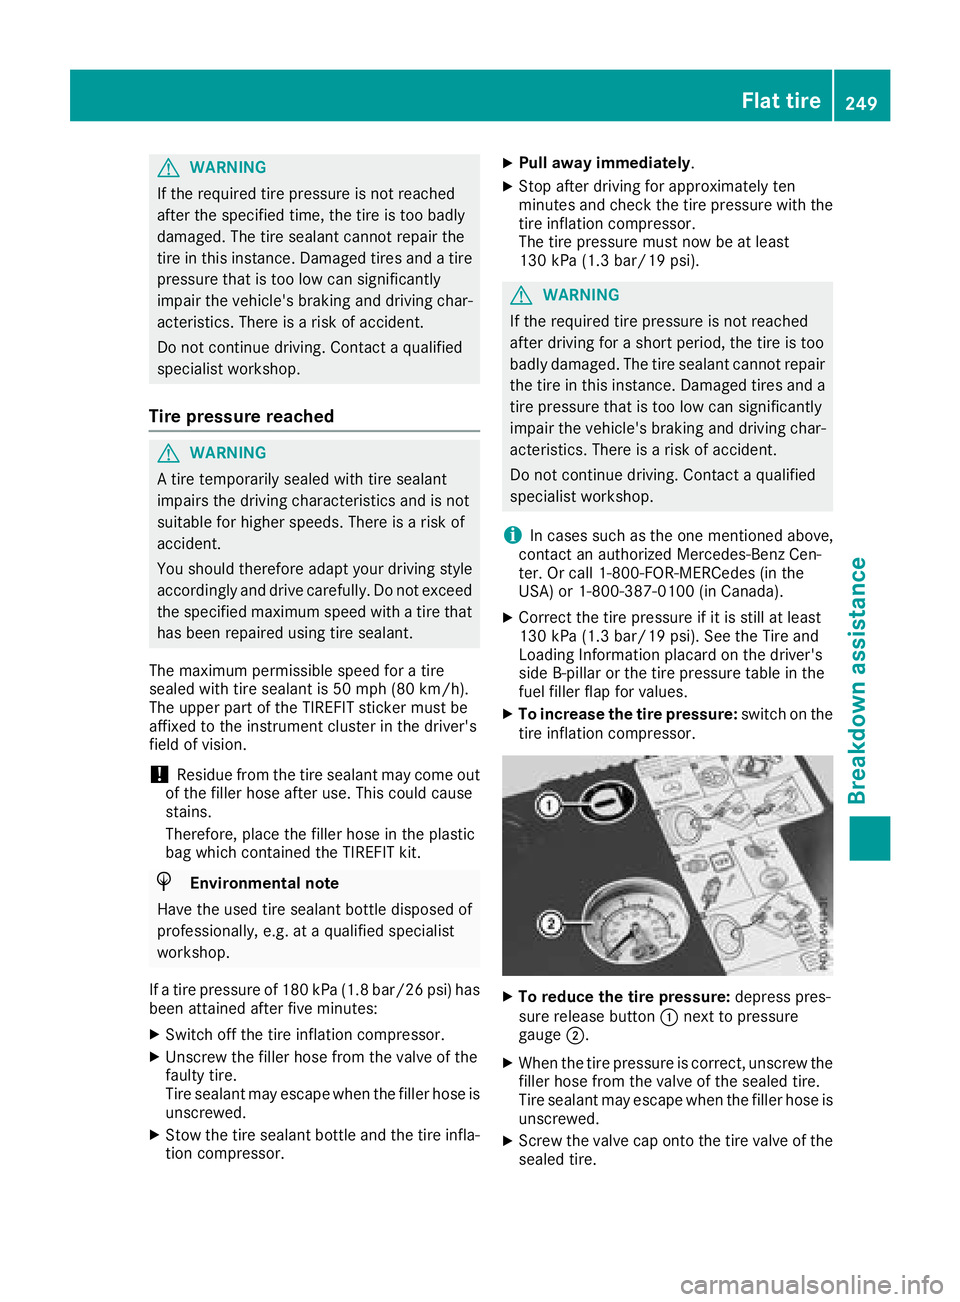
XTo increase the tire pressure: switch on the
tire inflation compressor.
XTo reduce the tire pressure: depress pres-
sure release button :next to pressure
gauge ;.
XWhen the tire pressure is correct, unscrew the
filler hose from the valve of the sealed tire.
Tire sealant may escape when the filler hose is
unscrewed.
XScrew the valve cap onto the tire valve of the
sealed tire.
Flat tire249
Breakdown assistance
Z