2018 MERCEDES-BENZ AMG GT COUPE emergency towing
[x] Cancel search: emergency towingPage 22 of 294
Replacing...................................... .276
Service life ..................................... 259
Sidewall (definition) ....................... 275
Speed rating (definition) ................ 275
Storing ...........................................2 77
Structure and characteristics
(definition) ..................................... 274
Summer tires in winter .................. 260
Temperature .................................. 270
TIN (Tire Identification Number)
(definition) ..................................... 276
Tire bead (definition) ......................2 75
Tire pressure (definition) ................ 275
Tire pressures (recommended) ...... 274
Tire size (data) ............................... 280
Tire size designation, load-bearing
capacity, speed rating .................... 271
Tire tread ....................................... 259
Tire tread (definition) ..................... 275
Total load limit (definition) ............. 276
Traction ......................................... 270
Traction (definition) ....................... 276
Tread wear ..................................... 270
Uniform Tire Quality Grading
Standards ...................................... 269
Uniform Tire Quality Grading
Standards (definition) .................... 274
Wear indicator (definition) ............. 276
Wheel and tire combination ........... 280
Wheel rim (definition) .................... 274
see Flat tire
Tool
see Vehicle tool kit
Touchpad
Changing the station/music
track .............................................. 207
Character suggestions ................... 206
Deleting characters ....................... 206
Entering a space ............................ 206
Entering characters ....................... 206
Gesture control .............................. 206
Handwriting recognition ................ 206
Operating the touchpad ................. 206
Overview ........................................ 206
Quick access for Audio .................. 207
Switching ....................................... 206
Switching input line ....................... 206 Tow-starting
Emergency engine starting ............ 256
To
wing away
Important safety guidelines ........... 254
Installing the towing eye ................ 255
Removing the towing eye ............... 255
Transporting the vehicle ................ 256
With both axles on the ground ....... 255
Towing eye ......................................... 245
Traction system
see ETS (Electronic Traction System)
Traffic reports
see also Digital Operator's Man-
ual .................................................. 204
Transmission
Driving tips .................................... 115
Selector lever ................................ 112
see Automatic transmission
Transmission position display ......... 114
Transmission positions
General notes ................................ 112
Overview ........................................ 113
Transporting the vehicle .................. 256
Trim pieces (cleaning instruc-
tions) .................................................. 243
Trip computer (on-board com-
puter) .................................................. 157
Trip odometer
Calling up ....................................... 156
Resetting (on-board computer) ...... 157
Trunk load (maximum) ...................... 288
Trunk partition .................................. 215
Turn signals
Display message ............................ 180
Switching on/off .............................. 92
Two-way radio
Frequencies ................................... 282
Installation ..................................... 282
Transmission output (maximum) .... 282
Type identification plate
see Vehicle identification plate
U
UnlockingEmergency unlocking ....................... 72
From inside the vehicle (central
unlocking button) ............................. 71
20Index
Page 23 of 294

USB devicesConnecting to the Media Inter-
face .............................................. .212
V
Vanity mirror (in the sun visor) ........217
Vehicle
Correct use ...................................... 28
Data acquisition ............................... 29
Display message ............................ 188
Electronics ..................................... 282
Equipment ....................................... 25
Individual settings .......................... 163
Limited Warranty .............................2 9
Loading .......................................... 266
Locking (in an emergency) ............... 72
Locking (SmartKey) .......................... 65
Lowering ........................................ 280
Maintenance .................................... 26
Operating safety .............................. 27
Parking .......................................... 122
Parking for a long period ................ 125
Pulling away ................................... 107
Raising ........................................... 277
Reporting problems ......................... 28
Securing from rolling away ............ 277
Towing away .................................. 254
Transporting .................................. 256
Unlocking (in an emergency) ........... 72
Unlocking (SmartKey) ...................... 65
Vehicle data ................................... 288
Vehicle battery
see Battery (vehicle)
Vehicle data
Trunk load (maximum) ................... 288
Vehicle dimensions ........................... 288
Vehicle emergency locking ................ 72
Vehicle identification number
see VIN
Vehicle identification plate .............. 282
Vehicle maintenance
see ASSYST PLUS
Vehicle tool kit .................................. 245
Ventilation
see Climate control
Video
Operating the DVD ......................... 161 see also Digital Operator's Man-
ual .................................................. 204
VIN
Seat ............................................... 283
Type plate ...................................... 282W
Warning and indicator lampsABS ................................................ 196
Active Brake Assist ........................ 201
Brakes ........................................... 195
Check Engine ................................. 199
Coolant .......................................... 199
Distance warning ........................... 201
ESP
®.............................................. 196
ESP®OFF ....................................... 197
Fuel tank ........................................ 199
Overview .......................................... 34
Parking brake ................................ 198
PASSENGER AIR BAG ...................... 40
Reserve fuel ................................... 199
Restraint system ............................ 198
Seat belt ........................................ 193
SPORT handling mode ................... 198
Steering ......................................... 203
Tire pressure monitor .................... 202
Warranty .............................................. 25
Washer fluid
Display message ............................ 191
Weather display (COMAND)
see also Digital Operator's Man-
ual .................................................. 204
Wheel and tire combinations
Tires ............................................... 280
Wheel bolt tightening torque ........... 280
Wheel chock ...................................... 277
Wheels
Changing a wheel .......................... 276
Checking ........................................ 259
Cleaning ......................................... 241
Important safety notes .................. 258
Information on driving .................... 258
Interchanging/changing ................ 276
Mounting a new wheel ................... 279
Mounting a wheel .......................... 277
Notes on sport tires ....................... 258
Removing a wheel .......................... 279
Index21
Page 53 of 294
ProblemPossible causes/consequences andMSolutions
The PASSENGER AIR
BAG OFF indicator lamp
lights up and remains lit,
even though the front-
passenger seat is occu-
pied by an adult or a per-
son of a stature corre-
sponding to that of an
adult.The classification of the person on the front-passenger seat is incor-
rect.
XMake sure the conditions for a correct classification of the person
on the front-passenger seat are met (Ypage 47).
XIf the PASSENGER AIR BAG OFF indicator lamp remains lit, the front-
passenger seat may not be used.
XHave OCS checked as soon as possible at an authorized Mercedes- Benz Center.
The PASSENGER AIR
BAG OFF indicator lamp
does not light up and/or
does not stay on.
The front-passenger seat
is:
Runoccupied
Roccupied by the
weight of a child up to
twelve months old in a
child restraint system
OCS is malfunctioning.
XMake sure there is nothing between the seat cushion and the child
seat.
XMake sure that the entire base of the child restraint system rests on
the seat cushion of the front-passenger seat. The backrest of the
forward-facing child restraint system must lie as flat as possible
against the backrest of the front-passenger seat. If necessary,
adjust the position of the front-passenger seat.
XWhen installing the child restraint system, make sure that the seat belt is tight. Do not pull the seat belt tight using the front-passenger
seat adjustment. This could result in the seat belt and the child
restraint system being pulled too tightly.
XCheck for correct installation of the child restraint system.
Make sure that the head restraint does not apply a load to the child
restraint system. If necessary, adjust the head restraint accord-
ingly.
XMake sure that no objects are applying additional weight onto the
seat.
XIf the PASSENGER AIR BAG OFF indicator lamp remains off and/or
the PASSENGER AIR BAG ON indicator lamp lights up, do not install a child restraint system on the front-passenger seat.
XHave OCS checked as soon as possible at an authorized Mercedes-Benz Center.
Deployment of Emergency Tensioning
Devices and air bags
Important safety notes
GWARNING
The air bag parts are hot after an air bag has
been deployed. There is a risk of injury.
Do not touch the air bag parts. Have a
deployed air bag replaced at a qualified spe-
cialist workshop as soon as possible.
GWARNING
A deployed air bag no longer offers any pro-
tection and cannot provide the intended pro-
tection in an accident. There is an increased
risk of injury.
Have the vehicle towed to a qualified special-
ist workshop in order to have a deployed air
bag replaced.
Mercedes-Benz recommends that you have the
vehicle transported to a qualified specialist
workshop after an accident. Observe the notes
on towing the vehicle away (
Ypage 254).
Occupant safety51
Safety
Z
Page 258 of 294
In order to signal a change of direction when
towing the vehicle with the hazard warning
lamps switched on, use the combination switch
as usual. In this case, only the indicator lamps
for the direction of travel flash. After resetting
the combination switch, the hazard warning
lamp starts flashing again.
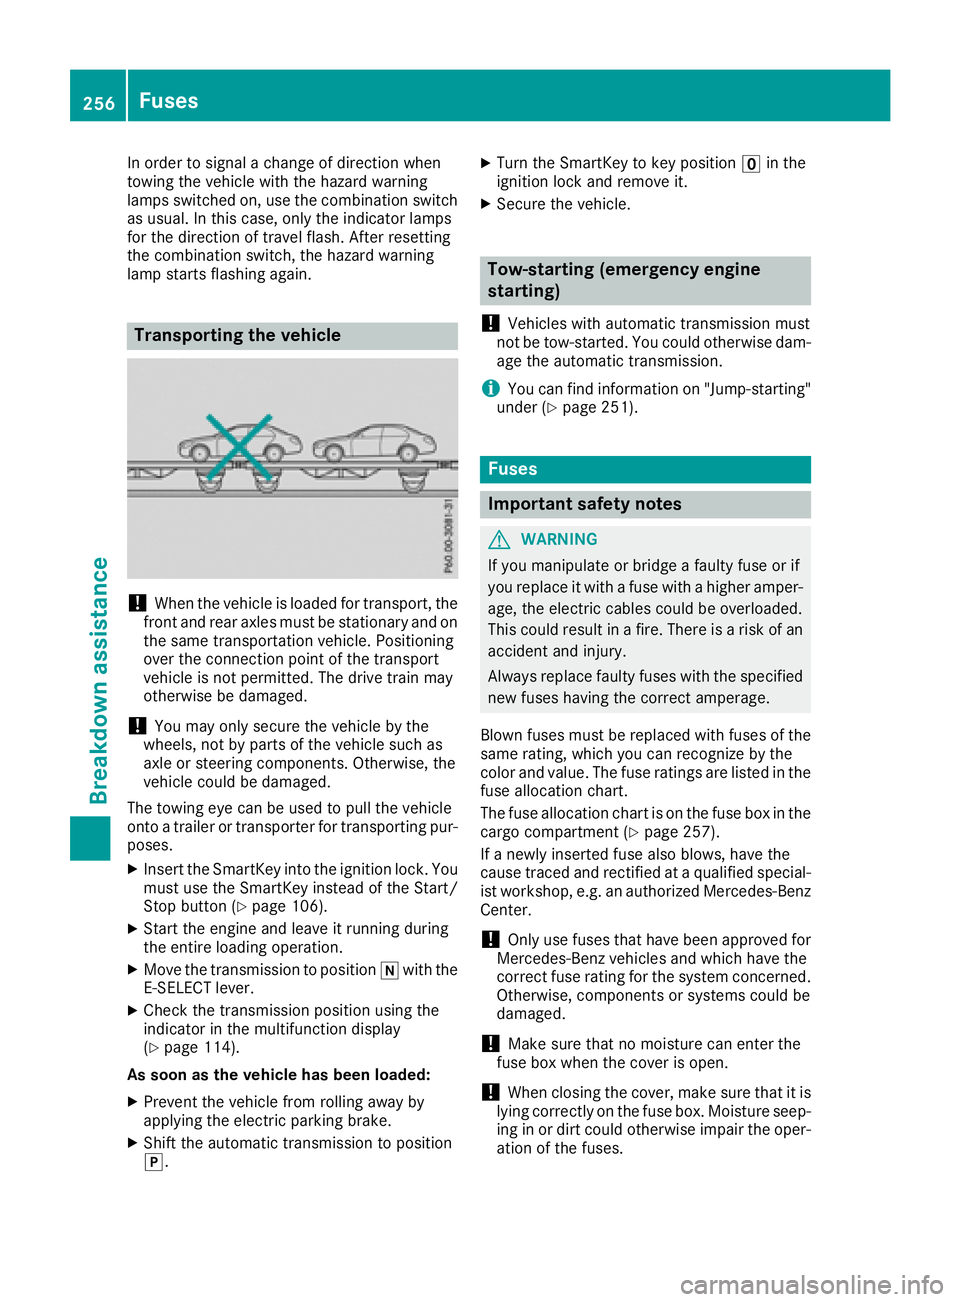
Transporting the vehicle
!When the vehicle is loaded for transport, the
front and rear axles must be stationary and on the same transportation vehicle. Positioning
over the connection point of the transport
vehicle is not permitted. The drive train may
otherwise be damaged.
!You may only secure the vehicle by the
wheels, not by parts of the vehicle such as
axle or steering components. Otherwise, the
vehicle could be damaged.
The towing eye can be used to pull the vehicle
onto a trailer or transporter for transporting pur- poses.
XInsert the SmartKey into the ignition lock. You
must use the SmartKey instead of the Start/
Stop button (
Ypage 106).
XStart the engine and leave it running during
the entire loading operation.
XMove the transmission to position iwith the
E-SELECT lever.
XCheck the transmission position using the
indicator in the multifunction display
(
Ypage 114).
As soon as the vehicle has been loaded:
XPrevent the vehicle from rolling away by
applying the electric parking brake.
XShift the automatic transmission to position
j.
XTurn the SmartKey to key position uin the
ignition lock and remove it.
XSecure the vehicle.
Tow-starting (emergency engine
starting)
!
Vehicles with automatic transmission must
not be tow-started. You could otherwise dam-
age the automatic transmission.
iYou can find information on "Jump-starting"
under (Ypage 251).
Fuses
Important safety notes
GWARNING
If you manipulate or bridge a faulty fuse or if
you replace it with a fuse with a higher amper- age, the electric cables could be overloaded.
This could result in a fire. There is a risk of an
accident and injury.
Always replace faulty fuses with the specified
new fuses having the correct amperage.
Blown fuses must be replaced with fuses of the
same rating, which you can recognize by the
color and value. The fuse ratings are listed in the
fuse allocation chart.
The fuse allocation chart is on the fuse box in the
cargo compartment (
Ypage 257).
If a newly inserted fuse also blows, have the
cause traced and rectified at a qualified special-
ist workshop, e.g. an authorized Mercedes-Benz Center.
!Only use fuses that have been approved for
Mercedes-Benz vehicles and which have the
correct fuse rating for the system concerned.
Otherwise, components or systems could be
damaged.
!Make sure that no moisture can enter the
fuse box when the cover is open.
!When closing the cover, make sure that it is
lying correctly on the fuse box. Moisture seep-
ing in or dirt could otherwise impair the oper-
ation of the fuses.
256Fuses
Breakdown assistance