2018 MERCEDES-BENZ AMG GT COUPE low oil pressure
[x] Cancel search: low oil pressurePage 142 of 294
Deactivating theHOL Dfunction
The HOLD function is deactivated if:
Ryou depress th eaccelerator and th etrans -
missio nis in position hork
Ryou shift th etransmissio nto position j
Ryou apply th ebrake sagain wit h acertain
amount of pressure until th eHOL Ddisplay dis -
appears from th emultifunction display
Ryou secure th evehicle usin gth eelectric park-
in g brake
iAfte r atime, th eelectric parking brake
secure sth evehicle and relieves th eservic e
brake .
The electric parking brake secure sth evehicle
automatically if th eHOLD function is activated
when th evehicle is stationary and :
Rthedriver's seat belt is no tfastene dand th e
driver's doo ris ope n
Rtheengin eis switched off, unless it is auto-
matically switched of fby th eEC Ostart/sto p
function
Ra syste mmalfunction occur s
Rthepowe rsupply is no tsufficien t
If th eelectric parking brake is no toperational, a
hor nwill soun dat regular intervals. The HOLD
function mus tthen be deactivated.
If amalfunction occurs, th etransmissio nmay
also be shifted to position jautomatically.
The Brake Immediately
messag emay also
appear in th emultifunction display.
XImmediately depress th ebrake firmly until th e
warnin gmessag ein th emultifunction display
goe sout .
The HOLD function is deactivated. If you turn of f
th eengine, take of fyour seat belt or ope nth e
driver's doo rwhen th eHOLD function is activa-
ted, ahor nwill soun dat regular intervals. The
soundin gof th ehor nalerts you to th efac tthat
th eHOLD function is still activated. If you
attempt to loc kth evehicle, th etone becomes
louder. The vehicle canno tbe locke duntil you
hav edeactivated th eHOLD function .
iAfterswitchin gof fth eengine, it can only be
started again once you hav edeactivated th e
HOLD function .
RACE START
Important safet ynotes
iRAC ESTART mus tno tbe used on normal
roads. RAC ESTART mus tonly be activated
and used on dedicated road circuits, outsid e
of publi croad use.
RAC ESTART enable soptimal acceleration from
a standin gstart .Fo rthis, asuitably high-grip
road surfac eis require dand th evehicle and tires
mus tbe in goo dworking order .
GWARNING
If you use RAC ESTART ,individual tires may
start to spi nand th evehicle could skid.
Dependin gon th eselecte dES P
®mode, there
is an increase dris kof skidding and havin gan
accident. Mak esur ethat no persons, animals
or obstacles are within range of th evehicle.
iObserv eth esafet ynote son drivin gsafet y
systems (Ypage 57).
Be sur eto rea dth esafet ynote sand informa-
tion on ES P
®(Ypage 61).
iObserveth especific servic erequirements
fo rracetrac kmode operation (Ypage 238).
Activation conditions
You can activateRAC ESTART under th efollow -
in g conditions:
Rth edoors are close d
Rtheengin eis running and th eengin eand
transmissio nare at operatin gtemperature .
Thi sis th ecas ewhen th eoil temperature dis -
play in th emultifunction display is shown in
whit e (
Ypage 165).
RESP®is functionin gcorrectl y (Ypage 61 )
Rthesteerin gwhee lis in th estraight-ahead
position
Rth evehicle is stationary and th ebrake peda lis
depressed sufficientl y(lef tfoot )
Rthetransmissio nis in position h
Rdrive program S,S+ orRAC Eis selecte d
(Ypage 111).
140Driving systems
Driving an d parking
Page 165 of 294
RDistance Pilot DISTRONIC (Ypage 131)
RDistance warning function of Active Brake
Assist (Ypage 58)
RBlind Spot Assist (Ypage 150)
RATTENTION ASSIST (Ypage 148)
RLane Keeping Assist (Ypage 152)
XPress:to display the ATTENTION ASSIST
assessment.
Service menu
Depending on the equipment installed in the
vehicle, you have the following options in the
Service
menu:
Rcalling up display messages in message mem- ory (Ypage 169)
Rchecking the tire pressure electronically
(Ypage 265).
Rcalling up the service due date (Ypage 238).
Rchecking the engine oil level using the on-
board computer (Ypage 234).
Settings menu
Introduction
Depending on the equipment installed in the
vehicle, you have the following options in the
Settings
menu:
Rchanging assistance settings (Ypage 163).
Rchanging the light settings (Ypage 164).
Rchanging the instrument cluster settings
(Ypage 164).
Rrestoring the factory settings (Ypage 165).
Assistance submenu
Activating/deactivating Active Brake
Assist
XPress òon the steering wheel to open the
menu list.
XPress :or9 on the steering wheel to
select the Settingsmenu.
XConfirm by pressing aon the steering
wheel.
XPress :or9 to select the DriveAs‐sistsubmenu.
XPressato confirm.
XSelect Brake Assistwith9 or:.
XPress ato confirm.
The current selection appears.
XTo activate/deactivate: press theabut-
ton again.
When Active Brake Assist is deactivated, the
æ symbol appears in the Assistance
Graphicmenu of the multifunction display.
Further information on Active Brake Assist
(
Ypage 58).
Activating/deactivating Blind Spot Assist
XPress òon the steering wheel to open the
menu list.
XPress :or9 on the steering wheel to
select the Settingsmenu.
XConfirm by pressing aon the steering
wheel.
XPress :or9 to select the DriveAs‐sistsubmenu.
XPressato confirm.
XPress :or9 to select Blind SpotAssist.
XPressato confirm.
The current selection appears.
XTo activate/deactivate: press theabut-
ton again.
When Blind Spot Assist is activated, gray
radar waves propagating backwards appear
next to the vehicle in the Assistance
Graphicmenu in the multifunction display.
For further information about Blind Spot Assist,
see (
Ypage 150).
Setting ATTENTION ASSIST
XPress òon the steering wheel to open the
menu list.
XPress :or9 on the steering wheel to
select the Settingsmenu.
XConfirm by pressing aon the steering
wheel.
XPress :or9 to select the DriveAs‐sistsubmenu.
XPressato confirm.
XSelect Attention Assistwith: or
9.
XPress ato confirm.
Menus and submenus163
On-board computer and displays
Z
Page 242 of 294
XUse plenty of water and rinse out the sponge
frequently.
XRinse the vehicle with clean water and dry
thoroughly with a chamois.
XDo not let the cleaning agent dry on the paint-work.
Carefully remove all deposits of road salt as
soon as possible when driving in winter.
Power washers
GWARNING
The water jet from a circular jet nozzle (dirt
blasters) can cause invisible exterior damage
to the tires or chassis components. Compo-
nents damaged in this way may fail unexpect-
edly. There is a risk of an accident.
Do not use power washers with circular jet
nozzles to clean the vehicle. Have damaged
tires or chassis components replaced imme-
diately.
!Always maintain a distance of at least
11.8 in (30 cm) between the vehicle and the
power washer nozzle. Information about the
correct distance is available from the equip-
ment manufacturer.
Move the power washer nozzle around when
cleaning your vehicle.
Do not aim directly at any of the following:
Rtires
Rdoor gaps, roof gaps, joints, etc.
Relectrical components
Rbattery
Rplug-type couplings
Rlights
Rseals
Rtrim
Rventilation slots
Damaged seals or electrical components can
lead to leaks or failures.
!Vehicles with decorative foil: parts of your
vehicle are covered with decorative foil. Main-
tain a distance of at least 27.5 in (70 cm)
between the foil-wrapped parts of the vehicle
and the nozzle of the high pressure cleaner.
Information about the correct distance is
available from the equipment manufacturer. Move the power washer nozzle around when
cleaning your vehicle.
The water temperature of the high-pressure
cleaner must not exceed 140 °F (60 °C).
!If the SmartKey is within the rear detection
range of KEYLESS-GO, the following situa-
tions, for example, could lead to the uninten-
tional opening of the tailgate:
Rwhen using an automatic car wash
Rwhen using a power washer
Make sure that the SmartKey is at least 10 ft (3 m) away from the vehicle.
Cleaning the paintwork
!Do not affix:
Rstickers
Rfilms
Rmagnetic plates or similar items
to painted surfaces. You could otherwise
damage the paintwork.
Scratches, corrosive deposits, areas affected by corrosion and damage caused by inadequate
care cannot always be completely repaired. In
such cases, visit a qualified specialist workshop.
XRemove dirt immediately, where possible,
while avoiding rubbing too hard.
XSoak insect remains with insect remover and
rinse off the treated areas afterwards.
XSoak bird droppings with water and rinse off
the treated areas afterwards.
XRemove coolant, brake fluid, tree resin, oils,
fuels and greases by rubbing gently with a
cloth soaked in petroleum ether or lighter
fluid.
XUse tar remover to remove tar stains.
XUse silicone remover to remove wax.
If water no longer forms "beads" on the paint
surface, use the paint care products recommen-
ded and approved by Mercedes-Benz. This is the
case approximately every three to five months,
depending on the climate conditions and the
care product used.
If dirt has penetrated the paint surface or if the
paint has become dull, the paint cleaner recom-
mended and approved by Mercedes-Benz
should be used.
Do not use these care products in the sun or on
the hood while the hood is hot.
240Care
Maintenance and care
Page 245 of 294
Always be particularly careful around the
exhaust tail pipe and the tail pipe trim. Allow
these components to cool down before touch-
ing them.
!Do not clean the exhaust pipe with acid-
based cleaning agents, such as bathroom
cleaner or wheel cleaner.
!Vehicles with black exhaust pipes: black
chromed screens should not be polished with
a chrome polish. They will otherwise lose their
black shine. For optimal care, the screens
should be rubbed with a lightly oiled cloth
after every car wash. Commercially available
engine and care oils are suitable for this.
For heavier soiling, you can apply a fine paint-
work polish with a microfiber cloth. Remove
the excess polish residue after polishing.
XClean the exhaust pipe with a chrome care
product tested and approved by Mercedes-
Benz.
Impurities combined with the effects of road grit
and corrosive environmental factors may cause flash rust to form on the surface. You can
restore the original shine of the exhaust pipe by
cleaning it regularly, especially in winter and
after washing.
Interior care
Cleaning the display
!For cleaning, do not use any of the following:
Ralcohol-based thinner or gasoline
Rabrasive cleaning agents
Rcommercially-available household cleaning
agents
These may damage the display surface. Do
not put pressure on the display surface when
cleaning. This could lead to irreparable dam-
age to the display.
XBefore cleaning the display, make sure that it
is switched off and has cooled down.
XClean the display surface using a commer-
cially available microfiber cloth and TFT/LCD
display cleaner.
XDry the display surface using a dry microfiber
cloth.
Cleaning the plastic trim
GWARNING
Care products and cleaning agents containing solvents cause surfaces in the cockpit to
become porous. As a result, plastic parts may
come loose in the event of air bag deploy-
ment. There is a risk of injury.
Do not use any care products and cleaning
agents to clean the cockpit.
!Never attach the following to plastic surfa-
ces:
Rstickers
Rfilms
Rperfume oil container or similar
You could otherwise damage the plastic.
!Do not allow cosmetics, insect repellent or
sunscreen to come into contact with the plas-
tic trim. This maintains the high-quality look of
the surfaces.
XWipe the plastic trim with a damp, lint-free
cloth, e.g. a microfiber cloth.
XHeavy soiling: use care and cleaning prod-
ucts recommended and approved by
Mercedes-Benz.
The surface may change color temporarily.
Wait until the surface is dry again.
Cleaning the steering wheel and gear or
selector lever
XThoroughly wipe with a damp cloth or use
leather care agents that have been recom-
mended and approved by Mercedes-Benz.
Cleaning the trim elements
!Do not use solvent-based cleaning agents
such as tar remover, wheel cleaners, polishes
or waxes. There is otherwise a risk of damag- ing the surface.
!Do not use chrome polish on trim pieces.
The trim pieces have a chrome look but are
mostly made of anodized aluminum and can
lose their shine if chrome polish is used. Use
a damp, lint-free cloth instead when cleaning
the trim pieces.
If the chrome-plated trim pieces are very
dirty, you can use a chrome polish. If you are
Care243
Maintenance and care
Z
Page 250 of 294
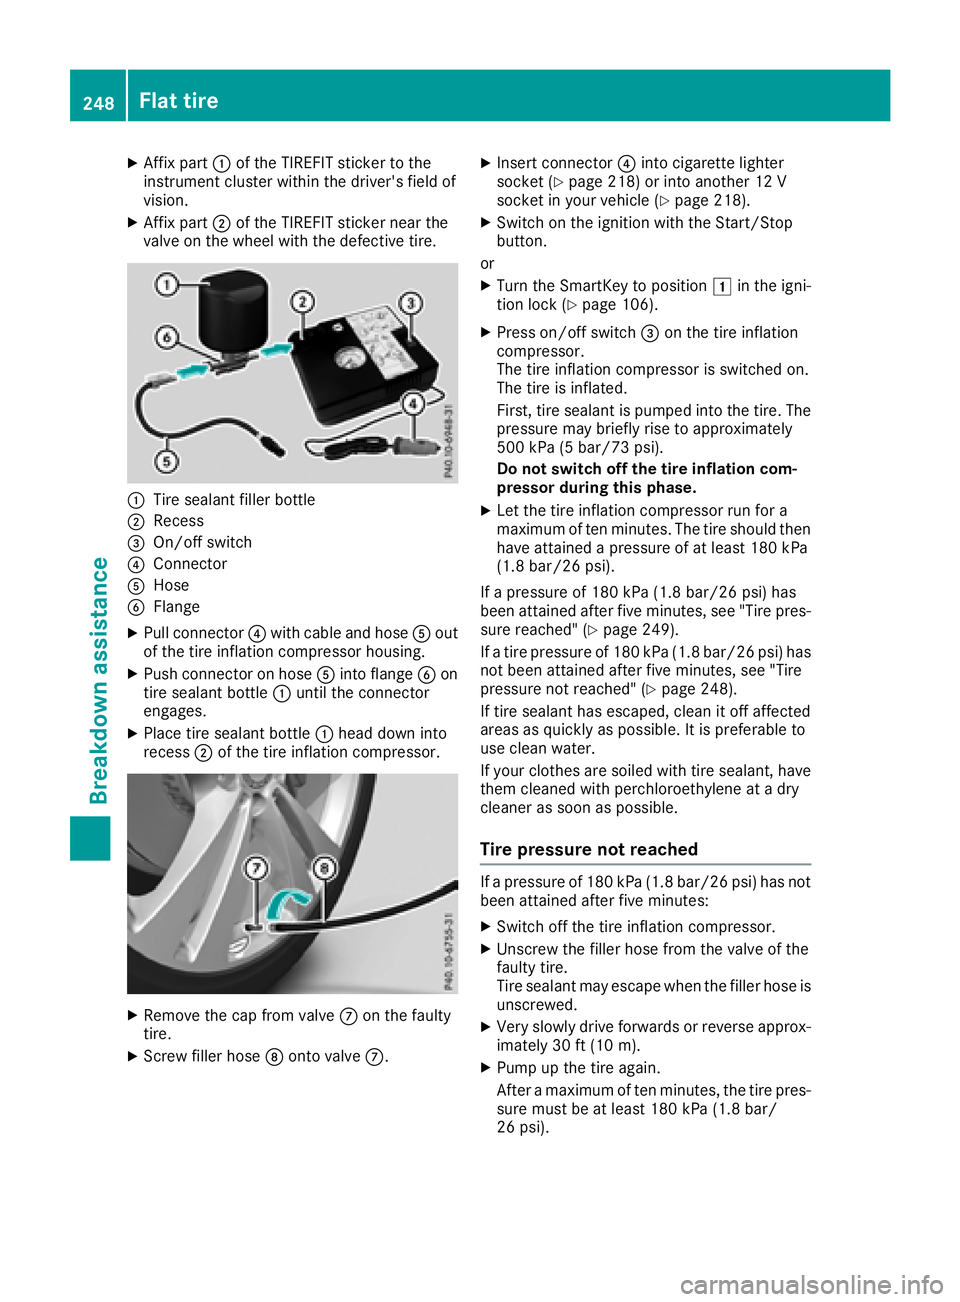
XAffix part:of the TIREFIT sticker to the
instrument cluster within the driver's field of
vision.
XAffix part ;of the TIREFIT sticker near the
valve on the wheel with the defective tire.
:Tire sealant filler bottle
;Recess
=On/off switch
?Connector
AHose
BFlange
XPull connector ?with cable and hose Aout
of the tire inflation compressor housing.
XPush connector on hose Ainto flange Bon
tire sealant bottle :until the connector
engages.
XPlace tire sealant bottle :head down into
recess ;of the tire inflation compressor.
XRemove the cap from valve Con the faulty
tire.
XScrew filler hose Donto valve C.
XInsert connector ?into cigarette lighter
socket (Ypage 218) or into another 12 V
socket in your vehicle (Ypage 218).
XSwitch on the ignition with the Start/Stop
button.
or
XTurn the SmartKey to position 1in the igni-
tion lock (Ypage 106).
XPress on/off switch =on the tire inflation
compressor.
The tire inflation compressor is switched on.
The tire is inflated.
First, tire sealant is pumped into the tire. The
pressure may briefly rise to approximately
500 kPa (5 bar/73 psi).
Do not switch off the tire inflation com-
pressor during this phase.
XLet the tire inflation compressor run for a
maximum of ten minutes. The tire should then
have attained a pressure of at least 180 kPa
(1.8 bar/26 psi).
If a pressure of 180 kPa (1.8 ba r/26 psi) has
been at tained after five minutes, see "Tire pres-
sure reached" (
Ypage 249).
If a tire pressure of 180 kPa (1.8 bar/26 psi) has
not been attained after five minutes, see "Tire
pressure not reached" (
Ypage 248).
If tire sealant has escaped, clean it off affected
areas as quickly as possible. It is preferable to
use clean water.
If your clothes ar e s
oiled with tire sealant, have
them cleaned with perchloroethylene at a dry
cleaner as soon as possible.
Tire pressure not reached
If a pressure of 180 kPa (1.8 bar/26 psi) has not
been attained after five minutes:
XSwitch off the tire inflation compressor.
XUnscrew the filler hose from the valve of the
faulty tire.
Tire sealant may escape when the filler hose is
unscrewed.
XVery slowly drive forwards or reverse approx- imately 30 ft (10 m).
XPump upthe tire again.
After a maximum of ten minutes, the tire pres-
sure must be at least 180 kPa (1.8 ba r/
26 psi) .
248Fla t tire
Breakdown assis tance
Page 287 of 294
and have the fuel tank and fuel lines drained
completely.
!Only refuel using unleaded premium grade
gasoline with at least 91 AKI/95 RON.
iE10 fuel contains up to 10% bioethanol.
Your vehicle is E10-compatible. You can
refuel your vehicle using E10 fuel.
!Only use the fuel recommended. Operating
the vehicle with other fuels can lead to dam-
age to the fuel system, engine and exhaust
system.
!Do not use the following:
RGasoline with more than 10% ethanol
RE100 (100% ethanol)
RGasoline with methanol
RM100 (100% methanol)
RGasoline with metalliferous additives
RDiesel
Do not mix such fuels with the fuel recom-
mended for your vehicle.
!To ensure the longevity and full perform-
ance of the engine, only premium-grade
unleaded gasoline must be used.
If standard unleaded gasoline is unavailable
and you have to refuel with unleaded gasoline
of a lower grade, observe the following pre-
cautions:
ROnly fill the fuel tank to half full with regular
unleaded gasoline and fill the rest with pre-
mium-grade unleaded gasoline as soon as
possible.
RDo not drive at the maximum speed.
RAvoid sudden acceleration and engine
speeds over 3,000 rpm.
Reformulated Gasoline (RFG) and/or unleaded
gasoline with additives can be used. The con-
centration of additives in the fuel, however,
must not exceed 10%, for example:
REthanol
RTAME
RETBE
RIPA
RTBA
For MTBE, the concentratio n should n
ot exceed
15%.
The concentration of methanol in gasoline,
including other additives, must not exceed 3%. All of these blends must fulfill the fuel require-
ments, for example:
Rknock resistance
Rboiling point
Rvapor pressure
You will usually find information about the fuel
grade on the fuel pump. If you cannot find the
label on the fuel pump, ask the gas station staff.
iFor further information, consult a qualified
specialist workshop or visit
http://www.mbusa.com (USA only).
Information on refueling (
Ypage 121).
Additives
!Operating the engine with fuel additives
added later can lead to engine failure. Do not
mix fuel additives with fuel. This does not
include additives for the removal and preven-
tion of residue buildup. gasoline must only be
mixed with additives recommended by
Mercedes-Benz. Comply with the instructions
for use on the product label. More information
about recommended additives can be
obtained from any authorized Mercedes-Benz
Center.
Mercedes-Benz recommends that you use bran-
ded fuels that have additives.
The fuel quality available in some countries may
not be sufficient. Residue could build up in the
fuel injection system as a result. In such cases,
and in consultation with an authorized
Mercedes-Benz Center, the fuel may be mixed
with the cleaning additive recommended by
Mercedes-Benz. You must obser
ve the notes
and mixing ratios specified on the container.
Service products and filling capacities285
Technical data
Z