2018 MERCEDES-BENZ AMG GT COUPE display
[x] Cancel search: displayPage 120 of 294
Shifting gears
If you pull on the left-hand or right-hand steering
wheel paddle shifter, the automatic transmis-
sion switches to temporary manual drive pro-
gram for a limited amount of time. Depending on
which steering wheel paddle shifter is pulled,
the automatic transmission immediately shifts
into the next gear down or up, if permitted.
XTo shift up: pull the right-hand steering wheel
paddle shifter (Ypage 116).
The automatic transmission shifts up to the
next gear.
If the maximum engine speed in the currently
engaged gear is reached and you continue to
accelerate, the automatic transmission auto-
matically shifts up in order to prevent engine
damage.
The automatic transmission will not shift up to
the next gear when the engine speed is very
low.
XTo shift down: pull on the left-hand steering
wheel paddle shifter (Ypage 116).
The automatic transmission shifts down to
the next gear.
If the engine were to exceed the maximum
engine speed when shifting down, the auto-
matic transmission protects against engine
damage by not shifting down.
Automatic down shifting occurs when coast-
ing.
When using kickdown, the automatic trans-
mission automatically shifts to a lower gear.
Deactivating
If you have activated temporary manual drive
program, it will remain active for a certain
amount of time. Under certain conditions, the
minimum amount of time is extended, e.g. in the
case of lateral acceleration, during overrun
mode or when driving on steep terrain.
When temporary manual drive program is deac-
tivated, the automatic transmission shifts into
the automatic drive program that was last selec-
ted. You can also deactivate temporary manual drive
program yourself:
XPull on the right-hand steering wheel paddle
shifter and hold it in place (Ypage 116).
or
XUse the DYNAMIC SELECT controller to
change the drive program (Ypage 111).
Temporary manual drive program is deactiva-
ted. The automatic transmission switches
into the automatic drive program that was last
selected.
Manual mode
General notes
In manual mode M, you can permanently change
gear yourself by using the steering wheel paddle
shifters. The transmission must be in position
h to do this.
The switching times correspond to the previ-
ously active automatic drive program.
The transmission only shifts down automatically at low engine speeds depending on the respec-
tive gear.
In addition to manual mode M, you can also
activate temporary manual drive program
(
Ypage 117).
Activating
In manual mode M, you can change gear your-
self using the steering wheel paddle shifters if
the transmission is in position h. You can see
the currently selected drive program and which gear is engaged in the multifunction display.
XPress the M button (Ypage 116).
M is shown in the multifunction display and
the indicator lamp on the M button lights up.
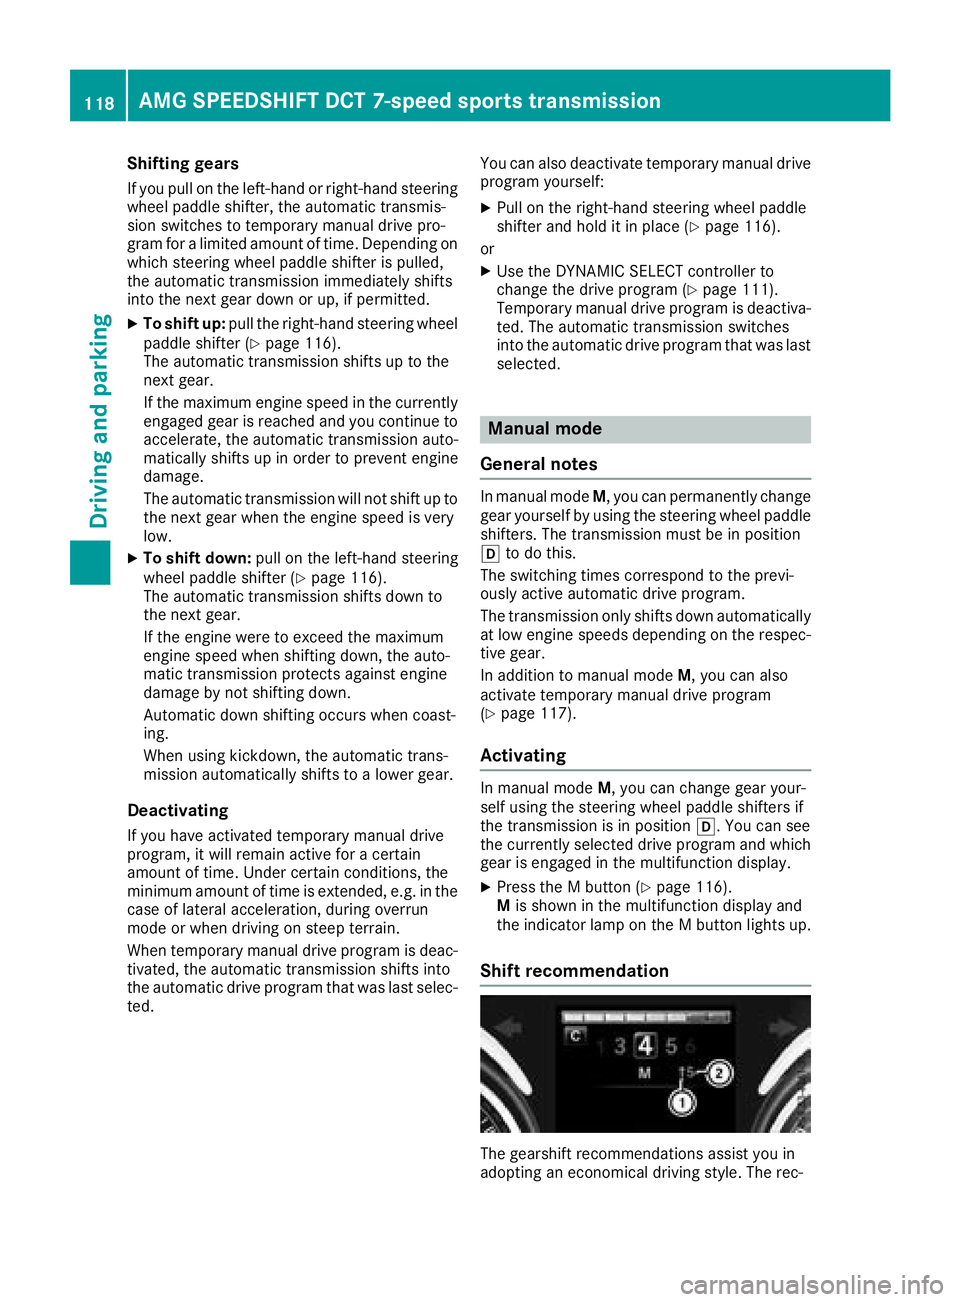
Shift recommendation
The gearshift recommendations assist you in
adopting an economical driving style. The rec-
118AMG SPEEDSHIFT DCT 7-speed sports transmission
Driving and parking
Page 121 of 294
ommended gear is shown in the multifunction
display.
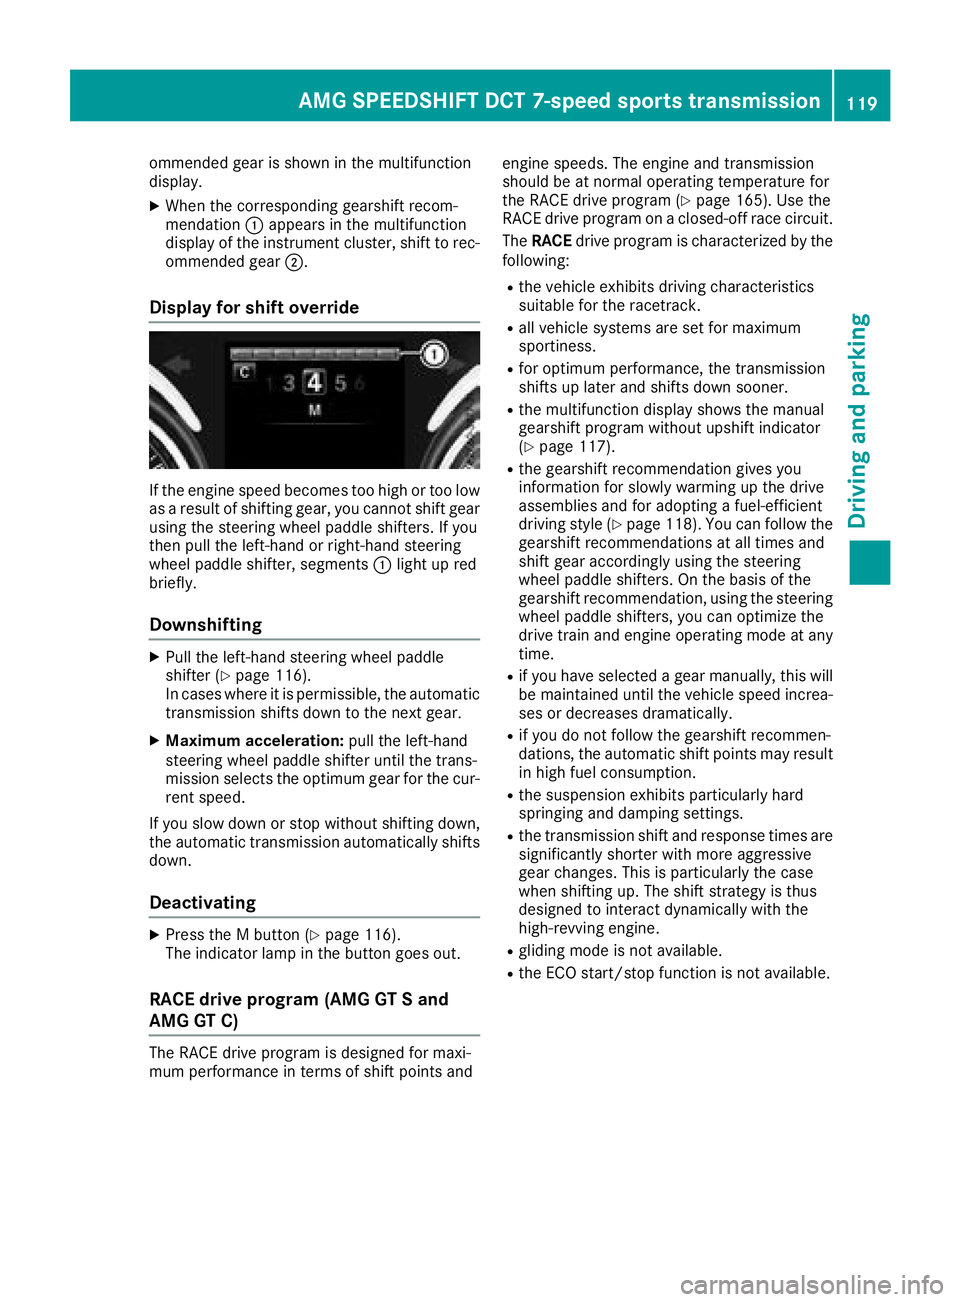
XWhen the corresponding gearshift recom-
mendation:appears in the multifunction
display of the instrument cluster, shift to rec-
ommended gear ;.
Display for shift override
If the engine speed becomes too high or too low
as a result of shifting gear, you cannot shift gear
using the steering wheel paddle shifters. If you
then pull the left-hand or right-hand steering
wheel paddle shifter, segments :light up red
briefly.
Downshifting
XPull the left-hand steering wheel paddle
shifter (Ypage 116).
In cases where it is permissible, the automatic transmission shifts down to the next gear.
XMaximum acceleration: pull the left-hand
steering wheel paddle shifter until the trans-
mission selects the optimum gear for the cur-
rent speed.
If you slow down or stop without shifting down,
the automatic transmission automatically shifts down.
Deactivating
XPress the M button (Ypage 116).
The indicator lamp in the button goes out.
RACE drive program (AMG GT S and
AMG GT C)
The RACE drive program is designed for maxi-
mum performance in terms of shift points and engine speeds. The engine and transmission
should be at normal operating temperature for
the RACE drive program (
Ypage 165). Use the
RACE drive program on a closed-off race circuit.
The RACE drive program is characterized by the
following:
Rthe vehicle exhibits driving characteristics
suitable for the racetrack.
Rall vehicle systems are set for maximum
sportiness.
Rfor optimum performance, the transmission
shifts up later and shifts down sooner.
Rthe multifunction display shows the manual
gearshift program without upshift indicator
(
Ypage 117).
Rthe gearshift recommendation gives you
information for slowly warming up the drive
assemblies and for adopting a fuel-efficient
driving style (
Ypage 118). You can follow the
gearshift recommendations at all times and
shift gear accordingly using the steering
wheel paddle shifters. On the basis of the
gearshift recommendation, using the steering
wheel paddle shifters, you can optimize the
drive train and engine operating mode at any
time.
Rif you have selected a gear manually, this will be maintained until the vehicle speed increa-
ses or decreases dramatically.
Rif you do not follow the gearshift recommen-
dations, the automatic shift points may resultin high fuel consumption.
Rthe suspension exhibits particularly hard
springing and damping settings.
Rthe transmission shift and response times are
significantly shorter with more aggressive
gear changes. This is particularly the case
when shifting up. The shift strategy is thus
designed to interact dynamically with the
high-revving engine.
Rgliding mode is not available.
Rthe ECO start/stop function is not available.
AMG SPEEDSHIFT DCT 7-speed sports transmission119
Driving and parking
Z
Page 123 of 294
!Use a filter when adding fuel from a fuel can.
The fuel lines and/or the fuel injection system
could otherwise be blocked by particles from
the fuel can.
If you overfill the fuel tank, fuel could spray out
when the fuel pump nozzle is removed.
For further information on fuel and fuel quality
(
Ypage 283).
Refueling
General information
Pay attention to the important safety notes
(Ypage 120).
If you unlock/lock the vehicle from the outside, the fuel filler flap also unlocks/locks.
The position of the fuel filler cap is displayed
8 in the instrument cluster. The arrow next
to the filling pump indicates the side of the vehi-
cle.
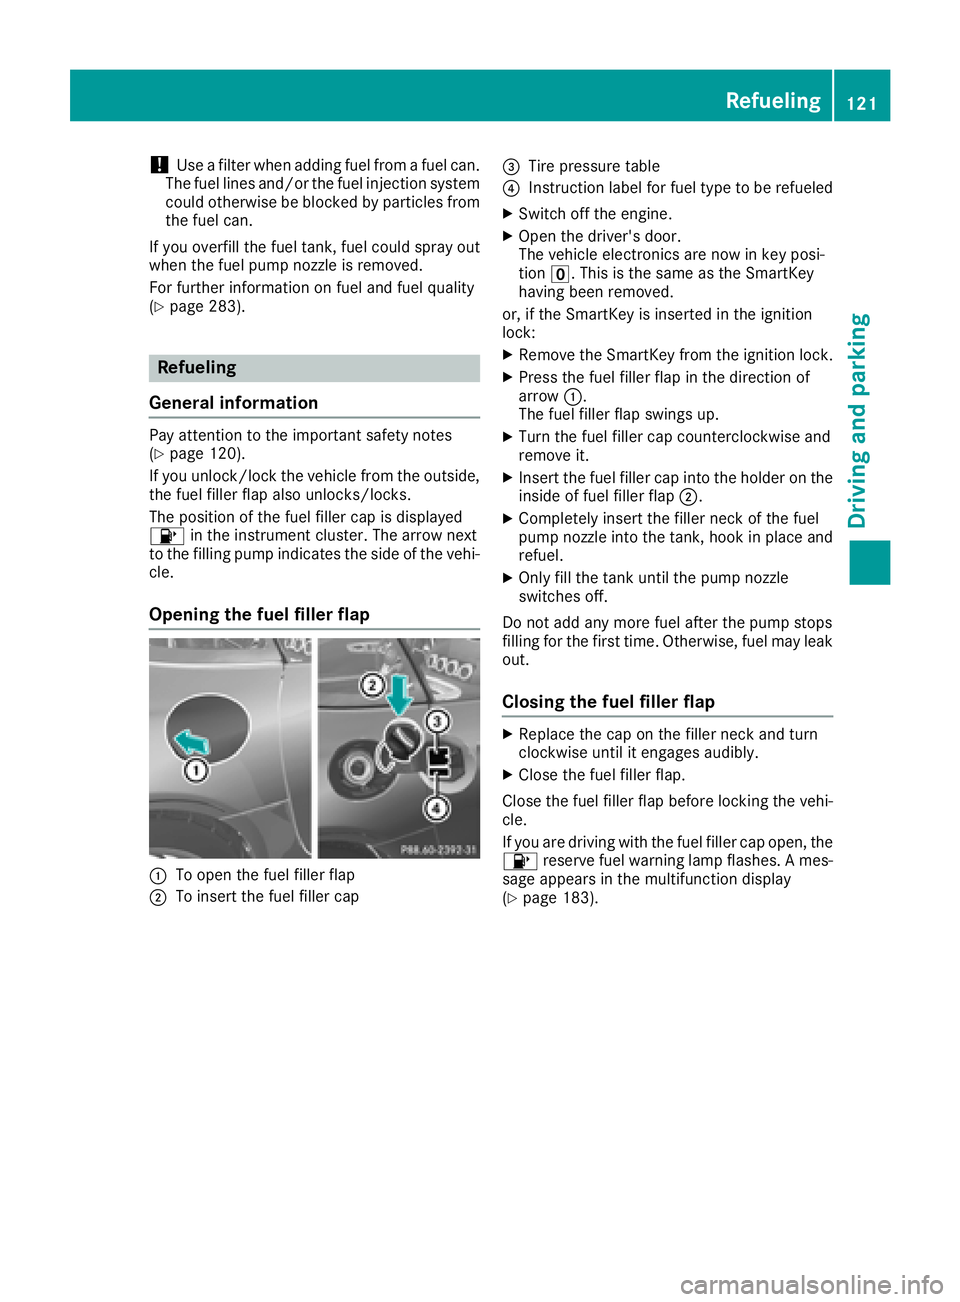
Opening the fuel filler flap
:To open the fuel filler flap
;To insert the fuel filler cap
=Tire pressure table
?Instruction label for fuel type to be refueled
XSwitch off the engine.
XOpen the driver's door.
The vehicle electronics are now in key posi-
tion u. This is the same as the SmartKey
having been removed.
or, if the SmartKey is inserted in the ignition
lock:
XRemove the SmartKey from the ignition lock.
XPress the fuel filler flap in the direction of
arrow :.
The fuel filler flap swings up.
XTurn the fuel filler cap counterclockwise and
remove it.
XInsert the fuel filler cap into the holder on the
inside of fuel filler flap ;.
XCompletely insert the filler neck of the fuel
pump nozzle into the tank, hook in place and
refuel.
XOnly fill the tank until the pump nozzle
switches off.
Do not add any more fuel after the pump stops
filling for the first time. Otherwise, fuel may leak
out.
Closing the fuel filler flap
XReplace the cap on the filler neck and turn
clockwise until it engages audibly.
XClose the fuel filler flap.
Close the fuel filler flap before locking the vehi-
cle.
If you are driving with the fuel filler cap open, the 8 reserve fuel warning lamp flashes. A mes-
sage appears in the multifunction display
(
Ypage 183).
Refueling121
Driving and parking
Z
Page 130 of 294

Observe the following rules when driving on salt-
treated roads:
RIn order to prevent any salt build-up, apply the
brakes occasionally while paying attention to
the traffic conditions.
RCarefully depress the brake pedal and the
beginning and end of a journey.
RMaintain a greater distance to the vehicle
ahead.
Servicing the brakes
!The brake fluid level may be too low, if:
Rif the red brake warning lamp lights up in
the instrument cluster and
Ryou hear a warning tone while the engine is
running
Observe additional warning messages in the
multifunction display.
The brake fluid level may be too low due to
brake pad wear or leaking brake lines.
Have the brake system checked immediately. Consult a qualified specialist workshop to
arrange this.
All checks and maintenance work on the brake
system must be carried out at a qualified spe-
cialist workshop.
Have brake pads installed and brake fluid
replaced at a qualified specialist workshop.
If the brake system has only been subject to
moderate loads, you should test the functional-
ity of your brakes at regular intervals.
Information on BAS (Brake Assist) (
Ypage 58).
For safety reasons, Mercedes-Benz recom-
mends only installing the following brake disks
and brake pads/linings:
Rbrake disks that have been approved by
Mercedes-Benz
Rbrake pads/linings that have been approved
by Mercedes-Benz or that are of an equivalent
standard of quality
Other brake disks or brake pads/linings can
compromise the safety of your vehicle.
Always replace all brake disks and brake pads/
linings on an axle at the same time. Always
install new brake pads/linings when replacing
brake disks.
The vehicle is equipped with lightweight brake
disks to which the wheel assembly with rim and
threaded connection is matched. The use of brake disks other than those
approved by Mercedes-Benz can change the
track width and is subject to approval, if appli-
cable.
Shock-type loads when handling the brake
discs, such as when changing wheels, can lead
to a reduction in comfort when driving with light-
weight brake discs. Avoid shock-type loads on
the lightweight brake disks, particularly on the
brake plate.
Mercedes-Benz recommends that you only use
brake fluid that has been specially approved for
your vehicle by Mercedes-Benz, or which corre-
sponds to an equivalent quality standard. Brake
fluid which has not been approved for
Mercedes-Benz vehicles or which is not of an
equivalent quality could affect your vehicle's
operating safety.
AMG high-performance and ceramic
brakes
The AMG brake systems are designed for heavy
loads. This may lead to noise when braking. This
will depend on:
RSpeed
RBraking force
REnvironmental conditions, such as tempera-
ture and humidity
The wear of individual components of the brake
system, such as the brake pads/linings or brake
discs, depends on the individual driving style
and operating conditions.
For this reason, it is impossible to state a mile-
age that will be valid under all circumstances. An aggressive driving style will lead to high wear.
You can obtain more information on this from a
qualified specialist workshop.
New and replaced brake pads and discs only
reach their optimum braking effect after several
hundred kilometers of driving. Compensate for
this by applying greater force to the brake pedal.
Keep this in mind, and adapt your driving and
braking accordingly during this break-in period.
Excessive heavy braking results in correspond-
ingly high brake wear. Observe the brake wear
warning lamp in the instrument cluster and note
any brake status messages in the multifunction
display. Especially for high performance driving,
it is important to maintain and have the brake
system checked regularly.
128Driving tips
Driving and parking
Page 132 of 294
brakes from overheating and wearing too
quickly.
Use cruise control only if road and traffic con-
ditions make it appropriate to maintain a steady
speed for a prolonged period. You can store any
road speed above 20 mph (30 km/h).
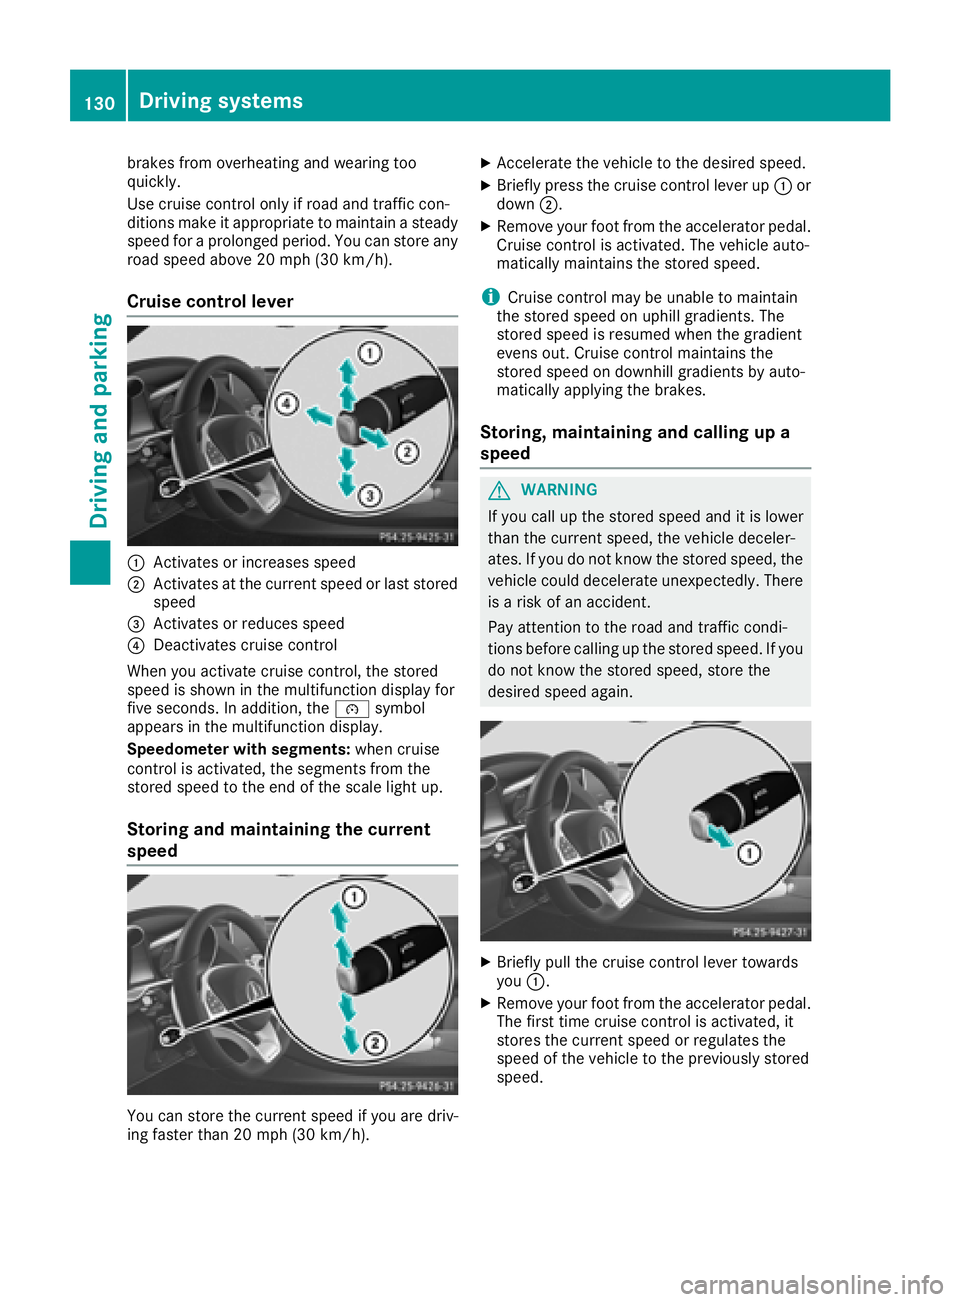
Cruise control lever
:Activates or increases speed
;Activates at the current speed or last stored
speed
=Activates or reduces speed
?Deactivates cruise control
When you activate cruise control, the stored
speed is shown in the multifunction display for
five seconds. In addition, the ésymbol
appears in the multifunction display.
Speedometer with segments: when cruise
control is activated, the segments from the
stored speed to the end of the scale light up.
Storing and maintaining the current
speed
You can store the current speed if you are driv-
ing faster than 20 mph (30 km/ h).
XAccelerate the vehicle to the desired speed.
XBriefly press the cruise control lever up :or
down ;.
XRemove your foot from the accelerator pedal.
Cruise control is activated. The vehicle auto-
matically maintains the stored speed.
iCruise control may be unable to maintain
the stored speed on uphill gradients. The
stored speed is resumed when the gradient
evens out. Cruise control maintains the
stored speed on downhill gradients by auto-
matically applying the brakes.
Storing, maintaining and calling up a
speed
GWARNING
If you call up the stored speed and it is lower
than the current speed, the vehicle deceler-
ates. If you do not know the stored speed, the vehicle could decelerate unexpectedly. There
is a risk of an accident.
Pay attention to the road and traffic condi-
tions before calling up the stored speed. If you
do not know the stored speed, store the
desired speed again.
XBriefly pull the cruise control lever towards
you :.
XRemove your foot from the accelerator pedal.
The first time cruise control is activated, it
stores the current speed or regulates the
speed of the vehicle to the previously stored
speed.
130Driving systems
Driving an d parking
Page 133 of 294
Setting a speed
Keep in mind that it may take a brief moment
until the vehicle has accelerated or braked to
the speed set.
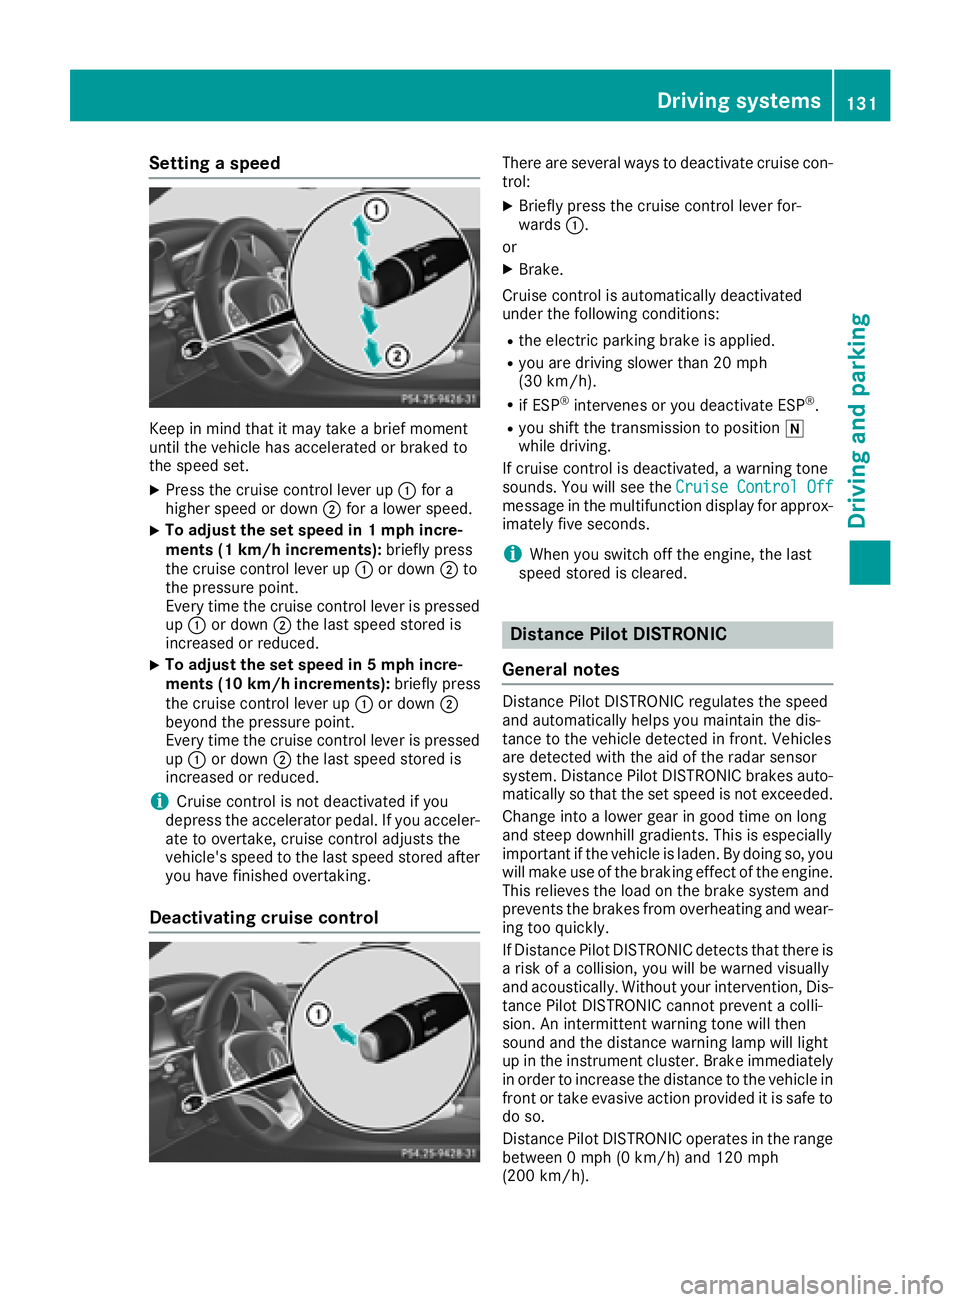
XPress the cruise control lever up:for a
higher speed or down ;for a lower speed.
XTo adjust the set speed in 1 mph incre-
ments (1 km/h increments): briefly press
the cruise control lever up :or down ;to
the pressure point.
Every time the cruise control lever is pressed
up : or down ;the last speed stored is
increased or reduced.
XTo adjust the set speed in 5 mph incre-
ments (10 km/h increments): briefly press
the cruise control lever up :or down ;
beyond the pressure point.
Every time the cruise control lever is pressed
up : or down ;the last speed stored is
increased or reduced.
iCruise control is not deactivated if you
depress the accelerator pedal. If you acceler-
ate to overtake, cruise control adjusts the
vehicle's speed to the last speed stored after
you have finished overtaking.
Deactivating cruise control
There are several ways to deactivate cruise con-
trol:
XBriefly press the cruise control lever for-
wards :.
or
XBrake.
Cruise control is automatically deactivated
under the following conditions:
Rthe electric parking brake is applied.
Ryou are driving slower than 20 mph
(30 km/h).
Rif ESP®intervenes or you deactivate ESP®.
Ryou shift the transmission to position i
while driving.
If cruise control is deactivated, a warning tone
sounds. You will see the Cruise Control Off
message in the multifunction display for approx-
imately five seconds.
iWhen you switch off the engine, the last
speed stored is cleared.
Distance Pilot DISTRONIC
General notes
Distance Pilot DISTRONIC regulates the speed
and automatically helps you maintain the dis-
tance to the vehicle detected in front. Vehicles
are detected with the aid of the radar sensor
system. Distance Pilot DISTRONIC brakes auto-
matically so that the set speed is not exceeded.
Change into a lower gear in good time on long
and steep downhill gradients. This is especially
important if the vehicle is laden. By doing so, you
will make use of the braking effect of the engine.
This relieves the load on the brake system and
prevents the brakes from overheating and wear-
ing too quickly.
If Distance Pilot DISTRONIC detects that there is a risk of a collision, you will be warned visually
and acoustically. Without your intervention, Dis-
tance Pilot DISTRONIC cannot prevent a colli-
sion. An intermittent warning tone will then
sound and the distance warning lamp will light
up in the instrument cluster. Brake immediately in order to increase the distance to the vehicle in
front or take evasive action provided it is safe to
do so.
Distance Pilot DISTRONIC operates in the range
between 0 mph (0 km/h) and 120 mph
(200 km/ h).
Driving system s131
Driving an d parking
Z
Page 136 of 294
pressure point for a higher speed, or down=
for a lower speed.
Every time the cruise control lever is pressed
up or down, the last speed stored is increased
or reduced.
XRemove your foot from the accelerator pedal.
Your vehicle adapts its speed to that of the
vehicle in front, but only up to the desired
stored speed.
iIf you do not fully release the accelerator
pedal, the DistancePilotSuspendedmes-
sage appears in the multifunction display. The set distance to a slower-moving vehicle in
front will then not be maintained. You will be
driving at the speed you determine by the
position of the accelerator pedal.
You can also activate Distance Pilot DISTRONIC
when stationary. The lowest speed that can be
set is 20 mph (30 km/ h).
XBriefly pull the cruise control lever towards
you ;or press it up :or down =.
Distance Pilot DISTRONIC is activated.
Activating at the current speed/last
stored speed
GWARNING
If you call up the stored speed and it differs
from the current speed, the vehicle acceler-
ates or decelerates. If you do not know the
stored speed, the vehicle could accelerate or brake unexpectedly. There is a risk of an acci-
dent.
Pay attention to the road and traffic condi-
tions before calling up the stored speed. If you
do not know the stored speed, store the
desired speed again.
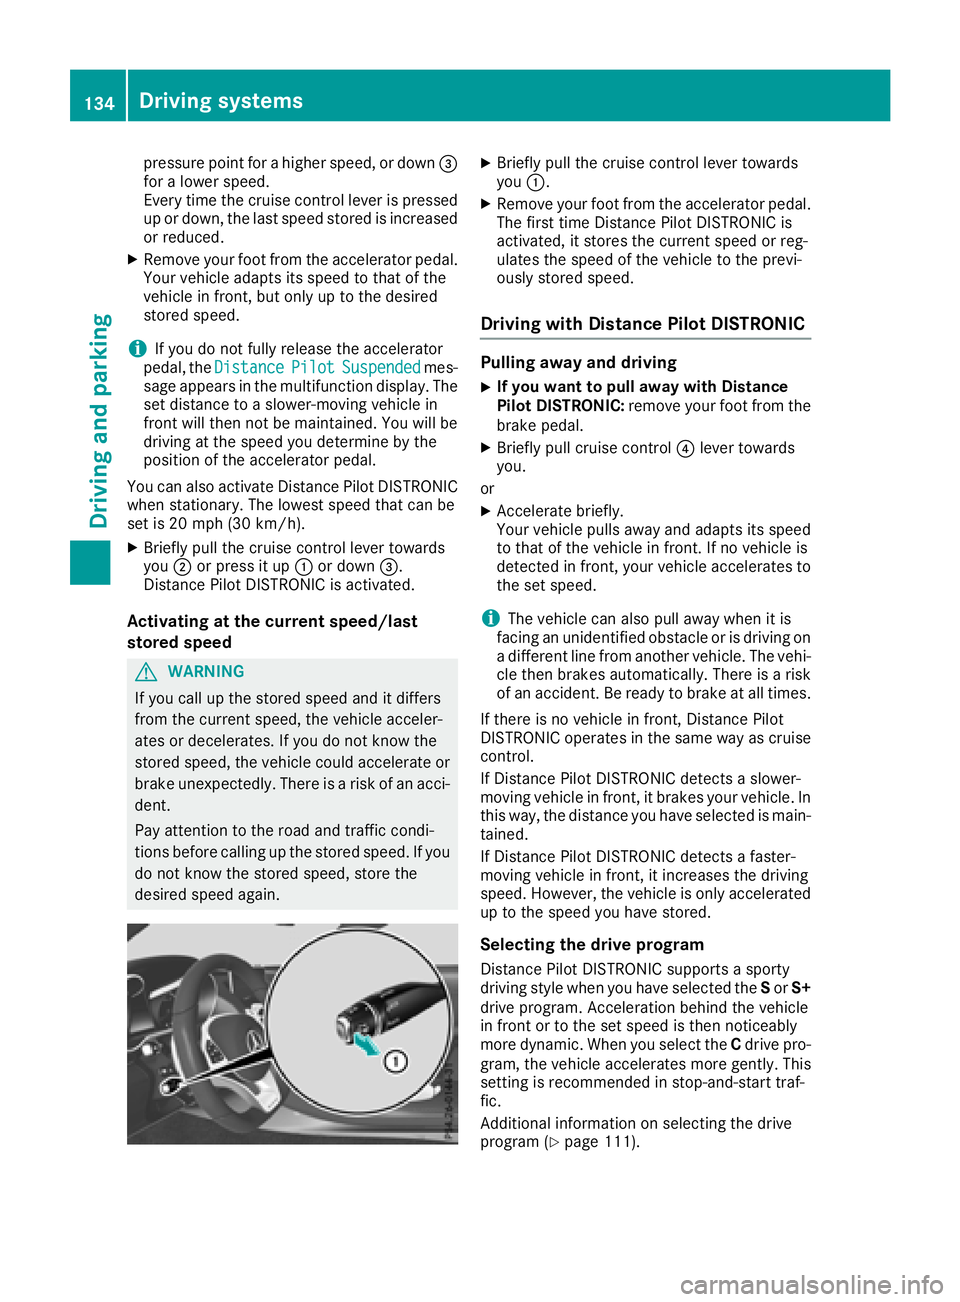
XBriefly pull the cruise control lever towards
you :.
XRemove your foot from the accelerator pedal.
The first time Distance Pilot DISTRONIC is
activated, it stores the current speed or reg-
ulates the speed of the vehicle to the previ-
ously stored speed.
Driving with Distance Pilot DISTRONIC
Pulling away and driving
XIf you want to pull away with Distance
Pilot DISTRONIC: remove your foot from the
brake pedal.
XBriefly pull cruise control ?lever towards
you.
or
XAccelerate briefly.
Your vehicle pulls away and adapts its speed
to that of the vehicle in front. If no vehicle is
detected in front, your vehicle accelerates to the set speed.
iThe vehicle can also pull away when it is
facing an unidentified obstacle or is driving on
a different line from another vehicle. The vehi-
cle then brakes automatically. There is a risk
of an accident. Be ready to brake at all times.
If there is no vehicle in front, Distance Pilot
DISTRONIC operates in the same way as cruise
control.
If Distance Pilot DISTRONIC detects a slower-
moving vehicle in front, it brakes your vehicle. In
this way, the distance you have selected is main-
tained.
If Distance Pilot DISTRONIC detects a faster-
moving vehicle in front, it increases the driving
speed. However, the vehicle is only accelerated
up to the speed you have stored.
Selecting the drive program
Distance Pilot DISTRONIC supports a sporty
driving style when you have selected the Sor S+
drive program. Acceleration behind the vehicle
in front or to the set speed is then noticeably
more dynamic. When you select the Cdrive pro-
gram, the vehicle accelerates more gently. This
setting is recommended in stop-and-start traf-
fic.
Additional information on se
lecting the drive
program (Ypage 111).
134Driving systems
Driving and parking
Page 138 of 294
iIf you accelerate to overtake, Distance Pilot
DISTRONIC adjusts the vehicle's speed to the
last speed stored after you have finished over-
taking.
Setting a specified minimum distance
You can set the specified minimum distance for
Distance Pilot DISTRONIC by varying the time
span between one and two seconds. With this
function you can set the minimum distance that
Distance Pilot DISTRONIC maintains to the vehi-
cle in front, dependent on vehicle speed. You
can see this distance in the multifunction dis-
play (
Ypage 137).
iMake sure that you maintain the minimum
distance to the vehicle in front as required by
law. Adjust the distance to the vehicle in front
if necessary.
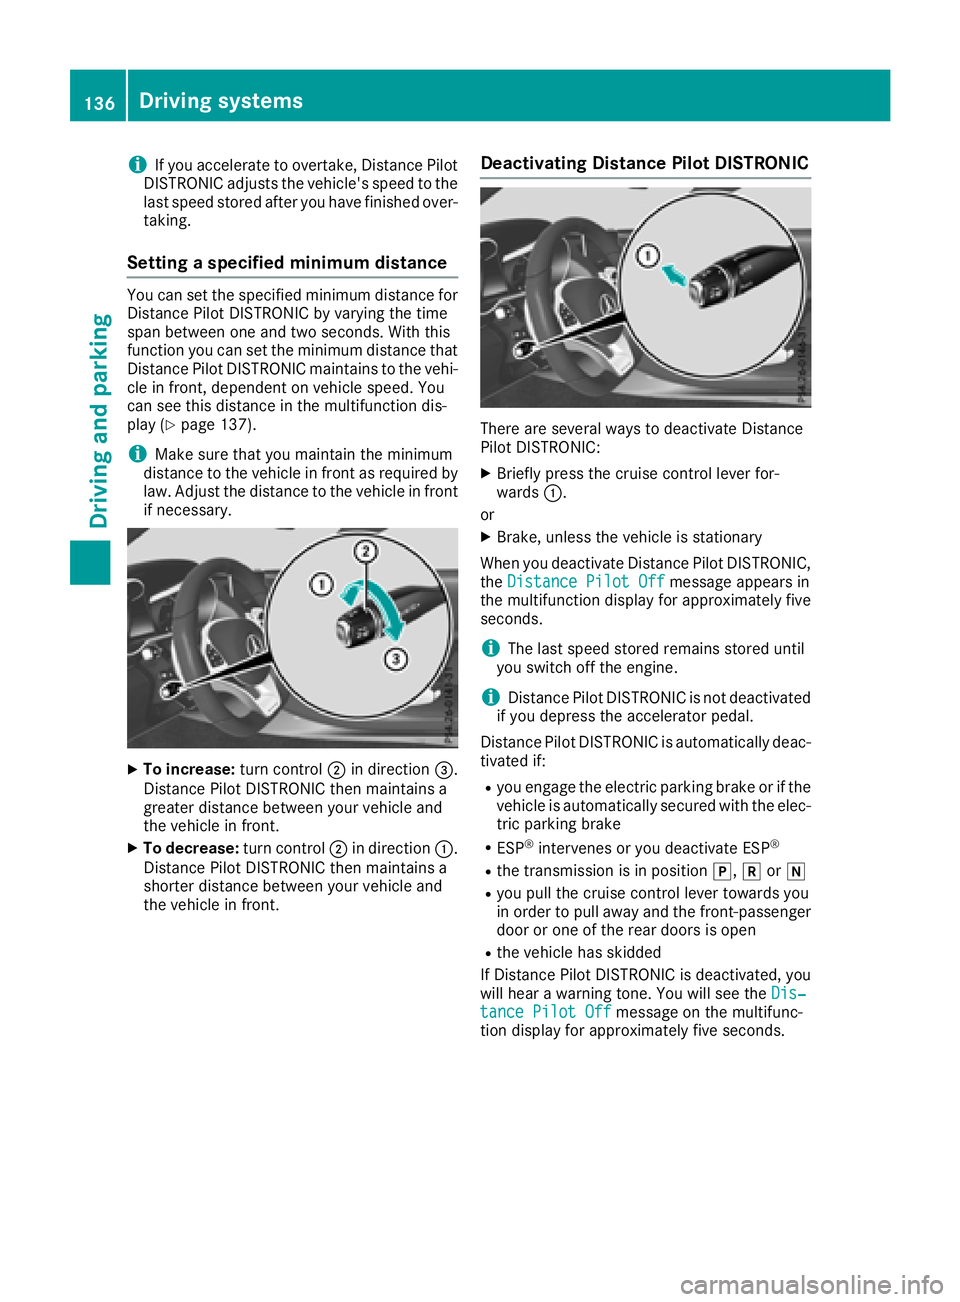
XTo increase: turn control;in direction =.
Distance Pilot DISTRONIC then maintains a
greater distance between your vehicle and
the vehicle in front.
XTo decrease: turn control;in direction :.
Distance Pilot DISTRONIC then maintains a
shorter distance between your vehicle and
the vehicle in front.
Deactivating Distance Pilot DISTRONIC
There are several ways to deactivate Distance
Pilot DISTRONIC:
XBriefly press the cruise control lever for-
wards :.
or
XBrake, unless the vehicle is stationary
When you deactivate Distance Pilot DISTRONIC,
the Distance Pilot Off
message appears in
the multifunction display for approximately five
seconds.
iThe last speed stored remains stored until
you switch off the engine.
iDistance Pilot DISTRONIC is not deactivated
if you depress the accelerator pedal.
Distance Pilot DISTRONIC is automatically deac-
tivated if:
Ryou engage the electric parking brake or if the
vehicle is automatically secured with the elec-
tric parking brake
RESP®intervenes or you deactivate ESP®
Rthe transmission is in position j,kori
Ryou pull the cruise control lever towards you
in order to pull away and the front-passenger
door or one of the rear doors is open
Rthe vehicle has skidded
If Distance Pilot DISTRONIC is deactivated, you
will hear a warning tone. You will see the Dis‐
tance Pilot Offmessage on the multifunc-
tion display for approximately five seconds.
136Driving systems
Driving and parking