2018 MERCEDES-BENZ AMG GT COUPE battery
[x] Cancel search: batteryPage 94 of 294

The daytime running lamps improve the visibility
of your vehicle during the day. Here, theDay‐
time Running Lightsfunction must be
switched on via the on-board computer
(
Ypage 164).
If the engine is running and you turn the light
switch to the TorL position, the manual
settings take precedence over the daytime run-
ning lamps.
Low-beam headlamps
GWARNING
When the light switch is set to Ã, the low-
beam headlamps may not be switched on
automatically if there is fog, snow or other
causes of poor visibility due to the weather
conditions such as spray. There is a risk of an
accident.
In such situations, turn the light switch to
L.
When the ignition is switched on and the light
switch is in the Lposition, the parking lamps
and low-beam headlamps are switched on even
if the light sensor does not sense dark condi-
tions. This is a particularly useful function in the
event of rain and fog.
XTo switch on the low-beam headlamps:
select key position 2with the Start/Stop
button or start the engine.
XTurn the light switch to the Lposition.
The green Lindicator lamp in the instru-
ment cluster lights up.
Rear fog lamp
The rear fog lamp improves visibility of your
vehicle for the traffic behind in the event of thick
fog. You must observe the legal requirements
for the country in which you are currently driving when operating the rear fog lamp.
XTo switch on the rear fog lamp: select key
position 2with the Start/Stop button or
start the engine.
XTurn the light switch to the LorÃ
position.
XPress the Rbutton.
The yellow Rindicator lamp in the instru-
ment cluster lights up.
XTo switch off the rear fog lamp: press the
R button.
The yellow Rindicator lamp in the instru-
ment cluster goes out.
Parking lamps
!If the battery charge is very low, the parking
lamps or standing lamps are automatically
switched off to enable the next engine start.
Always park your vehicle safely and in a well lit
area, in accordance with the relevant legal
stipulations. Avoid using the Tparking
lamps over a period of several hours. If pos-
sible, switch on the right-hand Xor left-
hand W standing lamps.
XTo switch on the parking lamps: turn the
light switch to the Tposition.
The green Tindicator lamp in the instru-
ment cluster lights up.
Standing lamps
Switching on the standing lamps ensures the
correspondin g side of the vehicle is illuminated.
XTo switch on the standing lamps: switch off
the engine with the Start/Stop button.
XTurn the light switch to the Wposition (left-
hand side of the vehicle) or Xposition
(right-hand side of the vehicle).
Combination switch
:High-beam headlamps
;Turn signal, right
=High-beam flasher
?Turn signal, left
92Exterior lighting
Lights and windshield wipers
Page 96 of 294
On very rare occasions, Adaptive Highbeam
Assist may fail to recognize other road users
that have lights, or may recognize them too
late. In this, or in similar situations, the auto-
matic high-beam headlamps will not be deac-tivated or will be activated regardless. There is
a risk of an accident.
Always carefully observe the traffic conditions
and switch off the high-beam headlamps in
good time.
Adaptive Highbeam Assist cannot take into
account road, weather or traffic conditions.
Adaptive Highbeam Assist is only an aid. You are
responsible for adjusting the vehicle's lighting
to the prevailing light, visibility and traffic con-
ditions.
In particular, the detection of obstacles can be
restricted if there is:
Rpoor visibility, e.g. due to fog, heavy rain or
snow
Rdirt on the sensors or the sensors are
obscured
Switching Adaptive Highbeam Assist
on/off
XTo switch on: turn the light switch to the
à position.
XPress the combination switch beyond the
pressure point in the direction of arrow :.
The _ indicator lamp in the multifunction
display lights up when it is dark and the light
sensor activates the low-beam headlamps.
If you are driving at speeds above approx-
imately 16 mph (25 km/h):
The headlamp range is set automatically
depending on the distance between the vehi-
cle and other road users.
If you are driving at speeds above approx-
imately 19 mph (30 km/h) and no other road
users have been detected:
The high-beam headlamps are switched on
automatically. The Kindicator lamp in the
instrument cluster also lights up.
If you are driving at speeds below approx-
imately 16 mph (25 km/h) or other road users have been detected or the roads are ade-
quately lit:
The high-beam headlamps are switched off
automatically. The Kindicator lamp in the instrument cluster goes out. The
_indi-
cator lamp in the multifunction display
remains lit.
XTo switch off: move the combination switch
back to its normal position or move the light
switch to another position.
The _ indicator lamp in the instrument
cluster goes out.
Headlamps fogged up on the inside
Certain climatic and physical conditions may
cause moisture to form in the headlamp. This
moisture does not affect the functionality of the
headlamp.
Interior lighting
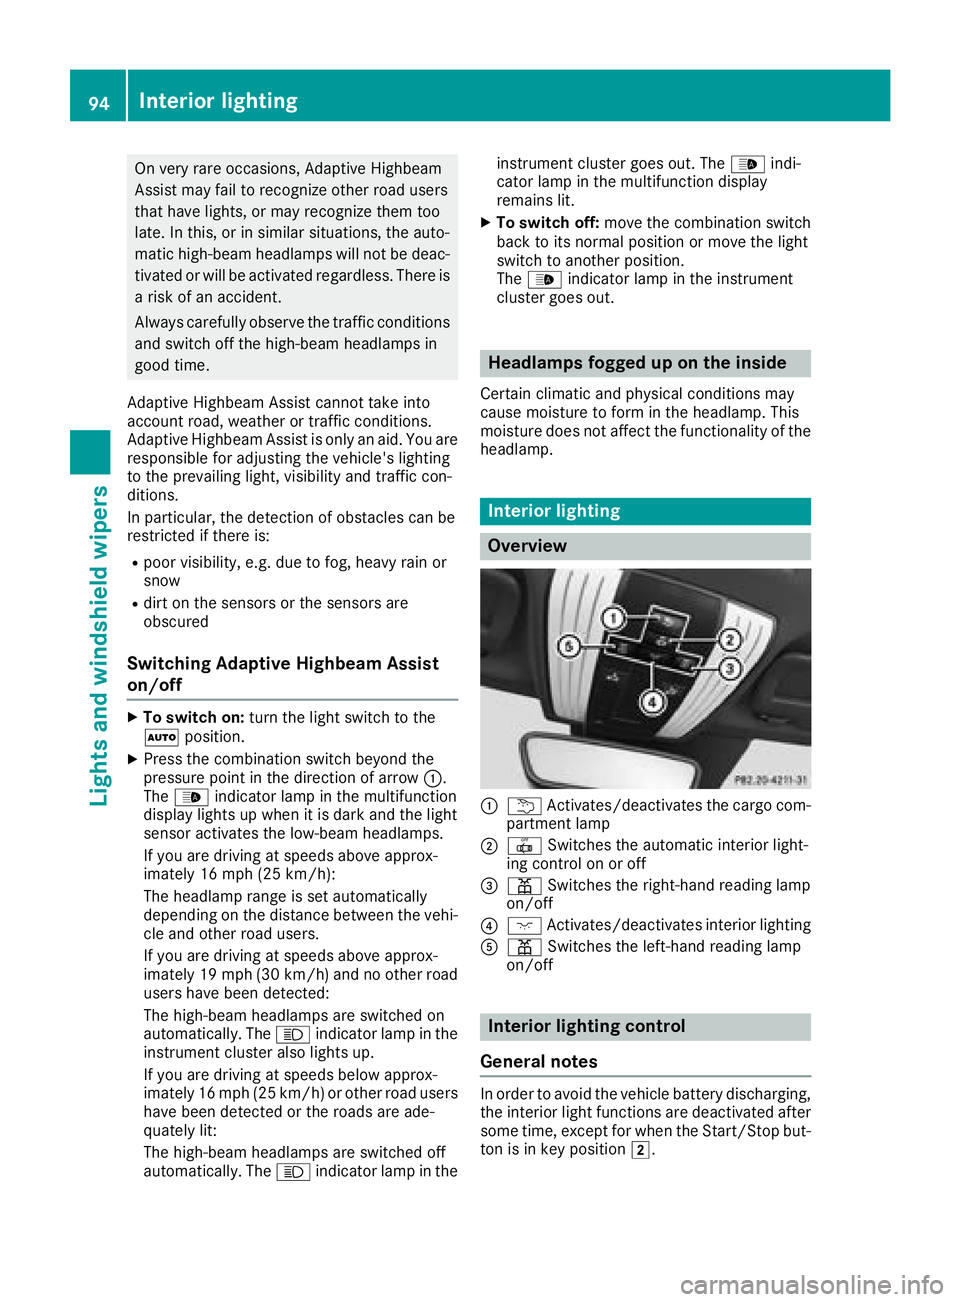
Overview
:u Activates/deactivates the cargo com-
partment lamp
;| Switches the automatic interior light-
ing control on or off
=p Switches the right-hand reading lamp
on/off
?c Activates/deactivates interior lighting
Ap Switches the left-hand reading lamp
on/off
Interior lighting control
General notes
In order to avoid the vehicle battery discharging,
the interior light functions are deactivated after
some time, except for when the Start/Stop but-
ton is in key position 2.
94Interior lighting
Lights and windshield wipers
Page 103 of 294
Setting the airflow
XSelect key position2with the Start/Stop
button (Ypage 106).
XTo increase or reduce: press theH
rocker switch up or down.
Activating/deactivating synchroniza-
tion
General notes
Climate control can be set centrally using the
synchronization function. The temperature set-
ting is adopted for the front-passenger side.
Activating/deactivating
XPress the 0rocker switch up or down.
The indicator lamp above the 0rocker
switch lights up or goes out.
The synchronization function deactivates if the
settings for the front-passenger side are
changed.
Defrosting the windshield
General notes
You can use this function to defrost the wind-
shield or to clear a fogged up windshield and
side windows.
Switch off the "Windshield defrosting" function
as soon as the windshield is clear again.
Activating/deactivating
XSelect key position 2with the Start/Stop
button (Ypage 106).
XTo switch on: press the¬rocker switch
up or down.
The indicator lamp above the ¬rocker
switch lights up. The current climate control
settings are deactivated.
The climate control system switches to the
following functions:
Rhigh airflow
Rhigh temperature
Rair distribution to the windshield and front
side windows
Rair-recirculation mode off
iIf necessary, the "Cooling with air dehumid-
ification" function is activated. In this case,
the indicator lamp above the ¿rocker
switch remains switched off.
XTo switch off: press the¬rocker switch
up or down.
The indicator lamp above the ¬rocker
switch goes out. The previously selected set-
tings are restored. Air-recirculation mode
remains deactivated.
Defrosting the windows
Windows fogged up on the inside
XActivate the "Cooling with air dehumidifica-
tion" function with the ¿rocker switch.
XSwitch on automatic mode using the Ã
rocker switch.
XIf the windows continue to fog up, activate the "Windshield defrosting" function using the
¬ rocker switch.
iYou should only select this setting until the
windshield is clear again.
Windows fogged up on the outside
XActivate the windshield wipers.
XSwitch on automatic mode using the Ã
rocker switch.
iIf you clean the windows regularly, they do
not fog up so quickly.
Rear window defroster
General notes
The rear window defroster has a high current
draw. You should therefore switch it off as soon
as the rear window is clear. Otherwise, the rear
window defroster switches off automatically
after several minutes.
If the battery voltage is too low, the rear window defroster may switch off.
Operating the climate control systems101
Climate control
Page 104 of 294
Activating/deactivating
XSelectke yposition 2withth eStart/Sto p
butto n (Ypage 106).
XPress th e¤ rockerswitch up or down .
The indicator lamp abov eth e¤ rocker
switch lights up or goe sout .
Problems with the rear window defros ter
ProblemPossible causes/consequences and MSolutions
The rear window
defrosterhas deactiva-
te dprematurel yor can -
no tbe activated.The battery has no tbeen sufficientl ycharged.
XSwitc hoff any consumer sthat are no trequired, e.g. reading lamps,
interior lighting or th eseat heating .
When th ebattery is sufficientl ycharged, th erear window defroste r
can be activated again .
Switching air-recirculati on mode
on/off
Gene ral notes
You can also temporarily deactivat eth eflo wof
fresh air manually if unpleasant odor sare enter-
ing th evehicl efrom outside .The air already
inside th evehicl ewill then be recirculated.
If you switch on air-recirculation mode, th ewin -
dows can fog up mor equickly, in particular at
low temperatures .Only use air-recirculation
mod ebriefl yto preven tth ewindows from fog -
gin gup.
Activating/deactivating
XSelec tke yposition 2withth eStart/Sto p
butto n (Ypage 106).
XTo activate: press theg rockerswitch up
or down .
The indicator lamp abov eth eg rocker
switch lights up.
Air-recirculation mod eswitches on automati-
cally:
Rat high outside temperatures
Rin atunne l(vehicles wit h anavigation system
only)
The indicator lamp abov eth eg rocker
switch is no tlit when automatic air-recirculation
mod eis activated. Outside air is added after
about 30 minutes.
XTo deactivate: press theg rockerswitch
up or down .
The indicator lamp abov eth eg rocker
switch goes out .
Air-recirculation mod edeactivates automati-
cally:
Rafter approximately fiv eminute sat outside
temperatures belo wapproximately 41 ‡
(5 †)
Rafter approximately five minutes if cooling
with air dehumidification is deactivated
Rafter approximately 30 minutes at outside
temperatures above approximately 41 ‡
(5 †) if the "Cooling with dehumidification"
function is activated
Air vents
Important safety notes
GWARNING
Very hot or very cold air can flow from the air
vents. This could result in burns or frostbite in
the immediate vicinity of the air vents. There
is a risk of injury.
Make sure that all vehicle occupants always
maintain a sufficient distance to the air out-
lets. If necessary, redirect the airflow to
another area of the vehicle interior.
102Air vents
Climate control
Page 111 of 294
Rthe engine and the transmission are at a suf-
ficient temperature for the ECO start/stop
function
Rthe set temperature for the vehicle interior
has been reached
Rthe battery is sufficiently charged
Rthe system detects that the windshield is not
fogged up when the air-conditioning system isswitched on
Rthe hood is closed
Rthe driver's door is closed and the driver's
seat belt is fastened
All of the vehicle's systems remain active when
the engine is stopped automatically.
The HOLD function can also be activated if the
engine has been switched off automatically. It is
then not necessary to continue applying the
brakes during the automatic stop phase. When
you depress the accelerator pedal, the engine
starts automatically and the braking effect of
the HOLD function is deactivated.
Automatic engine start
The engine starts automatically if:
Ryou switch off the ECO start/stop function by pressing the ECO button
Rswitch to drive program RACE,S+ orS
(Ypage 111)
Ryou switch to manual mode M(Ypage 116)
Rin transmission position h, the brake pedal
is released and the HOLD function is not
active
Ryou depress the accelerator pedal
Ryou engage reverse gear k
Ryou move the transmission out of position j
Ryou unfasten your seat belt or open the driv-
er's door
Rthe vehicle starts to roll
Rthe brake system requires this
Rthe temperature in the vehicle interior devi-
ates from the set range
Rthe system detects moisture on the wind-
shield when the air-conditioning system is
switched on
Rthe battery's condition of charge is too low
Shifting the transmission to position jdoes
not start the engine.
Deactivating or activating the ECO
start/stop function
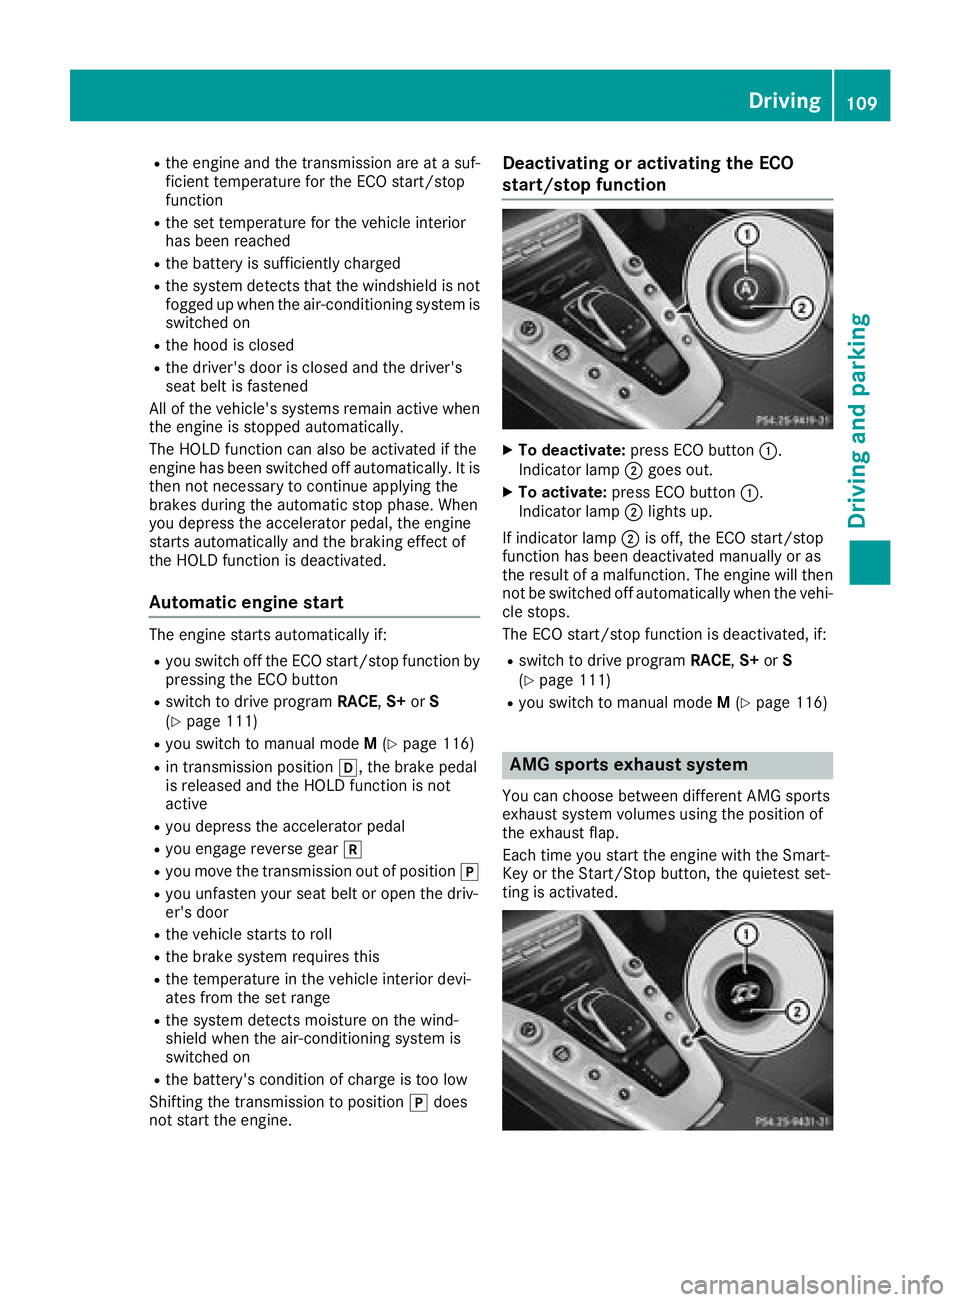
XTo deactivate: press ECO button :.
Indicator lamp ;goes out.
XTo activate: press ECO button :.
Indicator lamp ;lights up.
If indicator lamp ;is off, the ECO start/stop
function has been deactivated manually or as
the result of a malfunction. The engine will then
not be switched off automatically when the vehi- cle stops.
The ECO start/stop function is deactivated, if:
Rswitch to drive program RACE,S+ orS
(Ypage 111)
Ryou switch to manual mode M(Ypage 116)
AMG sports exhaust system
You can choose between different AMG sports
exhaust system volumes using the position of
the exhaust flap.
Each time you start the engine with the Smart-
Key or the Start/Stop button, the quietest set-
ting is activated.
Driving109
Driving an d parking
Z
Page 112 of 294
Setting the volume:
XPress button:.
If you select the loudest setting, indicator
lamp ;lights up. You can also adjust the position of the exhaust
flap using the:RDYNAMIC SELECT controller (Ypage 111)
RMultimedia system
Problems with the engine
ProblemPossible causes/consequences and
MSolutions
The engine does not
start.The HOLD function or Distance Pilot DISTRONIC is activated.
XDeactivate the HOLD function (Ypage 140) or Distance Pilot
DISTRONIC (Ypage 136).
XTry to start the engine again (Ypage 106).
The engine does not
start. The starter motor
can be heard.RThere is a malfunction in the engine electronics.
RThere is a malfunction in the fuel supply.
Before attempting to start the engine again:
XPress the Start/Stop button repeatedly until all indicator lamps in
the instrument cluster go out.
or
XTurn the SmartKey back to SmartKey position uin the ignition
lock.
XTry to start the engine again (Ypage 106). Avoid excessively long
and frequent attempts to start the engine as these will drain the
battery.
If the engine does not start after several attempts:
XConsult a qualified specialist workshop.
The engine does not
start. You cannot hear
the starter motor.The on-board voltage is too low because the battery is too weak or
discharged.
XJump-start the vehicle (Ypage 251).
If the engine does not start despite attempts to jump-start it:
XConsult a qualified specialist workshop.
The starter motor was exposed to a thermal load that was too high.
XTry to start the engine again (Ypage 106).
If the engine still does not start:
XConsult a qualified specialist workshop.
110Driving
Driving and parking
Page 124 of 294
Problems with fuel and the fuel tank
ProblemPossible causes/consequences andMSolutions
Fuel is leaking from the
vehicle.GWARNING
The fuel line or the fuel tank is faulty.
Risk of explosion or fire.
XApply the electric parking brake.
XSwitch off the engine.
XOpen the driver's door.
The vehicle electronics are now in key position u. This is the same
as the SmartKey having been removed.
or, if the SmartKey is inserted in the ignition lock:
XRemove the SmartKey from the ignition lock.
XDo not restart the engine under any circumstances.
XConsult a qualified specialist workshop.
The fuel filler flap cannot
be opened.The fuel filler flap is not unlocked.
XUnlock the vehicle (Ypage 65).
The SmartKey battery is discharged or nearly discharged.
XUnlock the vehicle using the mechanical key (Ypage 67).
The fuel filler flap is unlocked, but the opening mechanism is jammed.
XConsult a qualified specialist workshop.
Parking
Important safety notes
GWARNING
Flammable material such as leaves, grass or
twigs may ignite if they come into contact with
hot parts of the exhaust system or exhaust
gas flow. There is a risk of fire.
Park the vehicle so that no flammable mate-
rials come into contact with parts of the vehi-
cle which are hot. Take particular care not to
park on dry grassland or harvested grain
fields.
GWARNING
If you leave children unsupervised in the vehi-
cle, they could set it in motion by, for example:
Rrelease the parking brake.
Rshift the automatic transmission out of the
parking position P.
Rstart the engine.
In addition, they may operate vehicle equip-
ment and become trapped. There is a risk of
an accident and injury.
When leaving the vehicle, always take the
SmartKey with you and lock the vehicle. Never
leave children unsupervised in the vehicle.
!If the engine speed is too high or the vehicle
is in motion, do not shift the automatic trans- mission directly from htok, from ktoh
or directly to j.
Do not open the driver's door while the vehi-
cle is in motion. At low speeds in transmission
122Parking
Driving and parking
Page 127 of 294
In addition, at least one of the following condi-
tions must be fulfilled:
Rthere is a system malfunction
Rthe power supply is insufficient
Rthe vehicle is stationary for a lengthy period
The red F(USA only) or !(Canada only)
indicator lamp in the instrument cluster lights
up.
The electric parking brake is not automatically
engaged if the engine is switched off by the ECO
start/stop function.
Releasing automatically
The electric parking brake is released when the
following conditions are fulfilled:
Rthe engine is running
Rthe seat belt tongue is engaged in the belt
buckle
Rthe transmission is in position hork and
you depress the accelerator pedal or shift
from position jtoh ork
Rif the transmission is in position k, the tail-
gate must be closed
If the seat belt tongue is not engaged in the seat
belt buckle, the following conditions must be
fulfilled:
Rthe driver's door and front-passenger door
are closed
Ryou move the transmission out of position j
or you have previously driven at a speed
above 2 mph (3 km/h)
Rif the transmission is in position k, the tail-
gate must be closed
When the electric parking brake is released, the red F (USA only) or !(Canada only) indi-
cator lamp goes out in the instrument cluster.
Emergency braking
The vehicle can also be braked during an emer-
gency by using the electric parking brake.
XWhile driving, push handle :of the electric
parking brake (Ypage 124).
The vehicle is braked as long as you keep
handle :of the electric parking brake
pressed. The longer electric parking brake
handle :is depressed, the greater the brak-
ing force. During braking:
Ra warning tone sounds
Rthe
Please Release Parking Brakemes-
sage appears
Rthe red F(USA only) or !(Canada
only) indicator lamp in the instrument cluster
flashes
When the vehicle has been braked to a stand-
still, the electric parking brake is engaged.
Parking the vehicle for a long period
General notes
If you leave the vehicle parked for longer than
four weeks, the battery may be damaged by
exhaustive discharging.
If you leave the vehicle parked for longer than six
weeks, the vehicle may suffer damage as a
result of lack of use.
XVisit a qualified specialist workshop and seek
advice.
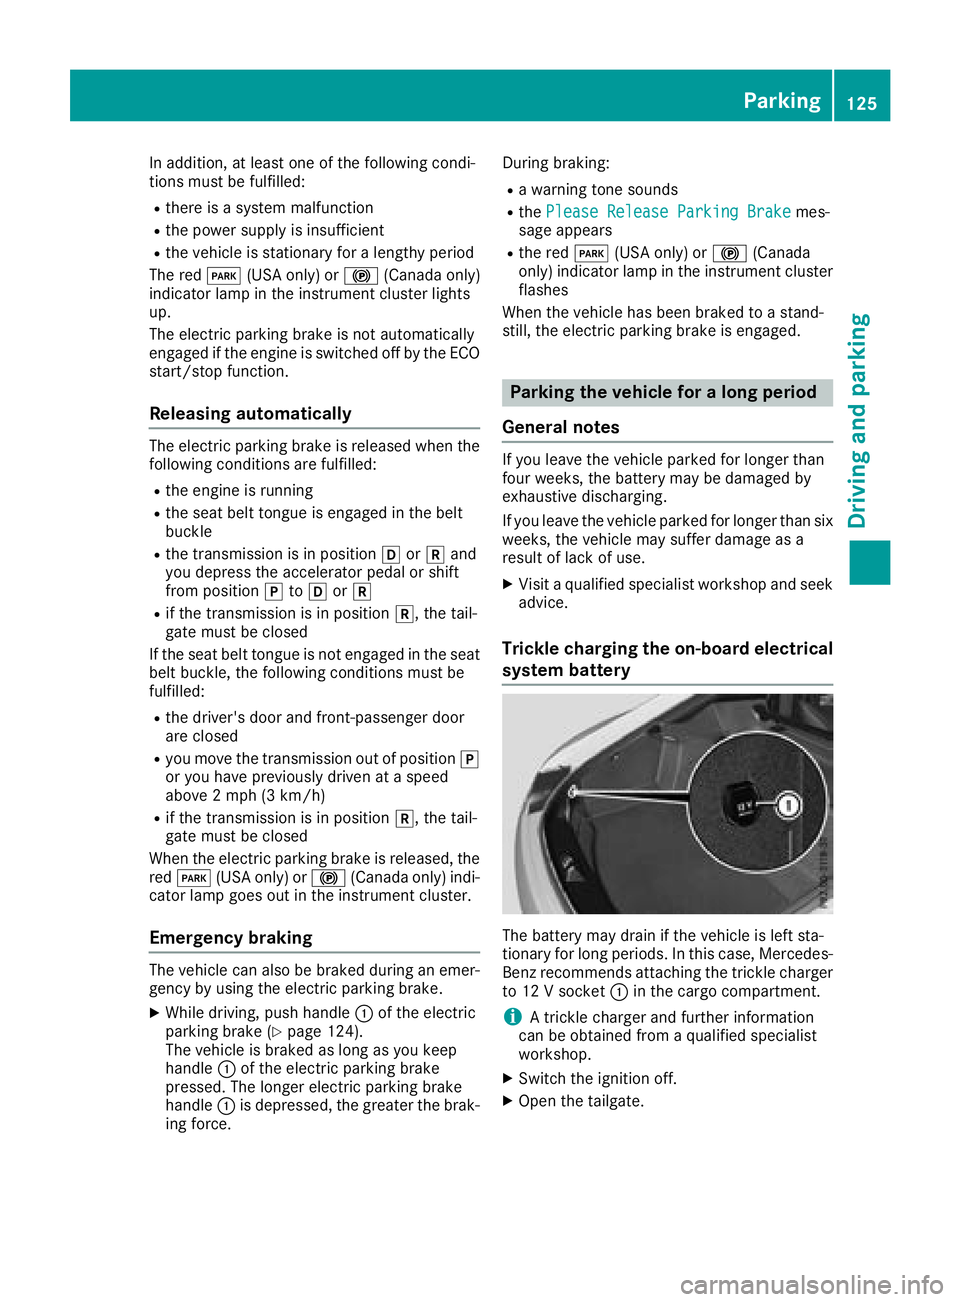
Trickle charging the on-board electrical
system battery
The battery may drain if the vehicle is left sta-
tionary for long periods. In this case, Mercedes-
Benz recommends attaching the trickle charger
to 12 V socket :in the cargo compartment.
iA trickle charger and further information
can be obtained from a qualified specialist
workshop.
XSwitch the ignition off.
XOpen the tailgate.
Parking125
Driving and parking
Z