2018 MERCEDES-BENZ AMG GT COUPE ESP
[x] Cancel search: ESPPage 55 of 294
they provide an indication of air bag deploy-
ment.
The vehicle can be deformed considerably, with-
out an air bag being deployed. This is the case if
only parts which are relatively easily deformed
are affected and the rate of deceleration is not
high. Conversely, air bags may be deployed eventhough the vehicle suffers only minor deforma-
tion. This is the case if, for example, very rigid
vehicle parts such as longitudinal body mem-
bers are hit, and sufficient deceleration occurs
as a result.
If the restraint system control unit detects a side
impact or if the vehicle rolls over, the applicable
components of the restraint system are
deployed independently of each other depend-
ing on the apparent type of accident.
RSide impact air bag on the side of impact,
independently of the Emergency Tensioning
Device and the use of the seat belt on the
driver's seat
The side impact air bag on the front-
passenger side deploys under the following
conditions:
-the OCS system detects that the front-
passenger seat is occupied or
-the seat belt buckle tongue is engaged in
the belt buckle of the front-passe nger seat
RWindow curtain air bag on the side of impact,
independently of the use of the seat belt and
independently of whether the front-
passenger seat is occupied
REmergency Tensioning Devices, if the system
determines that deployment can offer addi-
tional protection in this situation
RWindow curtain air bags on the driver's and
front-passenger side in certain situations
when the vehicle rolls over, if the system
determines that deployment can offer addi-
tional protection to that provided by the seat
belt
iNot all air bags are deployed in an accident.
The different air bag systems work independ- ently of each other.
How the air bag system works is determined
by the severity of the accident detected,
especially the vehicle deceleration or accel-
eration and the apparent type of accident:
RFrontal collision
RSide impact
RRollover
PRE-SAFE®(anticipatory occupant
protection system)
Introduction
In certain hazardous situations, PRE-SAFE®
takes pre-emptive measures to protect the vehi-
cle occupants.
Important safety notes
!Make sure that there are no objects in the
footwell or behind the seats. There is a danger that the seats and/or objects could be dam-
aged when PRE-SAFE
®is activated.
Despite your vehicle being equipped with the
PRE-SAFE
®system, the possibility of personal
injuries occurring as a result of an accident can-
not be eliminated. Always adapt your driving
style to suit the prevailing road and weather
conditions and maintain a safe distance from
the vehicle in front. Drive carefully.
Function
PRE-SAFE®intervenes:
Rin emergency braking situations, e.g. when
BAS is activated
Rin critical driving situations, e.g. when physi-
cal limits are exceeded and the vehicle under-
steers or oversteers severely
Ron vehicles with Distance Pilot DISTRONIC:
when active, Brake Assist intervenes power-
fully
PRE-SAFE
®takes the following measures
depending on the hazardous situation detected:
Rthe front seat belts are pre-tensioned.
Rif the vehicle skids, the side windows are
closed.
Rvehicles with the memory function for the
front-passenger seat: the front-passenger
seat is adjusted if it is in an unfavorable posi-
tion.
If the hazardous situation passes without result-
ing in an accident, PRE-SAFE
®slackens the belt
pre-tensioning. All settings made by PRE-SAFE®
can then be reversed.
Occupant safety53
Safety
Z
Page 58 of 294
as intended. The child cannot then be
restrained in the event of an accident, heavy
braking or sudden changes of direction. Thereis an increased risk of injury, possibly even
fatal.
Replace child restraint systems which have
been damaged or subjected to a load in an
accident as soon as possible. Have the secur-
ing systems on the child restraint system
checked at a qualified specialist workshop,
before you install a child restraint system
again.
The securing system of child restraint systems is
the seat belt system.
If you install a child restraint system on the
front-passenger seat, be sure to observe the
instructions and safety notes on the "Occupant
Classification System (OCS)" (
Ypage 46). There
you will also find information on deactivating the
front-passenger front air bag.
All child restraint systems must meet the fol-
lowing standards:
RU.S. Federal Motor Vehicle Safety Standards
213 and 225
RCanadian Motor Vehicle Safety Standards
213 and 210.2
Confirmation that the child restraint system cor- responds to the standards can be found on an
instruction label on the child restraint system.
This confirmation can also be found in the instal-
lation instructions that are included with the
child restraint system.
Observe the warning labels in the vehicle int e-
r
ior and on the child restraint system.
Child restraint system on the front-
passenger seat
General notes
If you install a child restraint system on the
front-passenger seat, always observe the
instructions and safety notes on the "Occupant
Classification System (OCS)" (
Ypage 46). You can thus avoid the risks that could arise as
a result of:
Ran incorrectly categorized person in the front-
passenger seat
Rthe unintentional deactivation of the front-
passenger front air bag
Rthe unsuitable positioning of the child
restraint system, e.g. too close to the dash-
board
Rearward-facing child restraint system
If it is absolutely necessary to install a rearward-
facing child restraint system on the front-
passenger seat, always make sure that the
front-passenger front air bag is deactivated.
Only if the PASSENGER AIR BAG OFF indicator
lamp is permanently lit (
Ypage 40) is the front-
passenger front air bag deactivated.
Always observe the child restraint system man-
ufacturer's installation and operating instruc-
tions.
Forward-facing child restraint system
If you secure a child in a forward-facing child
restraint system on the front-passenger seat,
always move the front-passenger seat as far
back as possible. The entire base of the child
restraint system must always rest on the seat
cushion of the front-passenger seat. The back-
rest of the child restraint system must lie as flat
as possible against the backrest of the front-
passenger seat. The child restraint system must
not touch the roof or be subjected to a load by
the head restraint. Adjust the angle of the seat
backrest and the head restraint position accord- ingly. Always make sure that the shoulder belt
strap is correctly routed from the front-
passenger seat belt guide to the shoulder belt
guide on the child restraint system. The shoul-
der belt strap must be routed forward and down
from the front-passenger seat belt guide.
Always observe the child restraint system man-
ufacturer's installation and operating instruc-
tions.
56Children in the vehicle
Safety
Page 59 of 294

Pets in the vehicle
GWARNING
If you leave animals unattended or unsecured
in the vehicle, they could press buttons or
switches, for example.
As a result, they could:
Ractivate vehicle equipment and become
trapped, for example
Ractivate or deactivate systems, thereby
endangering other road users
Unsecured animals could also be flung around
the vehicle in the event of an accident or sud-
den steering or braking, thereby injuring vehi-
cle occupants. There is a risk of an accident
and injury.
Never leave animals unattended in the vehi-
cle. Always secure animals properly during
the journey, e.g. use a suitable animal trans-
port box.
Driving safety systems
Overview of driving safety systems
In this section, you will find information about
the following driving safety systems:
RABS (Anti-lock BrakingSystem)
(Ypage 57)
RBAS ( Brake Assist System) (Ypage 58)
RActive Brake Assist (Ypage 58)
RESP®(Electronic StabilityProgram)
(Ypage 61)
REBD ( Electronic Brake force Distribution)
(Ypage 63)
RADAPTIVE BRAKE (Ypage 63)
Important safety notes
If you fail to adapt your driving style or if you are
inattentive, the driving safety systems can nei-
ther reduce the risk of an accident nor override the laws of physics. Driving safety systems are
merely aids designed to assist driving. You are
responsible for maintaining the distance to the
vehicle in front, for vehicle speed, for braking in good time, and for staying in lane. Always adapt
your driving style to suit the prevailing road and weather conditions and maintain a safe distance
from the vehicle in front. Drive carefully.
The driving safety systems described only work
as effectively as possible when there is ade-
quate contact between the tires and the road
surface. Please pay special attention to the
notes on tires, recommended minimum tire
tread depths, etc. (
Ypage 258).
In wintry driving conditions, always use winter
tires (M+S tires) and if necessary, snow chains.
Only in this way will the driving safety systems
described in this section work as effectively as
possible.
ABS (Anti-lock Braking System)
General information
ABS regulates brake pressure in such a way that
the wheels do not lock when you brake. This
allows you to continue steering the vehicle when
braking.
The ! ABS warning lamp in the instrument
cluster lights up when the ignition is switched
on. It goes out when the engine is running.
ABS works from a speed of about 5 mph
(8 km/h), regardless of road-surface conditions.
ABS works on slippery surfaces, even when you
only brake gently.
Important safety notes
iObserve the "Important safety notes" sec-
tion (Ypage 57).
GWARNING
If ABS is faulty, the wheels could lock when
braking. The steerability and braking charac-
teristics may be severely impaired. Addition-
ally, further driving safety systems are deac-
tivated. There is an increased danger of skid-
ding and accidents.
Drive on carefully. Have ABS checked imme-
diately at a qualified specialist workshop.
When ABS is malfunctioning, other systems,
including driving safety systems, will also
become inoperative. Observe the information
on the ABS warning lamp (
Ypage 196) and dis-
Driving safety systems57
Safety
Z
Page 63 of 294
ESP®(Electronic Stability Program)
General notes
iObserve the "Important safety notes" sec-
tion (Ypage 57).
ESP
®monitors driving stability and traction, i.e.
power transmission between the tires and the
road surface.
If ESP
®detects that the vehicle is deviating from
the direction desired by the driver, one or more
wheels are braked to stabilize the vehicle. The
engine output is also modified to keep the vehi-
cle on the desired course within physical limits.
ESP
®assists the driver when pulling away on
wet or slippery roads. ESP®can also stabilize
the vehicle during braking.
ETS (Electronic Traction System)
iObserve the "Important safety notes" sec-
tion (Ypage 57).
ETS traction control is part of ESP
®.
Traction control brakes the drive wheels indi-
vidually if they spin. This enables you to pull
away and accelerate on slippery surfaces, for
example if the road surface is slippery on one
side. In addition, more drive torque is transfer-
red to the wheel or wheels with traction.
Traction control remains active, even if you
deactivate ESP
®.
Important safety notes
iObserve the "Important safety notes" sec-
tion (Ypage 57).
GWARNING
If ESP
®is malfunctioning, ESP®is unable to
stabilize the vehicle. Additionally, further driv-
ing safety systems are deactivated. This
increases the risk of skidding and an accident.
Drive on carefully. Have ESP
®checked at a
qualified specialist workshop.
ESP
®is only deactivated if the åwarning
lamp is lit continuously.
When SPORT handling mode is activated, the
M warning lamp lights up in the instrument
panel. When the
åandh warning lamps light up
continuously, ESP
®is not available due to a mal-
function.
Observe the information on warning lamps
(
Ypage 196) and display messages which may
be shown in the instrument cluster
(
Ypage 170).
Only use wheels with the recommended tire
sizes. Only then will ESP
®function properly.
Characteristics of ESP®
General information
If the ÷ ESP®warning lamp goes out before
beginning the journey, ESP®is automatically
active.
If ESP
®intervenes, the ÷ESP®warning lamp
flashes in the instrument cluster.
If ESP
®intervenes:
XDo not deactivate ESP®under any circum-
stances.
XOnly depress the accelerator pedal as far as
necessary when pulling away.
XAdapt your driving style to suit the prevailing
road and weather conditions.
ECO start/stop function
The ECO start/stop function switches the
engine off automatically when the vehicle stops
moving. The engine starts automatically when
the driver wants to pull away again. ESP
®
remains in its previously selected status. Exam-
ple: if ESP®was deactivated before the engine
was switched off, ESP®remains deactivated
when the engine is switched on again.
Deactivating/activating ESP®
Important safety notes
iObserve the "Important safety notes" sec-
tion (Ypage 57).
You can select between the following states of
ESP
®:
RESP®is activated
RSPORT handling mode is activated
RESP®is deactivated
Driving safety systems61
Safety
Z
Page 64 of 294
GWARNING
If you deactivate ESP
®, ESP®no longer sta-
bilizes the vehicle. There is an increased risk
of skidding and an accident.
Only deactivate ESP
®in the situations descri-
bed in the following.
GWARNING
When SPORT handling mode is activated,
there is a greater risk of skidding and acci-
dents.
Only activate SPORT handling mode in the sit-
uations described in the following.
In the following situations, it may be better to
activate SPORT handling mode or deactivate
ESP
®:
Rwhen using snow chains
Rin deep snow
Ron sand or gravel
Ron specially designated roads when the vehi-
cle's own oversteering and understeering
characteristics are desired
Driving in SPORT handling mode or without
ESP
®requires an extremely qualified and expe-
rienced driver.
Activate ESP
®as soon as the situations descri-
bed above no longer apply. ESP®will otherwise
not be able to stabilize the vehicle if the vehicle
starts to skid or a wheel starts to spin.
!Avoid spinning the driven wheels for an
extended period with ESP®deactivated. You
could otherwise damage the drivetrain.
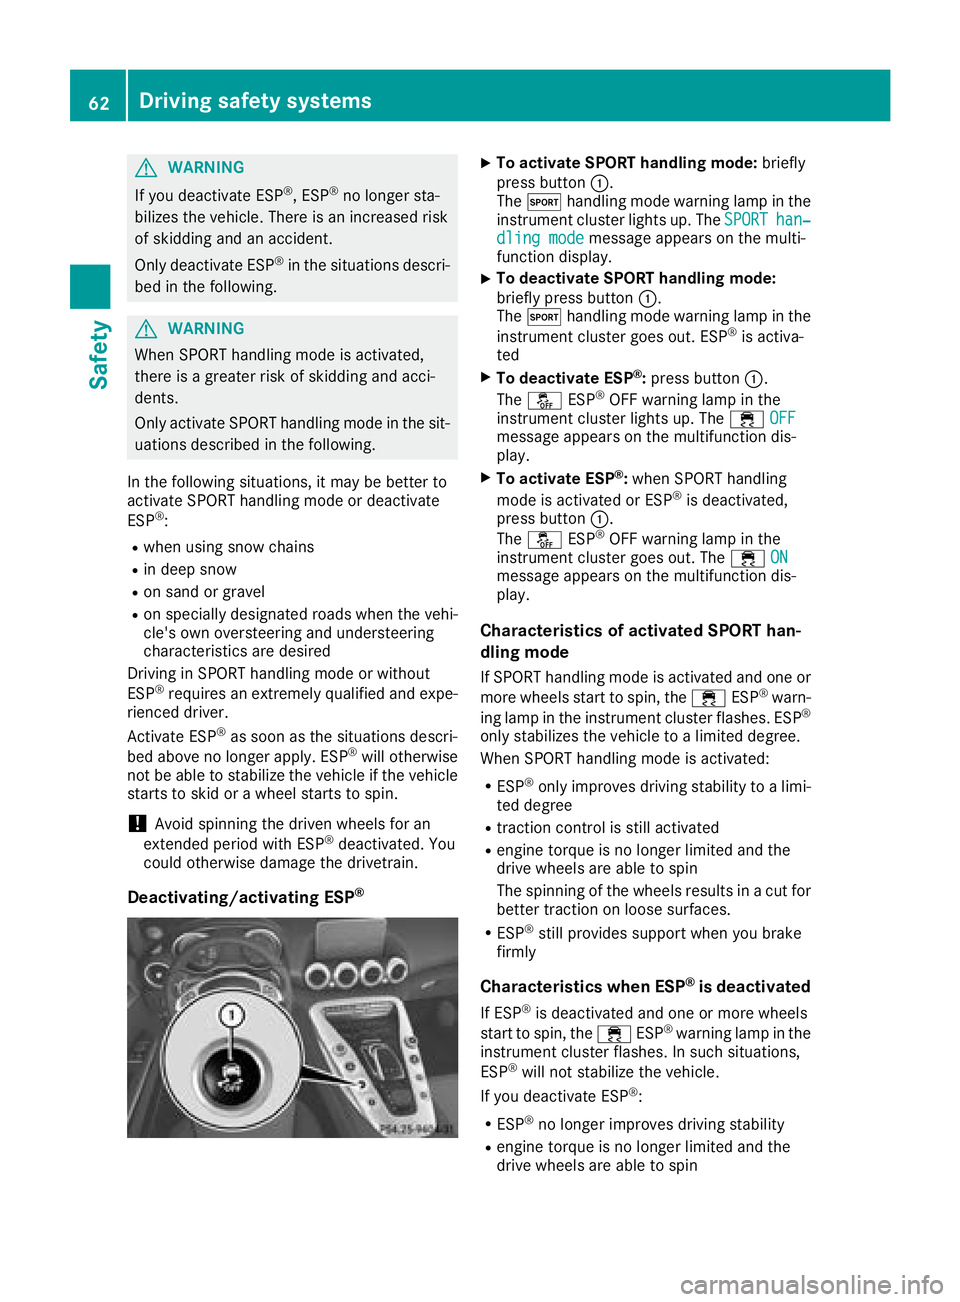
Deactivating/activating ESP®
XTo activate SPORT handling mode: briefly
press button :.
The M handling mode warning lamp in the
instrument cluster lights up. The SPORT
han‐dling modemessage appears on the multi-
function display.
XTo deactivate SPORT handling mode:
briefly press button :.
The M handling mode warning lamp in the
instrument cluster goes out. ESP
®is activa-
ted
XTo deactivate ESP®: press button :.
The å ESP®OFF warning lamp in the
instrument cluster lights up. The ÷OFF
message appears on the multifunction dis-
play.
XTo activate ESP®:when SPORT handling
mode is activated or ESP®is deactivated,
press button :.
The å ESP
®OFF warning lamp in the
instrument cluster goes out. The ÷ON
message appears on the multifunction dis-
play.
Characteristics of activated SPORT han-
dling mode
If SPORT handling mode is activated and one or
more wheels start to spin, the ÷ESP®warn-
ing lamp in the instrument cluster flashes. ESP®
only stabilizes the vehicle to a limited degree.
When SPORT handling mode is activated:
RESP®only improves driving stability to a limi-
ted degree
Rtraction control is still activated
Rengine torque is no longer limited and the
drive wheels are able to spin
The spinning of the wheels results in a cut for
better traction on loose surfaces.
RESP®still provides support when you brake
firmly
Characteristics when ESP®is deactivated
If ESP®is deactivated and one or more wheels
start to spin, the ÷ESP®warning lamp in the
instrument cluster flashes. In such situations,
ESP
®will not stabilize the vehicle.
If you deactivate ESP®:
RESP®no longer improves driving stability
Rengine torque is no longer limited and the
drive wheels are able to spin
62Driving safety systems
Safety
Page 65 of 294
The spinning of the wheels results in a cut for
better traction on loose surfaces.
Rtraction control is still activated
RAdaptive Brake Assist is unavailable
Active Brake Assist is also not activated if you
brake firmly with assistance from ESP
®.
RPRE-SAFE®is unavailable
PRE-SAFE®is also not activated if you brake
firmly with assistance from ESP®.
RESP®still provides support when you brake
firmly
EBD (electronic brake force distribu-
tion)
General information
EBD monitors and controls the brake pressure
on the rear wheels to improve driving stability
while braking.
Important safety notes
iObserve the "Important safety notes" sec-
tion (Ypage 57).
GWARNING
If EBD is malfunctioning, the rear wheels can
lock, e.g. under full braking. This increases the
risk of skidding and an accident.
You should therefore adapt your driving style
to the different handling characteristics. Have
the brake system checked at a qualified spe-
cialist workshop.
Observe information regarding indicator and
warning lamps (
Ypage 196) as well as display
messages (Ypage 172).
ADAPTIVE BRAKE
ADAPTIVE BRAKE enhances braking safety and
offers increased braking comfort. In addition to
the braking function, ADAPTIVE BRAKE also fea-
tures the hill start assist function (
Ypage 107).
Protection against theft
Immobilizer
The immobilizer prevents your vehicle from
being started without the correct SmartKey.
XTo activate with KEYLESS-GO start-func-
tion or KEYLESS-GO: switch the ignition off
and open the driver's door.
XTo activate with the SmartKey: remove the
SmartKey from the ignition lock.
XTo deactivate: switch on the ignition.
When leaving the vehicle, always take the
SmartKey with you and lock the vehicle. Anyone
can start the engine if a valid SmartKey has been
left inside the vehicle.
iThe immobilizer is always deactivated when
you start the engine.
In the event that the engine cannot be started
(yet the vehicle's battery is charged), the sys-
tem is not operational. Contact an authorized
Mercedes-Benz Center or call
1-800-FOR-MERCedes (in the USA) or
1-800-387-0100 (in Canada).
ATA (anti-theft alarm system)
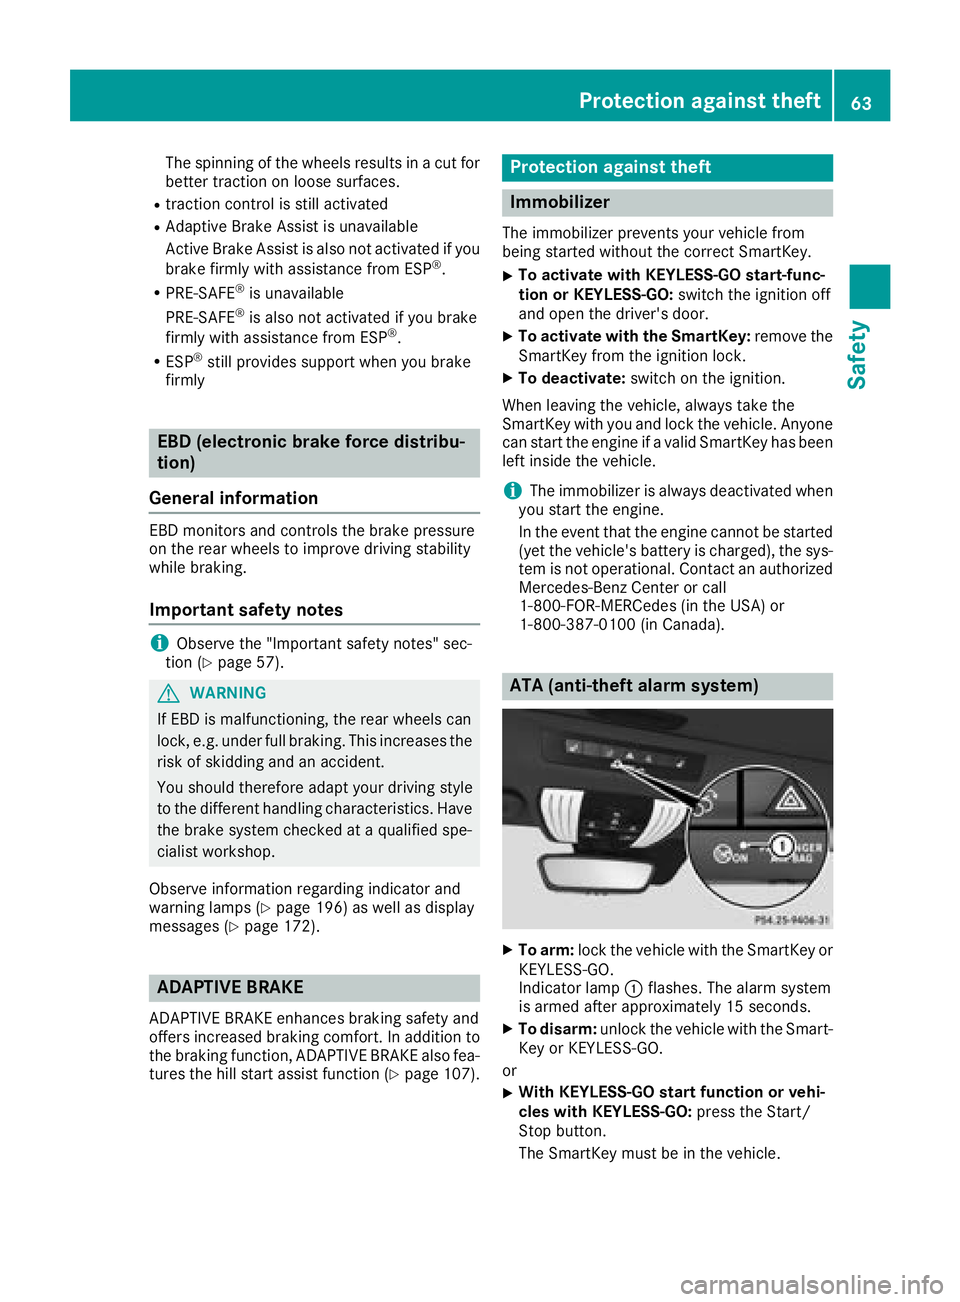
XTo arm: lock the vehicle with the SmartKey or
KEYLESS-GO.
Indicator lamp :flashes. The alarm system
is armed after approximately 15 seconds.
XTo disarm: unlock the vehicle with the Smart-
Key or KEYLESS-GO.
or
XWith KEYLESS-GO start function or vehi-
cles with KEYLESS-GO: press the Start/
Stop button.
The SmartKey must be in the vehicle.
Protection against theft63
Safety
Z
Page 68 of 294
When the locator lighting is activated via the
multimedia system, it lights up when it is dark
after the vehicle is unlocked with the SmartKey.
Information on activating and deactivating the
locator lighting can be found in the Digital Oper-
ator's Manual.
XTo open the tailgate:press and hold the
F button until the tailgate opens.
KEYLESS-GO
General notes
Bear in mind that the engine can be started by
any of the vehicle occupants if there is a Smart-
Key in the vehicle (
Ypage 107).
Locking/unlocking centrally
You can start, lock or unlock the vehicle using
KEYLESS-GO. To do this, you only need carry the
SmartKey with you. You can combine the func-
tions of KEYLESS-GO with those of a conven-
tional SmartKey. Unlock the vehicle by using
KEYLESS-GO, for instance, and lock it using the
& button on the SmartKey.
The driver's door and the door at which the han-
dle is used, must both be closed. The SmartKey
must be outside the vehicle. When locking or
unlocking with KEYLESS-GO, the distance
between the SmartKey and the corresponding
door handle must not be greater than 3 ft (1 m).
A check which periodically establishes a radio
connection between the vehicle and the Smart-
Key determines whether a valid SmartKey is in
the vehicle. This occurs, for example:
Rwhen starting the engine
Rwhile driving
Rwhen using the tailgate unlocking sensor
Rwhen the external door handles are touched
Rduring convenience closing
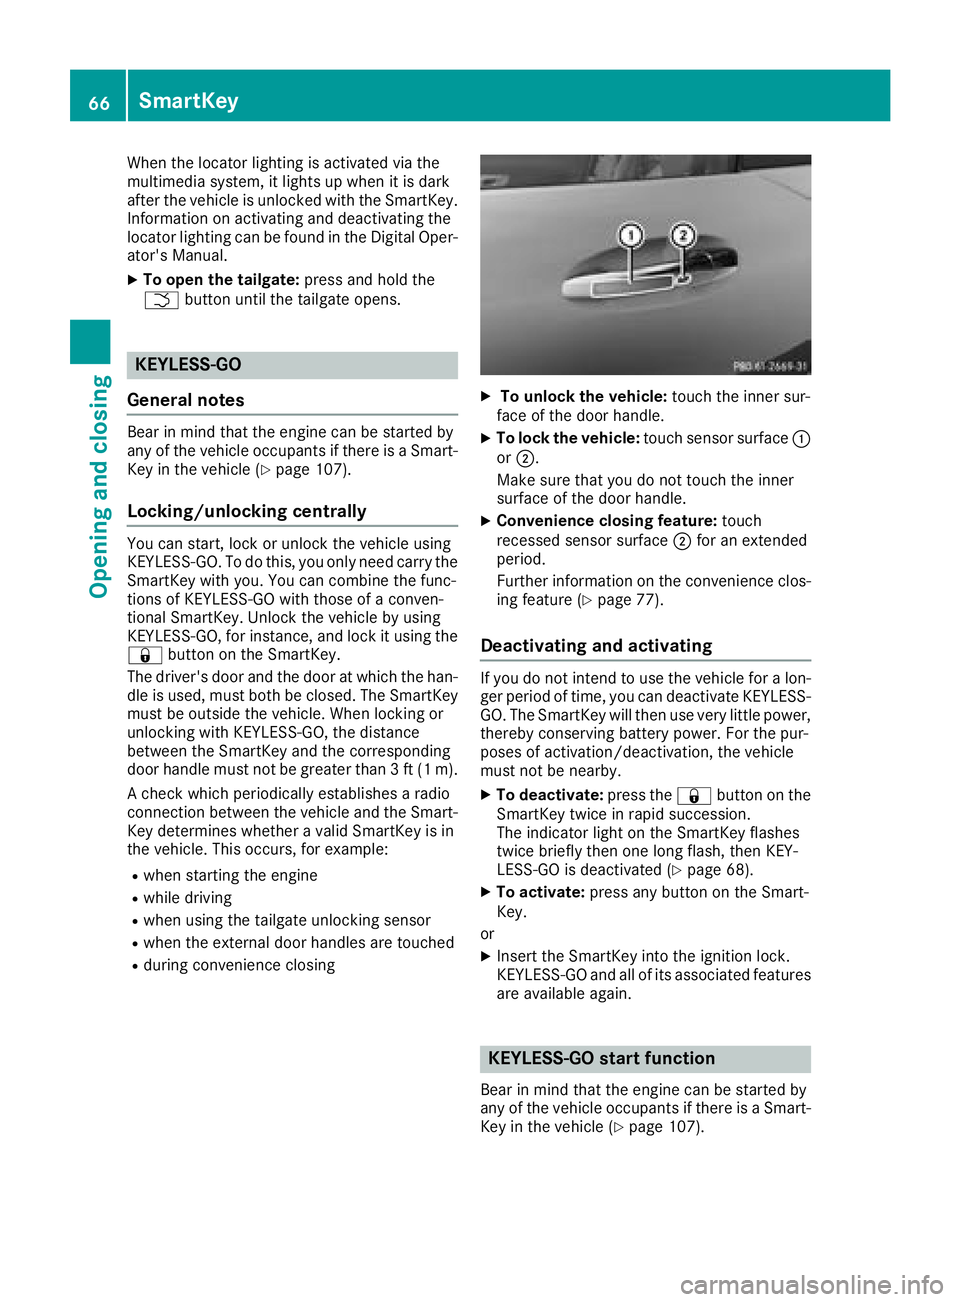
XTo unlock the vehicle: touch the inner sur-
face of the door handle.
XTo lock the vehicle: touch sensor surface :
or ;.
Make sure that you do not touch the inner
surface of the door handle.
XConvenience closing feature: touch
recessed sensor surface ;for an extended
period.
Further information on the convenience clos-
ing feature (
Ypage 77).
Deactivating and activating
If you do not intend to use the vehicle for a lon-
ger period of time, you can deactivate KEYLESS-
GO. The SmartKey will then use very little power,
thereby conserving battery power. For the pur-
poses of activation/deactivation, the vehicle
must not be nearby.
XTo deactivate: press the&button on the
SmartKey twice in rapid succession.
The indicator light on the SmartKey flashes
twice briefly then one long flash, then KEY-
LESS-GO is deactivated (
Ypage 68).
XTo activate: press any button on the Smart-
Key.
or
XInsert the SmartKey into the ignition lock.
KEYLESS-GO and all of its associated features
are available again.
KEYLESS-GO start function
Bear in mind that the engine can be started by
any of the vehicle occupants if there is a Smart-
Key in the vehicle (
Ypage 107).
66SmartKey
Opening and closing
Page 78 of 294
only opens again automatically after the corre-
sponding switch is released. The automatic
reversing feature is only an aid and does not
relieve you of the responsibility of paying atten-
tion when closing a side window.
GWARNING
The reversing feature does not react:
Rto soft, light and thin objects, e.g. small fin-
gers
Rwhile resetting
This means that the reversing feature cannot
prevent someone being trapped in these sit-
uations. There is a risk of injury.
Make sure that no body parts are in close
proximity during the closing procedure. If
someone becomes trapped, press the switch
to open the side window again.
Opening and closing the side win-
dows
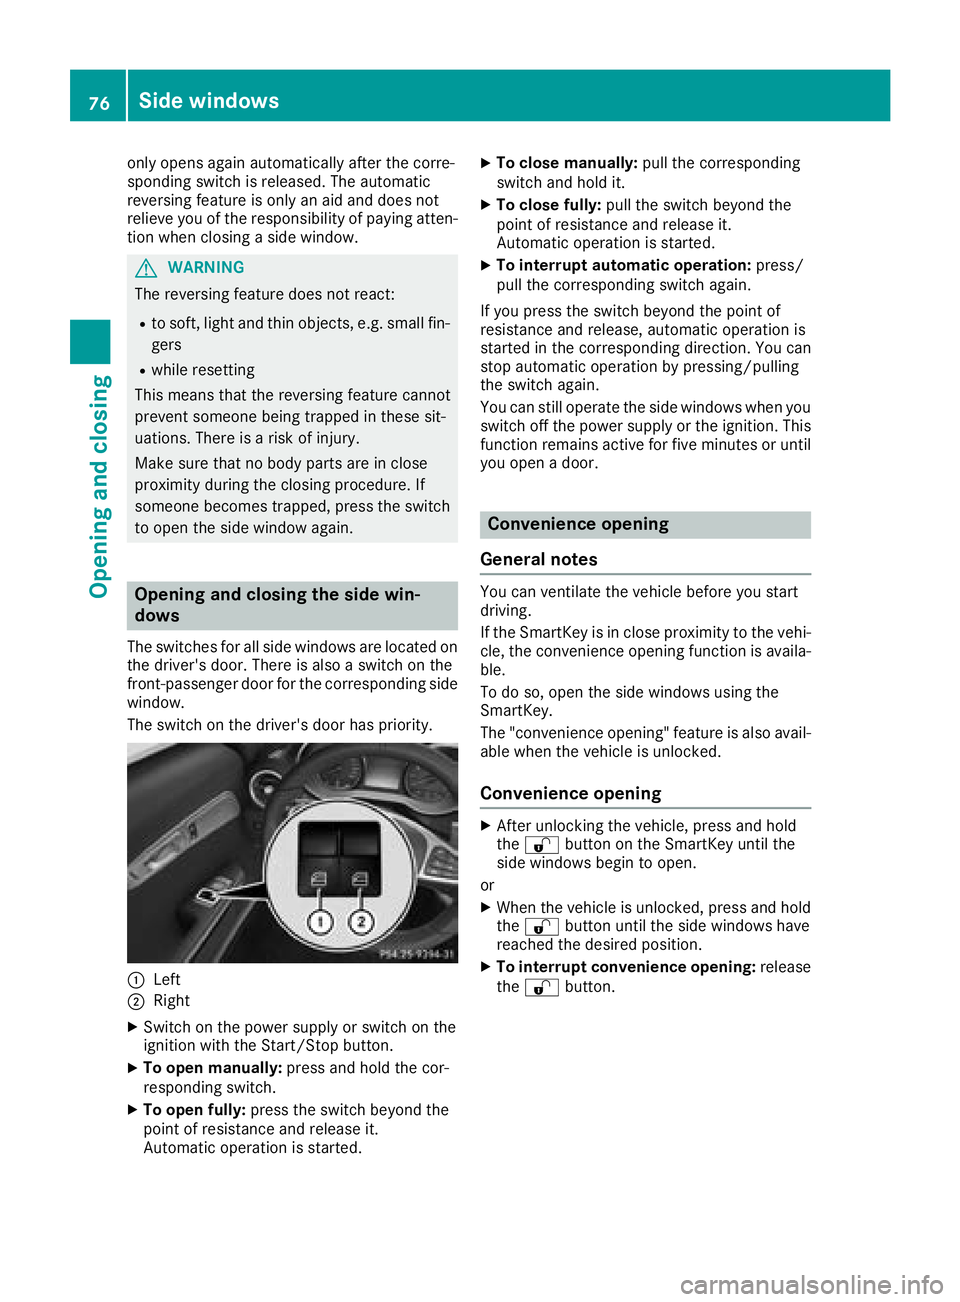
The switches for all side windows are located on the driver's door. There is also a switch on the
front-passenger door for the corresponding side
window.
The switch on the driver's door has priority.
:Left
;Right
XSwitch on the power supply or switch on the
ignition with the Start/Stop button.
XTo open manually: press and hold the cor-
responding switch.
XTo open fully: press the switch beyond the
point of resistance and release it.
Automatic operation is started.
XTo close manually: pull the corresponding
switch and hold it.
XTo close fully: pull the switch beyond the
point of resistance and release it.
Automatic operation is started.
XTo interrupt automatic operation: press/
pull the corresponding switch again.
If you press the switch beyond the point of
resistance and release, automatic operation is
started in the corresponding direction. You can
stop automatic operation by pressing/pulling
the switch again.
You can still operate the side windows when you
switch off the power supply or the ignition. This
function remains active for five minutes or until
you open a door.
Convenience opening
General notes
You can ventilate the vehicle before you start
driving.
If the SmartKey is in close proximity to the vehi-
cle, the convenience opening function is availa-
ble.
To do so, open the side windows using the
SmartKey.
The "convenience opening" feature is also avail-
able when the vehicle is unlocked.
Convenience opening
XAfter unlocking the vehicle, press and hold
the % button on the SmartKey until the
side windows begin to open.
or
XWhen the vehicle is unlocked, press and hold
the % button until the side windows have
reached the desired position.
XTo interrupt convenience opening: release
the % button.
76Side windows
Opening and closing