2018 MERCEDES-BENZ AMG GT COUPE heating
[x] Cancel search: heatingPage 89 of 294
This means that you could misjudge the dis-
tance from road users traveling behind, e.g.
when changing lane. There is a risk of an acci-
dent.
For this reason, always make sure of the
actual distance from the road users traveling
behind by glancing over your shoulder.
Adjusting the exterior mirrors
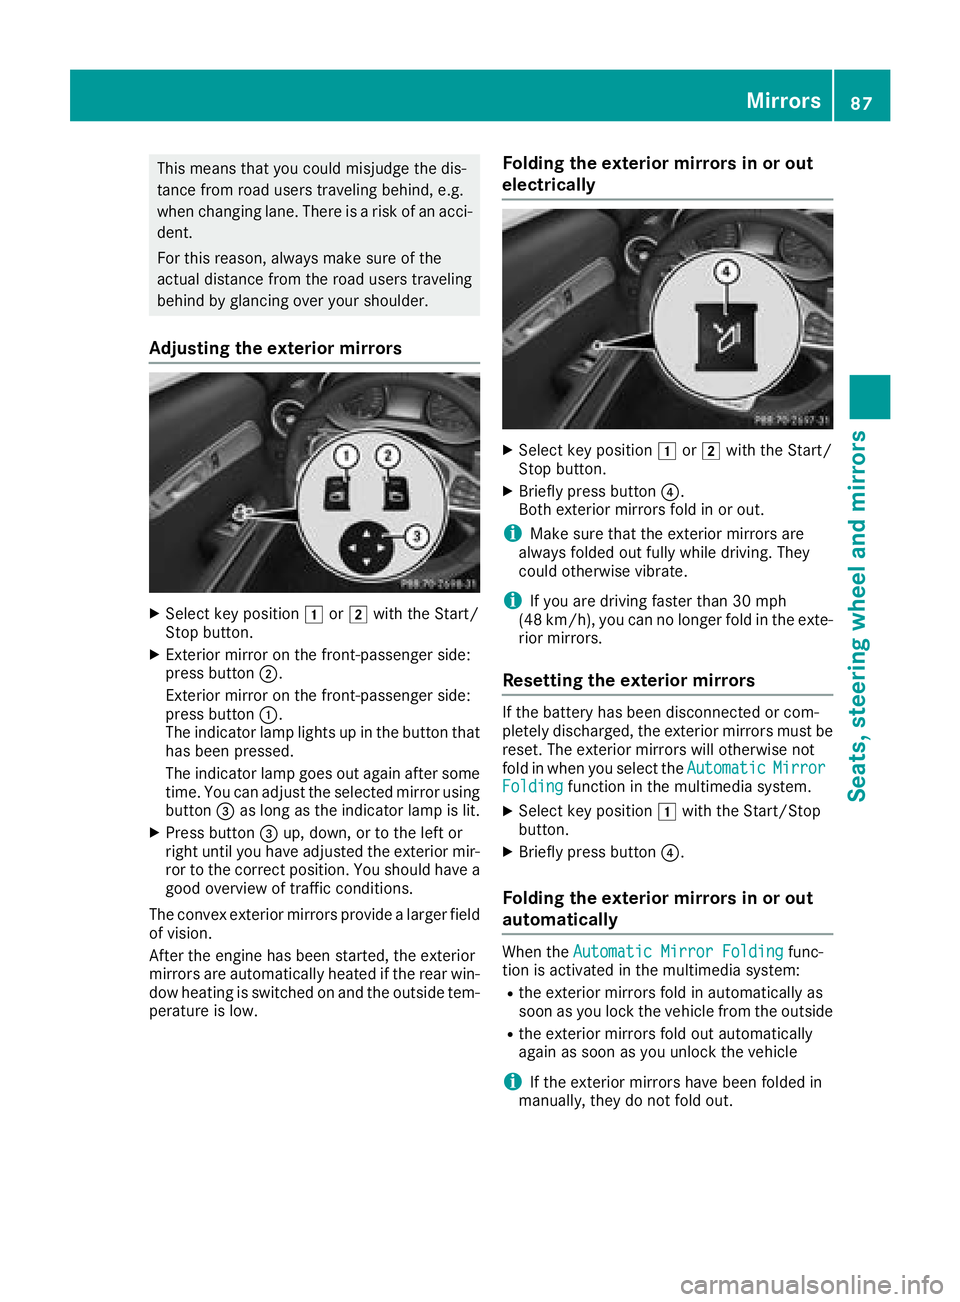
XSelect key position1or2 with the Start/
Stop button.
XExterior mirror on the front-passenger side:
press button ;.
Exterior mirror on the front-passenger side:
press button :.
The indicator lamp lights up in the button that
has been pressed.
The indicator lamp goes out again after some
time. You can adjust the selected mirror using
button =as long as the indicator lamp is lit.
XPress button =up, down, or to the left or
right until you have adjusted the exterior mir-
ror to the correct position. You should have a
good overview of traffic conditions.
The convex exterior mirrors provide a larger field of vision.
After the engine has been started, the exterior
mirrors are automatically heated if the rear win-
dow heating is switched on and the outside tem-
perature is low.
Folding the exterior mirrors in or out
electrically
XSelect key position 1or2 with the Start/
Stop button.
XBriefly press button ?.
Both exterior mirrors fold in or out.
iMake sure that the exterior mirrors are
always folded out fully while driving. They
could otherwise vibrate.
iIf you are driving faster than 30 mph
(48 km/h), you can no longer fold in the exte-
rior mirrors.
Resetting the exterior mirrors
If the battery has been disconnected or com-
pletely discharged, the exterior mirrors must be
reset. The exterior mirrors will otherwise not
fold in when you select the Automatic
MirrorFoldingfunction in the multimedia system.
XSelect key position1with the Start/Stop
button.
XBriefly press button ?.
Folding the exterior mirrors in or out
automatically
When theAutomatic Mirror Foldingfunc-
tion is activated in the multimedia system:
Rthe exterior mirrors fold in automatically as
soon as you lock the vehicle from the outside
Rthe exterior mirrors fold out automatically
again as soon as you unlock the vehicle
iIf the exterior mirrors have been folded in
manually, they do not fold out.
Mirrors87
Seats, steering wheel and mirrors
Z
Page 104 of 294
Activating/deactivating
XSelectke yposition 2withth eStart/Sto p
butto n (Ypage 106).
XPress th e¤ rockerswitch up or down .
The indicator lamp abov eth e¤ rocker
switch lights up or goe sout .
Problems with the rear window defros ter
ProblemPossible causes/consequences and MSolutions
The rear window
defrosterhas deactiva-
te dprematurel yor can -
no tbe activated.The battery has no tbeen sufficientl ycharged.
XSwitc hoff any consumer sthat are no trequired, e.g. reading lamps,
interior lighting or th eseat heating .
When th ebattery is sufficientl ycharged, th erear window defroste r
can be activated again .
Switching air-recirculati on mode
on/off
Gene ral notes
You can also temporarily deactivat eth eflo wof
fresh air manually if unpleasant odor sare enter-
ing th evehicl efrom outside .The air already
inside th evehicl ewill then be recirculated.
If you switch on air-recirculation mode, th ewin -
dows can fog up mor equickly, in particular at
low temperatures .Only use air-recirculation
mod ebriefl yto preven tth ewindows from fog -
gin gup.
Activating/deactivating
XSelec tke yposition 2withth eStart/Sto p
butto n (Ypage 106).
XTo activate: press theg rockerswitch up
or down .
The indicator lamp abov eth eg rocker
switch lights up.
Air-recirculation mod eswitches on automati-
cally:
Rat high outside temperatures
Rin atunne l(vehicles wit h anavigation system
only)
The indicator lamp abov eth eg rocker
switch is no tlit when automatic air-recirculation
mod eis activated. Outside air is added after
about 30 minutes.
XTo deactivate: press theg rockerswitch
up or down .
The indicator lamp abov eth eg rocker
switch goes out .
Air-recirculation mod edeactivates automati-
cally:
Rafter approximately fiv eminute sat outside
temperatures belo wapproximately 41 ‡
(5 †)
Rafter approximately five minutes if cooling
with air dehumidification is deactivated
Rafter approximately 30 minutes at outside
temperatures above approximately 41 ‡
(5 †) if the "Cooling with dehumidification"
function is activated
Air vents
Important safety notes
GWARNING
Very hot or very cold air can flow from the air
vents. This could result in burns or frostbite in
the immediate vicinity of the air vents. There
is a risk of injury.
Make sure that all vehicle occupants always
maintain a sufficient distance to the air out-
lets. If necessary, redirect the airflow to
another area of the vehicle interior.
102Air vents
Climate control
Page 122 of 294
Problems with the transmission
ProblemPossible causes/consequences andMSolutions
The transmission has
problems shifting gear.There is a malfunction in the transmission.
The transmission no longer shifts into the next gear.
XHave the transmission checked at a qualified specialist workshop
immediately.
The acceleration ability
is deteriorating.
The transmission no lon-
ger shifts into all of the
gears.A sub-transmission has failed.
The smoothness of the gear change is restricted.
XHave the transmission checked at a qualified specialist workshop
immediately.
Refueling
Important safety notes
GWARNING
Fuel is highly flammable. If you handle fuel
incorrectly, there is a risk of fire and explo-
sion.
You must avoid fire, open flames, creating
sparks and smoking. Switch off the engine
and, if applicable, the auxiliary heating before refueling.
GWARNING
Fuel is poisonous and hazardous to health.
There is a risk of injury.
You must make sure that fuel does not come into contact with your skin, eyes or clothing
and that it is not swallowed. Do not inhale fuel
vapors. Keep fuel away from children.
If you or others come into contact with fuel,
observe the following:
RWash away fuel from skin immediately
using soap and water.
RIf fuel comes into contact with your eyes,
immediately rinse them thoroughly with
clean water. Seek medical assistance with-
out delay.
RIf fuel is swallowed, seek medical assis-
tance without delay. Do not induce vomit-
ing.
RImmediately change out of clothing which
has come into contact with fuel.
GWARNING
Electrostatic buildup can create sparks and
ignite fuel vapors. There is a risk of fire and
explosion.
Always touch the vehicle body before opening
the fuel filler flap or touching the fuel pump
nozzle. Any existing electrostatic buildup is
thereby discharged.
Do not get into the vehicle again during the refu-
eling process. Otherwise, electrostatic charge
could build up again.
!Do not use diesel to refuel vehicles with a
gasoline engine. Do not switch on the ignition
if you accidentally refuel with the wrong fuel.
Otherwise, the fuel will enter the fuel system. Even small amounts of the wrong fuel could
result in damage to the fuel system and the
engine. Notify a qualified specialist workshop
and have the fuel tank and fuel lines drained
completely.
!Overfilling the fuel tank could damage the
fuel system.
!Take care not to spill any fuel on painted
surfaces. You could otherwise damage the
paintwork.
120Refueling
Driving and parking
Page 129 of 294
Certain engine systems are designed to keep
the level of poisonous componentsinexhaust
fumes within legal limits.
These systems only work at peak efficiency if
they are serviced exact ly inaccordance with the
manufacturer's specific ations.Always have
work on the engine carried out at a qualified
specialist workshop. Mercedes-Benz recom-
men dsthat you use an authorized Mercedes-
Benz Center for th ispurpose. Inparticular, work
relevant to safety or on safety-related systems
must becarried out at a qualified specialist
workshop.
The engine settings must not bechanged under
any circumstances. Furthermore, all specific
service work must becarried out at regular
intervals and inaccordance with the Mercedes-
Benz service requirements.
You can obtain current information concerning
the servicing of your veh icleat any time from a
qualif ied specialist workshop.This couldbean
overview of the maintenance work or any addi-
tional maintenance work, for example.
Brakes
Important safety notes
GWAR NING
If you shift downon aslippery road surface in
an attempt to increase the engine's braking
effect, the drive wheels could lose their grip.
There isan increased danger of skiddin g and
acc iden ts.
Do not shift downforaddit ional engine brak-
ing on a slippery road surface.
Downhill gradients
!On long and steep gradients, you must
reduce the load on the brakes byshifting to a
lower gear ingood time. This allowsyou to
take advantage of the engine's braking effect.
This helps you to avoid overheating the
brakes and wearing them out excessively.
When you take advantage of engine braking, a
driv e wheel may not turn for some time, e.g.
on a slippery road surface. This could cause
damage to the drive train. This type of damage
is not covered bythe Mercedes-Benz war-
ranty.
Heavy and light loads
GWARNING
If you rest your foot on the brake pedal while
driving, the braking system can overheat. This increases the stopping distance and can even
cause the braking system to fail. There is a
risk of an accident.
Never use the brake pedal as a footrest. Never
depress the brake pedal and the accelerator
pedal at the same time.
!Depressing the brake pedal constantly
results inexcessive and premature wear to
the brake pads.
If the brakes have been subjected to a heavy
load, do not stop the vehicle immediately. Drive
on for a short while. This allowsthe airflow to
cool the brakes more quickly.
Wet roads
If you have driven for a long time inheavy rain
wit hout braking, there may be a delayed reac-
tion from the brakes when braking for the first
time. This may also occur after the vehicle has
been washed or driven through deep water.
You have to depress the brake pedal more
firmly. Maintain a greater distance from the
vehicle infront.
After driving on a wet road or having the vehicle
washed, brake firmly while paying attention to
the traffic conditions. This willwarm up the
brake discs, thereby drying them more quickly
and protecting them against corrosion.
Limited braking performance on salt-
treated roads
If you drive on salted roads, a layer of salt resi-
due may form on the brake discs and brake
pads. This can result in a significantly longer
braking distance.
Driving tips127
Driving and parking
Z
Page 132 of 294
brakes from overheating and wearing too
quickly.
Use cruise control only if road and traffic con-
ditions make it appropriate to maintain a steady
speed for a prolonged period. You can store any
road speed above 20 mph (30 km/h).
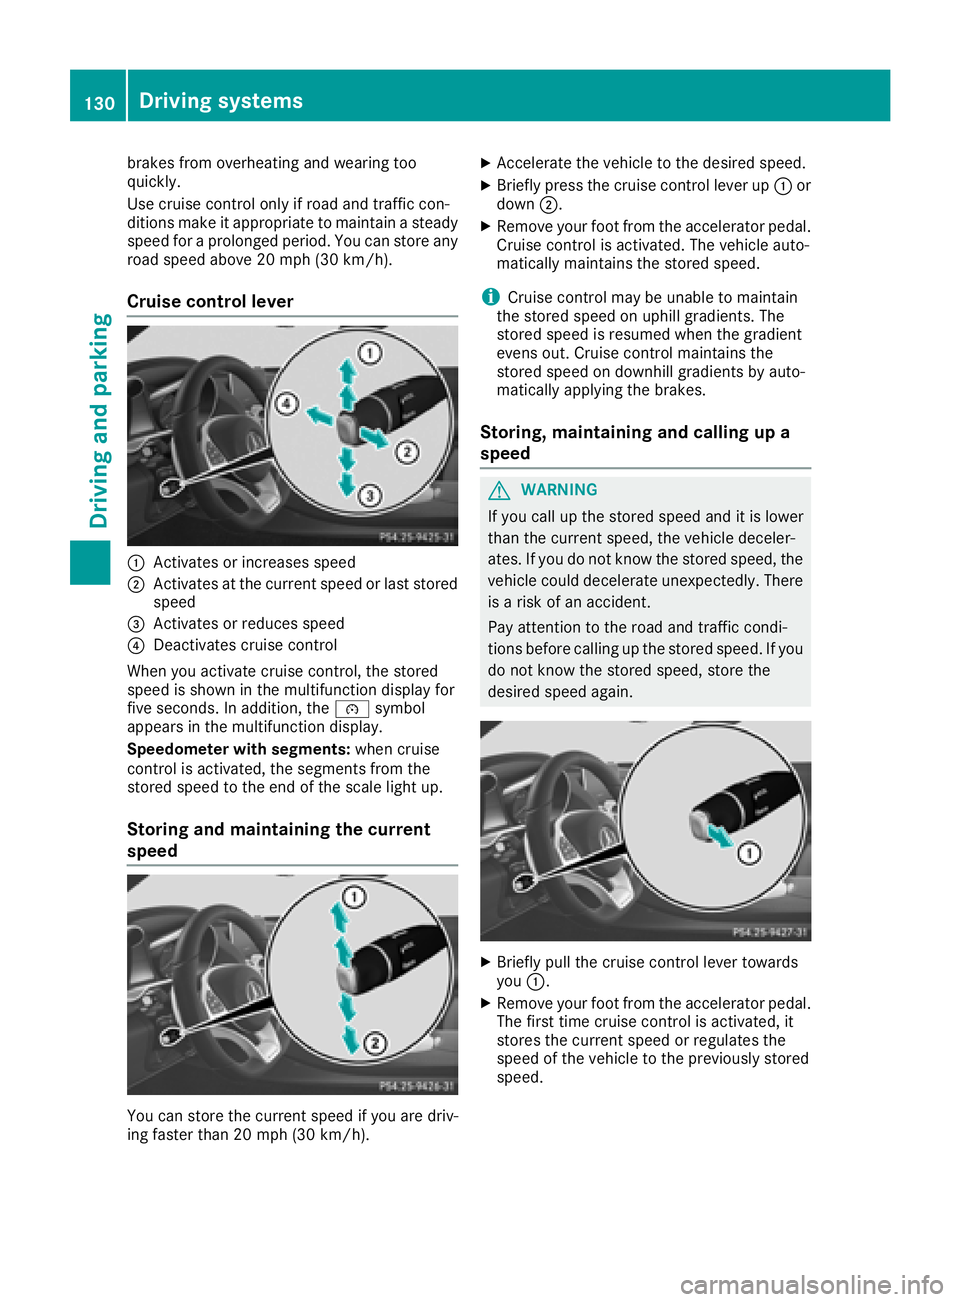
Cruise control lever
:Activates or increases speed
;Activates at the current speed or last stored
speed
=Activates or reduces speed
?Deactivates cruise control
When you activate cruise control, the stored
speed is shown in the multifunction display for
five seconds. In addition, the ésymbol
appears in the multifunction display.
Speedometer with segments: when cruise
control is activated, the segments from the
stored speed to the end of the scale light up.
Storing and maintaining the current
speed
You can store the current speed if you are driv-
ing faster than 20 mph (30 km/ h).
XAccelerate the vehicle to the desired speed.
XBriefly press the cruise control lever up :or
down ;.
XRemove your foot from the accelerator pedal.
Cruise control is activated. The vehicle auto-
matically maintains the stored speed.
iCruise control may be unable to maintain
the stored speed on uphill gradients. The
stored speed is resumed when the gradient
evens out. Cruise control maintains the
stored speed on downhill gradients by auto-
matically applying the brakes.
Storing, maintaining and calling up a
speed
GWARNING
If you call up the stored speed and it is lower
than the current speed, the vehicle deceler-
ates. If you do not know the stored speed, the vehicle could decelerate unexpectedly. There
is a risk of an accident.
Pay attention to the road and traffic condi-
tions before calling up the stored speed. If you
do not know the stored speed, store the
desired speed again.
XBriefly pull the cruise control lever towards
you :.
XRemove your foot from the accelerator pedal.
The first time cruise control is activated, it
stores the current speed or regulates the
speed of the vehicle to the previously stored
speed.
130Driving systems
Driving an d parking
Page 133 of 294
Setting a speed
Keep in mind that it may take a brief moment
until the vehicle has accelerated or braked to
the speed set.
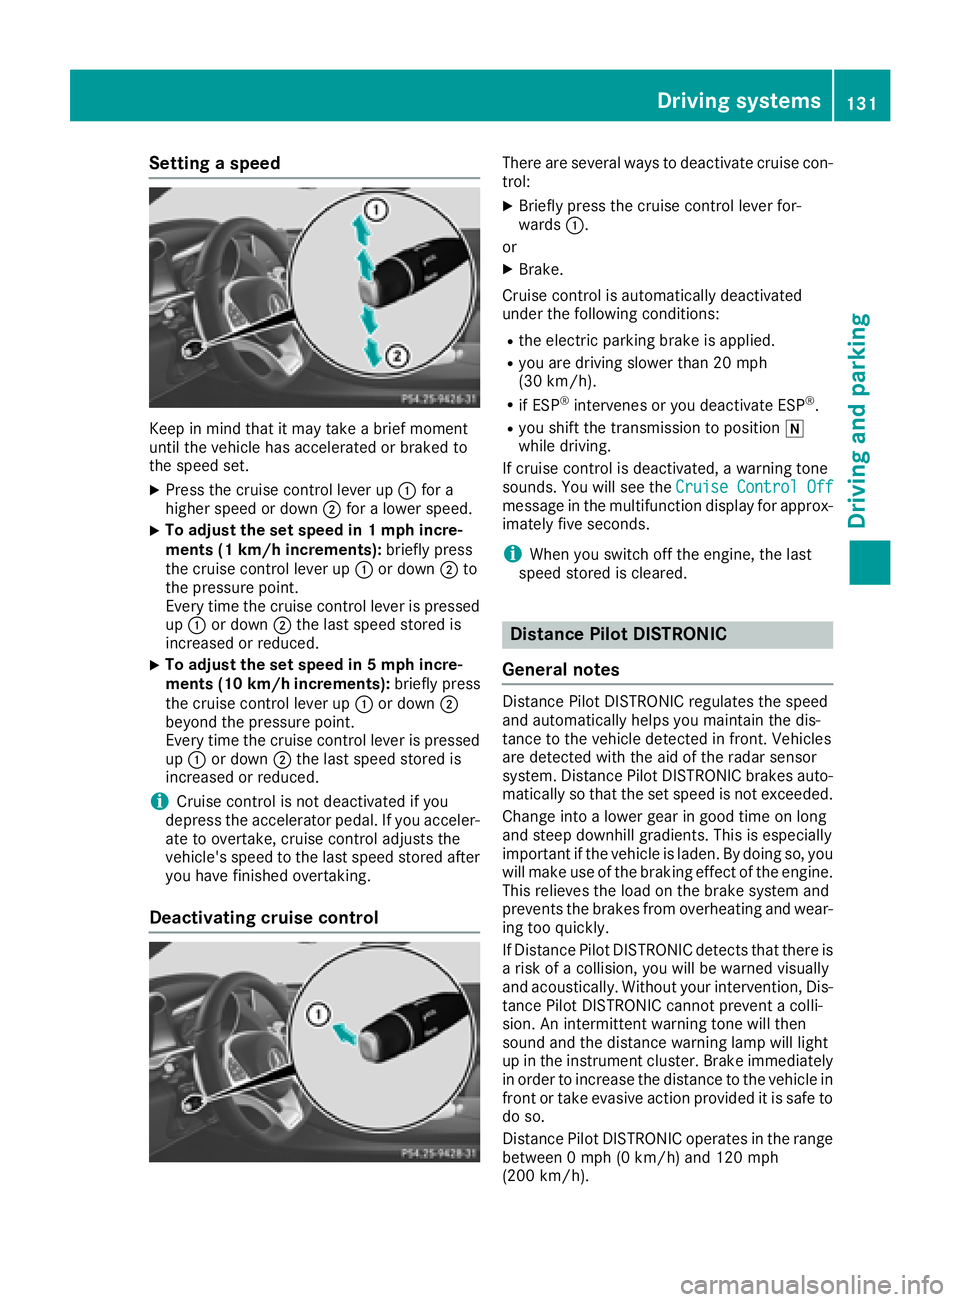
XPress the cruise control lever up:for a
higher speed or down ;for a lower speed.
XTo adjust the set speed in 1 mph incre-
ments (1 km/h increments): briefly press
the cruise control lever up :or down ;to
the pressure point.
Every time the cruise control lever is pressed
up : or down ;the last speed stored is
increased or reduced.
XTo adjust the set speed in 5 mph incre-
ments (10 km/h increments): briefly press
the cruise control lever up :or down ;
beyond the pressure point.
Every time the cruise control lever is pressed
up : or down ;the last speed stored is
increased or reduced.
iCruise control is not deactivated if you
depress the accelerator pedal. If you acceler-
ate to overtake, cruise control adjusts the
vehicle's speed to the last speed stored after
you have finished overtaking.
Deactivating cruise control
There are several ways to deactivate cruise con-
trol:
XBriefly press the cruise control lever for-
wards :.
or
XBrake.
Cruise control is automatically deactivated
under the following conditions:
Rthe electric parking brake is applied.
Ryou are driving slower than 20 mph
(30 km/h).
Rif ESP®intervenes or you deactivate ESP®.
Ryou shift the transmission to position i
while driving.
If cruise control is deactivated, a warning tone
sounds. You will see the Cruise Control Off
message in the multifunction display for approx-
imately five seconds.
iWhen you switch off the engine, the last
speed stored is cleared.
Distance Pilot DISTRONIC
General notes
Distance Pilot DISTRONIC regulates the speed
and automatically helps you maintain the dis-
tance to the vehicle detected in front. Vehicles
are detected with the aid of the radar sensor
system. Distance Pilot DISTRONIC brakes auto-
matically so that the set speed is not exceeded.
Change into a lower gear in good time on long
and steep downhill gradients. This is especially
important if the vehicle is laden. By doing so, you
will make use of the braking effect of the engine.
This relieves the load on the brake system and
prevents the brakes from overheating and wear-
ing too quickly.
If Distance Pilot DISTRONIC detects that there is a risk of a collision, you will be warned visually
and acoustically. Without your intervention, Dis-
tance Pilot DISTRONIC cannot prevent a colli-
sion. An intermittent warning tone will then
sound and the distance warning lamp will light
up in the instrument cluster. Brake immediately in order to increase the distance to the vehicle in
front or take evasive action provided it is safe to
do so.
Distance Pilot DISTRONIC operates in the range
between 0 mph (0 km/h) and 120 mph
(200 km/ h).
Driving system s131
Driving an d parking
Z
Page 191 of 294
Display messagesPossible causes/consequences andMSolutions
ReversingNotPossi‐bleServiceRequiredThe sub-transmission wit hth eeve ngear shas failed. You can no longer
engage revers egear .The smoothness of th egear chang eis restricted.
The transmission is in emergenc ymode.
A warning tone also sounds.
XVisit aqualified specialist workshop .
Transmission Mal‐function StopAmalfunction has occurred in th emechanical transmission compo -
nents.
A warning tone also sounds. The transmission shift sautomatically to
position i.
XPull overand stop th evehicl esafely as soo nas possible, payin g
attention to roa dand traffic conditions.
XShift th eselector lever to position j.
XSecureth evehicl eagainst rollin gaway (Ypage 122).
XNotify aqualified specialist workshop or breakdown service.
Depres sBrake toStart EngineYou canno tstart th eengine. The engin ehas been switched off in hor
k.
XDepress th ebrak epedal and start th eengine.
Onl yShift to 'P'whe nVehicl eisSta‐tionar y
The vehicl eis moving .
XPull overand stop th evehicl esafely as soo nas possible, payin g
attention to roa dand traffic conditions.
XShift th etransmission to position j.
j
ParkingLoc kMal ‐funct. Apply Park‐ing Brake
The transmission position jcanno tbe selected.
XMak esur ethat th eelectric parking brak eis applied.
XPreven tth evehicl efrom rollin gaway before you leav eit
(Ypage 277).
XVisit aqualified specialist workshop .
d
Transmission OilCoolingMalfunction
The transmission coolan tpump is faulty. The transmission may over-
heat .
XIn th eon-boar dcomputer, select th eAMGmen uand chec kth e
transmission oil temperature (Ypage 165).
XAvoid excessive loading,e.g. due to dynamic driving.
XIf th etransmission oil temperature is belo w24 8°F (12 0°C) ,drive
on to th eneares tqualified specialist workshop .
d
Trans. Oil Overhea‐ted Drive on withCare
The transmission oil has overheated.
Manual mod eM and temporar ymanual drive progra mare no longer
available. Only th eComfor tdrive progra mis available for th etrans -
mission .The engin eoutput is reduce daccording to th edegree of
overheating .
XAllow thetransmission oil to cool by adopting adefensiv edrivin g
style.
Display messages18 9
On-board computer and displays
Z
Page 220 of 294
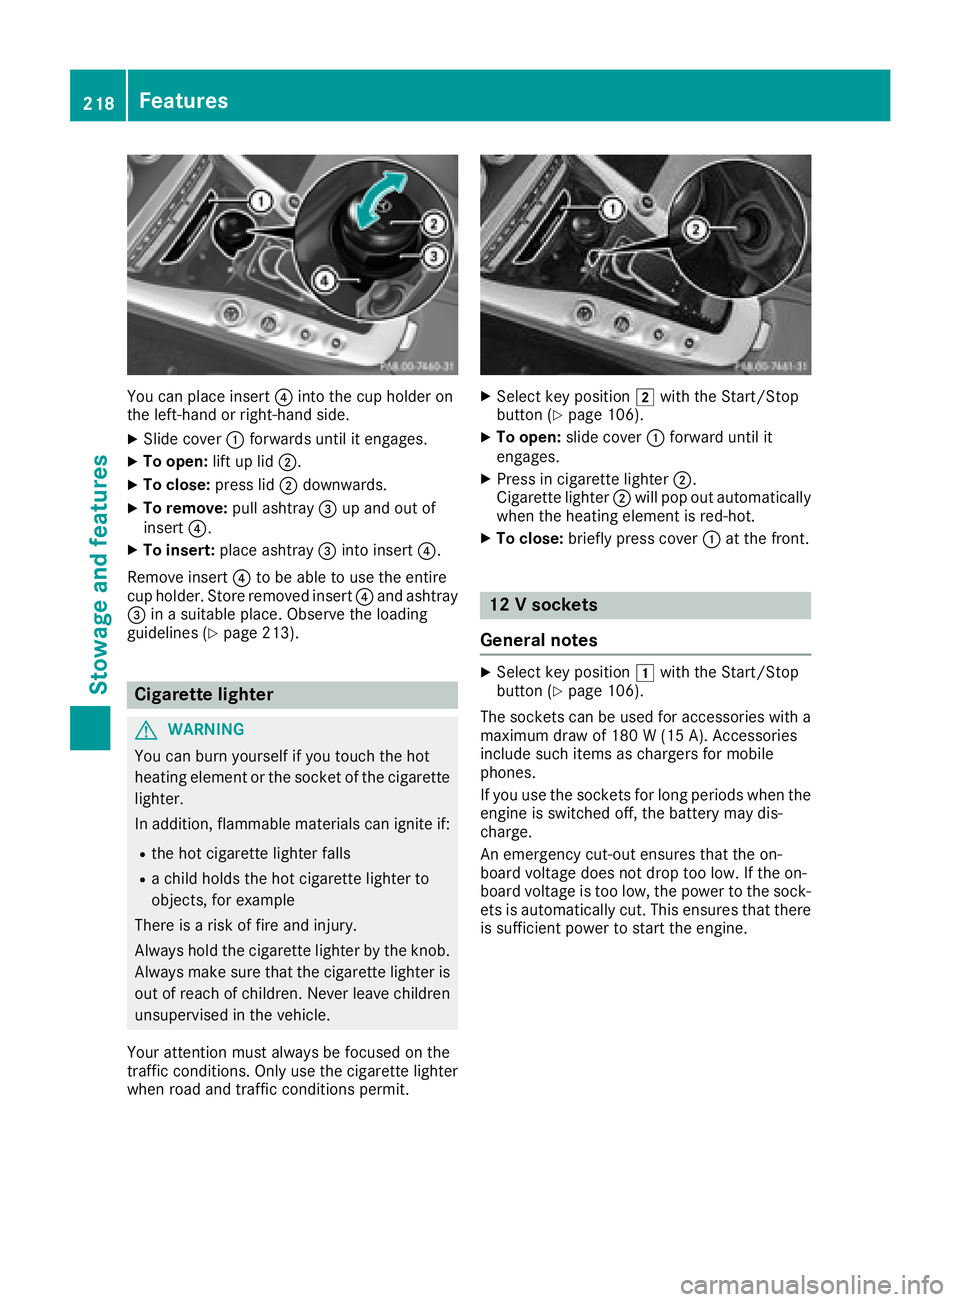
You can place insert?into the cup holder on
the left-hand or right-hand side.
XSlide cover :forwards until it engages.
XTo open: lift up lid;.
XTo close: press lid;downwards.
XTo remove: pull ashtray=up and out of
insert ?.
XTo insert: place ashtray =into insert ?.
Remove insert ?to be able to use the entire
cup holder. Store removed insert ?and ashtray
= in a suitable place. Observe the loading
guidelines (
Ypage 213).
Cigarette lighter
GWARNING
You can burn yourself if you touch the hot
heating element or the socket of the cigarette lighter.
In addition, flammable materials can ignite if:
Rthe hot cigarette lighter falls
Ra child holds the hot cigarette lighter to
objects, for example
There is a risk of fire and injury.
Always hold the cigarette lighter by the knob.
Always make sure that the cigarette lighter is
out of reach of children. Never leave children
unsupervised in the vehicle.
Your attention must always be focused on the
traffic conditions. Only use the cigarette lighter when road and traffic conditions permit.
XSelect key position 2with the Start/Stop
button (Ypage 106).
XTo open: slide cover :forward until it
engages.
XPress in cigarette lighter ;.
Cigarette lighter ;will pop out automatically
when the heating element is red-hot.
XTo close: briefly press cover :at the front.
12 V sockets
General notes
XSelect key position 1with the Start/Stop
button (Ypage 106).
The sockets can be used for accessories with a
maximum draw of 180 W (15 A). Accessories
include such items as chargers for mobile
phones.
If you use the sockets for long periods when the
engine is switched off, the battery may dis-
charge.
An emergency cut-out ensures that the on-
board voltage does not drop too low. If the on-
board voltage is too low, the power to the sock-
ets is automatically cut. This ensures that there
is sufficient power to start the engine.
218Features
Stowage and features