2018 LINCOLN CONTINENTAL parking brake
[x] Cancel search: parking brakePage 277 of 615
Trailer lamps are required on most towedvehicles. Make sure all running lights, brakelights, turn signals and hazard lights areworking.
Before Towing a Trailer
Practice turning, stopping and backing up toget the feel of your vehicle-trailercombination before starting on a trip. Whenturning, make wider turns so the trailerwheels clear curbs and other obstacles.
When Towing a Trailer
•Do not drive faster than 70 mph(113 km/h) during the first 500 mi(800 km).
•Do not make full-throttle starts.
•Check your hitch, electrical connectionsand trailer wheel lug nuts thoroughly afteryou have traveled 50 mi (80 km).
•When stopped in congested or heavytraffic during hot weather, place thetransmission in park (P) to aid engine andtransmission cooling and to help A/Cperformance.
•Turn off the speed control with heavyloads or in hilly terrain. The speed controlmay turn off automatically when you aretowing on long, steep grades.
•Shift to a lower gear when driving downa long or steep hill. Do not apply thebrakes continuously, as they mayoverheat and become less effective.
•If your transmission is equipped with aGrade Assist or Tow/Haul feature, usethis feature when towing. This providesengine braking and helps eliminateexcessive transmission shifting foroptimum fuel economy and transmissioncooling.
•Allow more distance for stopping with atrailer attached. Anticipate stops andbrake gradually.
•Avoid parking on a grade. However, ifyou must park on a grade:
1. Turn the steering wheel to point yourvehicle tires away from traffic flow.
2. Set your vehicle parking brake.
3. Place the transmission in park (P).
4. Place wheel chocks in front and back ofthe trailer wheels. Chocks are notincluded with your vehicle.
Launching or Retrieving a Boat orPersonal Watercraft (PWC)
Note:Disconnect the wiring to the trailerbefore backing the trailer into the water.
Note:Reconnect the wiring to the trailerafter removing the trailer from the water.
When backing down a ramp during boatlaunching or retrieval:
•Do not allow the static water level to riseabove the bottom edge of the rearbumper.
•Do not allow waves to break higher than6 in (15 cm) above the bottom edge ofthe rear bumper.
Exceeding these limits may allow water toenter vehicle components:
•Causing internal damage to thecomponents.
•Affecting driveability, emissions, andreliability.
274
Continental (CPL) Canada/United States of America, enUSA, Edition date: 201706, Second-Printing
Towing
Page 301 of 615
Protected ComponentsFuse Amp RatingFuse Or Relay Number
Anti-lock brake system valves.30A 226
Not used.—27
Rear climate controlled seats.30A 228
Run/Start Relay.—29
Not used.—30
Electric power-assisted steering.10A 131Electric parking brake.
Anti-lock brake system module.10A 132
Powertrain control module.10A 133
Blind spot information system.10A 134Adaptive cruise control.Front view camera.360 degree camera module.Rear camera.Transmission range control module.
Not used.—35
Electric cooling fan relay.—36
298
Continental (CPL) Canada/United States of America, enUSA, Edition date: 201706, Second-Printing
Fuses
Page 315 of 615
GENERAL INFORMATION
Have your vehicle serviced regularly to helpmaintain its roadworthiness and resale value.There is a large network of authorizeddealers that are there to help you with theirprofessional servicing expertise. We believethat their specially trained technicians arebest qualified to service your vehicle properlyand expertly. They are supported by a widerange of highly specialized tools developedspecifically for servicing your vehicle.
If your vehicle requires professional service,an authorized dealer can provide thenecessary parts and service. Check yourwarranty information to find out which partsand services are covered.
Use only recommended fuels, lubricants,fluids and service parts conforming tospecifications. Motorcraft® parts aredesigned and built to provide the bestperformance in your vehicle.
Precautions
•Do not work on a hot engine.
•Make sure that nothing gets caught inmoving parts.
•Do not work on a vehicle with the enginerunning in an enclosed space, unless youare sure you have enough ventilation.
•Keep all open flames and other burningmaterial (such as cigarettes) away fromthe battery and all fuel related parts.
Working with the Engine Off
1. Set the parking brake and shift thetransmission to park (P).
2. Switch off the engine.
3. Block the wheels.
Working with the Engine On
WARNING: To reduce the risk ofvehicle damage and personal burn injuries,do not start your engine with the air cleanerremoved and do not remove it while theengine is running.
1. Set the parking brake and shift thetransmission to park (P).
2. Block the wheels.
OPENING AND CLOSING THE
HOOD
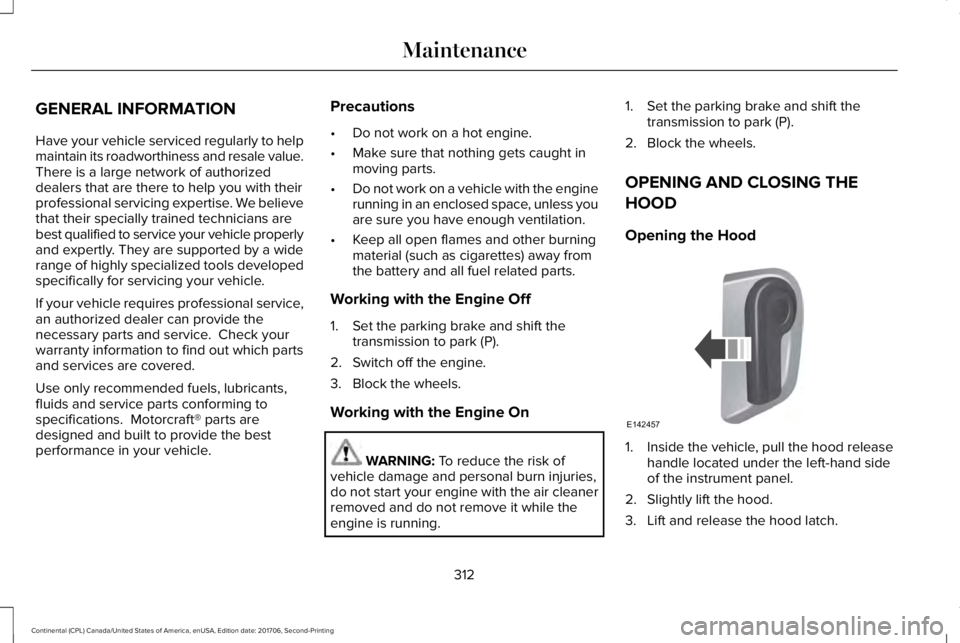
Opening the Hood
1. Inside the vehicle, pull the hood releasehandle located under the left-hand sideof the instrument panel.
2. Slightly lift the hood.
3. Lift and release the hood latch.
312
Continental (CPL) Canada/United States of America, enUSA, Edition date: 201706, Second-Printing
MaintenanceE142457
Page 320 of 615

Automatic transmission dipstick.See Automatic Transmission FluidCheck (page 324).
H.
Washer fluid reservoir. SeeWasher Fluid Check (page 325).I.
ENGINE OIL DIPSTICK - 2.7L
ECOBOOST™/3.0L ECOBOOST™
Minimum.A
Nominal.B
Maximum.C
ENGINE OIL DIPSTICK - 3.7L
MINA
MAXB
ENGINE OIL CHECK
To check the engine oil level consistentlyand accurately, do the following:
1.Make sure the parking brake is on. Makesure the transmission is in park (P) orneutral (N).
2. Run the engine until it reaches normaloperating temperature.
3. Make sure that your vehicle is on levelground.
4.Switch the engine off and wait 15 minutesfor the oil to drain into the oil pan. Checking the engine oil level too soonafter you switch the engine off may resultin an inaccurate reading.
5. Open the hood. See Opening andClosing the Hood (page 312).
6. Remove the dipstick and wipe it with aclean, lint-free cloth. See Under HoodOverview (page 315).
7.Replace the dipstick and remove it againto check the oil level. See Engine OilDipstick (page 317).
8. Make sure that the oil level is betweenthe maximum and minimum marks. If theoil level is at the minimum mark, add oilimmediately. See Capacities andSpecifications (page 382).
9. If the oil level is correct, replace thedipstick and make sure it is fully seated.
317
Continental (CPL) Canada/United States of America, enUSA, Edition date: 201706, Second-Printing
MaintenanceE250320 E146429
Page 326 of 615
Your vehicle has limited engine power whenin the fail-safe mode, drive your vehicle withcaution. Your vehicle does not maintainhigh-speed operation and the engine mayoperate poorly.
Remember that the engine is capable ofautomatically shutting down to preventengine damage. In this situation:
1. Pull off the road as soon as safelypossible and switch the engine off.
2. If you are a member of a roadsideassistance program, we recommend thatyou contact your roadside assistanceservice provider.
3.If this is not possible, wait a short periodfor the engine to cool.
4. Check the coolant level. If the coolantlevel is at or below the minimum mark,add prediluted coolant immediately.
5.When the engine temperature cools, youcan re-start the engine. Have your vehiclechecked as soon as possible to minimizeengine damage.
Note:Driving your vehicle without repairincreases the chance of engine damage.
Engine Coolant TemperatureManagement (If Equipped)
WARNING: To reduce the risk of crashand injury, be prepared that the vehiclespeed may reduce and the vehicle may notbe able to accelerate with full power until thecoolant temperature reduces.
If you tow a trailer with your vehicle, theengine may temporarily reach a highertemperature during severe operatingconditions, for example ascending a long orsteep grade in high ambient temperatures.
At this time, you may notice the coolanttemperature gauge moves toward the redzone and a message may appear in theinformation display.
You may notice a reduction in vehicle speedcaused by reduced engine power in orderto manage the engine coolant temperature. Your vehicle may enter this mode if certainhigh-temperature and high-load conditionstake place. The amount of speed reductiondepends on vehicle loading, grade andambient temperature. If this occurs, there isno need to stop your vehicle. You cancontinue to drive.
The air conditioning may automatically turnon and off during severe operatingconditions to protect the engine fromoverheating. When the coolant temperaturedecreases to the normal operatingtemperature, the air conditioning turns on.
If the coolant temperature gauge moves fullyinto the red zone, or if the coolanttemperature warning or service engine soonmessages appear in your information display,do the following:
1.Stop your vehicle as soon as it is safe todo so. Fully apply the parking brake, shiftinto park (P) or neutral (N).
323
Continental (CPL) Canada/United States of America, enUSA, Edition date: 201706, Second-Printing
Maintenance
Page 330 of 615

Note:Until you switch the ignition to the onposition, you will receive a message in yourinformation display stating that your vehicleis not in park.
1. Apply the parking brake.
2. Shift into park (P) or neutral (N).
3. Switch off all accessories.
4. Press the brake pedal and start yourvehicle.
5. Run the engine until it reaches normaloperating temperature. While the engineis warming up, complete the following:Reset the clock. See Audio Unit (page405). Reset the power windowsbounce-back feature. See PowerWindows (page 101). Reset the radiostation presets. See Audio Unit (page405).
6. Allow the engine to idle for at least oneminute.
7.Drive the vehicle at least 10 mi (16 km) tocompletely relearn the idle trim and fueltrim strategy.
Note:If you do not allow the engine torelearn the idle and fuel trim strategy, theidle quality of your vehicle may be adverselyaffected until the engine computereventually relearns the idle trim and fuel trimstrategy.
Note:Certain features may not operate ifthe battery monitor system is not reset witha scan tool following a jump start or batteryreplacement. Normal electrical accessoryoperation should resume after your vehicleis left undisturbed for 8 hours.
Make sure that you dispose of old batteriesin an environmentally friendly way. Seekadvice from your local authority aboutrecycling old batteries.
If storing your vehicle for more than 30 dayswithout recharging the battery, werecommend that you disconnect the batterycables to maintain battery charge for quickstarting.
CHECKING THE WIPER BLADES
Run the tip of your fingers over the edge ofthe blade to check for roughness.
Clean the wiper blades with washer fluid orwater applied with a soft sponge or cloth.
CHANGING THE WIPER BLADES
Replace the wiper blades at least annuallyfor optimum performance.
You can improve poor wiper quality bycleaning the wiper blades and thewindshield. See Cleaning the Windows andWiper Blades (page 337).
327
Continental (CPL) Canada/United States of America, enUSA, Edition date: 201706, Second-Printing
MaintenanceE142463
Page 333 of 615

Front Direction Indicator
1. Switch all of the lamps and the ignitionoff.
2. Disconnect the electrical connector.
3. Turn the bulb holder counterclockwiseand remove it.
4.Remove the bulb by pulling it straight out.
LED Lamps
LED lamps are not serviceable items. See anauthorized dealer if they fail.
The following lamps are LED:
•Front parking lamps.
•Front side marker lamps.
•Side direction indicators.
•Rear side marker lamps.
•Brake and rear lamps.
•Central high mounted brake lamp.
•Rear direction indicators.
•Reversing lamps.
•License plate lamps.
BULB SPECIFICATION CHART
The specified replacement bulbs are in thechart below. Headlamp bulbs must bemarked with an authorized D.O.T.(Department of Transportation) for NorthAmerica to affirm lamp performance, lightbrightness and pattern and safe visibility. Thecorrect bulbs will not damage the lampassembly or void the lamp assembly warrantyand will provide quality bulb burn time.
Trade numberFunction
D3S* Headlamp (high intensity discharge) Low and High
LED* Sidemarker - front
LED* Park lamp - front
7444NA* Turn lamp - front
LED*Signal indicator mirror lamp
330
Continental (CPL) Canada/United States of America, enUSA, Edition date: 201706, Second-Printing
MaintenanceE163826
Page 344 of 615
CLEANING LEATHER SEATS (If
Equipped)
Note:Follow the same procedure ascleaning leather seats for cleaning leatherinstrument panels and leather interior trimsurfaces.
For routine cleaning, wipe the surface witha soft, damp cloth and a mild soap and watersolution. Dry the area with a clean, soft cloth.
For cleaning and removing stains such asdye transfer, use Motorcraft Premium Leatherand Vinyl Cleaner or a commercially availableleather cleaning product for automotiveinteriors.
Note:Test any cleaner or stain remover onan inconspicuous area.
You should:
•Remove dust and loose dirt with avacuum cleaner.
•Clean and treat spills and stains as soonas possible.
Do not use the following products as thesemay damage the leather:
•Oil and petroleum or silicone-basedleather conditioners.
•Household cleaners.
•Alcohol solutions.
•Solvents or cleaners intended specificallyfor rubber, vinyl and plastics.
REPAIRING MINOR PAINT
DAMAGE
Authorized dealers have touch-up paint tomatch your vehicle’s color. Your vehicle colorcode is printed on a sticker on the front,left-hand side door jamb. Take your colorcode to your authorized dealer to make sureyou get the correct color.
Before repairing minor paint damage, use acleaner such as Motorcraft Bug and TarRemover to remove particles such as birddroppings, tree sap, insect deposits, tarspots, road salt and industrial fallout.
Always read the instructions before usingcleaning products.
CLEANING THE WHEELS
1. Regularly clean them with a wheelcleaner. We recommend that you useFord approved wheel cleaner if available.
2. Remove dirt and brake dust with asponge.
3. Remove tar and grease with a bug andtar remover. We recommend that you useFord approved bug and tar remover ifavailable.
4. Thoroughly rinse the wheels with waterafter cleaning.
If you intend on parking your vehicle for anextended period after cleaning the wheelswith a wheel cleaner, drive your vehicle fora few minutes before doing so. This reducesthe risk of corrosion of the brake discs, brakepads and linings.
Do not clean the wheels when they are hot.
Note: Some car washes could damagewheel rims and covers.
341
Continental (CPL) Canada/United States of America, enUSA, Edition date: 201706, Second-Printing
Vehicle Care