2018 LINCOLN CONTINENTAL wheel
[x] Cancel search: wheelPage 366 of 615

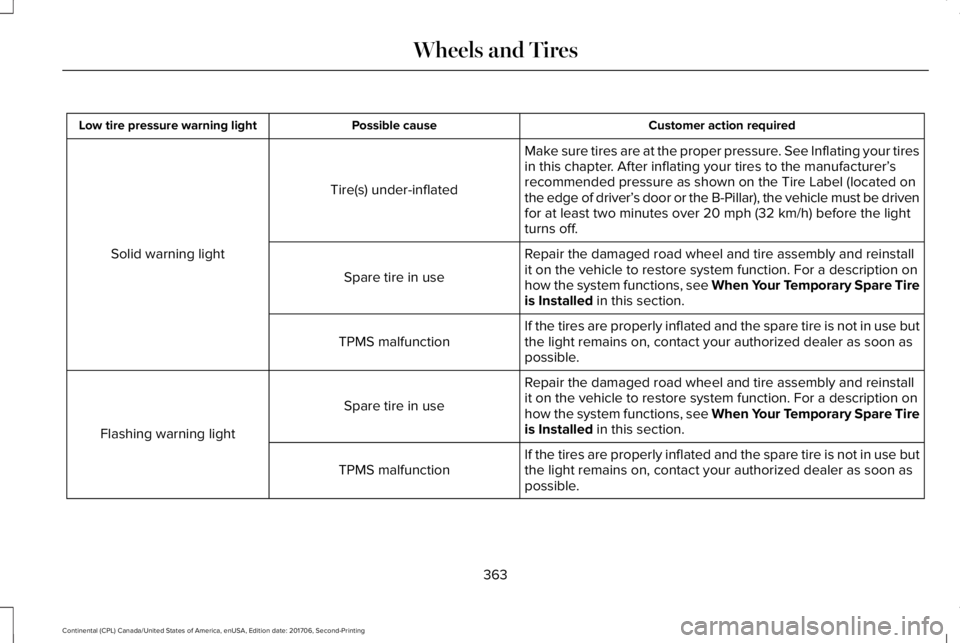
Customer action requiredPossible causeLow tire pressure warning light
Make sure tires are at the proper pressure. See Inflating your tiresin this chapter. After inflating your tires to the manufacturer’srecommended pressure as shown on the Tire Label (located onthe edge of driver’s door or the B-Pillar), the vehicle must be drivenfor at least two minutes over 20 mph (32 km/h) before the lightturns off.
Tire(s) under-inflated
Solid warning lightRepair the damaged road wheel and tire assembly and reinstallit on the vehicle to restore system function. For a description onhow the system functions, see When Your Temporary Spare Tireis Installed in this section.
Spare tire in use
If the tires are properly inflated and the spare tire is not in use butthe light remains on, contact your authorized dealer as soon aspossible.TPMS malfunction
Repair the damaged road wheel and tire assembly and reinstallit on the vehicle to restore system function. For a description onhow the system functions, see When Your Temporary Spare Tireis Installed in this section.
Spare tire in use
Flashing warning light
If the tires are properly inflated and the spare tire is not in use butthe light remains on, contact your authorized dealer as soon aspossible.TPMS malfunction
363
Continental (CPL) Canada/United States of America, enUSA, Edition date: 201706, Second-Printing
Wheels and Tires
Page 367 of 615

When Inflating Your Tires
WARNING: Do not use the tirepressure displayed in the information displayas a tire pressure gauge. Failure to followthis instruction could result in personal injuryor death.
When putting air into your tires (such as at agas station or in your garage), the tirepressure monitoring system may not respondimmediately to the air added to your tires.
It may take up to two minutes of driving over20 mph (32 km/h) for the light to turn off afteryou have filled your tires to therecommended inflation pressure.
How Temperature Affects Your TirePressure
The tire pressure monitoring system monitorstire pressure in each pneumatic tire. Whiledriving in a normal manner, a typicalpassenger tire inflation pressure mayincrease about 2–4 psi (14–28 kPa) from acold start situation. If the vehicle is stationaryovernight with the outside temperature
significantly lower than the daytimetemperature, the tire pressure may decreaseabout 3 psi (21 kPa) for a drop of 30°F (17°C)in ambient temperature. This lower pressurevalue may be detected by the tire pressuremonitoring system as being significantlylower than the recommended inflationpressure and activate the system warninglight for low tire pressure. If the low tirepressure warning light is on, visually checkeach tire to verify that no tire is flat. If one ormore tires are flat, repair as necessary.Check the air pressure in the road tires. Ifany tire is under-inflated, carefully drive thevehicle to the nearest location where air canbe added to the tires. Inflate all the tires tothe recommended inflation pressure.
CHANGING A ROAD WHEEL
WARNING: If the tire pressure monitorsensor becomes damaged it may notfunction.
Note:You should only use tire sealants inroadside emergencies as they may causedamage to the tire pressure monitoringsystem sensor.
Note:The tire pressure monitoring systemindicator light illuminates when the sparetire is in use. To restore the full function ofthe monitoring system, all road wheelsequipped with tire pressure monitoringsensors must be mounted on the vehicle.
If you get a flat tire when driving, do notapply the brake heavily. Instead, graduallydecrease your speed. Hold the steeringwheel firmly and slowly move to a safe placeon the side of the road.
Have a flat serviced by an authorized dealerin order to prevent damage to the tirepressure monitoring system sensors. SeeTire Pressure Monitoring System (page 359).Replace the spare tire with a road tire assoon as possible. During repairing orreplacing of the flat tire, have an authorizeddealer inspect the tire pressure monitoringsystem sensor for damage.
364
Continental (CPL) Canada/United States of America, enUSA, Edition date: 201706, Second-Printing
Wheels and Tires
Page 368 of 615

Dissimilar Spare Wheel and TireAssembly Information
WARNING: Failure to follow theseguidelines could result in an increased riskof loss of vehicle control, injury or death.
If you have a dissimilar spare wheel and tire,then it is intended for temporary use only.This means that if you need to use it, youshould replace it as soon as possible with aroad wheel and tire assembly that is thesame size and type as the road tires andwheels that were originally provided. If thedissimilar spare tire or wheel is damaged, itshould be replaced rather than repaired.
A dissimilar spare wheel and tire assemblyis defined as a spare wheel and tire assemblythat is different in brand, size or appearancefrom the road tires and wheels and can beone of three types:
1. T-type mini-spare: This spare tire beginswith the letter T for tire size and may haveTemporary Use Only molded in the sidewall.
•Do not exceed the maximum speedlabeled on the tire and wheel assembly.This maximum speed can be either on alabel affixed to the wheel or molded intothe tire.
2. Full-size dissimilar spare with label onwheel: This spare tire has a label on thewheel that states: THIS WHEEL AND TIREASSEMBLY FOR TEMPORARY USE ONLY.
When driving with one of the dissimilar sparetires listed above, do not:
•Exceed 50 mph (80 km/h).
•Load the vehicle beyond maximumvehicle load rating listed on the SafetyCompliance Label.
•Tow a trailer.
•Use snow chains on the end of thevehicle with the dissimilar spare tire.
•Use more than one dissimilar spare tireat a time.
•Use commercial car washing equipment.
•Try to repair the dissimilar spare tire.
Use of one of the dissimilar spare tires listedabove at any one wheel location can lead toimpairment of the following:
•Handling, stability and brakingperformance.
•Comfort and noise.
•Ground clearance and parking at curbs.
•Winter weather driving capability.
•Wet weather driving capability.
•All-wheel driving capability, if applicable.
3. Full-size dissimilar spare without labelon wheel
When driving with the full-size dissimilarspare wheel and tire assembly, do not:
•Exceed 70 mph (113 km/h).
•Use more than one dissimilar sparewheel and tire assembly at a time.
•Use commercial car washing equipment.
•Use snow chains on the end of thevehicle with the dissimilar spare wheeland tire assembly.
365
Continental (CPL) Canada/United States of America, enUSA, Edition date: 201706, Second-Printing
Wheels and Tires
Page 369 of 615

The usage of a full-size dissimilar sparewheel and tire assembly can lead toimpairment of the following:
•Handling, stability and brakingperformance.
•Comfort and noise.
•Ground clearance and parking at curbs.
•Winter weather driving capability.
•Wet weather driving capability.
•All-wheel driving capability.
When driving with the full-size dissimilarspare wheel and tire assembly additionalcaution should be given to:
•Towing a trailer.
•Driving vehicles equipped with a camperbody.
•Driving vehicles with a load on the cargorack.
Drive cautiously when using a full-sizedissimilar spare wheel and tire assembly andseek service as soon as possible.
Tire Change Procedure (If Equipped)
WARNING: The jack supplied with thisvehicle is only intended for changing wheels.Do not use the vehicle jack other than whenyou are changing a wheel in an emergency.
WARNING: The jack should be usedon level firm ground wherever possible.
WARNING: Check that the vehicle jackis not damaged or deformed and the threadis lubricated and clean.
WARNING: Never place anythingbetween the vehicle jack and the ground.
WARNING: Never place anythingbetween the vehicle jack and your vehicle.
WARNING: Use only the specifiedjacking points. If you use other positions, youmay damage the body, steering, suspension,engine, braking system or the fuel lines.
WARNING: To help prevent yourvehicle from moving when changing a wheel,shift the transmission into park (P), set theparking brake and use an appropriate blockor wheel chock to secure the wheeldiagonally opposite to the wheel beingchanged. For example, when changing thefront left wheel, place an appropriate blockor wheel chock on the right rear wheel.
WARNING: When one of the frontwheels is off the ground, the transmissionalone will not prevent the vehicle frommoving or slipping off the jack, even if thetransmission is in park (P).
WARNING: Do not get under a vehiclethat is only supported by a vehicle jack.
366
Continental (CPL) Canada/United States of America, enUSA, Edition date: 201706, Second-Printing
Wheels and Tires
Page 370 of 615

WARNING: Always use the jackprovided as original equipment with yourvehicle. If using a jack other than the oneprovided, make sure the jack capacity isadequate for the vehicle weight, includingany vehicle cargo or modifications. If you areunsure if the jack capacity is adequate,contact the authorized dealer.
Note:The jack does not requiremaintenance or additional lubrication overthe service life of your vehicle.
Note:Passengers should not remain in yourvehicle when the vehicle is being jacked.
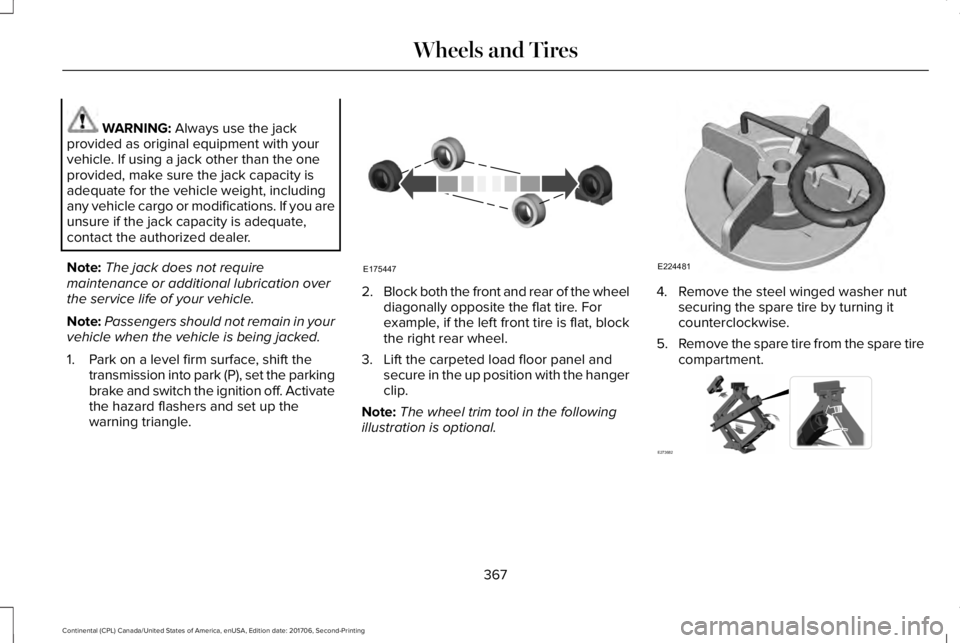
1. Park on a level firm surface, shift thetransmission into park (P), set the parkingbrake and switch the ignition off. Activatethe hazard flashers and set up thewarning triangle.
2.Block both the front and rear of the wheeldiagonally opposite the flat tire. Forexample, if the left front tire is flat, blockthe right rear wheel.
3. Lift the carpeted load floor panel andsecure in the up position with the hangerclip.
Note:The wheel trim tool in the followingillustration is optional.
4. Remove the steel winged washer nutsecuring the spare tire by turning itcounterclockwise.
5.Remove the spare tire from the spare tirecompartment.
367
Continental (CPL) Canada/United States of America, enUSA, Edition date: 201706, Second-Printing
Wheels and TiresE175447 E224481 E273682
Page 371 of 615

6. Remove plastic wing nut and jack andlug wrench assembly. Remove the strapfrom the jack. Turn the jack hex nut drivescrew counterclockwise and detach lugwrench from the jack.
7. If your vehicle has a wheel trim, use thetool supplied to remove it and access thelug nuts.
8.Loosen each wheel lug nut one-half turncounterclockwise, but do not removethem until the wheel is raised off theground.
9. The vehicle jacking points are shownabove, and are depicted on the yellowwarning label on the jack.
WARNING: Do not attempt to changea tire on the side of the vehicle close tomoving traffic. Pull far enough off the roadto avoid the danger of being hit whenoperating the jack or changing the wheel.
368
Continental (CPL) Canada/United States of America, enUSA, Edition date: 201706, Second-Printing
Wheels and TiresE181744 1
E181745
2 E145908 E166722
Page 372 of 615

10. Position the jack so that the vehicledownward flange rests in the jacksaddle. Use the lug wrench and turnthe jack nut clockwise. When the flattire is off the ground, remove the lugnuts with the lug wrench.
11.Replace the flat tire with the spare tire,making sure the valve stem is facingoutward. Reinstall the lug nuts until thewheel is snug against the hub. Do notfully tighten the lug nuts until the wheelhas been lowered.
12. Lower the wheel by turning the jackhandle counterclockwise.
13. Remove the jack and fully tighten thelug nuts in the order shown. SeeTechnical Specifications (page 370).
14.Fold up the wrench and re-attach to thejack. Re-attach the strap on the jack.Re-position the jack and wrenchassembly into the original vehicleposition and secure with the plasticwing nut. Securely fasten the jackbefore you drive.
15. Unblock the wheel and pick up thewarning triangle.
Stowing the flat tire
You cannot store the full-sized road wheelin the temporary spare tire well.
1. Find the flat tire retainer strap tuckedinside the jack channel. Lower thecarpeted load floor.
2.Stow the flat tire in the cargo area on theload floor with the wheel facing up.Secure the flat tire with the retainer strapby following the next steps.
369
Continental (CPL) Canada/United States of America, enUSA, Edition date: 201706, Second-Printing
Wheels and TiresE201100 12
3
4
5
E75442 E273683
Page 373 of 615

3. Locate the rear left side and right sidecargo tie-down rings. Push the loop endof the retainer strap through one cargotie-down ring. Thread the non-loop endthrough the loop.
4. Weave the retainer strap through thewheel openings.
5.Locate the cargo tie-down in the oppositerear corner of the cargo area. Thread theretainer strap though the tie-down andpull tight.
6.Secure the flat tire by tying a 2-half hitchknot.TECHNICAL SPECIFICATIONS
370
Continental (CPL) Canada/United States of America, enUSA, Edition date: 201706, Second-Printing
Wheels and TiresE142906 E143746