Page 371 of 514

3716-2. Maintenance
LS500_OM_OM50F54U_(U) 6
Maintenance and care Parking brake • Does the parking
brake operate nor-
mally?
•When parked on a
slope and the park-
ing brake is on, is the
vehicle securely
stopped?
Seat belts • Do the seat belts
operate smoothly?
• The seat belts should
not be damaged.
Seats • Do the seat controls
operate properly?
Steering wheel • Does the steering
wheel rotate
smoothly?
• Does the steering
wheel have the cor-
rect amount of free
play?
•There should not be
any strange sounds
coming from the
steering wheel.
Vehicle exterior Items Check points
Doors/trunk • Do the doors/trunk
operate smoothly?
Engine hood •Does the engine
hood lock system
work properly?
Fluid leaks •There should not be
any signs of fluid
leakage after the
vehicle has been
parked.Items Check points
Tires • Is the tire inflation
pressure correct?
• The tires should not
be damaged or
excessively worn.
• Have the tires been
rotated according to
the maintenance
schedule?
•The wheel nuts
should not be loose.
Windshield wip-
ers • The wiper blades
should not show any
signs of cracking,
splitting, wear, con-
tamination or defor-
mation.
• The wiper blades
should clear the
windshield without
streaking or skip-
ping.Items Check points
Page 378 of 514
378 6-3. Do-it-yourself maintenance
LS500_OM_OM50F54U_(U) ■
Battery
→ P.384
■
Removing the engine compartment cover
Outside
Front
■
Installing the clips
1 Push up center portion
2 Insert
3 PressEngine compartment cover
A NOTICE
■
Checking the engine compartment
cover after installation
Make sure that the cover is securely
installed in its original position.
Page 379 of 514

3796-3. Do-it-yourself maintenance
LS500_OM_OM50F54U_(U) 6
Maintenance and care ■
Removing the service cover
1 Pull up the passenger side end of
the rubber strip to disengage it
from the vehicle body.
2 Remove the service cover.Push the tabs and lift away the service
cover.
■
Installing the service cover
1 Install the service cover.Make sure to engage the claws on the
windshield side of the service cover when
installing the service cover. 2 Engage the rubber strip to the vehi-
cle body.
With the engine at operating tempera-
ture and turned off, check the oil level
on the dipstick. ■
Checking the engine oil
1 Park the vehicle on level ground.
After warming up the engine and
turning it off, wait more than 5 min-
utes for the oil to drain back into the
bottom of the engine.
2 Holding a rag under the end, pull
the dipstick out.
2WD models
AWD modelsService cover NOTICE■
Checking the service cover after
installation
Make sure that the cover is securely
installed in its original position.
Checking and adding the engine
oil
Page 407 of 514

4076-3. Do-it-yourself maintenance
LS500_OM_OM50F54U_(U) 6
Maintenance and care
Type D
Normal fuse
Blown fuse ■
After a fuse is replaced●
When installing the lid, make sure that the
tab is installed securely.●
If the lights do not turn on even after the
fuse has been replaced, a bulb may need
replacement.●
If the replaced fuse blows again, have the
vehicle inspected by your Lexus dealer.■
If there is an overload in a circuit
The fuses are designed to blow, protecting
the wiring harness from damage.
WARNING■
To prevent system breakdowns and
vehicle fire
Observe the following precautions.
Failure to do so may cause damage to
the vehicle, and possibly a fire or injury.
●
Never use a fuse of a higher amperage
rating than that indicated, or use any
other object in place of a fuse.
●
Always use a genuine Lexus fuse or
equivalent.
Never replace a fuse with a wire, even
as a temporary fix.
●
Do not modify the fuses or fuse boxes. A
B NOTICE■
Before replacing fuses
Have the cause of electrical overload
determined and repaired by your Lexus
dealer as soon as possible.
Page 410 of 514

410 7-1. Essential information
LS500_OM_OM50F54U_(U) 7-1.Essential information
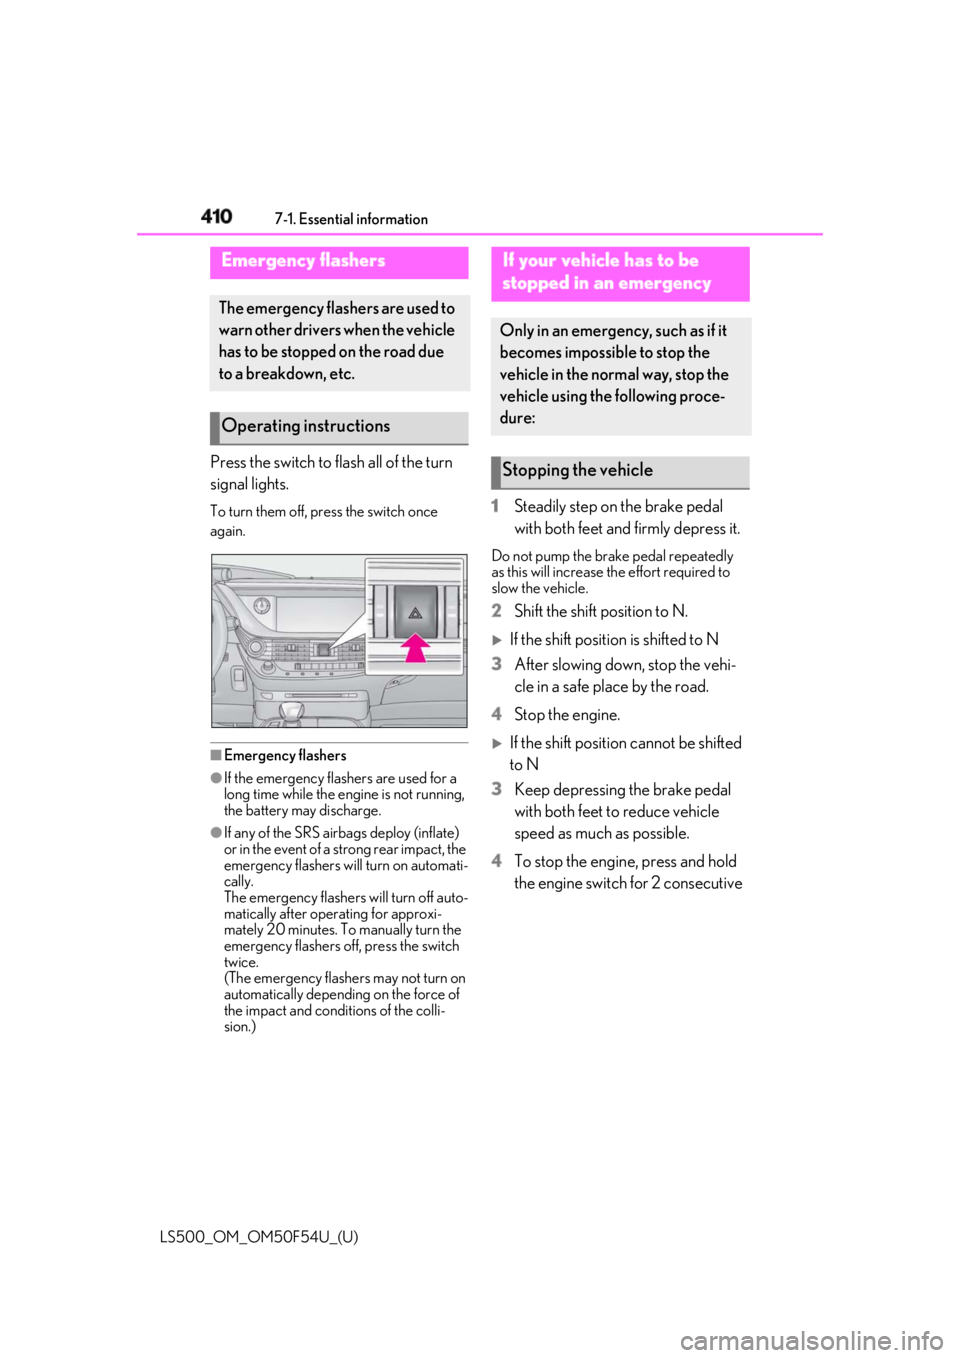
Press the switch to flash all of the turn
signal lights. To turn them off, press the switch once
again.
■
Emergency flashers●
If the emergency flashers are used for a
long time while the engine is not running,
the battery may discharge.●
If any of the SRS airbags deploy (inflate)
or in the event of a strong rear impact, the
emergency flashers will turn on automati-
cally.
The emergency flashers will turn off auto-
matically after operating for approxi-
mately 20 minutes. To manually turn the
emergency flashers off, press the switch
twice.
(The emergency flashers may not turn on
automatically depending on the force of
the impact and conditions of the colli-
sion.) 1 Steadily step on the brake pedal
with both feet and firmly depress it. Do not pump the brake pedal repeatedly
as this will increase the effort required to
slow the vehicle.
2 Shift the shift position to N.
If the shift position is shifted to N
3 After slowing down, stop the vehi-
cle in a safe place by the road.
4 Stop the engine.
If the shift position cannot be shifted
to N
3 Keep depressing the brake pedal
with both feet to reduce vehicle
speed as much as possible.
4 To stop the engine, press and hold
the engine switch for 2 consecutive Emergency flashers The emergency flashers are used to
warn other drivers when the vehicle
has to be stopped on the road due
to a breakdown, etc.
Operating instructions If your vehicle has to be
stopped in an emergency Only in an emergency, such as if it
becomes impossible to stop the
vehicle in the normal way, stop the
vehicle using the following proce-
dure:
Stopping the vehicle
Page 413 of 514

4137-2. Steps to take in an emergency
LS500_OM_OM50F54U_(U) 7
When trouble arises
In the following situations, it is not pos-
sible to be towed by another vehicle
using cables or chains, as the rear
wheels may be locked due to the park-
ing lock. Contact your Lexus dealer or
commercial towing service.
There is a malfunction in the shift control system. ( → P.163, 428)
There is a malfunction in the engine
immobilizer system. ( → P.58)
There is a malfunction in the smart
access system with push-button
start. ( → P.436)
The battery is discharged.
( → P.438)
The following may indicate a problem
with your transmission. Contact your
Lexus dealer or commercial towing
service before towing.
The engine is running but the vehi-
cle does not move.
The vehicle makes an abnormal
sound.
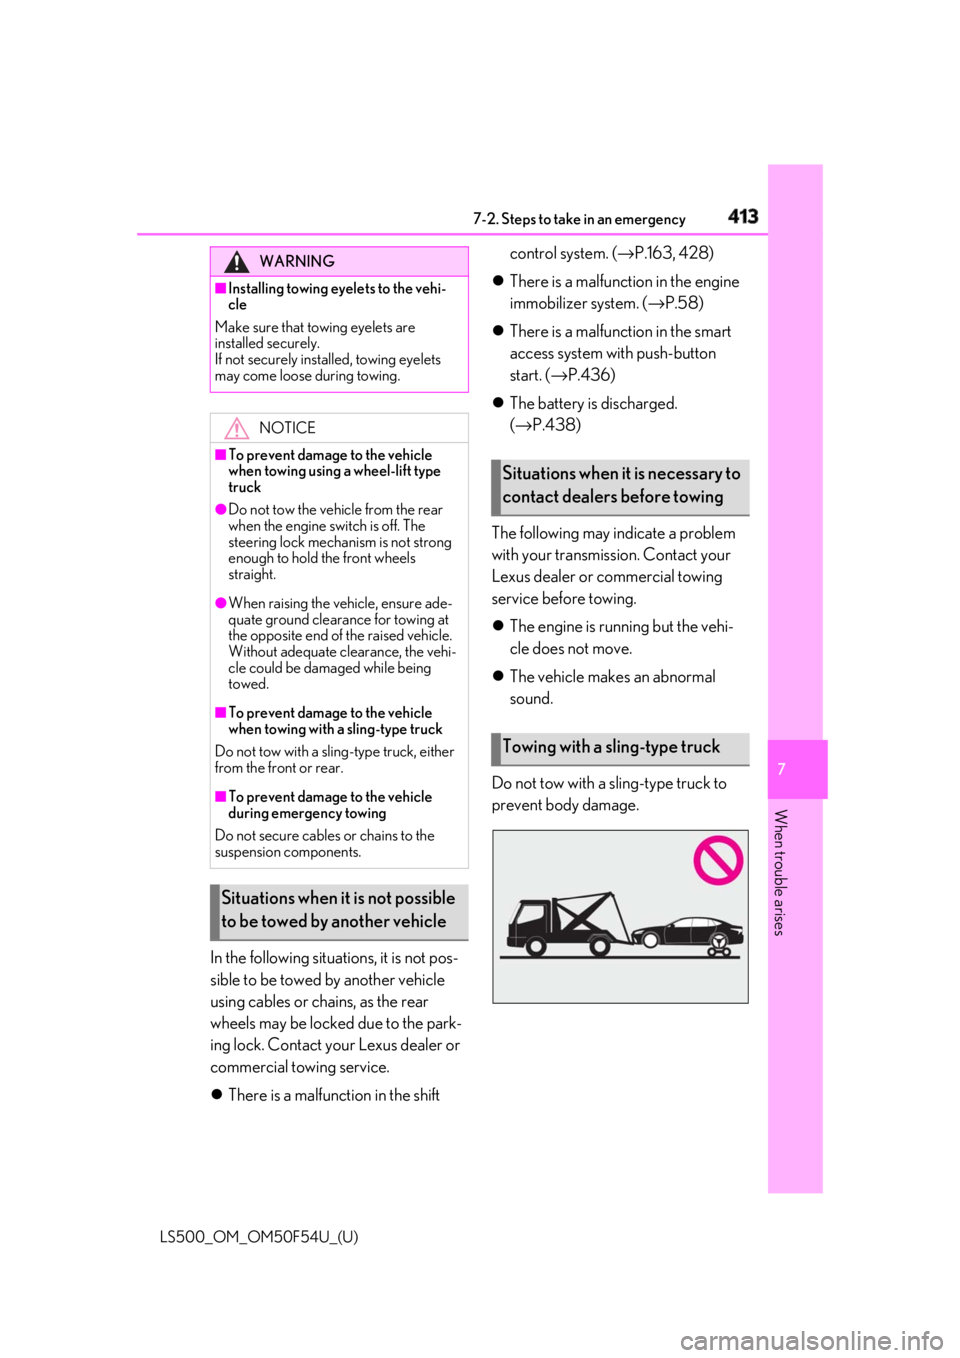
Do not tow with a sling-type truck to
prevent body damage.WARNING■
Installing towing eyelets to the vehi-
cle
Make sure that towing eyelets are
installed securely.
If not securely installed, towing eyelets
may come loose during towing.
NOTICE■
To prevent damage to the vehicle
when towing using a wheel-lift type
truck●
Do not tow the vehicle from the rear
when the engine switch is off. The
steering lock mechanism is not strong
enough to hold the front wheels
straight.●
When raising the vehicle, ensure ade-
quate ground clearance for towing at
the opposite end of the raised vehicle.
Without adequate clearance, the vehi-
cle could be damaged while being
towed.■
To prevent damage to the vehicle
when towing with a sling-type truck
Do not tow with a sling-type truck, either
from the front or rear.
■
To prevent damage to the vehicle
during emergency towing
Do not secure cables or chains to the
suspension components.
Situations when it is not possible
to be towed by another vehicle Situations when it is necessary to
contact dealers before towing
Towing with a sling-type truck
Page 414 of 514

414 7-2. Steps to take in an emergency
LS500_OM_OM50F54U_(U)
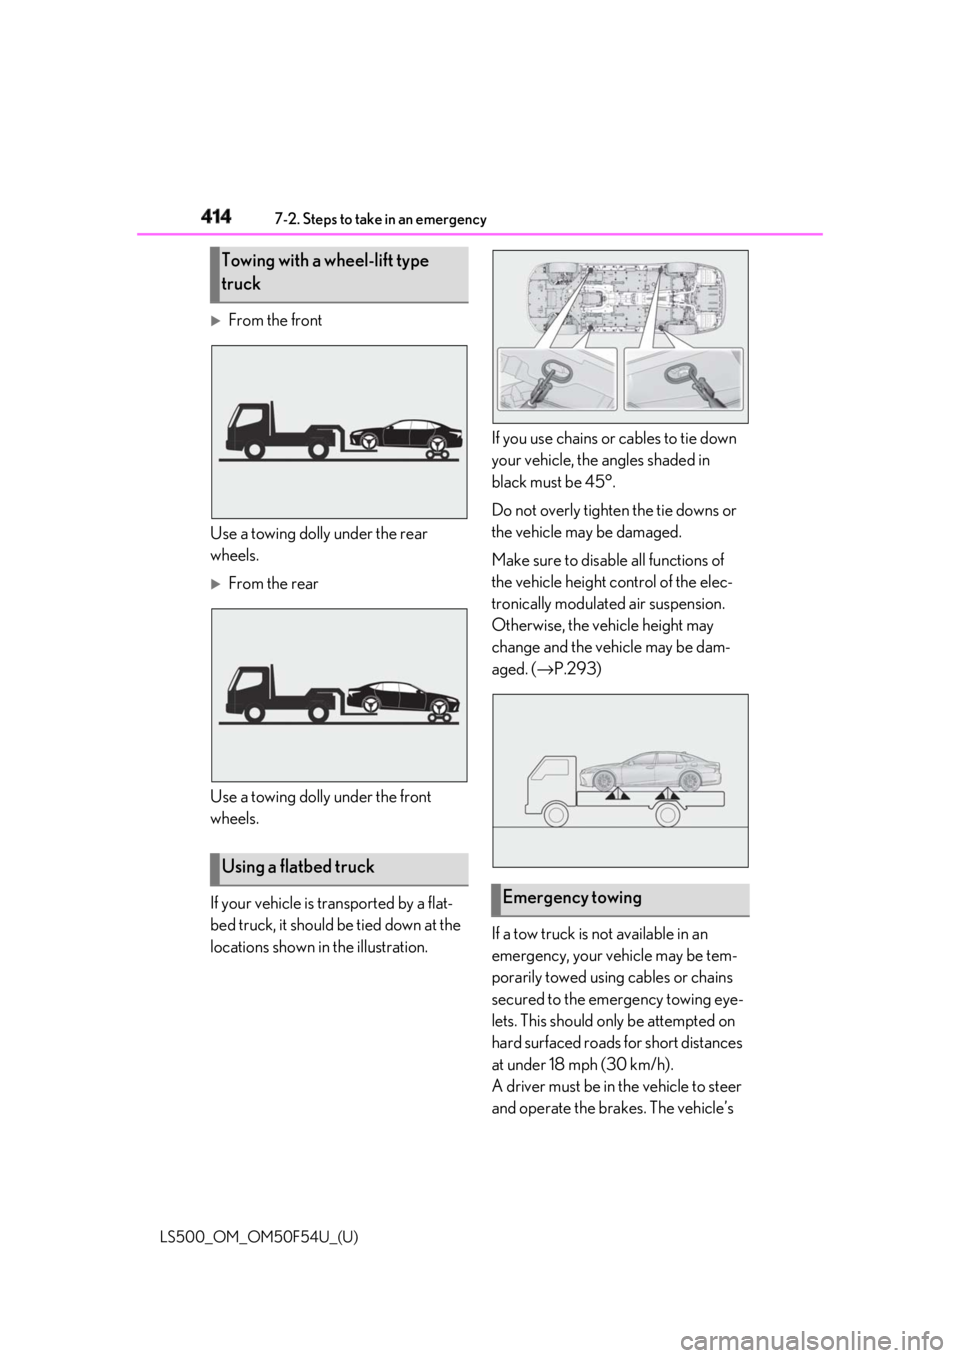
From the front
Use a towing dolly under the rear
wheels.
From the rear
Use a towing dolly under the front
wheels.
If your vehicle is transported by a flat-
bed truck, it should be tied down at the
locations shown in the illustration. If you use chains or cables to tie down
your vehicle, the angles shaded in
black must be 45°.
Do not overly tighten the tie downs or
the vehicle may be damaged.
Make sure to disable all functions of
the vehicle height control of the elec-
tronically modulated air suspension.
Otherwise, the vehicle height may
change and the vehicle may be dam-
aged. ( → P.293)
If a tow truck is not available in an
emergency, your vehicle may be tem-
porarily towed using cables or chains
secured to the emergency towing eye-
lets. This should only be attempted on
hard surfaced roads for short distances
at under 18 mph (30 km/h).
A driver must be in the vehicle to steer
and operate the brakes. The vehicle’s Towing with a wheel-lift type
truck
Using a flatbed truck
Emergency towing
Page 415 of 514

4157-2. Steps to take in an emergency
LS500_OM_OM50F54U_(U) 7
When trouble arises wheels, drive train, axles, steering and
brakes must be in good condition.
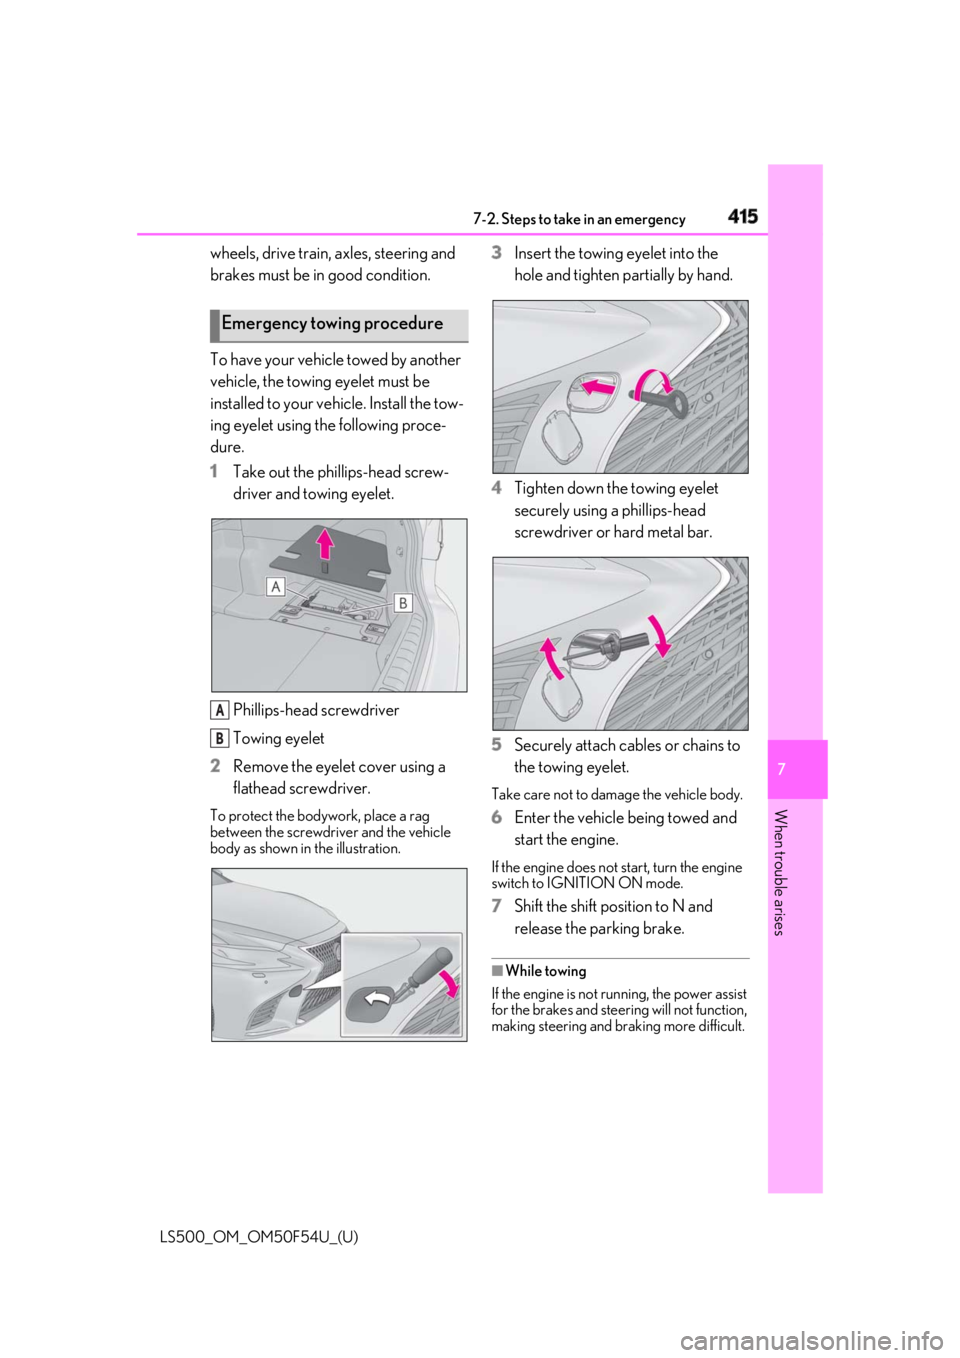
To have your vehicle towed by another
vehicle, the towing eyelet must be
installed to your vehicle. Install the tow-
ing eyelet using the following proce-
dure.
1 Take out the phillips-head screw-
driver and towing eyelet.
Phillips-head screwdriver
Towing eyelet
2 Remove the eyelet cover using a
flathead screwdriver.To protect the bodywork, place a rag
between the screwdriver and the vehicle
body as shown in the illustration. 3 Insert the towing eyelet into the
hole and tighten partially by hand.
4 Tighten down the towing eyelet
securely using a phillips-head
screwdriver or hard metal bar.
5 Securely attach cables or chains to
the towing eyelet. Take care not to damage the vehicle body.
6 Enter the vehicle being towed and
start the engine. If the engine does not start, turn the engine
switch to IGNITION ON mode.
7 Shift the shift position to N and
release the parking brake. ■
While towing
If the engine is not running, the power assist
for the brakes and steering will not function,
making steering and braking more difficult.Emergency towing procedure
A
B