2018 LEXUS LS500 remote control
[x] Cancel search: remote controlPage 324 of 514
324 5-3. Using the air conditioning system and defogger
LS500_OM_OM50F54U_(U) When the function is on, the indicator illu-
minates on the control screen.
Sub function menu When the sub function button on the
Remote Touch is pressed, the following
functions can be switched on and off.
“Rear off”: Turn the rear seats fan off
“Rear AUTO”: Set the rear seats automatic
mode on/off ( → P.324)
: Disables operation of the rear air
conditioning system using the Rear Multi
Operation Panel ■
Rear Multi Operation Panel *
Various functions can be operated by
touching the displayed buttons on the
Rear Multi Operation Panel. *
: The Rear Multi Operation Panel cannot
be used to operate the rear air condi-
tioning system if the function is disabled.
( → P.323)
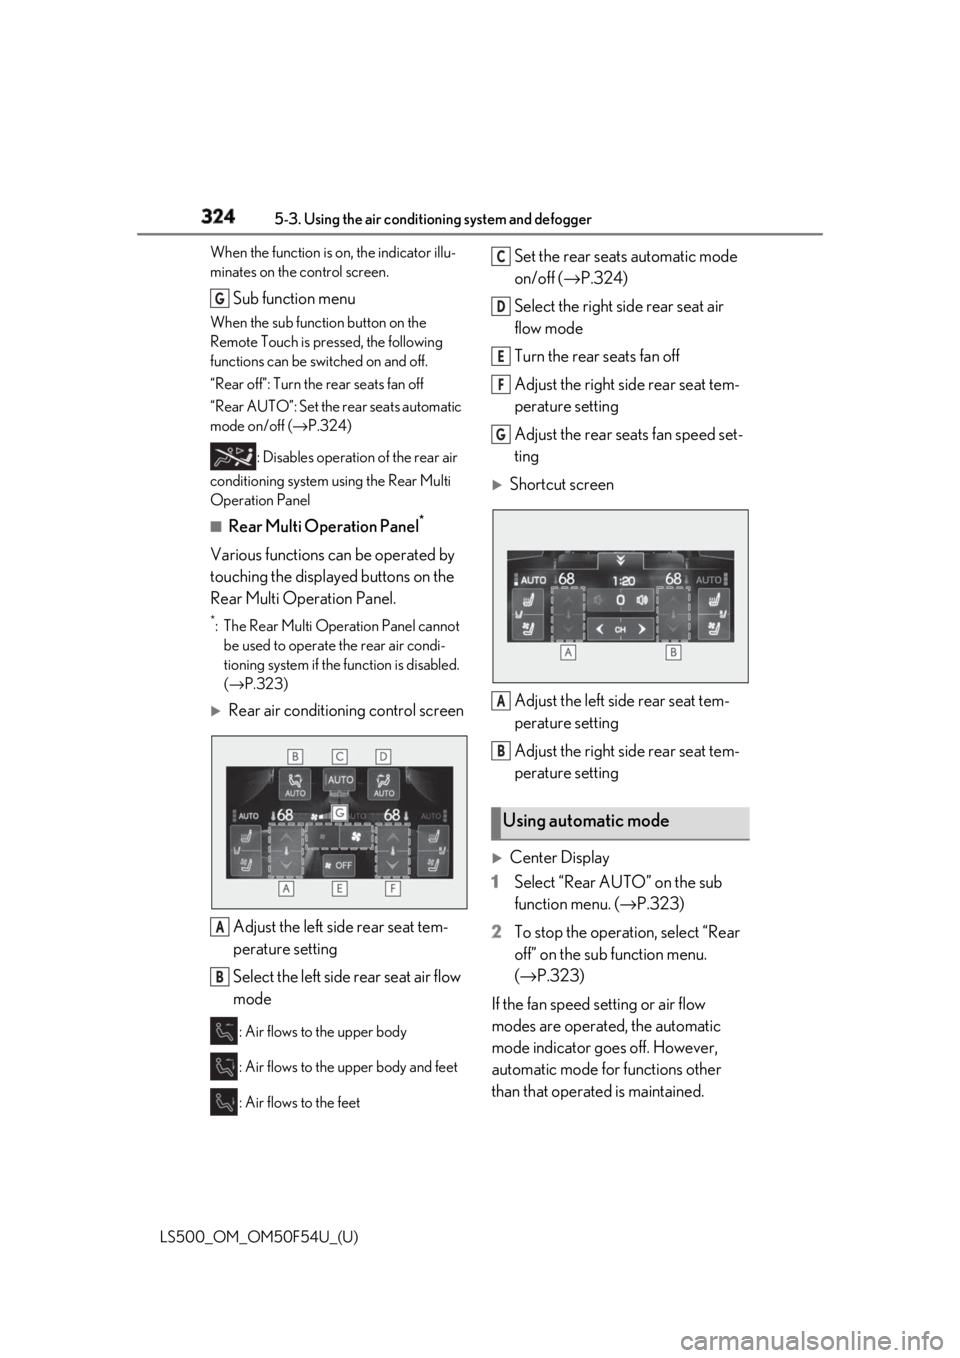
Rear air conditioning control screen
Adjust the left side rear seat tem-
perature setting
Select the left side rear seat air flow
mode : Air flows to the upper body
: Air flows to the upper body and feet
: Air flows to the feet Set the rear seats automatic mode
on/off ( → P.324)
Select the right side rear seat air
flow mode
Turn the rear seats fan off
Adjust the right side rear seat tem-
perature setting
Adjust the rear seats fan speed set-
ting
Shortcut screen
Adjust the left side rear seat tem-
perature setting
Adjust the right side rear seat tem-
perature setting
Center Display
1 Select “Rear AUTO” on the sub
function menu. ( → P.323)
2 To stop the operation, select “Rear
off” on the sub function menu.
( → P.323)
If the fan speed setting or air flow
modes are operated, the automatic
mode indicator goes off. However,
automatic mode for functions other
than that operated is maintained.G
A
B Using automatic mode C
D
E
F
G
A
B
Page 326 of 514
326 5-3. Using the air conditioning system and defogger
LS500_OM_OM50F54U_(U) *
:If equipped
Heated steering wheel *
/seat
heaters *
/seat ventilators *
Heated steering wheel Warms up the grip of the steering wheel
Front seat heaters/Rear seat
heaters Warm up the seat upholstery
Front seat ventilators/Rear seat
ventilators Maintain good ventilation by pulling air
through the seat upholstery
The Center Display and Rear Multi
Operation Panel/rear control
panel can be used to operate the
heated steering wheel, seat heaters
and seat ventilators as follows: Center Display Press the “MENU” button on the
Remote Touch to display the main menu
and move the cursor to to display
the shortcut button s. Then, select
to display the heated steering
wheel/front seat heater/front seat venti-
lator control screen.
To display the rear seat heater/rear seat
ventilator control sc reen, select . (if
equipped)
Rear Multi Operation Panel Touch “Climate” on the home screen to
display the air conditioning control
screen.( →
P.308 )
Touching the shortc ut button on the
home screen will di splay operation but-
tons for the rear seat heaters and rear
seat ventilators.
Rear control panel The rear seat heaters can be operated.
WARNING■
To prevent minor burn injuries
Care should be taken if anyone in the fol-
lowing categories comes in contact with
the steering wheel or seats when the
heater is on:
●
Babies, small children, the elderly, the
sick and the physically challenged
●
Persons with sensitive skin
●
Persons who are fatigued
●
Persons who have taken alcohol or
drugs that induce sleep (sleeping
drugs, cold remedies, etc.)
Page 327 of 514
3275-3. Using the air conditio ning system and defogger
LS500_OM_OM50F54U_(U) 5
Interior features ■
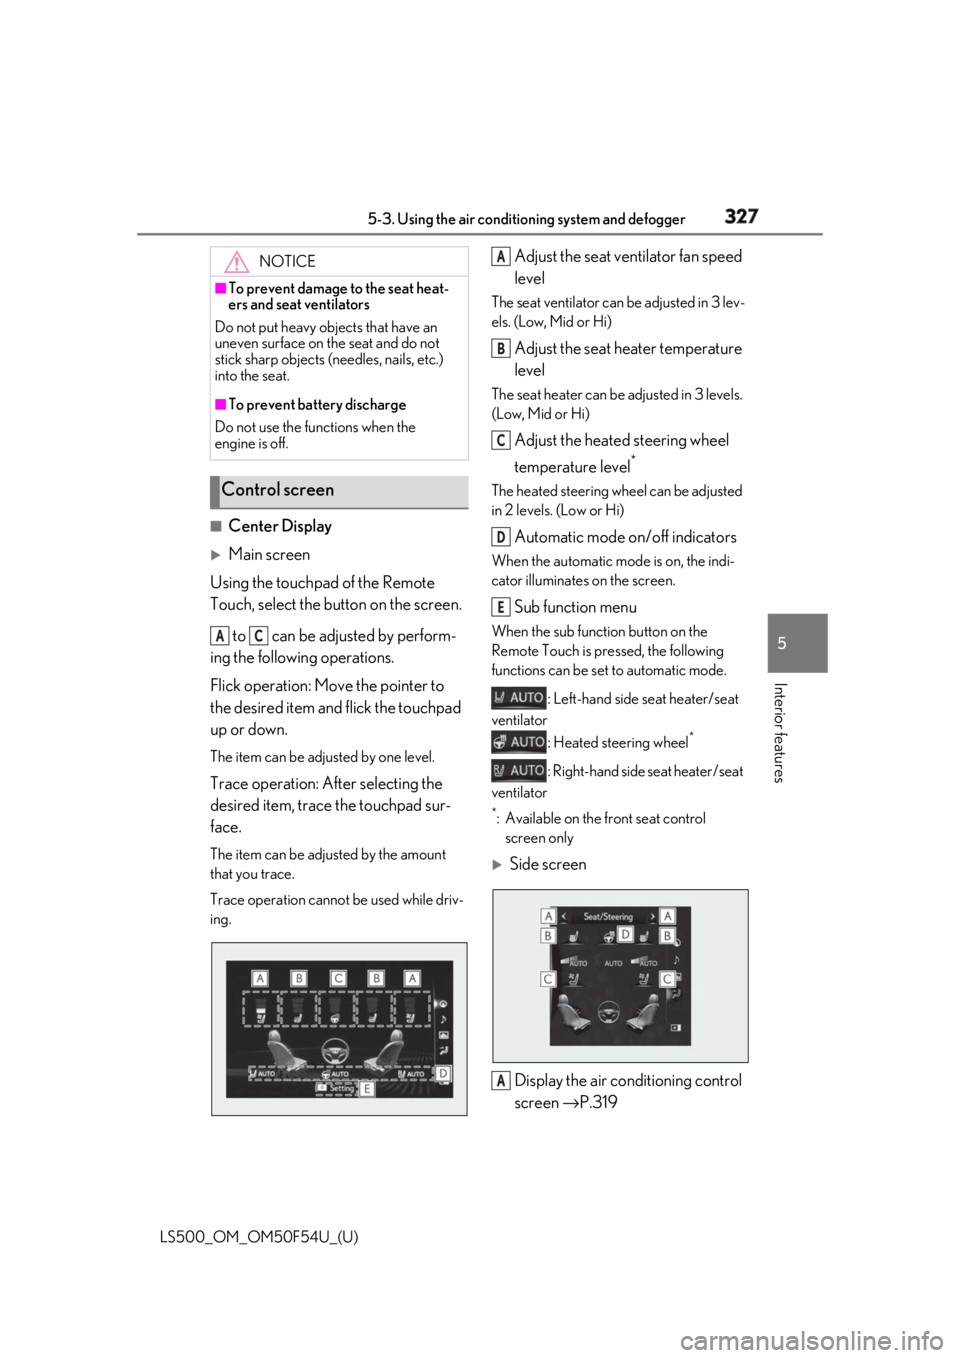
Center Display
Main screen
Using the touchpad of the Remote
Touch, select the button on the screen.
to can be adjusted by perform-
ing the following operations.
Flick operation: Move the pointer to
the desired item and flick the touchpad
up or down. The item can be adjusted by one level.
Trace operation: After selecting the
desired item, trace the touchpad sur-
face. The item can be adjusted by the amount
that you trace.
Trace operation cannot be used while driv-
ing. Adjust the seat ventilator fan speed
level The seat ventilator can be adjusted in 3 lev-
els. (Low, Mid or Hi)
Adjust the seat heater temperature
level The seat heater can be adjusted in 3 levels.
(Low, Mid or Hi)
Adjust the heated steering wheel
temperature level *
The heated steering wheel can be adjusted
in 2 levels. (Low or Hi)
Automatic mode on/off indicators When the automatic mode is on, the indi-
cator illuminates on the screen.
Sub function menu When the sub function button on the
Remote Touch is pressed, the following
functions can be set to automatic mode.
: Left-hand side seat heater/seat
ventilator
: Heated steering wheel *
: Right-hand side seat heater/seat
ventilator *
: Available on the front seat control
screen only
Side screen
Display the air conditioning control
screen → P.319NOTICE■
To prevent damage to the seat heat-
ers and seat ventilators
Do not put heavy objects that have an
uneven surface on the seat and do not
stick sharp objects (needles, nails, etc.)
into the seat. ■
To prevent battery discharge
Do not use the functions when the
engine is off.
Control screen A C A
B
C
D
E
A
Page 350 of 514
350 5-6. Using the other interior features
LS500_OM_OM50F54U_(U) ferent code to a HomeLink ®
button that
already has a code registered to it, the already registered code will not be
erased.■
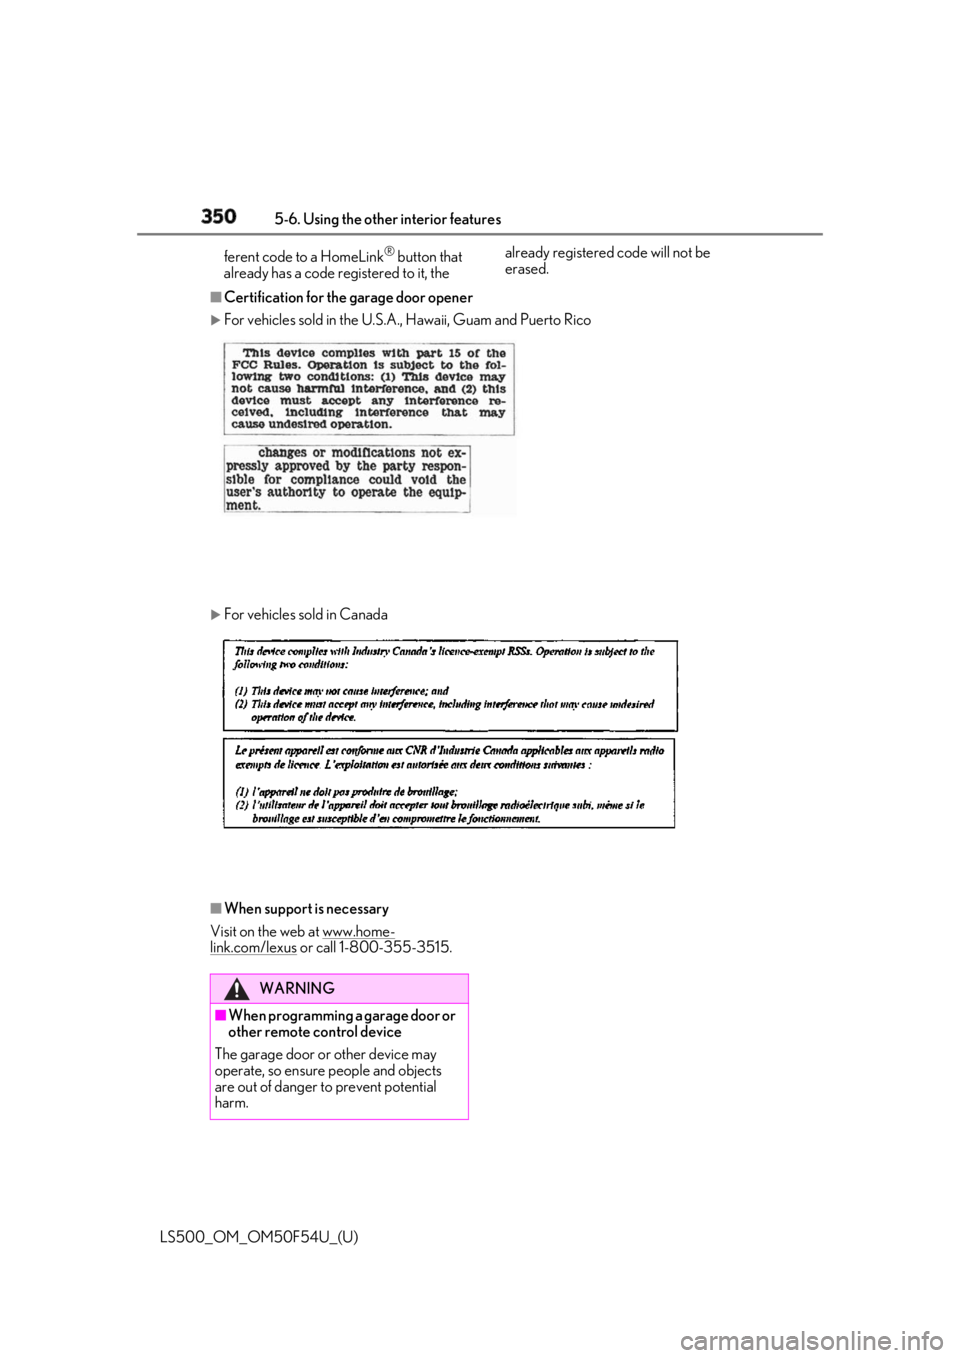
Certification for the garage door opener
For vehicles sold in the U.S.A. , Hawaii, Guam and Puerto Rico
For vehicles sold in Canada
■
When support is necessary
Visit on the web at www.home-
link.com/lexus or call 1-800-355-3515.
WARNING
■
When programming a garage door or
other remote control device
The garage door or other device may
operate, so ensure people and objects
are out of danger to prevent potential
harm.
Page 351 of 514
3515-6. Using the other interior features
LS500_OM_OM50F54U_(U) 5
Interior features
■
Before programming HomeLink ®
During programming, it is possible
that garage doors, gates, or other
devices may operate. For this rea-
son, make sure that people and
objects are clear of the garage door
or other devices to prevent injury or
other potential harm.
It is recommended that a new bat-
tery be placed in the remote control
transmitter for more accurate pro-
gramming.
Garage door opener motors manu-
factured after 1995 may be
equipped with rolling code protec-
tion. If this is the case, you may need
a stepladder or other sturdy, safe
device to reach the “Learn” or
“Smart” button on the garage door
opener motor. ■
Programming HomeLink ®
Steps 1 through 3 must be performed
within 60 seconds, otherwise the indi-
cator light will stop flashing and pro-
gramming will not be able to be
completed.
1 Press and release the HomeLink ®
button you want to program and
check that the HomeLink ®
indica-
tor light flashes (orange).
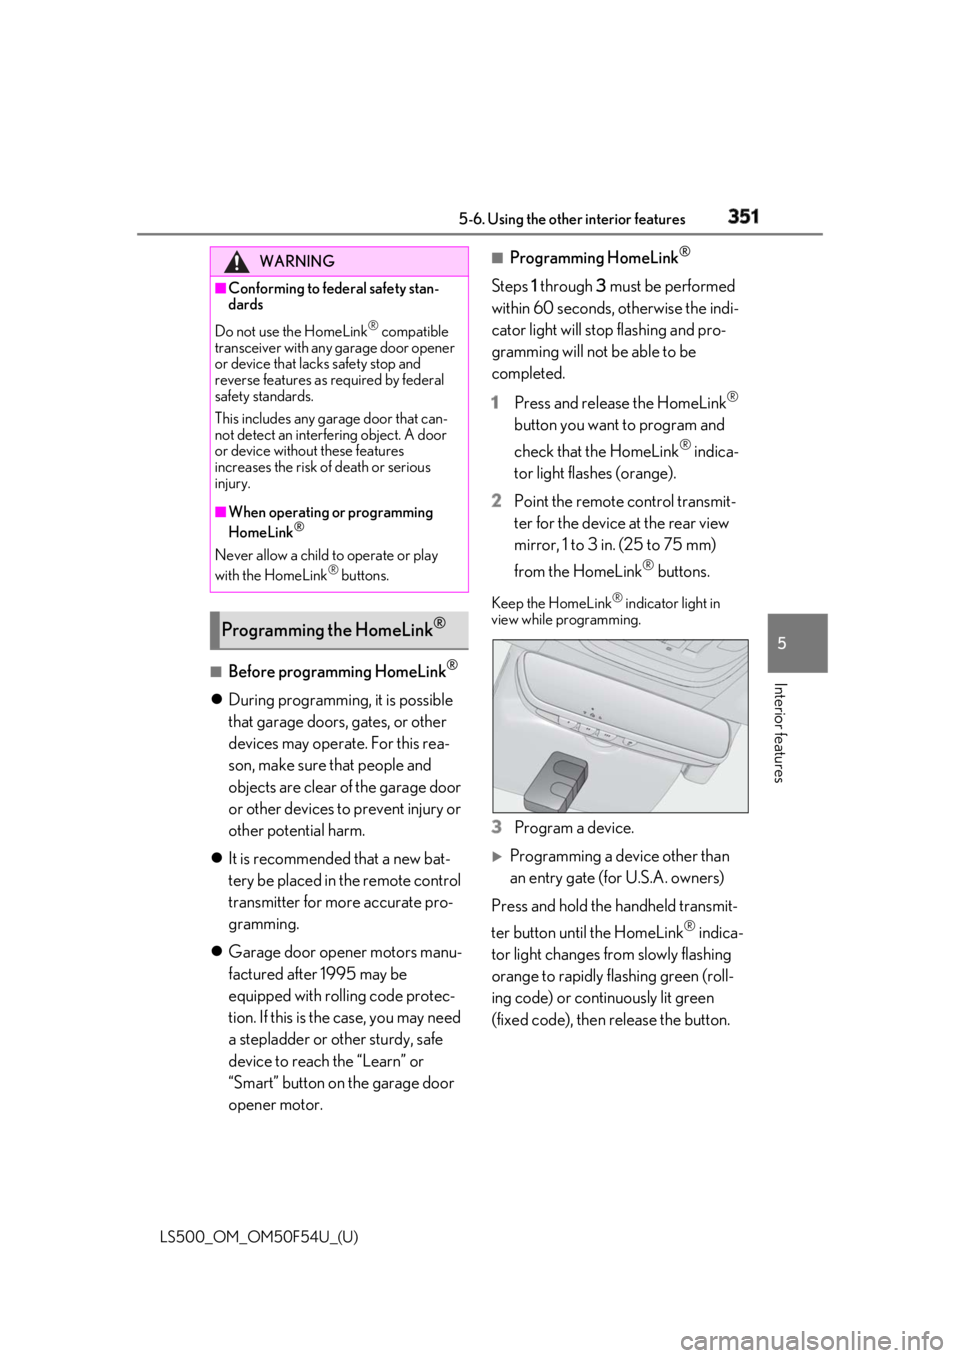
2 Point the remote control transmit-
ter for the device at the rear view
mirror, 1 to 3 in. (25 to 75 mm)
from the HomeLink ®
buttons.Keep the HomeLink ®
indicator light in
view while programming.
3 Program a device.
Programming a device other than
an entry gate (for U.S.A. owners)
Press and hold the handheld transmit-
ter button until the HomeLink ®
indica-
tor light changes from slowly flashing
orange to rapidly flashing green (roll-
ing code) or continuously lit green
(fixed code), then release the button.WARNING■
Conforming to federal safety stan-
dards
Do not use the HomeLink ®
compatible
transceiver with any garage door opener
or device that lacks safety stop and
reverse features as required by federal
safety standards.
This includes any garage door that can-
not detect an interfering object. A door
or device without these features
increases the risk of death or serious
injury. ■
When operating or programming
HomeLink ®
Never allow a child to operate or play
with the HomeLink ®
buttons.
Programming the HomeLink ®
Page 352 of 514
352 5-6. Using the other interior features
LS500_OM_OM50F54U_(U)
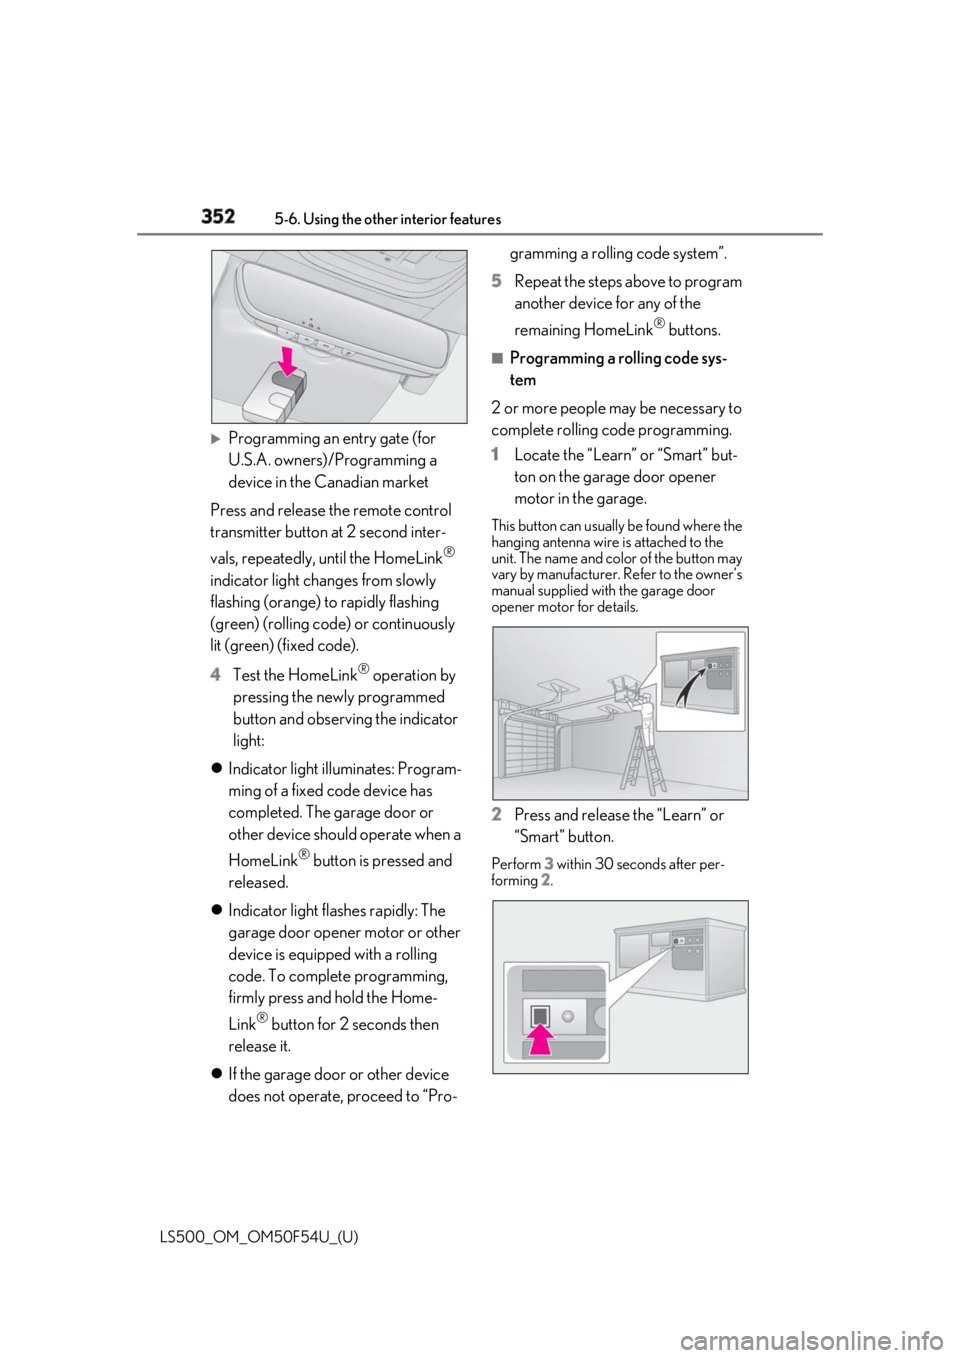
Programming an entry gate (for
U.S.A. owners)/Programming a
device in the Canadian market
Press and release th e remote control
transmitter button at 2 second inter-
vals, repeatedly, until the HomeLink ®
indicator light changes from slowly
flashing (orange) to rapidly flashing
(green) (rolling code ) or continuously
lit (green) (fixed code).
4 Test the HomeLink ®
operation by
pressing the newly programmed
button and observing the indicator
light:
Indicator light illuminates: Program-
ming of a fixed code device has
completed. The garage door or
other device should operate when a
HomeLink ®
button is pressed and
released.
Indicator light flashes rapidly: The
garage door opener motor or other
device is equipped with a rolling
code. To complete programming,
firmly press and hold the Home-
Link ®
button for 2 seconds then
release it.
If the garage door or other device
does not operate, proceed to “Pro- gramming a rolling code system”.
5 Repeat the steps above to program
another device for any of the
remaining HomeLink ®
buttons.■
Programming a rolling code sys-
tem
2 or more people may be necessary to
complete rolling code programming.
1 Locate the “Learn” or “Smart” but-
ton on the garage door opener
motor in the garage. This button can usually be found where the
hanging antenna wire is attached to the
unit. The name and color of the button may
vary by manufacturer. Refer to the owner’s
manual supplied with the garage door
opener motor for details.
2 Press and release the “Learn” or
“Smart” button. Perform 3 within 30 seconds after per-
forming 2 .
Page 384 of 514
384 6-3. Do-it-yourself maintenance
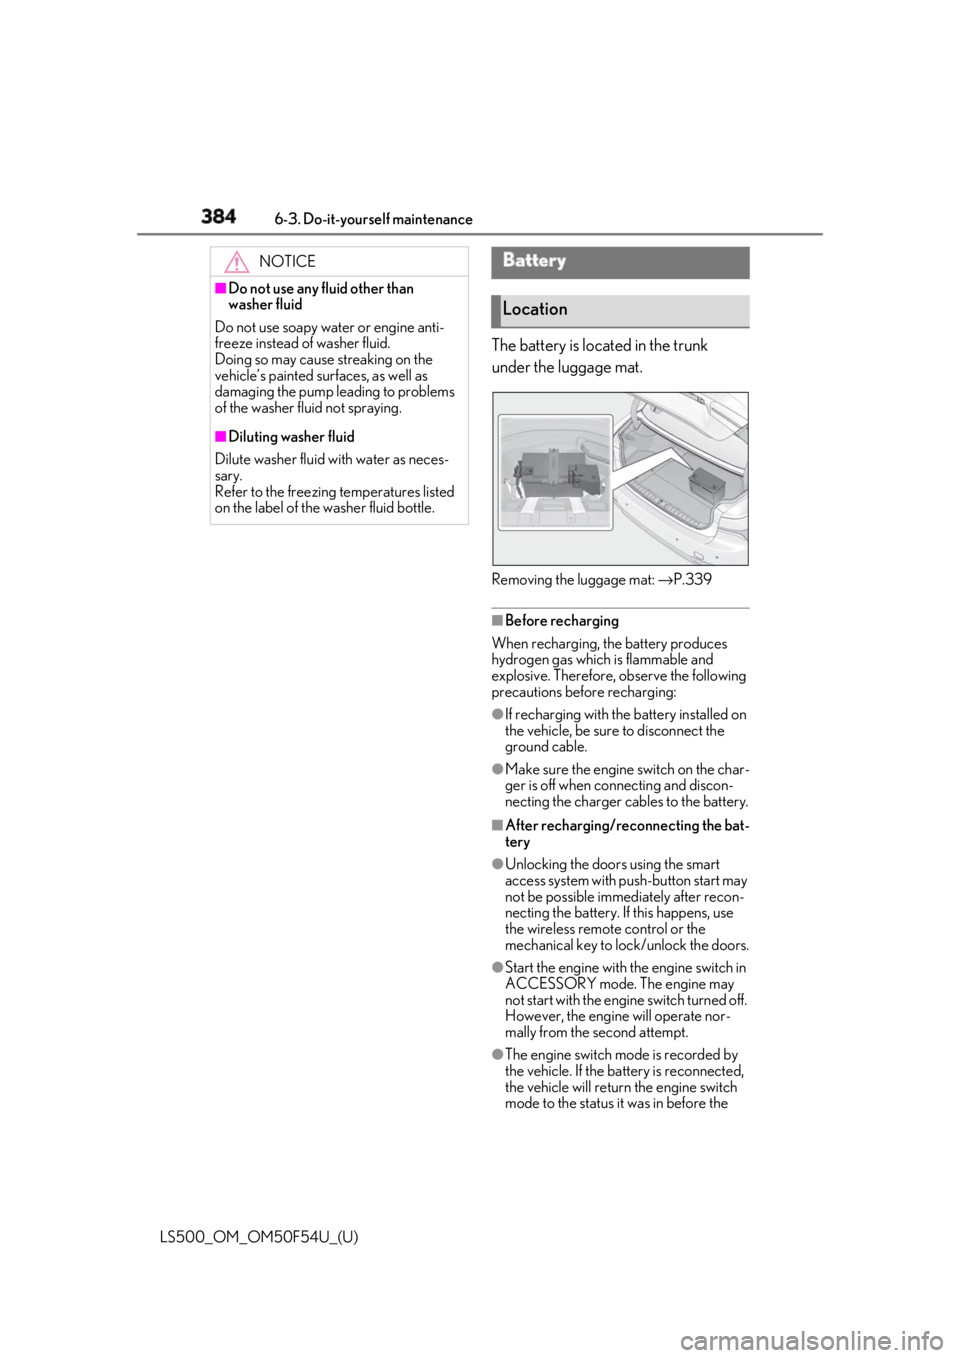
LS500_OM_OM50F54U_(U) The battery is located in the trunk
under the luggage mat.
Removing the luggage mat: → P.339
■
Before recharging
When recharging, the battery produces
hydrogen gas which is flammable and
explosive. Therefore, observe the following
precautions before recharging: ●
If recharging with the battery installed on
the vehicle, be sure to disconnect the
ground cable. ●
Make sure the engine switch on the char-
ger is off when connecting and discon-
necting the charger cables to the battery. ■
After recharging/reconnecting the bat-
tery ●
Unlocking the doors using the smart
access system with pu sh-button start may
not be possible immediately after recon-
necting the battery. If this happens, use
the wireless remote control or the
mechanical key to lo ck/unlock the doors.
●
Start the engine with the engine switch in
ACCESSORY mode. The engine may
not start with the engine switch turned off.
However, the engine will operate nor-
mally from the second attempt.
●
The engine switch mode is recorded by
the vehicle. If the battery is reconnected,
the vehicle will return the engine switch
mode to the status it was in before the NOTICE■
Do not use any fluid other than
washer fluid
Do not use soapy water or engine anti-
freeze instead of washer fluid.
Doing so may cause streaking on the
vehicle’s painted surfaces, as well as
damaging the pump leading to problems
of the washer fluid not spraying. ■
Diluting washer fluid
Dilute washer fluid with water as neces-
sary.
Refer to the freezing temperatures listed
on the label of the washer fluid bottle. Battery
Location
Page 403 of 514
4036-3. Do-it-yourself maintenance
LS500_OM_OM50F54U_(U) 6
Maintenance and care filter.
■
If the electronic key battery is depleted
The following symptoms may occur: ●
The smart access system with push-but-
ton start and wireless remote control will
not function properly. ●
The operationa l range will be reduced.■
When the card key battery needs to be
replaced (if equipped)
The battery for the card key is available only
at Lexus dealers. Your Lexus dealer can
replace the battery for you.
Flathead screwdriver
Small flathead screwdriver
Lithium battery CR2032 ■
Use a CR2032 lithium battery ●
Batteries can be purchased at your Lexus
dealer, local electrical appliance shops or
camera stores.
●
Replace only with the same or equivalent
type recommended by the manufacturer.
●
Dispose of used batteries according to
local laws.NOTICE■
When using the air conditioning sys-
tem
Make sure that a filter is always installed.
Using the air conditioning system without
a filter may cause damage to the system. ■
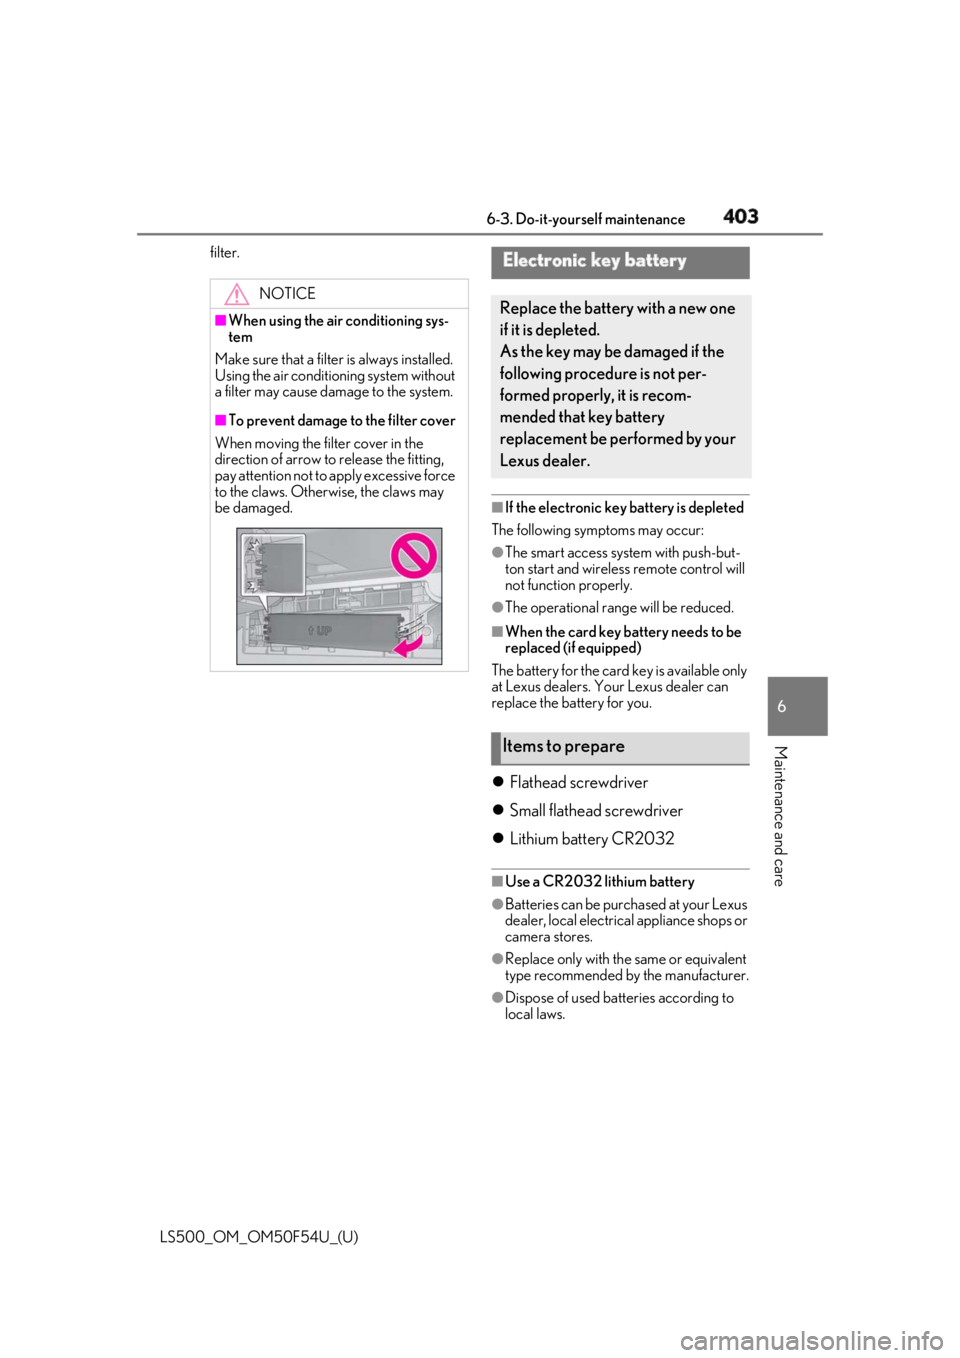
To prevent damage to the filter cover
When moving the filter cover in the
direction of arrow to release the fitting,
pay attention not to apply excessive force
to the claws. Otherwise, the claws may
be damaged. Electronic key battery Replace the battery with a new one
if it is depleted.
As the key may be damaged if the
following procedure is not per-
formed properly, it is recom-
mended that key battery
replacement be performed by your
Lexus dealer.
Items to prepare