Page 131 of 605

445
Features of your vehicle
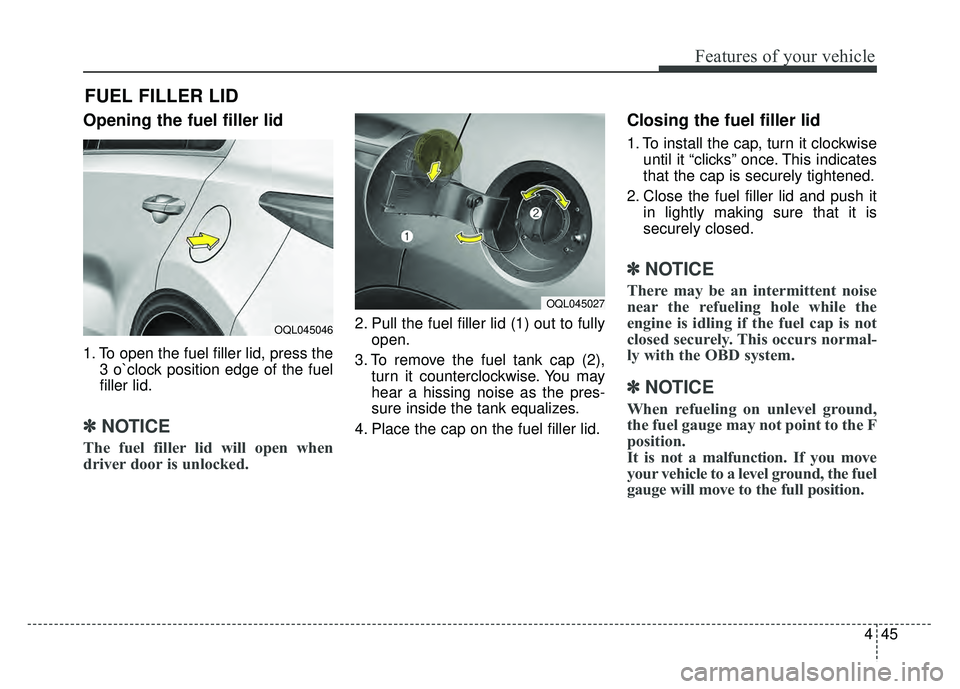
Opening the fuel filler lid
1. To open the fuel filler lid, press the3 o`clock position edge of the fuel
filler lid.
✽ ✽NOTICE
The fuel filler lid will open when
driver door is unlocked.
2. Pull the fuel filler lid (1) out to fully
open.
3. To remove the fuel tank cap (2), turn it counterclockwise. You may
hear a hissing noise as the pres-
sure inside the tank equalizes.
4. Place the cap on the fuel filler lid.
Closing the fuel filler lid
1. To install the cap, turn it clockwise until it “clicks” once. This indicates
that the cap is securely tightened.
2. Close the fuel filler lid and push it in lightly making sure that it is
securely closed.
✽ ✽NOTICE
There may be an intermittent noise
near the refueling hole while the
engine is idling if the fuel cap is not
closed securely. This occurs normal-
ly with the OBD system.
✽ ✽NOTICE
When refueling on unlevel ground,
the fuel gauge may not point to the F
position.
It is not a malfunction. If you move
your vehicle to a level ground, the fuel
gauge will move to the full position.
FUEL FILLER LID
OQL045027
OQL045046
Page 271 of 605
Audio system
59
(8) DISP
(9) CLOCK
When pressed briefly : Display time screen
When pressed and held : Move to the time setting mode (10)
SCAN
Radio mode : previews all receiv- able broadcasts for 5 seconds
each
Media (CD/USB/My Music) modes : previews each song (file) for 10
seconds each.
(11) SETUP
Changes to Setup mode.
(12) TUNE knob
Radio mode : turn to change broadcast frequencies.
Media (CD/USB/iPod
®/My Music)
modes : turn to search Tracks/
chan nels/files.
(13) CAT/FOLDER
SiriusXM Radio : Category Search
MP3 CD/USB mode : Search Folder
Page 317 of 605
![KIA SPORTAGE 2018 Owners Manual Audio system
555
Setup Mode
Press the [SETUP]button to display
the Setup screen.
You can select and control options
related to [Display], [Sound],
[Clock/Calendar], [Phone] and
[System] .
With the Dis KIA SPORTAGE 2018 Owners Manual Audio system
555
Setup Mode
Press the [SETUP]button to display
the Setup screen.
You can select and control options
related to [Display], [Sound],
[Clock/Calendar], [Phone] and
[System] .
With the Dis](/manual-img/2/54576/w960_54576-316.png)
Audio system
555
Setup Mode
Press the [SETUP]button to display
the Setup screen.
You can select and control options
related to [Display], [Sound],
[Clock/Calendar], [Phone] and
[System] .
With the Display Button
Press the [SETUP] button �Select
[Display]
You can select and control options
related to [Brightness], [Mode Pop
up] and [Media Display].
Adjusting the Brightness
Use the [Left/Right] b uttons to adjust
the screen brightness or set the
Brightness on Automatic, Day or Night
mode.
Press the [Default] button to reset.
Automatic : Adjusts the brightness automatically.
Day : Always maintains the bright- ness on high.
Night : Always maintains the bright- ness on low. Mode Pop up
This feature is used to display the
Mode Pop up screen when entering
radio and media modes.
When this feature is turned on,
pressing the [RADIO]
or [MEDIA]
button will display the Mode Pop up
screen.
✽ ✽ NOTICE
The media Mode Pop up screen can
be displayed only when two or more
media modes have been connected.
Page 320 of 605
Audio system
58
5
With the Clock/Calendar Button
Press the [SETUP] button �Select
[Clock/Calendar]
You can select and control options
related to [Clock Settings], [Calendar
Settings], [Time Format] and [Clock
Display].
Clock Settings
Use the [Up/Down] buttons to set the
Hour, Minutes and AM/PM setting.
Press and hold the [CLOCK] button
to display the Clock/Calendar
screen. Calendar Settings
Use the [Up/Down] buttons to set the
Day, Month and Year setting.
Time Format
This feature is used to change the
clock format between 12hr or 24hr.
Clock Display
This feature is used to display a clock
on the screen when the audio sys-
tem is turned off.
Page 450 of 605
What to do in an emergency
16
7
Removing and storing the
spare tire
Turn the tire hold-down wing bolt
counterclockwise.
Store the tire in the reverse order of
removal.
To prevent the spare tire and tools
from “rattling” while the vehicle is in
motion, store them properly. If it is hard to loosen the tire hold-
down wing bolt by hand, you can
loosen it easily using the jack handle.
1. Put the jack handle (1) inside of
the tire hold-down wing bolt.
2. Turn the tire hold-down wing bolt counterclockwise with the jack
handle.
Use caution when utilizing the sharp
jack handle.
WARNING- Running vehi- cle on jack
Do not start or run the engine of
the vehicle while the vehicle is
on the jack as this may cause
the vehicle to fall off the jack.
OQL065031
OQL065032
Page 452 of 605
What to do in an emergency
18
7
6. Loosen the wheel lug nuts coun-
terclockwise one turn each, but do
not remove any nut until the tire
has been raised off the ground.
7. Place the jack at the front (1) orrear (2) jacking position closest to
the tire you are changing. Place
the jack at the designated loca-
tions under the frame. The jacking
positions are plates welded to the
frame with two tabs and a raised
dot to line up with the jack. 8. Insert the wheel lug nut wrench
into the jack and turn it clockwise,
raising the vehicle until the tire just
clears the ground. This measure-
ment is approximately 1 in. (30
mm).
Before removing the wheel lug
nuts, make sure the vehicle is sta-
ble and that there is no chance for
movement or slippage.
OQL065029
OQL065026
OQL065027
OQL065028
Page 453 of 605

719
What to do in an emergency
9. Loosen the wheel nuts andremove them with your fingers.
Slide the wheel off the studs and
lay it flat so it cannot roll away. To
put the wheel on the hub, pick up
the spare tire, line up the holes
with the studs and slide the wheel
onto them. If this is difficult, tip the
wheel slightly and get the top hole
in the wheel lined up with the top
stud. Jiggle the wheel back and
forth until the wheel can slide over
the other studs. Wheels may have sharp edges.
Handle them carefully to avoid possi-
ble severe injury. Before putting the
wheel into place, be sure that there
is nothing on the hub or wheel (such
as mud, tar, gravel, etc.) that pre-
vents the wheel from fitting solidly
against the hub.
10. To install the wheel, hold it on the
studs, put the wheel nuts on the
studs and tighten them finger
tight. Jiggle the tire to be sure it is
completely seated, then tighten
the nuts as much as possible
with your fingers again.
11. Insert the wrench into the jack and lower the vehicle to the
ground by turning the wheel nut
wrench counterclockwise.
WARNING- Installing a
wheel
Make sure the wheel makes
good contact with the hub when
installed. If the contact of the
mounting surface between the
wheel and hub is not good, the
wheel nuts could come loose
and cause the loss of a wheel.
Loss of a wheel may result in
loss of control of the vehicle.
Page 468 of 605

What to do in an emergency
34
7
3. Install the towing hook by turning it
clockwise into the hole until it is
fully secured.
4. Remove the towing hook and install the cover after use.Emergency towing
If towing is necessary, we recom-
mend you to have it done by an
authorized Kia dealer or a com-
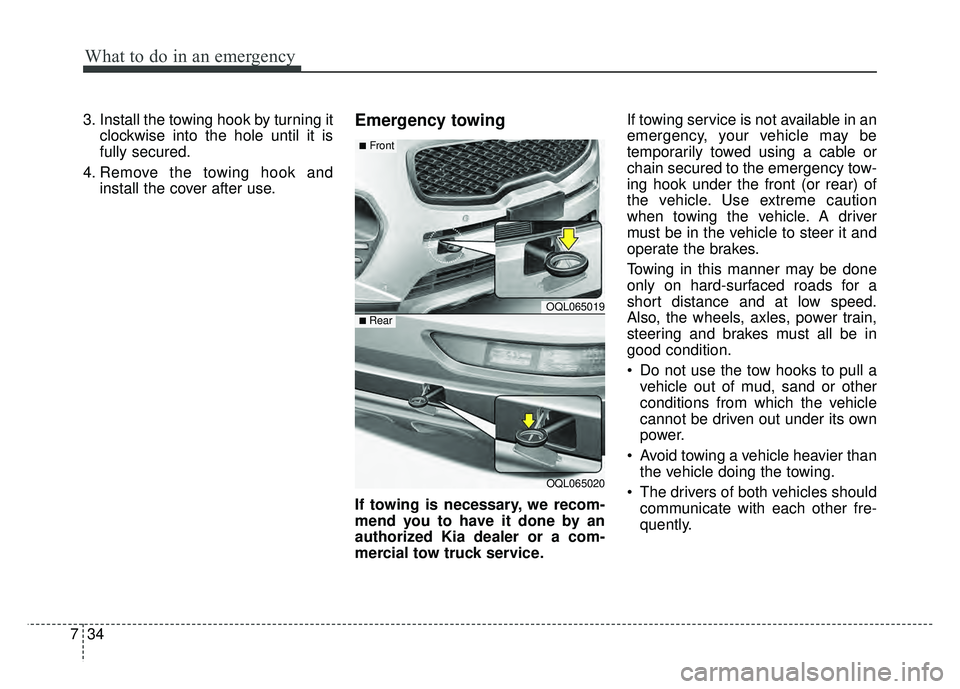
mercial tow truck service. If towing service is not available in an
emergency, your vehicle may be
temporarily towed using a cable or
chain secured to the emergency tow-
ing hook under the front (or rear) of
the vehicle. Use extreme caution
when towing the vehicle. A driver
must be in the vehicle to steer it and
operate the brakes.
Towing in this manner may be done
only on hard-surfaced roads for a
short distance and at low speed.
Also, the wheels, axles, power train,
steering and brakes must all be in
good condition.
Do not use the tow hooks to pull a
vehicle out of mud, sand or other
conditions from which the vehicle
cannot be driven out under its own
power.
Avoid towing a vehicle heavier than the vehicle doing the towing.
The drivers of both vehicles should communicate with each other fre-
quently.
OQL065019
OQL065020
■Front
■ Rear