Page 128 of 605

Features of your vehicle
42
4
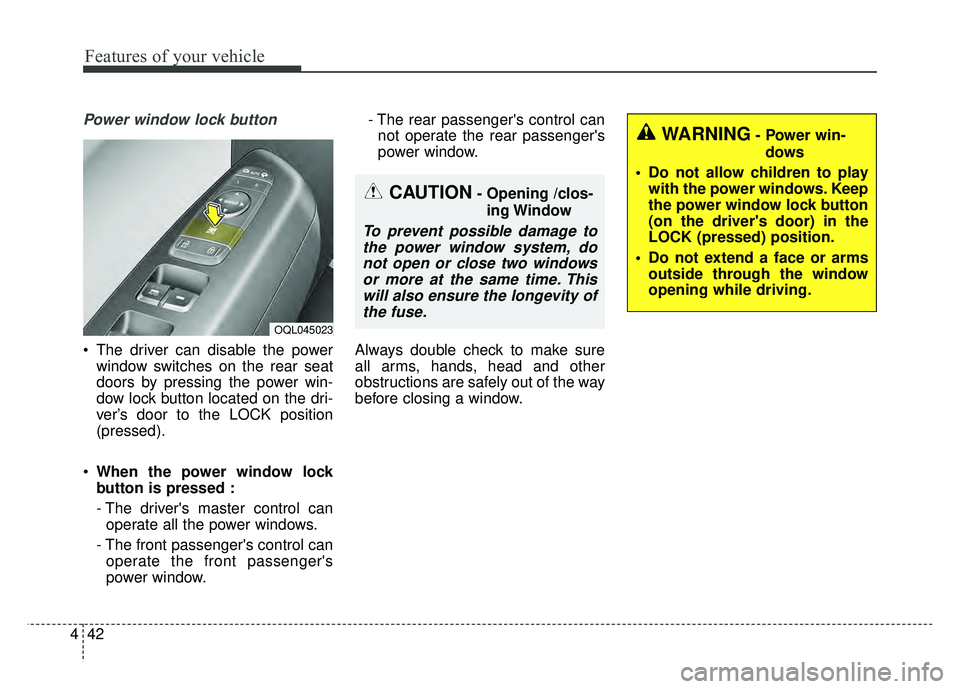
Power window lock button
The driver can disable the power
window switches on the rear seat
doors by pressing the power win-
dow lock button located on the dri-
ver’s door to the LOCK position
(pressed).
When the power window lock
button is pressed :
- The driver's master control can
operate all the power windows.
- The front passenger's control can operate the front passenger's
power window. - The rear passenger's control can
not operate the rear passenger's
power window.
Always double check to make sure
all arms, hands, head and other
obstructions are safely out of the way
before closing a window.
CAUTION- Opening /clos- ing Window
To prevent possible damage tothe power window system, donot open or close two windowsor more at the same time. Thiswill also ensure the longevity ofthe fuse.
OQL045023
WARNING- Power win-
dows
Do not allow children to play with the power windows. Keep
the power window lock button
(on the driver's door) in the
LOCK (pressed) position.
Do not extend a face or arms outside through the window
opening while driving.
Page 144 of 605
Features of your vehicle
58
4
MIRRORS
Inside rearview mirror
Adjust the rearview mirror so that the
center view through the rear window
is seen. Make this adjustment before
you start driving.
Do not place objects in the rear seat
or cargo area which would interfere
with your vision through the rear win-
dow.
Day/night rearview mirror
(if equipped)
Make this adjustment before you
start driving and while the day/night
lever (3) is in the day position.
Pull the day/night lever (3) toward
you to reduce the glare from the
headlights of the vehicles behind you
during night driving.
Remember that you lose somerearview clarity in the night position.
❈ (1) : Day, (2) : Night
WARNING- Mirror adjust-
ment
Do not adjust the rearview mir-
ror while the vehicle is moving.
This could result in loss of con-
trol.
WARNING
Do not modify the inside mirror
and don’t install a wide mirror. It
could result in injury during an
accident or deployment of the
air bag.
OQL045035
Page 208 of 605

Features of your vehicle
122
4
The system may not operate normal-
ly in the below conditions.
When the light from the on-coming
or front vehicle is not detected
because of lamp damage, hidden
from sight, etc.
When the lamp of the on-coming or front vehicle is covered with dust,
snow or water.
When the light from the on-coming or front vehicle is not detected
because of exhaust fume, smoke,
fog, snow, etc.
When the front window is covered with foreign matters such as ice,
dust, fog, or is damaged.
When there is a similar shape lamp with the front vehicle’s lamps.
When it is hard to see because of fog, heavy rain or snow.
When the headlamp is not repaired or replaced at an authorized deal-
er.
When headlamp aiming is not properly adjusted.
When driving on a narrow curved road or rough road. When driving downhill or uphill.
When only part of the vehicle in
front is visible on a crossroad or
curved road.
When there is a traffic light, reflect- ing sign, flashing sign or mirror.
When the road conditions are bad such as being wet or covered with
snow.
When the front vehicle’s head- lamps are off but the fog lamps on.
When a vehicle suddenly appears from a curve.
When the vehicle is tilted from a flat tire or being towed.
When the LDWS (lane departure warning system) warning light illu-
minates. (if equipped)✽ ✽ NOTICE
• Do not place any accessories,
stickers or tint the windshield.
• Have the windshield glass replaced from an authorized dealer.
• Do not remove or damage related parts of the High Beam Assist sys-
tem.
• Be careful that water doesn’t get into the High Beam Assist unit.
• Do not place objects on the dash- board that reflect light such as
mirrors, white paper, etc. The sys-
tem may malfunction if sunlight is
reflected.
• At times, the Smart High Beam system may not work properly,
always check the road conditions
for your safety. When the system
does not operate normally, manu-
ally change between the high
beam and low beam.
Page 211 of 605
4125
Features of your vehicle
A : Wiper speed control (front)· MIST – Single wipe
· OFF – Off
· INT – Intermittent wipe
· LO – Low wiper speed
· HI – High wiper speed
B : Intermittent control wipe time adjustment
C : Wash with brief wipes (front)*
D : Rear wiper/washer control · HI – Continuous wipe
· LO – Intermittent wipe
· OFF – Off
E : Wash with brief wipes (rear)*
* if equipped
Windshield wipers
Operates as follows when the igni-
tion switch is turned ON.
MIST : For a single wiping cycle,
move the lever to this (MIST)
position and release it. The
wipers will operate continu-
ously if the lever is held in this
position.
OFF : Wiper is not in operation
INT : Wiper operates intermittently at the same wiping intervals. Use
this mode in light rain or mist.
To vary the speed setting, turn
the speed control knob.
LO : Normal wiper speed
HI : Fast wiper speed
WIPERS AND WASHERS
Windshield wiper/washer
OQL045407/OQL045464
Rear window wiper/washer
Page 213 of 605
4127
Features of your vehicle
Rear window wiper and wash-
er switch
The rear window wiper and washer
switch is located at the end of the
wiper and washer switch lever. Turn
the switch to the desired position to
operate the rear wiper and washer.
HI : Continuous wipe
LO : Intermittent wipe
OFF : OFF
WARNING - Obscured
visibility
Do not use the washer in freez-
ing temperatures without first
warming the windshield with
the defrosters; the washer solu-
tion could freeze on the wind-
shield and obscure your vision.
OQL045465
CAUTION -Wipers & windshields
To prevent possible damage to the wipers or windshield,do not operate the wiperswhen the windshield is dry.
To prevent damage to the wiper blades, do not use gasoline,kerosene, paint thinner, orother solvents on or near them.
To prevent damage to the wiper arms and other compo-nents, do not attempt to movethe wipers manually.
Page 219 of 605

4133
Features of your vehicle
If you want to defrost and defog the
front windshield, refer to “Windshield
defrosting and defogging” in this sec-
tion.
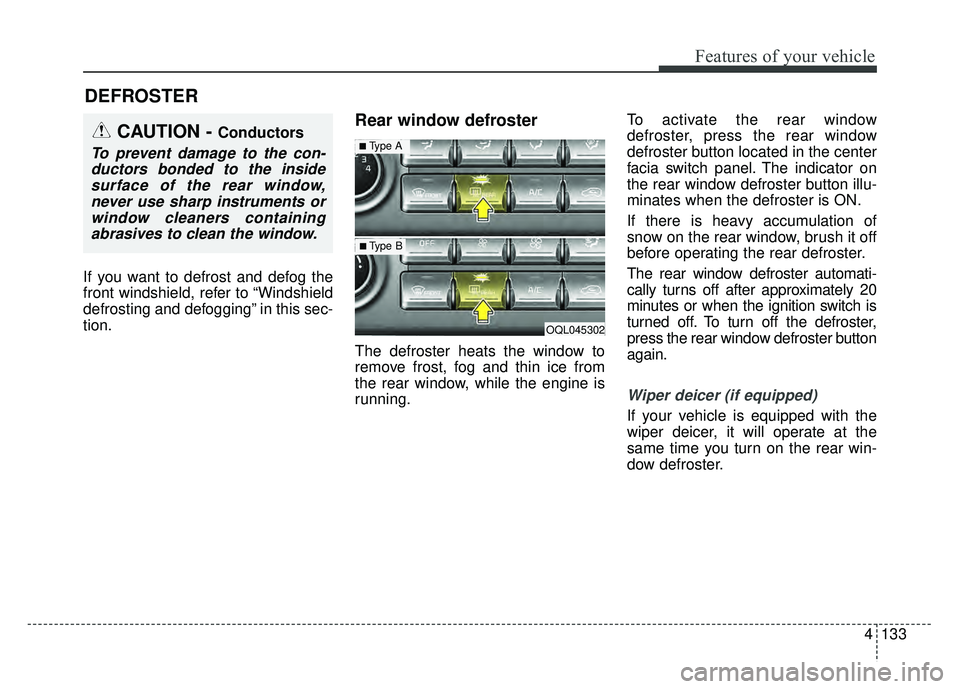
Rear window defroster
The defroster heats the window to
remove frost, fog and thin ice from
the rear window, while the engine is
running.To activate the rear window
defroster, press the rear window
defroster button located in the center
facia switch panel. The indicator on
the rear window defroster button illu-
minates when the defroster is ON.
If there is heavy accumulation of
snow on the rear window, brush it off
before operating the rear defroster.
The rear window defroster automati-
cally turns off after approximately 20
minutes or when the ignition switch is
turned off. To turn off the defroster,
press the rear window defroster button
again.
Wiper deicer (if equipped)
If your vehicle is equipped with the
wiper deicer, it will operate at the
same time you turn on the rear win-
dow defroster.
DEFROSTER
CAUTION - Conductors
To prevent damage to the con-
ductors bonded to the insidesurface of the rear window,never use sharp instruments orwindow cleaners containingabrasives to clean the window.
OQL045302
■Type A
■ Type B
Page 220 of 605
Features of your vehicle
134
4
MANUAL CLIMATE CONTROL SYSTEM (IF EQUIPPED)
OQL045300L
1. Fan speed control knob
2. Front windshield defroster button
3. Rear window defroster button
4. Air conditioning button
5. Air intake control button
6. Mode selection button
7. Temperature control button
✽ ✽
NOTICE
Operating the blower when the
ignition switch is in the ON posi-
tion could cause the battery to dis-
charge. Operate the blower when
the engine is running.
Page 222 of 605

Features of your vehicle
136
4
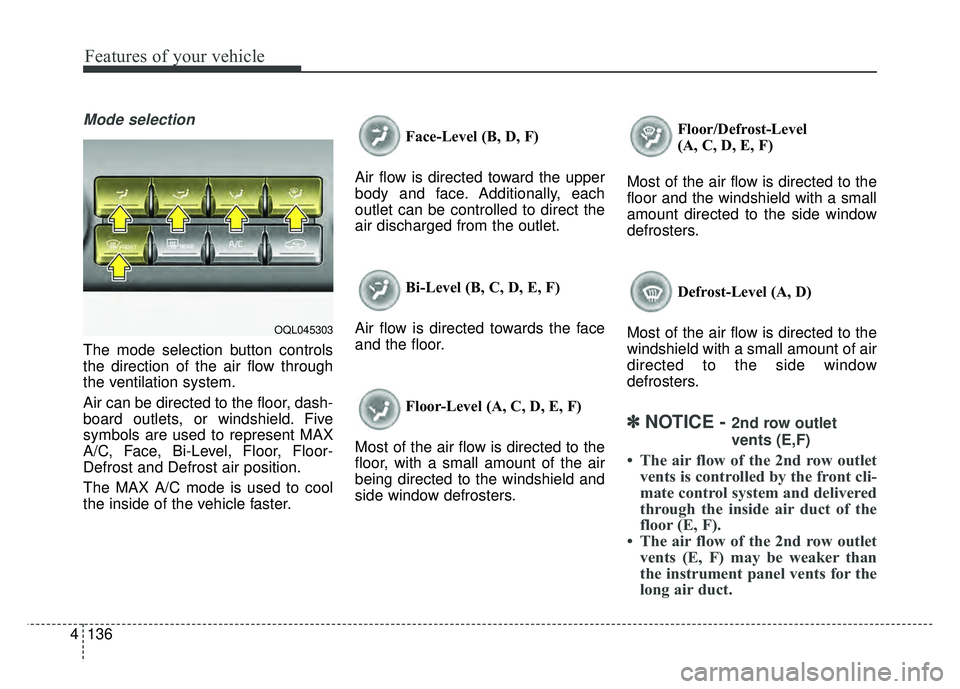
Mode selection
The mode selection button controls
the direction of the air flow through
the ventilation system.
Air can be directed to the floor, dash-
board outlets, or windshield. Five
symbols are used to represent MAX
A/C, Face, Bi-Level, Floor, Floor-
Defrost and Defrost air position.
The MAX A/C mode is used to cool
the inside of the vehicle faster. Face-Level (B, D, F)
Air flow is directed toward the upper
body and face. Additionally, each
outlet can be controlled to direct the
air discharged from the outlet.
Bi-Level (B, C, D, E, F)
Air flow is directed towards the face
and the floor.
Floor-Level (A, C, D, E, F)
Most of the air flow is directed to the
floor, with a small amount of the air
being directed to the windshield and
side window defrosters. Floor/Defrost-Level
(A, C, D, E, F)
Most of the air flow is directed to the
floor and the windshield with a small
amount directed to the side window
defrosters.
Defrost-Level (A, D)
Most of the air flow is directed to the
windshield with a small amount of air
directed to the side window
defrosters.
✽ ✽ NOTICE - 2nd row outlet
vents (E,F)
• The air flow of the 2nd row outlet
vents is controlled by the front cli-
mate control system and delivered
through the inside air duct of the
floor (E, F).
• The air flow of the 2nd row outlet vents (E, F) may be weaker than
the instrument panel vents for the
long air duct.
OQL045303