Page 479 of 536

Maintenance
68
7
If you do not have a spare, use a
fuse of the same rating from a circuityou may not need for operating thevehicle, such as the power outletfuse.
If the head lamp, turn signal lamp,
stop signal lamp, fog lamp, DRL, tail
lamp, HMSL do not work and the
fuses are OK, check the fuse panel
in the engine compartment. If a fuse
is blown, it must be replaced.
✽ ✽ NOTICE
If the headlamp, fog lamp, turn sig-
nal lamp, or tail lamp malfunction
even without any problem to the
lamps, have the vehicle checked by
an authorized Kia dealer for assis-
tance.
✽ ✽NOTICE - Fuse Panel Covers
• Put all switches in ON when driv-
ing.
• If the vehicle remains idle for over 1 month, put all switches in OFF
to prevent the batteries from being
discharged.
• Excluding long-term parking for over 1 month, the contact points of
switches may wear out upon
extensive use. Please refrain from
excessive use of switches.
Fuse switch
Always, put the fuse switch at the ON
position.
If you move the switch to the OFF
position, some items such as audio
and digital clock must be reset and
transmitter (or smart key) may not
work properly. When the switch is
Off, the caution indicator will be dis-
played on the instrument cluster.
Always place the fuse switch in the
ON position while driving the vehicle.
OUMA074017
Page 484 of 536

773
Maintenance
DescriptionFuse ratingProtected component
A/CON (RR) 15AICM Relay Box (Rear Blower Motor Relay)
SUNROOF 2 20ASunroof Control Module (Roller)
SUNROOF 1 20ASunroof Control Module (Glass)
CLUSTER 10AInstrument Cluster
GATEWAY10AGateway (MCU IG1)
IMMO.10ASmart Key Control Module, Immobilizer Module
IG1 15AE/R Junction Block (Fuse - MDPS 3, TCU 1), PCB Block (Fuse - ABS 3, SENSOR 6, ECU 1, CRUISE)
MULTIMEDIA 15AUSB Charger, Audio, A/V & Navigation Head Unit, Telematics Unit
MEMORY 2 10AInstrument Cluster, Data Link Connector, A/C Control Module, Rear A/C Control Module, Clock Spring,
MUT, Electro Chromic Mirror, Driver/Passenger Door Module, Passenger Power Window Switch, Driver IMS
Control Module
DOOR LOCK 20ADoor Lock Relay, Door Unlock Relay, Tail Gate Relay, DRIVER/PASSENGER/RL/RR DOOR MODULE
SMART KEY 2 10AStart/Stop Button Switch, Smart Key Control Module, Immobilizer Module
AEB10AAEB Unit
WASHER 15ABCM, Multifunction Switch
MDPS 7.5AMDPS UNIT(COLUMN TYPE), Steering Angle Sensor
Page 496 of 536

785
Maintenance
Headlamp (bulb type) -high/low
1. Open the hood.
2. Remove the headlamp assemblyfrom the body of the vehicle
3. Remove the headlamp bulb cover by turning it counterclockwise.
4. Remove the socket from the assembly by turning the socket
counterclockwise until the tabs on
the socket align with the slots on
the assembly.
5. Remove the bulb by pulling it out.
6. Inset a new bulb into the socket. 7. Install the socket in the assembly
by aligning the tabs on the socket
with the slots in the assembly.
Push the socket into the assembly
and turn the socket clockwise.
8. Install the headlamp bulb cover by turning it clockwise.
Turn signal lamp
Follow the steps 1 to 3 from the pre-
vious page.
4. Remove the socket from theassembly by turning the socket
counterclockwise until the tabs on
the socket align with the slots on
the assembly.
5. Remove the bulb from the socket by pressing it in and rotating it
counterclockwise until the tabs on
the bulb align with the slots in the
socket. Pull the bulb out of the
socket
OUM074108L
Turn signal
OUM074053L
High lamp Low lamp
Page 497 of 536

Maintenance
86
7
6. Insert a new bulb by inserting it
into the socket and rotating it until
it locks into place.
7. Install the socket in the assembly by aligning the tabs on the socket
with the slots in the assembly.
Push the socket into the assembly
and turn the socket clockwise.
✽ ✽NOTICE
If bulb will not rotate inside socket,
remove bulb, rotate 180°, and try
again.
Front fog lamp bulbs
(if equipped)
1. Remove the front bumper under cover.
2. Reach your hand into the back of the front bumper.
3. Disconnect the power connector from the socket.
4. Remove the bulb-socket from the housing by turning the socket
counter clockwise until the tabs on
the socket align with the slots on
the housing. 5. Install the new bulb-socket into the
housing by aligning the tabs on
the socket with the slots in the
housing. Push the socket into the
housing and turn the socket clock-
wise.
6. Connect the power connector to the socket.
7. Reinstall the front bumper under cover.
✽ ✽NOTICE
Always have the headlamp aiming
adjusted after an accident or after
the headlamp assembly is reinstalled
at an authorized Kia dealer.OUMA074109
Page 500 of 536

789
Maintenance
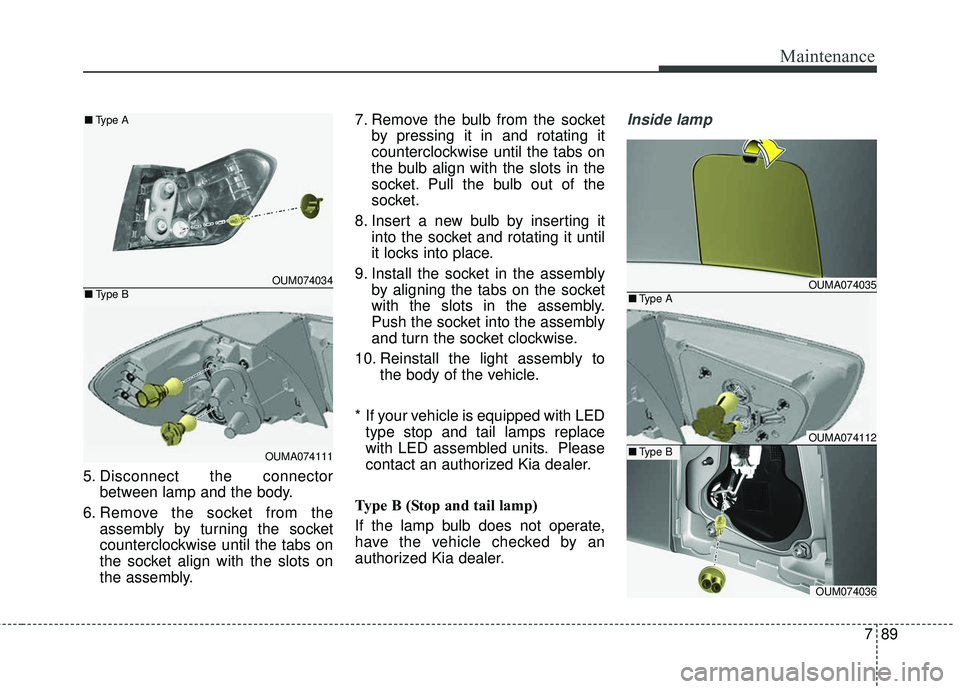
5. Disconnect the connectorbetween lamp and the body.
6. Remove the socket from the assembly by turning the socket
counterclockwise until the tabs on
the socket align with the slots on
the assembly. 7. Remove the bulb from the socket
by pressing it in and rotating it
counterclockwise until the tabs on
the bulb align with the slots in the
socket. Pull the bulb out of the
socket.
8. Insert a new bulb by inserting it into the socket and rotating it until
it locks into place.
9. Install the socket in the assembly by aligning the tabs on the socket
with the slots in the assembly.
Push the socket into the assembly
and turn the socket clockwise.
10. Reinstall the light assembly to the body of the vehicle.
* If your vehicle is equipped with LED type stop and tail lamps replace
with LED assembled units. Please
contact an authorized Kia dealer.
Type B (Stop and tail lamp)
If the lamp bulb does not operate,
have the vehicle checked by an
authorized Kia dealer.
Inside lamp
OUMA074035
OUMA074112
OUM074036
■ Type A
■Type B
OUM074034
OUMA074111
■
Type A
■ Type B
Page 501 of 536

Maintenance
90
7
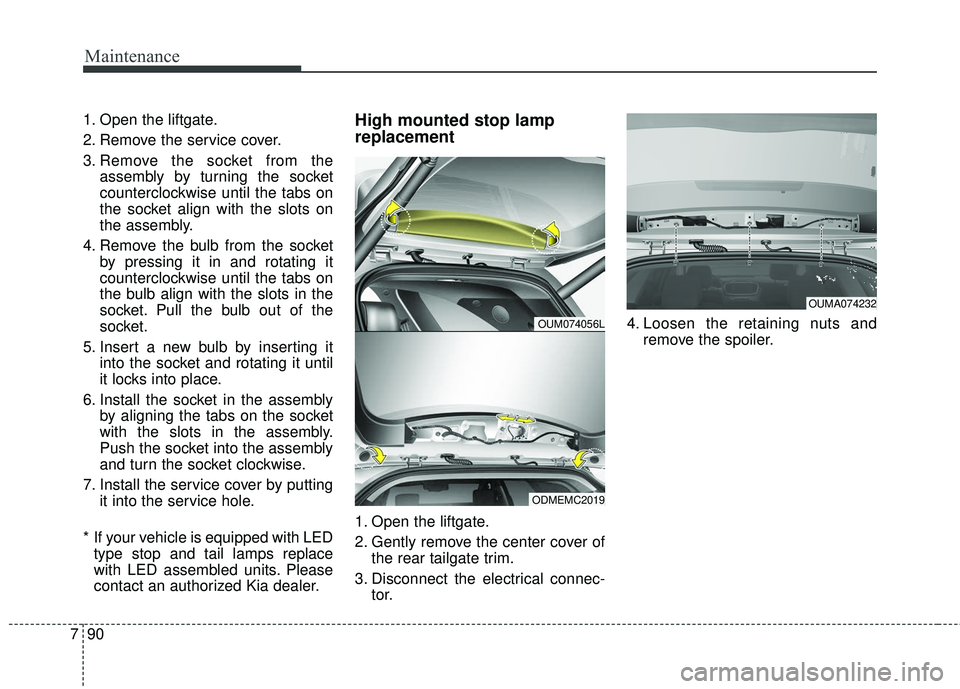
1. Open the liftgate.
2. Remove the service cover.
3. Remove the socket from the
assembly by turning the socket
counterclockwise until the tabs on
the socket align with the slots on
the assembly.
4. Remove the bulb from the socket by pressing it in and rotating it
counterclockwise until the tabs on
the bulb align with the slots in the
socket. Pull the bulb out of the
socket.
5. Insert a new bulb by inserting it into the socket and rotating it until
it locks into place.
6. Install the socket in the assembly by aligning the tabs on the socket
with the slots in the assembly.
Push the socket into the assembly
and turn the socket clockwise.
7. Install the service cover by putting it into the service hole.
* If your vehicle is equipped with LED type stop and tail lamps replace
with LED assembled units. Please
contact an authorized Kia dealer.High mounted stop lamp
replacement
1. Open the liftgate.
2. Gently remove the center cover of the rear tailgate trim.
3. Disconnect the electrical connec- tor. 4. Loosen the retaining nuts and
remove the spoiler.
OUM074056L
ODMEMC2019
OUMA074232