Page 41 of 54

39ALWAYS CHECK THE OWNER’S MANUAL FOR COMPLETE OPER ATING INFORMATION AND SAFET Y WARNINGS *IF EQUIPPED
FRONT
REARFRONTREARFRONTREARFRONTREAR
REAR
REAR
FRONTREARFRONTREARFRONTREARFRONTREAR
REAR
REAR
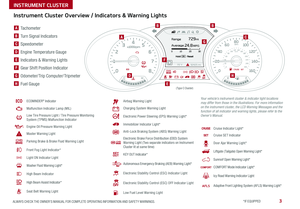
Sunroof Operation*
The Sunroof and Sunshade operation is controlled through
multi-directional switches/levers A, B or C The ignition
needs to be ON to operate the sunroof/sunshade
To slide the Front/Rear Sunshade and Sunroof:
•Auto Open: Slide the levers A, B or C backward to the
farthest position and release
•Auto Close (Sunroof only): Slide the levers A, B or C
forward to the farthest position and release
REMINDER: The front Sunroof will automatically open all the way The Rear Sunroof will only partially open To open all the way, slide the Rear Sunroof lever again
Tilt the Front Sunroof:
•Raise: Push lever A upward
•Lower: Pull lever A downward
•Auto Close Sunroof and Sunshade: Slide the Front Sunroof
lever A forward to the farthest position
REMINDERS:
•
When the Power Window Lock is depressed, the Rear Sunroof controls cannot operate the Rear Sunroof
•Sunshade needs to remain OPEN while Sunroof is open and vehicle is moving
To stop the Sunroof/Sunshade at any position, push or pull the Sunroof control lever in any direction
QUICK TIP
A
B
C
(Rear Sunroof control in the rear overhead console)
(Front overhead console for Front and Rear Sunroof controls)
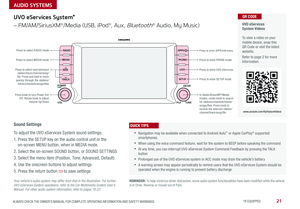
Parking Assist System*
The Parking Assist System*
is not a safety device The
Parking Assist System* is a
supplemental system that
assists the driver by chiming if
any object is detected within
the sensing area to the front,
rear and side of the vehicle when
moving forward or backing up
To activate, press button D (LED illuminated) The
system is also activated when the ignition is ON and
the gear shift is moved into R (Reverse) To deactivate
the system, press the Parking Assist System* button D
(LED not illuminated)
REMINDERS:
•
If the vehicle is moving at speeds over 3 mph, the system may not activate correctly
•
When more than two objects are sensed at the same time, the closest one will be recognized first
The Parking Assist System* is not a substitute for proper and safe backing-up procedures. Always drive safely and use caution when backing up. The Parking Assist System* may not detect every object in front of or behind the vehicle.
(Button located below Gear shift)
D
OTHER KEY FEATURES
Page 42 of 54

Rear-Camera Display*
The Rear-Camera Display system is not a safety device It is a
supplemental system that displa")
SEDONA FEATURES & FUNCTIONS GUIDE40*IF EQUIPPED
(Navigation screen display shown)
Rear-Camera Display*
The Rear-Camera Display system is not a safety device It is a
supplemental system that displays the view behind the vehicle through the
Standard Audio System, UVO eServices System and the UVO eServices
with Premium Navigation screens while the vehicle is in Reverse
The Rear-Camera Display* activates when the:
•Ignition or the Engine Start /Stop button*
is in the ON position (Green Light)
•Gear Shift Lever is in the R (Reverse) position
•To turn the Rear-Camera Display* OFF, press
the camera button A (LED not illuminated)
(Button located below Gear shift)
A
REMINDERS:
•The Rear-Camera Display* is ON by default when ignition is cycled
•While camera is active, only the volume controls on the Audio System can be operated
•
The screen image above is for illustration purposes only The actual image or graphics may differ in your vehicle
The Rear-Camera Display* is not a substitute for proper and safe backing-up procedures. The Rear-Camera Display may not display every object behind the vehicle. Always drive safely and use caution when backing up.
P
R
N
DSHIFTLOCK
RELEASE
Power Liftgate / Smart Liftgate*
Opening from Inside the Vehicle:
Press the Power Liftgate Open/Close button* B to automatically open/
close the Liftgate Depress the POWER DOOR OFF button* C to disable
REMINDER: If POWER DOOR OFF button is pressed, the Power Liftgate button on the Smart Key will be disabled
Opening from Outside the Vehicle:
To open Power Liftgate* automatically, press the
Liftgate Release button D on exterior of the Liftgate
Automatically close by pressing Power Liftgate
Close button* E
Power Liftgate Height Adjustment:
For your convenience, the liftgate opening height
is adjustable To program the opening height,
perform the following:
1 Open liftgate and manually position liftgate to
your preferred opening height
2 Depress and hold the close button on the liftgate
for 3 seconds or more
3 The system will beep 3 times when the programming is complete
E
D
(Button located on inside edge of liftgate)
FRONT
REARFRONTREARFRONTREARFRONT
REAR
REAR
REAR
BC
(Buttons located on overhead console)
OTHER KEY FEATURES
Page 43 of 54

Smart Key:
To open the Power Liftgate*, press")
41ALWAYS CHECK THE OWNER’S MANUAL FOR COMPLETE OPER ATING INFORMATION AND SAFET Y WARNINGS *IF EQUIPPED
Power Liftgate / Smart Liftgate* (continued)
Smart Key:
To open the Power Liftgate*, press and hold the Smart key Liftgate button
F until the Liftgate begins opening Press again to close
REMINDER: Pulling the Liftgate upward by the handle or pressing the button a second time will interrupt the automatic opening of the Power Liftgate
Smart Liftgate*
When the Smart Key fob is on your person and you are near the back of
the vehicle, within close proximity, the hazard lights will blink and a chime
will sound for about 3 seconds as an alert that the Smart Liftgate* is about
to open
Then the alert system will blink and chime two additional times before
opening the Smart Liftgate* G
The Smart Liftgate* feature is OFF by default To enable the Smart
Liftgate*, go to User Settings in the LCD Instrument Cluster modes
HOLDHOLD
HOLDF
G
To view a video on your mobile device, snap this QR Code or visit the listed website
Refer to page 2 for more information
Smart Power Liftgate Video
Power Liftgate Opening Height Adjustment Video
QR CODE
www.youtube.com/KiaFeatureVideos
• During the Smart Liftgate alert, the Smart Liftgate can be deactivated with the Smart Key by pressing any button on the key fob
• The open height can be adjusted For information on how to set open height, see your owner's manual
QUICK TIP
REMINDERS:
•All doors are closed and locked after about 15 seconds
•If the POWER DOOR OFF button is depressed, the Smart Liftgate will not operate
•
The Smart Liftgate feature will not operate when the doors are recently closed and locked, and the Smart Key is still detected after 15 seconds near the vehicle or within 60 inches of the door handles, a door is not locked or closed or the Smart Key is in the vehicle
For more information on the Smart Power Liftgate operation, please refer to the Owner's Manual.
OTHER KEY FEATURES
Page 44 of 54

Tighten for ONE CLICK to prevent
Malfunction Indicator from illuminating
REMINDERS:
•")
SEDONA FEATURES & FUNCTIONS GUIDE*IF EQUIPPED 42
Fuel Cap / Malfunction
Indicator (Check Engine Light)
Tighten for ONE CLICK to prevent
Malfunction Indicator from illuminating
REMINDERS:
• The Fuel Filler Door Release button is located on the driver’s button panel, left of the Steering Wheel
• It is normal operation when tightening to hear one click and then when Fuel Cap is released, it clicks back
One-Click Fuel Cap Video To view a video on your mobile device, snap this QR Code or visit the listed website
Refer to page 2 for more information
QR CODE
www.youtube.com/KiaFeatureVideos
Child-Protector Rear
Door Lock
Located on the front edge of the rear
passenger doors, move the Child-
protector rear door lock to the lock
position to disable the inner door
handles from opening the rear
passenger doors
Hood Release Lever and Latch
Opening the Hood:
1 Pull the Hood Release Lever A to unlatch the Hood
2 In the front of the vehicle, lift the Hood slightly, push the secondary
Latch B to the left inside of the Hood’s center and lift the Hood
3 Pull out the support rod from the Hood and set into place to hold
the Hood open
REMINDER: Open the Hood only after turning the engine off, on a flat surface, with the gear shift in P (Park) position and setting the parking brake
(Lever located near floor below Driver's Panel) (Secondary latch located inside lip of Hood)
A
B
Closing the Hood:
Lower the Hood about halfway and then press down to securely lock
in place
(Located on the front edge of the rear passenger doors)
OTHER KEY FEATURES
Page 45 of 54

43ALWAYS CHECK THE OWNER’S MANUAL FOR COMPLETE OPER ATING INFORMATION AND SAFET Y WARNINGS
How to Sync Transmitter with HomeLink®*
If programming for the first time, begin with Step 1 (repeating this step will
delete all information)
To program non-rolling and rolling code garage door openers and
other devices:
1 Press and hold the left A and center D buttons simultaneously until
the indicator light C begins to flash (to reprogram buttons, skip this
step)
2 Press and hold the desired button A, B or D and hold the button
on the transmitter while it is approximately 1 to 3 inches away from
the mirror The HomeLink® Indicator light C will flash rapidly once the
frequency signal has been successfully programmed
To finish programming rolling code garage door openers, complete
these steps:
3 Locate the “learn” or “smart” button on the garage door’s motor
head unit Press and release the button and complete Step 4 within
30 seconds
4 Firmly press and release the programmed HomeLink® button up to
three times
Operating HomeLink®:
Press one of the programmed HomeLink® buttons
Erasing programmed buttons:
Press and hold the left A and center D buttons simultaneously
for approximately 20 seconds, and then release both buttons within
30 seconds
If your garage door opener was manufactured in 2011 or later, and you’re unable to program your vehicle’s HomeLink® system, you may need to purchase a HomeLink Repeater Kit. For more information, go to www.HomeLink.com or call (800) 355-3515.
The HomeLink® with Auto-Dimming Rearview Mirror* is designed to reduce
glare from a vehicle’s headlights located in the rear and also connect up to
three electronic transmitters into one location
•
To turn automatic dimming ON, press button F
•
To turn automatic dimming OFF, press button G
REMINDER: Mirror indicator light C will illuminate when automatic dimming is ON
HomeLink® with Auto-Dimming
Rearview Mirror*
A HomeLink® button
B HomeLink® button
C Indicator light
D HomeLink® button
E Glare detection sensor
F Automatic dimming ON
G Automatic dimming OFF
•
•You can reprogram a single HomeLink® button by repeating Step 2 •Erasing programmed buttons will delete all trained transmitters
QUICK TIPS
ABCDEFG
OTHER KEY FEATURES
Page 46 of 54
 / Passenger
Airbag Off Indicator
ODS detects the presence and position of the front passenger and adj")
SAFETY FEATURES
SEDONA FEATURES & FUNCTIONS GUIDE44*IF EQUIPPED
Occupant Detection System (ODS) / Passenger
Airbag Off Indicator
ODS detects the presence and position of the front passenger and adjusts
or turns off airbag deployment accordingly
Depending on the situation and type of accident, the system may:
•Deploy airbag (Adult)
•Not deploy the airbag (Unoccupied)
If the system determines that the airbag should not be deployed, the
“PASSENGER AIRBAG OFF” light will illuminate
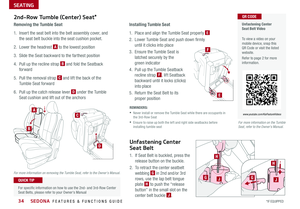
Seat Belts
To properly fasten your seat belts:
1
Insert the belt tongue plate A into the buckle B until it clicks
2
Position the lap portion of the belt
across your lap as LOW ON THE
HIPS as possible C Adjust the belt
to a SNUG FIT by pulling up on the
shoulder portion D
REMINDER: For maximum protection, always wear your seat belt
Seat Belt Retractor Locks
Retractor locks allow lap/shoulder seat belts to remain unlocked during
normal vehicle operation for freedom of movement and increased comfort
During a STRONG STOP, SUDDEN TURN OR CERTAIN COLLISIONS, seat
belt retractors will automatically lock the belts to reduce the risk of injury
The seat belt warning chime operates for driver’s seat only
QUICK TIP
PRESS
A
B
D
C
(Type A shown)
Page 47 of 54

45ALWAYS CHECK THE OWNER’S MANUAL FOR COMPLETE OPER ATING INFORMATION AND SAFET Y WARNINGS
MAINTENANCE
Normal Maintenance Schedule
When your vehicle requires service, remember that your dealer knows your vehicle best Your dealer has factory-trained technicians, recommended special tools,
genuine Kia replacement parts and is dedicated to your complete satisfaction For expert advice and quality service, see your authorized Kia dealer
7,500 miles
PERFORM
•Rotate tire
•Add fuel additive1 (Every 7,500 miles)
REPLACE
•Engine oil and filter (Every 7,500 miles)
INSPECT*
•Battery condition
•Air cleaner filter
•Vacuum hose
•Power steering fluid**
•Power steering pump, belt and hoses**
15,000 miles
PERFORM
•Rotate tire
•Add fuel additive1 (Every 7,500 miles)
REPLACE
•Climate control air filter (For evaporator and blower unit)
•Engine oil and filter (Every 7,500 miles)
INSPECT*
•Battery condition
•Air cleaner filter
•Vacuum hose
•Air conditioning refrigerant
•Brake hoses and lines
•Drive shafts and boots
•Exhaust pipe and muffler
•Front brake disc/pads, calipers
•Rear brake disc/pads
•Steering gear box, linkage & boots/lower
arm ball joint, upper arm ball joint
•Suspension mounting bolts
•Power steering fluid**
•Power steering pump, belt and hoses**
*And, if necessary, adjust, correct, clean or replace * *If equipped
1 If TOP TIER detergent gasoline is not available, one bottle of additive is recommended Additives are available from your authorized Kia dealer along with information on how to use them Do not mix other additives
QUICK TIP
Check your Maintenance Schedule or schedule an appointment with a dealer using your UVO eServices account by logging into your UVO App or your account on MyUVO com ( Vehicles equipped with UVO eServices only - See page 20 for setup information)
*And, if necessary, adjust, correct, clean or replace * *If equipped
1 If TOP TIER detergent gasoline is not available, one bottle of additive is recommended Additives are available from your authorized Kia dealer along with information on how to use them Do not mix other additives
Page 48 of 54

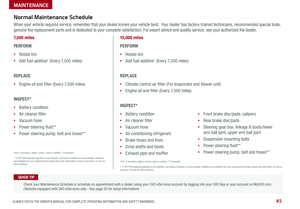
22,500 miles
PERFORM
•Rotate tire
•Add fuel additive1 (Every 7,500 miles)
REPLACE
•Engine oil and filt")
SEDONA FEATURES & FUNCTIONS GUIDE46
MAINTENANCE
Normal Maintenance Schedule (Continued)
22,500 miles
PERFORM
•Rotate tire
•Add fuel additive1 (Every 7,500 miles)
REPLACE
•Engine oil and filter (Every 7,500 miles)
INSPECT*
•Battery condition
•Air cleaner filter
•Vacuum hose
•Power steering fluid**
•Power steering pump, belt and hoses**
30,000 miles
PERFORM
•Rotate tire
•Add fuel additive1 (Every 7,500 miles)
REPLACE
•Climate control air filter (For evaporator and blower unit)
•Air cleaner filter
•Engine oil and filter (Every 7,500 miles)
INSPECT*
•Battery condition
•Vacuum hose
•Air conditioning refrigerant
•Brake hoses and lines
•Drive shafts and boots
•Exhaust system
•Front brake disc/pads, calipers
•Rear brake disc/pads
•Steering gear box, linkage & boots/
lower arm ball joint, upper arm ball joint
•Suspension mounting bolts
•Brake fluid
•Fuel filter2
•Fuel lines, fuel hoses and connections
•Fuel tank air filter2
•Parking brake
•Vapor hose and fuel filler cap
•Power steering fluid**
•Power steering pump, belt and hoses**
*And, if necessary, adjust, correct, clean or replace **If equipped
1 If TOP TIER Detergent Gasoline is not available, one bottle of additive is recommended Additives are available from your authorized Kia dealer along with information on how to use them Do not mix other additives
*And, if necessary, adjust, correct, clean or replace * *If equipped
1 If TOP TIER Detergent Gasoline is not available, one bottle of additive is recommended Additives are available from your authorized Kia dealer along with information on how to use them Do not mix other additives 2 Fuel filter & Fuel tank air filter are considered to be maintenance free but periodic inspection is recommended for this maintenance schedule depends on fuel quality If there are some important safety matters like fuel flow restriction, surging, loss of power, hard starting problem etc, replace the fuel filter immediately regardless of maintenance schedule and consult an authorized Kia dealer for details