Page 33 of 54
SEATING
31ALWAYS CHECK THE OWNER’S MANUAL FOR COMPLETE OPER ATING INFORMATION AND SAFET Y WARNINGS *IF EQUIPPED
Power Adjustable Driver’s Seat*
Move/press controls to adjust Seat forward/backward, Seat Cushion
tilt up/down, Seatback forward/backward or Lumbar up/down/
forward/backward*
A
AABC
B
C
SeatbackLumbar*SeatSeat Cushion
Manual Adjustable Driver’s Seat*
Pull lever D to slide Seat forward/backward
Pull/press lever E to adjust Seat height
Pull lever F to adjust Seatback recline
Press G to adjust Lumbar support
G
D
EF
When adjusting seat forward or backwards, ensure seat clicks or locks into place before driving the vehicle
When adjusting seat forward or backward, ensure seat clicks or locks into place before driving vehicle
QUICK TIP
QUICK TIP
For more information on Power Adjustable Driver’s Seat operation, refer to the Owner's Manual.For more information on Manual Adjustable Driver’s Seat operation, refer to the Owner's Manual.
Page 34 of 54

SEATING
SEDONA FEATURES & FUNCTIONS GUIDE32*IF EQUIPPED
2nd-Row Seat
Folding 2nd-Row Seat
1 Lower the 2nd-Row Seat Headrest to the lowest position
2 Pull up on the Seatback folding lever A or strap* and fold the
Seatback down
Unfolding 2nd-Row Seat
1 Lift the folding Seatback lever A and move the Seatback backward
2 Then lift the lever A again or return Seatback to an upright usable
position
2nd-Row Walk-In Seat*
To get in and out of the 3rd-Row Seat, adjust the 2nd-Row Walk-In Seat as
follows:
1 Lift the 2nd-Row Seat armrest
2 Adjust headrest to the lowest position
3 Accessing from outside of the vehicle: Pull up the Walk-In Lever A –
the seat will stand up and headrest will fold automatically C
4 Accessing from the 3rd-Row seat: Pull the release strap B – the seat
will stand up and headrest will fold automatically C
5 Return the 2nd-Row Seat to its original position and push until it locks
(clicks) into place and the headrest unfolds
•When you return Seatback to its original position, ensure it locks (clicks) into place •It may be necessary to slide the front Seat forward and adjust the front Seatbacks to fully lower rear seats •Lower Rear Headrests to the lowest position
QUICK TIPS
•For specific information on how to use the 2nd- and 3rd-Row Center Seat Belts, please refer to your Owner's Manual
QUICK TIP
B
A
A
For more information on 2nd-Row Walk-In Seat operation, refer to the Owner's Manual.
For more information on 2nd-Row Seat operation, refer to the Owner's Manual.
C
REMINDER: The lever must return to its original position for the Seatback to lock
Page 35 of 54

SEATING
33ALWAYS CHECK THE OWNER’S MANUAL FOR COMPLETE OPER ATING INFORMATION AND SAFET Y WARNINGS *IF EQUIPPED
2nd-Row First-Class Lounge Seating*
Leg Rest Extension
•Pull control A to raise the leg rest extension
•Pull control A to lower the leg rest, which partially closes Then, manually press leg rest extension to fully lock
into place
Arm Rest Adjustment
•To raise arm rest – From any position, press the armrest release button B
(on inside of arm rest) and lift up to desired position
•To lower armrest – Press arm rest down, and it will rest in it's original position
•To lower armrest further, press the release button (on inside of arm rest) and push the armrest down
Press button again to lift the armrest back up to desired position
REMINDER: If you lift the armrest to the top without depressing the release button B,
it will return back to the lowest position previously selected
Seatback Recline - Pull control C to recline Seatback
Seat Forward/Backward - Press control D to slide seat forward/ backward
Seat Adjust Inboard/Outboard - Press control E to slide seat inward/outward
REMINDER: Always return leg extension to its original position when adjusting seat
For more information on 2nd-Row First-Class Lounge Seating operation, refer to the Owner's Manual.
E
A
B
D
C
Sedona 2nd and 3rd Row Seats Video
To view a video on your mobile device, snap this QR Code or visit the listed website
Refer to page 2 for more information
QR CODE
www.youtube.com/KiaFeatureVideos
Page 36 of 54

SEATING
SEDONA FEATURES & FUNCTIONS GUIDE34*IF EQUIPPED
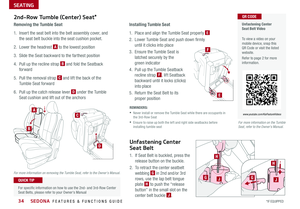
Installing Tumble Seat
1 Place and align the Tumble Seat properly E
2 Lower Tumble Seat and push down firmly
until it clicks into place
3 Ensure the Tumble Seat is
latched securely by the
green indicator
4 Pull up the Tumble Seatback
recline strap F, lift Seatback
backward until it locks (clicks)
into place
5 Return the Seat Belt to its
proper position
Unfastening Center
Seat Belt
1 If Seat Belt is buckled, press the
release button on the buckle
2 To retract the center seatbelt
webbing G in 2nd and/or 3rd
rows, use the lap belt tongue
plate H to push the “release
button” in the small slot on the
center belt buckle J
2nd-Row Tumble (Center) Seat*
Removing the Tumble Seat
1 Insert the seat belt into the belt assembly cover, and
the seat belt buckle into the seat cushion pocket
2 Lower the headrest A to the lowest position
3 Slide the Seat backward to the farthest position
4 Pull up the recline strap B and fold the Seatback
forward
5
Pull the removal strap C and lift the back of the
Tumble Seat forward
6
Pull up the catch release lever D under the Tumble
Seat cushion and lift out of the anchors
REMINDERS:
•
Never install or remove the Tumble Seat while there are occupants in the 3rd-Row Seat
•
Ensure to raise up both the left and right side seatbacks before installing tumble seat
For more information on removing the Tumble Seat, refer to the Owner's Manual.
A
B
C
D
Unfastening Center Seat Belt Video
To view a video on your mobile device, snap this QR Code or visit the listed website
Refer to page 2 for more information
QR CODE
www.youtube.com/KiaFeatureVideos
For specific information on how to use the 2nd- and 3rd-Row Center Seat Belts, please refer to your Owner's Manual
QUICK TIP
H
H
GGJJ
E
F
For more information on the Tumble Seat, refer to the Owner's Manual.
Page 37 of 54
SEATING
35ALWAYS CHECK THE OWNER’S MANUAL FOR COMPLETE OPER ATING INFORMATION AND SAFET Y WARNINGS *IF EQUIPPED
3rd-Row Seat - Folding and Stowing
Folding 3rd-Row Seat
1 Fully lower headrest A
2 Pull Seat folding strap located in the back of the Seatback B
3 Fold Seat down C
Stowing 3rd-Row Seats*
The rear seats can be folded and stowed in the
luggage compartment for additional cargo space
1 Fully lower headrests D
2 Pull release lever E and push Seat firmly in place
REMINDER: The seat straps on the front and back of the 3rd-Row Seat are for folding only
D
E
B
A
C
For more information on 3rd-Row Seat operation, refer to the Owner's Manual.
Sedona 2nd and 3rd Row Seat Video
To view a video on your mobile device, snap this QR Code or visit the listed website
Refer to page 2 for more information
QR CODE
www.youtube.com/KiaFeatureVideos
For specific information on how to use the 2nd- and 3rd-Row Center Seat Belts, please refer to your Owner's Manual
QUICK TIP
Page 38 of 54
*
A Press the release button to unfold the key
B Press to lock All Doors
C Press to unlock Driver’s Door:")
SEDONA FEATURES & FUNCTIONS GUIDE36*IF EQUIPPED
Remote Keyless Entry (Folding Key)*
A Press the release button to unfold the key
B Press to lock All Doors
C Press to unlock Driver’s Door: Press twice in 4 seconds to unlock All Doors
and Liftgate, and manually open
D
Press and hold left /right button to automatically open/close the power sliding doors*
E Manual Liftgate*: Press and hold for more than 1 second to unlock Liftgate and manually open
Power Liftgate*: Press and hold for more than 1 second for Power Liftgate to automatically open/close
F Press and hold more than a half second for Panic Alarm To turn OFF Alarm, press any button
Double-Turn Lock/Unlock All
•Turn counterclockwise once to unlock Driver’s Door
•Turn counterclockwise again within 4 seconds to unlock All Doors
•Turn clockwise once to lock All Doors
A
B
C
D
FE
D
Power Sliding Doors*
Press the left /right Power Sliding Door button G on the overhead controls,
on the Center Pillars H or on the key fob D to automatically open/close
the sliding doors
FRONT
REARFRONTREARFRONTREARFRONTREAR
REAR
REAR
G
H
G
REMINDER: If the POWER DOOR OFF button is depressed, the Smart Power Liftgate* will not operate
For more information on the Power Sliding Doors operation, please refer to the Owner's Manual.
(Buttons located in overhead controls)
UnlockLock
(Buttons located on center pillars)
(Type B shown)
REMINDERS:
• The Manual Liftgate does not automatically open when the E button is pressed
•
The Liftgate unlocks when the Smart Key fob is within close proximity of the rear liftgate
Remote button configuration may vary depending on vehicle options.
OTHER KEY FEATURES
Page 39 of 54

37ALWAYS CHECK THE OWNER’S MANUAL FOR COMPLETE OPER ATING INFORMATION AND SAFET Y WARNINGS *IF EQUIPPED
Engine Start/Stop Button & Smart Key Video To view a video on your mobile device, snap this QR Code or visit the listed website
Refer to page 2 for more information
QR CODE
www.youtube.com/KiaFeatureVideos
• The Smart Key’s signal can be blocked by the normal operation of a cellular phone or smartphone To help prevent this, store each device separately
• If the Smart Key battery is weak or not working properly, hold the Smart Key fob up to the Engine Start /Stop button (Lock button side closest) and press to start engine
QUICK TIPS
Remote button configuration may vary depending on vehicle options.
For more information on the Mechanical Key, please refer to your Owner’s Manual
Smart Key*
A Press to lock All Doors
B
Press to unlock Driver’s Door Press twice within 4 seconds to unlock All Doors
C Power Sliding Doors:
Option 1 - Press and hold the left /right button to automatically open/close the power sliding doors*
Option 2 - With the Smart Key fob on your person, pull the Power Sliding Door handle once and
the door will open/close automatically
D Manual Liftgate*: Press and hold for more than 1 second to unlock Liftgate Then lift by the handle to manually open Liftgate
REMINDERS:
•
The Liftgate does not automatically open when the D button is pressed
•
The Liftgate unlocks when the Smart Key fob is within close proximity of the vehicle
Power Liftgate*: Press and hold for Power Liftgate to open automatically Press again at any time to stop Press again to automatically close
Smart Power Liftgate*: When enabled, the liftgate will open automatically as you approach the rear of the vehicle with the Smart Key fob with you (For more details, see page 40)
E Press and hold for more than a half second for Panic Alarm To turn off Alarm, press any button
Driver’s Door Lock/Unlock button G:
•Press button once to unlock driver’s door
•Press again within 4 seconds to unlock all doors
•
Press again to lock all doors
Mechanical Key F:
•Press button on back of key fob to release Mechanical Key
•Use to unlock driver’s door
•Use to enable/disable Child-Protector Rear Door Lock
•Use to lock glove box
A
B
C
E
G
D
C
F
(Type B shown)
OTHER KEY FEATURES
Page 40 of 54

SEDONA FEATURES & FUNCTIONS GUIDE38*IF EQUIPPED
FRONTREARFRONTREARFRONTREARFRONTREAR
REAR
REAR
Map/Room Lamps
Automatic turn off function*
The interior lights automatically turn off approximately 30 seconds after
the Engine Start /Stop button is OFF
Map/Room Lamp Operation
Press the lens A to turn the Map Lamp ON/OFF This light produces a
spot beam for convenient use as a map lamp or as a personal lamp for
the driver or the front passenger
When the button B is pressed the following occurs:
•When any door or the liftgate is opened, the map and room lamps turn ON
•When doors are unlocked from the Smart Key or key removed from
ignition, the Map and Room Lamps turn ON for approximately 30
seconds or until a door is opened
•When doors are closed, the lamps will gradually turn OFF after
approximately 30 seconds
•When all doors are locked or the ignition is turned ON, the Map Lamp
will turn OFF immediately
When the button C is pressed, the lamps stay ON continuously
Room Lamp – Press the lens D to turn the Room Lamp ON/OFF
REMINDER: When Room Lamp lens is pressed ON it will remain ON, even when the Map Lamp switch is in the OFF position
FRONT
REARFRONTREARFRONTREARFRONTREAR
REAR
REAR
•When doors are unlocked by the Smart Key*, the lamp turns ON for approximately 30 seconds •If your vehicle is equipped with the theft alarm system, the interior lights automatically turn off approximately 3 seconds after the system is in armed stage •Using interior lights for an extended period of time may cause battery discharge
QUICK TIPS
A
CB
DD
A
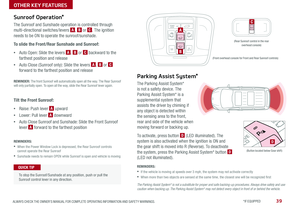
Sunvisor
Use the Sunvisor to shield direct light through the front or side windows
Slide the Sunvisor out and adjust as needed
REMINDERS:
•Sunvisor may not shield all direct light
•The Sunvisor may impair visibility if not adjusted properly
•
Be aware of seating position when adjusting or swinging Sunvisor around to or from the front or side windows
•Do not operate the vehicle if the sunvisor is impairing your visibility
(Lamp controls located in the overhead consoles) Type A shown
OTHER KEY FEATURES