2018 KIA RIO remote control
[x] Cancel search: remote controlPage 122 of 490
Features of your vehicle
50
4
Inside rearview mirror
Adjust the rearview mirror so that the
center view through the rear window
is seen. Make this adjustment before
you start driving.
Do not place objects in the rear seat
which would interfere with your vision
through the rear window.
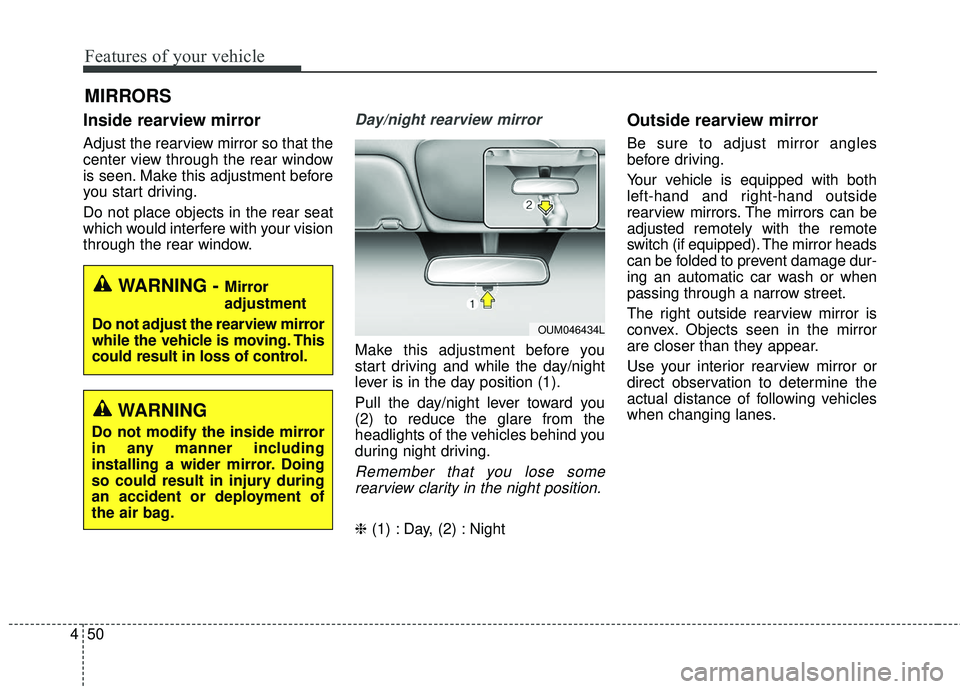
Day/night rearview mirror
Make this adjustment before you
start driving and while the day/night
lever is in the day position (1).
Pull the day/night lever toward you
(2) to reduce the glare from the
headlights of the vehicles behind you
during night driving.
Remember that you lose some
rearview clarity in the night position.
❈ (1) : Day, (2) : Night
Outside rearview mirror
Be sure to adjust mirror angles
before driving.
Your vehicle is equipped with both
left-hand and right-hand outside
rearview mirrors. The mirrors can be
adjusted remotely with the remote
switch (if equipped). The mirror heads
can be folded to prevent damage dur-
ing an automatic car wash or when
passing through a narrow street.
The right outside rearview mirror is
convex. Objects seen in the mirror
are closer than they appear.
Use your interior rearview mirror or
direct observation to determine the
actual distance of following vehicles
when changing lanes.
MIRRORS
WARNING - Mirror
adjustment
Do not adjust the rearview mirror
while the vehicle is moving. This
could result in loss of control.
OUM046434L
WARNING
Do not modify the inside mirror
in any manner including
installing a wider mirror. Doing
so could result in injury during
an accident or deployment of
the air bag.
Page 123 of 490
451
Features of your vehicle
Remote control
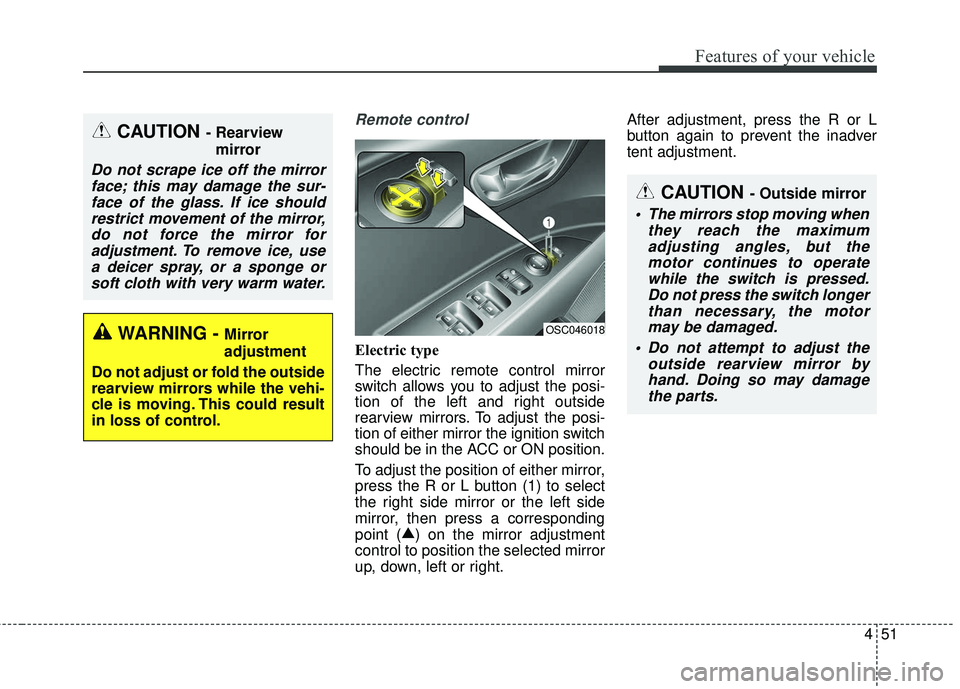
Electric type
The electric remote control mirror
switch allows you to adjust the posi-
tion of the left and right outside
rearview mirrors. To adjust the posi-
tion of either mirror the ignition switch
should be in the ACC or ON position.
To adjust the position of either mirror,
press the R or L button (1) to select
the right side mirror or the left side
mirror, then press a corresponding
point (▲
) on the mirror adjustment
control to position the selected mirror
up, down, left or right. After adjustment, press the R or L
button again to prevent the inadver
tent adjustment.
CAUTION - Rearview
mirror
Do not scrape ice off the mirrorface; this may damage the sur-face of the glass. If ice shouldrestrict movement of the mirror,do not force the mirror foradjustment. To remove ice, usea deicer spray, or a sponge orsoft cloth with very warm water.
WARNING - Mirror
adjustment
Do not adjust or fold the outside
rearview mirrors while the vehi-
cle is moving. This could result
in loss of control.OSC046018
CAUTION - Outside mirror
The mirrors stop moving when they reach the maximumadjusting angles, but themotor continues to operatewhile the switch is pressed.Do not press the switch longerthan necessary, the motormay be damaged.
Do not attempt to adjust the outside rearview mirror byhand. Doing so may damagethe parts.
Page 219 of 490
Audio system
510
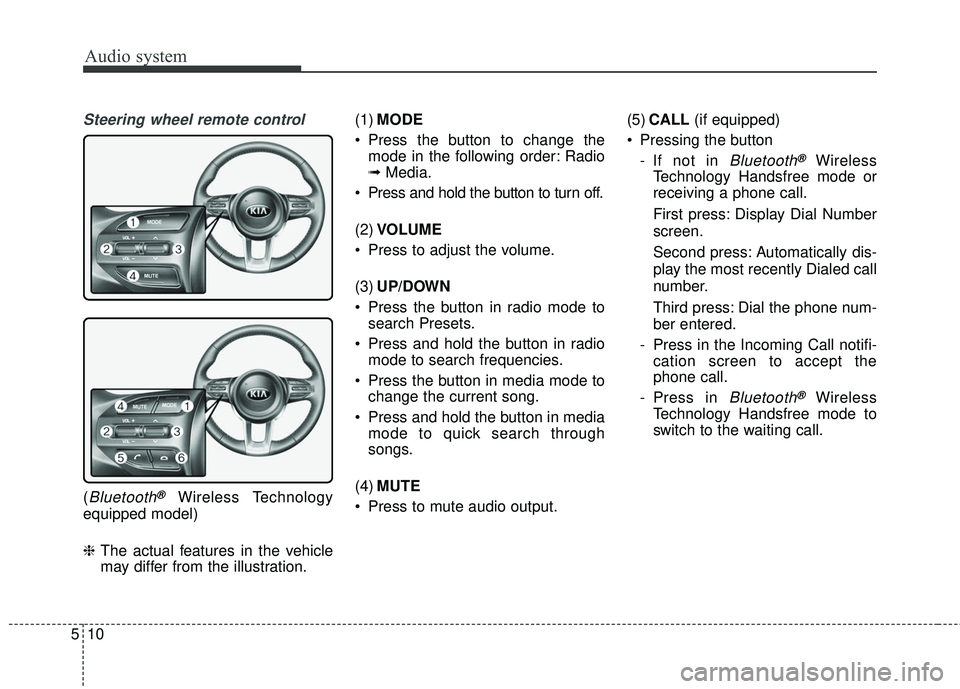
Steering wheel remote control
(Bluetooth®Wireless Technology
equipped model)
❈ The actual features in the vehicle
may differ from the illustration. (1)
MODE
Press the button to change the mode in the following order: Radio
➟ Media.
Press and hold the button to turn off.
(2) VOLUME
Press to adjust the volume.
(3) UP/DOWN
Press the button in radio mode to search Presets.
Press and hold the button in radio mode to search frequencies.
Press the button in media mode to change the current song.
Press and hold the button in media mode to quick search through
songs.
(4) MUTE
Press to mute audio output. (5)
CALL (if equipped)
Pressing the button - If not in
Bluetooth®Wireless
Technology Handsfree mode or
receiving a phone call.
First press: Display Dial Number
screen.
Second press: Automatically dis-
play the most recently Dialed call
number.
Third press: Dial the phone num-
ber entered.
- Press in the Incoming Call notifi- cation screen to accept the
phone call.
- Press in
Bluetooth®Wireless
Technology Handsfree mode to
switch to the waiting call.
Page 239 of 490
Audio system
530
Pairing a Bluetooth®Wireless
Technology device
Information on pairing Bluetooth®
Wireless Technology devices
Pairing refers to the process of pair-
ing
Bluetooth®Wireless Technology
cell phones or devices with the
system prior to connection. This is
a necessary procedure for
Bluetooth®
Wireless Technology connection
and usage.
Up to five devices can be paired.
Pairing the first Bluetooth
®Wireless
Technology device
Press the [PHONE] button on the
audio system or the [CALL] button
on the steering wheel remote control
➟ Search for the vehicle from the
Bluetooth®Wireless Technology
device, and pair ➟ Enter the passkey
on the
Bluetooth®Wireless Technology
device or approve passkey ➟
Bluetooth®Wireless Technology pair-
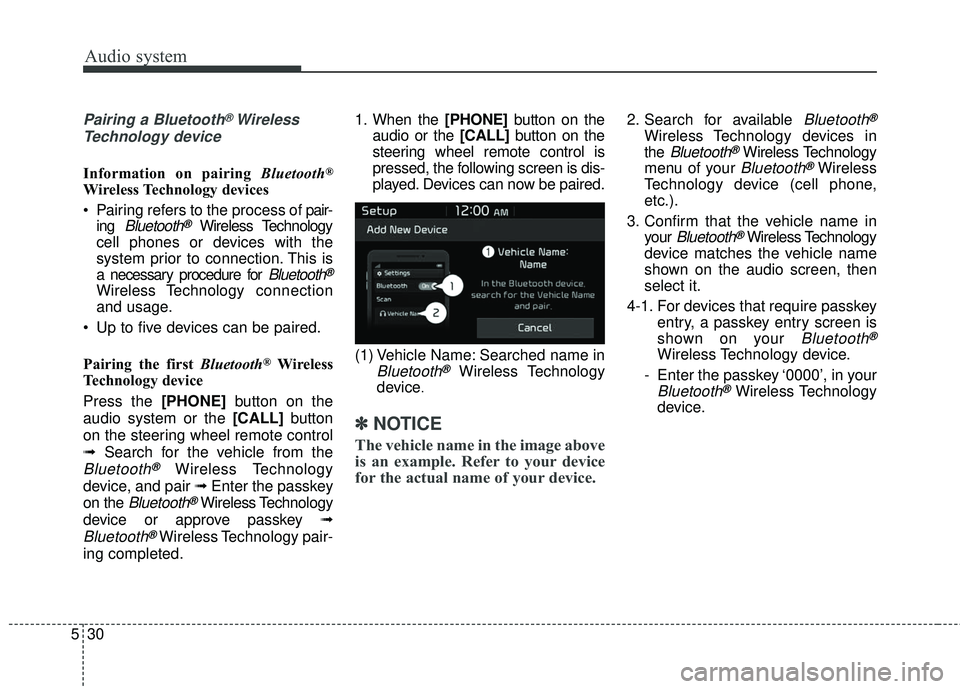
ing completed. 1. When the [PHONE]
button on the
audio or the [CALL] button on the
steering wheel remote control is
pressed, the following screen is dis-
played. Devices can now be paired.
(1) Vehicle Name: Searched name in
Bluetooth®Wireless Technology
device
.
✽ ✽ NOTICE
The vehicle name in the image above
is an example. Refer to your device
for the actual name of your device.
2. Search for available Bluetooth®
Wireless Technology devices in
the
Bluetooth®Wireless Technology
menu of your
Bluetooth®Wireless
Technology device (cell phone,
etc.).
3. Confirm that the vehicle name in your
Bluetooth®Wireless Technology
device matches the vehicle name
shown on the audio screen, then
select it.
4-1. For devices that require passkey entry, a passkey entry screen is
shown on your
Bluetooth®
Wireless Technology device.
- Enter the passkey ‘0000’, in your
Bluetooth®Wireless Technology
device.
Page 241 of 490
![KIA RIO 2018 Owners Manual Audio system
532
Connecting Bluetooth®Wireless
Technology devices
If there are no connected devices
Press the [PHONE] button on the
audio system or the [CALL] button in
the steering wheel remote cont KIA RIO 2018 Owners Manual Audio system
532
Connecting Bluetooth®Wireless
Technology devices
If there are no connected devices
Press the [PHONE] button on the
audio system or the [CALL] button in
the steering wheel remote cont](/manual-img/2/40415/w960_40415-240.png)
Audio system
532
Connecting Bluetooth®Wireless
Technology devices
If there are no connected devices
Press the [PHONE] button on the
audio system or the [CALL] button in
the steering wheel remote control ➟
List of paired
Bluetooth®Wireless
Technology devices ➟Select the
desired
Bluetooth®Wireless Technology
device from the list ➟ Connect
Bluetooth®
Wireless Technology. If there are connected devices
Press the [PHONE]
button on the
audio system ➟ Select [Settings] ➟
Select [Connections] ➟Select
Bluetooth®Wireless Technology device
to connect ➟ Select [Connect] ➟
Connect
Bluetooth®Wireless Technology.
✽ ✽ NOTICE
• Only one Bluetooth®Wireless
Technology device can be connected
at a time.
• When a Bluetooth
®Wireless
Technology device is connected,
other devices cannot be paired.
Accepting/rejecting phone calls
Receiving phone calls with
Bluetooth®Wireless Technology con-
nected.
(1) Caller name: If the caller number is in your contacts, the correspon-
ding name is displayed.
(2) Incoming phone number: Incoming phone number is displayed.
(3) Accept: Accept call.
(4) Reject: Reject call.
Page 327 of 490

79
What to do in an emergency
TPMS (Tire Pressure
Monitoring System)
malfunction indicator
The TPMS malfunction indicator will
illuminate after it blinks for approxi-
mately one minute when there is a
problem with the Tire Pressure
Monitoring System. If the system is
able to correctly detect an under
inflation warning at the same time as
system failure then it will illuminate
the TPMS malfunction indicator.
Have the system checked by an
authorized Kia dealer as soon as
possible to determine the cause of
the problem.
The TPMS malfunction indicator may
be illuminated if the vehicle is moving
around electric power supply cables
or radio transmitters such as at
police stations, government and pub-
lic offices, broadcasting stations, mil-
itary installations, airports, or trans-
mitting towers, etc. This can interfere
with normal operation of the Tire
Pressure Monitoring System
(TPMS).The TPMS malfunction indicator may
illuminate if snow chains or some
separately purchased devices such
as notebook computers, mobile
charger, remote starter, navigation
etc. are used in the vehicle. This can
interfere with normal operation of the
Tire Pressure Monitoring System
(TPMS).
WARNING- Low
pressure
damage
Do not drive on low pressure
tires. Significantly low tire pres-
sure can cause the tires to over-
heat and fail making the vehicle
unstable resulting in increased
braking distances and a loss of
vehicle control.
Page 333 of 490

715
What to do in an emergency
When you drive your vehicle from a
warm area to a cold area or from a cold
area to a warm area, or the outside
temperature is greatly higher or lower,
you should check the tire inflation pres-
sure and adjust the tires to the recom-
mended tire inflation pressure.TPMS (Tire PressureMonitoring System)malfunction indicator
The low tire pressure telltale will illu-
minate after it blinks for approximate-
ly one minute when there is a prob-
lem with the Tire Pressure
Monitoring System. If the system is
able to correctly detect an underinfla-
tion warning at the same time as sys-
tem failure then it will illuminate both
the TPMS malfunction and low tire
pressure position telltales e.g. if
Front Left sensor fails, the TPMS
malfunction indicator illuminates, but
if the Front Right, Rear Left, or Rear
Right tire is under-inflated, the low
tire pressure position telltales may
illuminate together with the TPMS
malfunction indicator.
Have the system checked by an
authorized Kia dealer as soon as
possible to determine the cause of
the problem. The TPMS malfunction indicator
may be illuminated if the vehicle is
moving around electric power sup-
ply cables or radios transmitters
such as at police stations, govern-
ment and public offices, broadcast-
ing stations, military installations,
airports, or transmitting towers,
etc. This can interfere with normal
operation of the Tire Pressure
Monitoring System (TPMS).
The TPMS malfunction indicator may be illuminated if snow chains
are used or some separate elec-
tronic devices such as notebook
computer, mobile charger, remote
starter or navigation etc., are used
in the vehicle. This can interfere
with normal operation of the Tire
Pressure Monitoring System
(TPMS).
WARNING- Low pressure
damage
Do not drive on low pressure
tires. Significantly low tire pres-
sure can cause the tires to over-
heat and fail making the vehicle
unstable resulting in increased
braking distances and a loss of
vehicle control.
CAUTION
When filling tires with more air, conditions to turn off the low tirepressure telltale may not be met.This is because a tire inflatorhas a margin of error in perform-ance. The low tire pressure tell-tale will be turned off if the tirepressure is above the recom-mended tire inflation pressure.
Page 422 of 490
865
Maintenance
✽ ✽NOTICE
Do not disassemble nor assemble the
multi fuse when it is secured with
nuts and bolts. Incorrect or partial
assembly torque may cause a fire.
Have the vehicle checked by an
authorized Kia dealer.
✽ ✽NOTICE- Random wiring pro-
hibited when retrofitting equip-
ment
Use of random wiring in the vehicle
might cause danger due to failure and
damage of the vehicle’s performance.
Using random wires especially when
retrofitting AVN or theft alarm sys-
tem, remote engine control, car
phone or radio might damage the
vehicle or cause fire.
✽ ✽ NOTICE- Remodeling
Prohibited
Do not try remodeling the vehicle in
any way. It is illegal, and may affect
the vehicle’s performance, durabili-
ty, and safety. Warranty is also not
provided for problems caused by
remodeling.
Be aware of safety problems caused
by remodeling the vehicle with unau-
thorized electrical devices(lamp,
black box, electrical equipment,
diagnostic device, communication
device, etc.). It might cause malfunc-
tion of the vehicle, wiring damage,
battery discharge, connector dam-
age, or fire. the vehicle or cause fire.
Window tinting precaution
Window tint(especially metallic film)
might cause communication disorder
or poor radio reception, and malfunc-
tion of the automatic lighting system
due to excessive change of illumina-
tion inside the vehicle. The solution
used might also flow into electric,
electronic devices causing disorder
and failure.
CAUTION
Visually inspect the battery capto ensure it is securely closed.If the battery cap is not securelyclosed, moisture may enter thesystem and damage the electri-cal components.