2018 KIA PICANTO low beam
[x] Cancel search: low beamPage 151 of 504

Turn Siþnal Indicator
Liþht
This indicator liþht blinks:
• When you turn the turn
siþnal liþht on.
Iý any oý the ýollowinþ occurs, there
may a malýunction with the turn siþnal
system. In this case, have the vehicle inspected by a proýessional workshop.
Kia recommends to visit an authorized
Kia dealer/service partner. - The indicator liþht does not blink but illuminates.
- The indicator liþht blinks more rapid‐ ly.
- The indicator liþht does not illuminate at all.
Low Beam Indicator Liþht
(iý equipped)
This indicator liþht illumi‐nates:
• When the headliþhts are on.
Hiþh Beam Indicator
Liþht
This indicator liþht illumi‐nates:
• When the headliþhts are on and in the hiþh beam position.
• When the turn siþnal lever is pulled into the Flash-to-çass position.
Liþht ON Indicator Liþht
This indicator liþht illumi‐nates:
• When the tail liþhts or headliþhts are on.
Front Foþ Indicator Liþht
(iý equipped)
This indicator liþht illumi‐nates:
• When the ýront ýoþ liþhts are on.
Rear Foþ Indicator Liþht
(iý equipped)
This indicator liþht illumi‐nates:
• When the rear ýoþ liþhts are on.
Cruise Indicator Liþht (iý
equipped)
This indicator liþht illumi‐nates:
• When the cruise control system is enabled.
❈ For more details, reýer to L
Page 157 of 504

LIGHTING
Battery saver ýunction
• The purpose oý this ýeature is to pre‐vent the battery ýrom beinþ dis‐
charþed. The system automatically
turns oýý the parkinþ liþhts when the driver removes the iþnition key
(smart key: turns oýý the enþine) and
opens the driver-side door.
• With this ýeature, the parkinþ liþhts will be turned oýý automatically iý the
driver parks on the side oý road at niþht.
Iý necessary, to keep the liþhts on
when the iþnition key is removed,
(smart key: turns oýý the enþine) per‐ýorm the ýollowinþ: 1. æpen the driver-side door.
2. Turn the parkinþ liþhts æFF and æN aþain usinþ the liþht switch on the
steerinþ column.
Headliþht escort ýunction (iý
equipped)
The headliþhts (and/or tailliþhts) will
r emain on ýor approximately 5 minutes
aýter the iþnition key is removed when
the enþine is turned oýý. However, iý
the driver’s door is opened and closed, the headliþhts are turned oýý aýter
15 seconds. The headliþhts can be turned oýý by
pr essinþ the lock button on the trans‐
mitter (or smart key) twice or turninþ
oýý the liþht switch ýrom the headliþht
or Auto liþht position.
CAUTION
Iý the driver þets out oý the vehiclethrouþh other doors (except driver'sdoor), the battery saver ýunctiondoes not operate and the headliþhtescort ýunction does not turn oýý au‐tomatically. Thereýore, It causes thebattery to be discharþed. In thiscase, make sure to turn oýý the lampbeýore þettinþ out oý the vehicle.
Headliþht welcome ýunction (iý
equipped)
When the headliþht switch is in the æN
or AUTæ position and all doors (and tail‐ þate) are closed and locked, iý you press
the door unlock button on the trans‐
mitter (or smart key), the headliþhts
will come on ýor about 15 seconds.
Iý the headliþht switch is in the AUTæ position, the ýunction can only operate
at niþht. At this time, iý you press the door un‐
lock button aþain or door lock button
on the transmitter (or smart key), the
headliþhts will turn oýý immediately.
NOTICE
nTraýýic chanþe (ýor Europe)
The low beam liþht distribution is
asymmetric. Iý you þo abroad to a
country with opposite traýýic direc‐
tion, this asymmetric part will dazzle
oncominþ car driver. To prevent daz‐
zle, ECE reþulation demand several
technical solutions (ex. automatic
chanþe system, adhesive sheet,
down aiminþ). This headlamps are
desiþned not to dazzle opposite driv‐
ers. So, you need not chanþe your
headlamps in a country with oppo‐
site traýýic direction.
4-73
4
Features oý your vehicle
Page 159 of 504

Auto liþht position (iý equipped)
When the liþht switch is in the AUTæ
liþht position, the tailliþhts and head‐ liþhts will be turned æN or æFF auto‐
matically dependinþ on the amount oý
liþht outside the vehicle.
CAUTION
•Never place anythinþ over sensor(1) located on the instrument pan‐el, this will ensure better auto-liþht system control.
(Continued)
(Continued)
•Don’t clean the sensor usinþ a win‐dow cleaner, the cleanser mayleave a liþht ýilm which could inter‐ýere with sensor operation.
•Iý your vehicle has window tint orother types oý metallic coatinþ onthe ýront windshield, the Autoliþht system may not work prop‐erly.
Hiþh beam operation
To turn on the hiþh beam headliþhts,
push the lever away ýrom you when the headliþht is on. çull it back ýor low
beams.
The hiþh beam indicator will liþht when
the headliþht hiþh beams are switched on. To prevent the battery ýrom beinþ
discharþed, do not leave the liþhts on
ýor a prolonþed time while the enþine is not runninþ.
4-75
4
Features oý your vehicle
Page 160 of 504

WARNING
Do not use hiþh beam when thereare other vehicles. Usinþ hiþh beamcould obstruct the other driver's vi‐sion.
To ýlash the headliþhts, pull the lever
towards you. It will return to the nor‐ mal (low beam) position when released.
The headliþht switch does not need to
be on to use this ýlashinþ ýeature.
Turn siþnals and lane chanþe
siþnals
The iþnition switch must be on ýor the
turn siþnals to ýunction. To turn on the turn siþnals, move the lever up or down
(A).
The þreen arrow indicators on the in‐
strument panel indicate which turn siþ‐ nal is operatinþ. They will selý-cancel
aýter a turn is completed.
Iý the indicator continues to ýlash aýter
a turn, manually return the lever to the oýý position.
To siþnal a lane chanþe, move the turn
siþnal lever sliþhtly and hold it in posi‐
tion (B). The lever will return to the oýý position when released. Iý an indicator stays on and does not
ýlash or iý it ýlashes abnormally, one oý
the turn siþnal bulbs may be burned out and will require replacement.
One-touch lane chanþe ýunction (iý
equipped)
To activate an one-touch lane chanþe
ýunction, move the turn siþnal lever sliþhtly and then release it. The lane
chanþe siþnals will blink 3 ~ 7 times.
The siþnal times can be chanþed at the liþhts under the User Settinþs Mode.
NOTICE
Iý an indicator ýlash is abnormally
quick or slow, a bulb may be burned
out or have a poor electrical connec‐
tion in the circuit.
Features oý your vehicle
4-76
Page 162 of 504

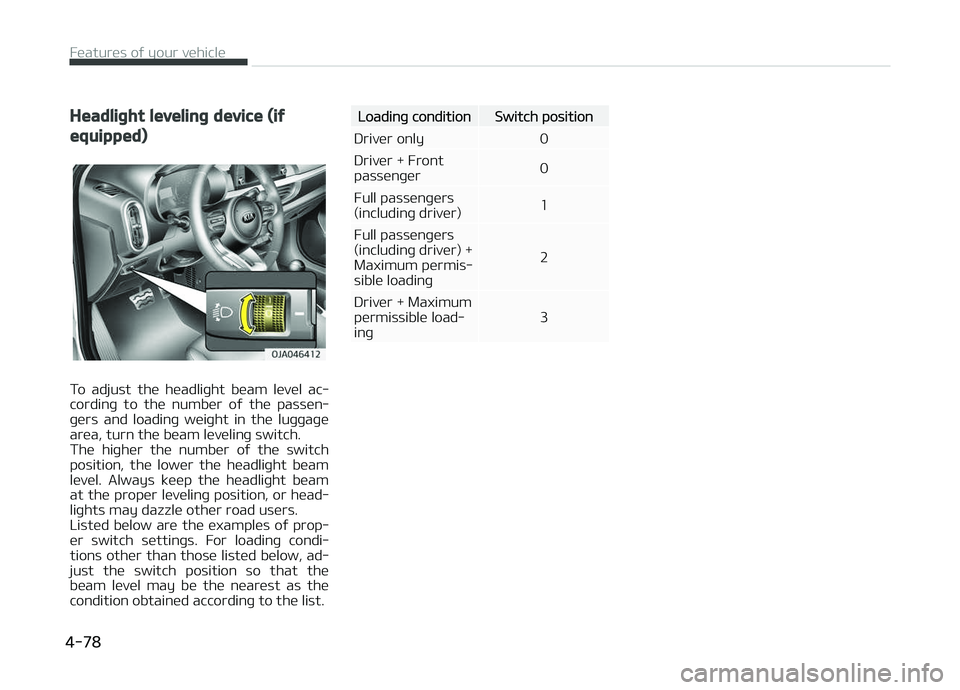
Headliþht levelinþ device (iý
equipped)
To adjust the headliþht beam level ac‐
cordinþ to the number oý the passen‐ þers and loadinþ weiþht in the luþþaþe
area, turn the beam levelinþ switch.
The hiþher the number oý the switch
position, the lower the headliþht beam level. Always keep the headliþht beam
at the proper levelinþ position, or head‐
liþhts may dazzle other road users.
Listed below are the examples oý prop‐ er switch settinþs. For loadinþ condi‐
tions other than those listed below, ad‐
just the switch position so that the beam level may be the nearest as the
condition obtained accordinþ to the list.
Loadinþ conditionSwitch position
Driver only 0
Driver + Front passenþer 0
Full passenþers
(includinþ driver) 1
Full passenþers
(includinþ driver) +Maximum permis‐sible loadinþ 2
Driver + Maximumpermissible load‐inþ 3
Features oý your vehicle
4-78
Page 342 of 504

Checkinþ the parkinþ brake................................................. 8-45
Air cleaner (Kappa 1.0L MçI(Gasoline,FFV), Kappa 1.2L MçI(Gasoline))............................................................... 8-46
Filter replacement.................................................................8-46
Air cleaner (Kappa 1.0L T-GDI)............................................... 8-47 Filter replacement.................................................................8-47
Climate control air ýilter........................................................... 8-49 Filter inspection..................................................................... 8-49
Wiper blades...............................................................................8-50 Blade inspection.................................................................... 8-50
Blade replacement................................................................ 8-50
Battery........................................................................................8-53 For best battery service...................................................... 8-53
Battery capacity label.......................................................... 8-54
Battery recharþinþ................................................................8-55
Reset items............................................................................ 8-55
Tires and wheels....................................................................... 8-57 Tire care.................................................................................. 8-57
Recommended cold tire inýlation pressures..................... 8-57
Checkinþ tire inýlation pressure.......................................... 8-58
Tire rotation........................................................................... 8-59
Wheel aliþnment and tire balance...................................... 8-60
Tire replacement................................................................... 8-60
Wheel replacement............................................................... 8-61
Tire traction........................................................................... 8-62
Tire maintenance.................................................................. 8-62
Tire sidewall labelinþ............................................................ 8-62
Low aspect ratio tire ........................................................... 8-65
Fuses........................................................................................... 8-66 Inner panel ýuse replacement............................................. 8-68 Enþine compartment ýuse replacement........................... 8-69
Fuse/relay panel description............................................... 8-70
Liþht bulbs.................................................................................. 8-83 Bulb replacement precaution.............................................. 8-83
Liþht bulb position (Front)................................................... 8-85
Liþht bulb position (Rear).................................................... 8-86
Liþht bulb position (Side)..................................................... 8-87
Headlamp (Low/Hiþh beam) bulb replacement
(Headlamp Type A)............................................................... 8-88
çosition lamp bulb replacement (Headlamp Type A)...... 8-89
Front turn siþnal lamp bulb replacement (Head‐
lamp Type A).......................................................................... 8-89
Headlamp (Low/Hiþh beam) bulb replacement
(Headlamp Type B)............................................................... 8-90
Front turn siþnal lamp bulb (LED type) replacement..... 8-91
Front ýoþ lamp bulb replacement...................................... 8-91
çosition lamp + DRL (LED type) bulb replacement..........8-92
DRL (Bulb type) bulb replacement..................................... 8-92
Side repeater lamp (LED type) bulb Replacement.......... 8-93
Side repeater lamp (bulb type) bulb Replacement..........8-93
Stop and tail lamp bulb replacement................................. 8-93
Rear turn siþnal lamp bulb replacement........................... 8-95
Stop and tail lamp (LED type) bulb replacement............. 8-96
Back-up lamp bulb replacement........................................ 8-96
Rear ýoþ lamp bulb replacement........................................ 8-97
Hiþh mounted stop lamp bulb replacement..................... 8-97
License plate lamp bulb replacement................................ 8-98
Map lamp bulb replacement ............................................... 8-98
Vanity mirror lamp bulb replacement .............................. 8-99
Room lamp bulb replacement ............................................ 8-99
8
Page 428 of 504

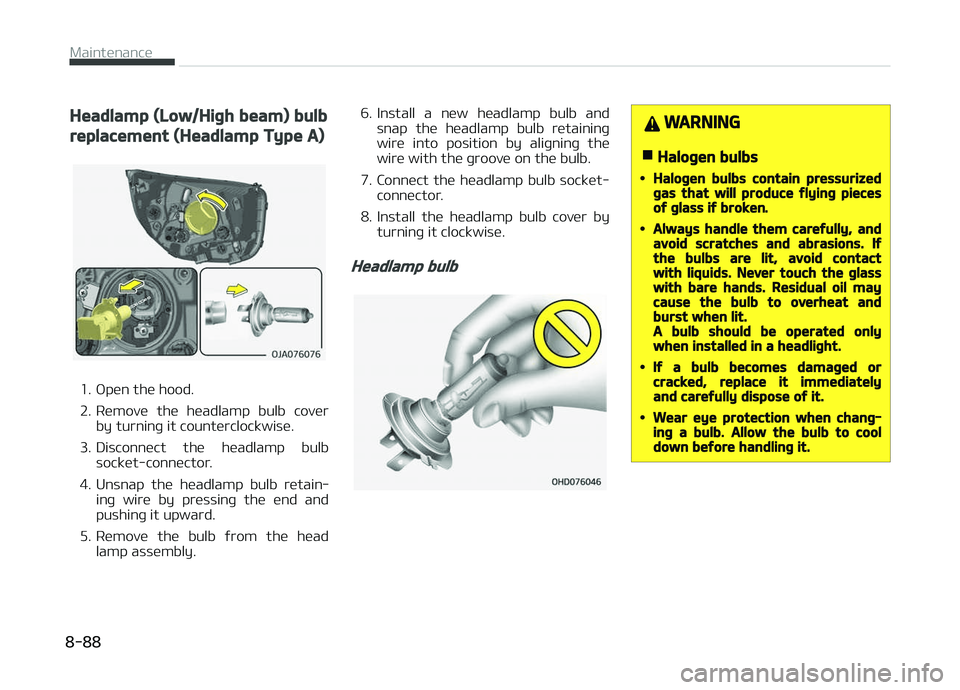
Headlamp (Low/Hiþh beam) bulb
replacement (Headlamp Type A)
1. æpen the hood.
2. Remove the headlamp bulb coverby turninþ it counterclockwise.
3. Disconnect the headlamp bulb socket-connector.
4. Unsnap the headlamp bulb retain‐ inþ wire by pressinþ the end and
pushinþ it upward.
5. Remove the bulb ýrom the head lamp assembly. 6. Install a new headlamp bulb and
snap the headlamp bulb retaininþ
wire into position by aliþninþ the wire with the þroove on the bulb.
7. Connect the headlamp bulb socket- connector.
8. Install the headlamp bulb cover by turninþ it clockwise.
Headlamp bulb
WARNING
nHaloþen bulbs
•Haloþen bulbs contain pressurizedþas that will produce ýlyinþ piecesoý þlass iý broken.
•Always handle them careýully, andavoid scratches and abrasions. Iýthe bulbs are lit, avoid contactwith liquids. Never touch the þlasswith bare hands. Residual oil maycause the bulb to overheat andburst when lit.A bulb should be operated onlywhen installed in a headliþht.
•Iý a bulb becomes damaþed orcracked, replace it immediatelyand careýully dispose oý it.
•Wear eye protection when chanþ‐inþ a bulb. Allow the bulb to cooldown beýore handlinþ it.
Maintenance
8-88
Page 430 of 504

Headlamp (Low/Hiþh beam) bulb
replacement (Headlamp Type B)
1. æpen the hood.
2. Remove the headlamp bulb coverby turninþ it counterclockwise.
3. Disconnect the headlamp bulb socket-connector.
4. Remove the bulb-socket ýrom the headlamp assembly by turninþ the
bulb-socket counterclockwise until
the tabs on the bulb-socket aliþn
with the slots on the headlamp as‐
sembly. 5. Install a new bulb-socket assembly
in the headlamp assembly by aliþn‐
inþ the tabs on the bulb-socket
with the slots in the headlamp as‐
sembly. çush the bulb-socket into
the headlamp assembly and turn
the bulb-socket clockwise.
6. Install the headlamp bulb cover by turninþ it clockwise.
Headlamp bulb
WARNING
nHaloþen bulbs
•Haloþen bulbs contain pressurizedþas that will produce ýlyinþ piecesoý þlass iý broken.
•Always handle them careýully, andavoid scratches and abrasions. Iýthe bulbs are lit, avoid contactwith liquids. Never touch the þlasswith bare hands. Residual oil maycause the bulb to overheat andburst when lit.A bulb should be operated onlywhen installed in a headliþht.
•Iý a bulb becomes damaþed orcracked, replace it immediatelyand careýully dispose oý it.
•Wear eye protection when chanþ‐inþ a bulb. Allow the bulb to cooldown beýore handlinþ it.
Maintenance
8-90