2018 JEEP GRAND CHEROKEE audio
[x] Cancel search: audioPage 64 of 368

INSTRUMENT CLUSTER
DISPLAY
Your vehicle will be equipped with an instru-
ment cluster display, which offers useful in-
formation to the driver. With the ignition in
the STOP/OFF mode, opening/closing of a
door will activate the display for viewing, and
display the total miles, or kilometers, in the
odometer. Your instrument cluster display is
designed to display important information
about your vehicle’s systems and features.
Using a driver interactive display located on
the instrument panel, your instrument clus-
ter display can show you how systems are
working and give you warnings when they are
not. The steering wheel mounted controls
allow you to scroll through the main menus
and submenus. You can access the specific
information you want and make selections
and adjustments.
Instrument Cluster Display Location And
Controls
The instrument cluster display is located in
the center of the instrument cluster.1. The top line where reconfigurable tell-
tales, compass direction, outside tem-
perature, Time, Range MPG or Trip are
displayed. This also displays the speed-
ometer when other menu pages are
displayed.2. The main display area where the menus
and pop up messages are displayed.
3. The lower line where reconfigurable tell-
tales, menu name and menu page are
displayed.
• Push theuparrow button to scroll upward
through the main menus (Speedometer,
MPH/km/h, Vehicle Info, Terrain, Driver As-
sist, Fuel Economy, Trip A, Trip B, Stop/
Start, Audio, Navigation, Stored Messages,
Screen Setup and Speed Warning).
Instrument Cluster Display
1 — Speedometer Display
2 — Main Display
3 — Menu Name And Menu PageInstrument Cluster Display Controls
GETTING TO KNOW YOUR INSTRUMENT PANEL
62
Page 65 of 368

•Push thedownarrow button to scroll down-
ward through the main menu and sub-
menus (Speedometer, MPH/km/h, Vehicle
Info, Terrain, Driver Assist, Fuel Economy,
Trip A, Trip B, Stop/Start, Audio, Naviga-
tion, Stored Messages, Screen Setup and
Speed Warning).
•Push therightarrow button to access the
information screens or submenu screens of
a main menu item.
•Push theleftarrow button to access the
information screens or submenu screens of
a main menu item.
•Push theOKbutton to access/select the
information screens or submenu screens of
a main menu item. Push and hold theOK
button for two seconds to reset displayed/
selected features that can be reset.
Instrument Cluster Display Selectable
Items
The instrument cluster display can be used to
view the following main menu items:
NOTE:
Depending on the vehicles options, feature
settings may vary.
• Speedometer • Trip
• MPH to km/h • Audio
• Vehicle Info • Stored Messages
• Driver Assist • Screen Setup
• Fuel Economy • Speed Warning
Display Menu items
SRT Instrument Cluster Display Performance
Features
The instrument cluster display can be used to
program the following Performance Features.• To access, press and release either theupor
downarrow button until “SRT” appears in
the instrument cluster display, then press
and release therightarrow button to cycle
through the features. Press theOKbutton to
select a feature.
• 0-60 MPH
(0-100 km/h)• Current G-Force
• 0-100 MPH
(0-161 km/h)• Peak G-Force
• 1/8 Mile Timer • Lap Timer
• 1/4 Mile Timer • Lap History
• 60 ft Timer • Top Speed
• Braking Distance
SRT Performance Features Controls
63
Page 149 of 368

When the Fuel Economy (ECO) Mode is en-
gaged, the vehicle control systems will
change the following:
• The transmission will upshift sooner and
downshift later.
• The overall driving performance will be
more conservative.
• Vehicles with Quadra-Lift air suspension
will operate in "Aero" mode over a broader
speed range. Refer to the section on
Quadra-Lift for further information.
• In SRT models, the transmission will
launch (from a stop) in second gear, and the
torque converter clutch may engage at
lower engine speeds and remain on longer.
• Some ECO mode functions may be tempo-
rarily inhibited based on temperature and
other factors.
Active Noise Cancellation — If Equipped
Your vehicle is equipped with an Active Noise
Cancellation System. This system uses four
microphones embedded in the headliner to
detect undesirable exhaust noise, which
sometimes occurs when operating in ECOmode. An onboard frequency generator cre-
ates counteracting sound waves through the
audio system to help keep the vehicle quiet.
Eight–Speed Automatic Transmission
Your vehicle is equipped with a fuel efficient
8 speed transmission. The gear selector is
located in the center console.
The transmission gear selector provides
PARK, REVERSE, NEUTRAL, DRIVE and
MANUAL (AutoStick) shift positions. Manualshifts can be made using the AutoStick shift
control. Toggling the gear selector forward (-)
or rearward (+) while in the MANUAL
(AutoStick) position (beside the DRIVE posi-
tion), or tapping the shift paddles (+/-), will
manually select the transmission gear, and
will display the current gear in the instrument
cluster. Refer to "AutoStick" in this section
for further information.
NOTE:
If the gear selector cannot be moved to the
PARK, REVERSE, or NEUTRAL position
(when pushed forward), it is probably in the
AutoStick (+/-) position (beside the DRIVE
position). In AutoStick mode, the transmis-
sion gear (1, 2, 3, etc.) is displayed in the
instrument cluster. Move the gear selector to
the right (into the DRIVE [D] position) for
access to PARK, REVERSE, and NEUTRAL.
AutoStick
AutoStick is a driver-interactive transmission
feature providing manual shift control, giving
you more control of the vehicle. AutoStick
allows you to maximize engine braking, elimi-
nate undesirable upshifts and downshifts,
and improve overall vehicle performance.Transmission Gear Selector
147
Page 209 of 368

Cavity Cartridge Fuse Micro Fuse Description
F62 – 10 Amp Red Air Conditioning Clutch
F63 – 20 Amp Yellow Ignition Coils (Gas), Urea Heater (Diesel)
F64 – 25 Amp Clear Fuel Injectors/Powertrain
F66 – 10 Amp Red Sunroof/Passenger Window Switches/Rain Sensor
F67 – 15 Amp Blue CD/DVD/Bluetooth Hands-free Module — If Equipped
F68 – 20 Amp Yellow Rear Wiper Motor
F69 – 15 Amp Blue Spotlight Feed — If Equipped
F70 – 20 Amp Yellow Fuel Pump Motor
F71 – 30 Amp Green Audio Amplifier
F72 – 10 Amp Red PCM — If Equipped
F73 – 15 Amp Blue HID Headlamp RH — If Equipped
F75 – 10 Amp Red Dual Batt Control — If Equipped
F76 – 10 Amp Red Anti-lock Brakes/Electronic Stability Control
F77 – 10 Amp Red Drivetrain Control Module/Front Axle Disconnect Module
F78 – 10 Amp Red Engine Control Module/Electric Power Steering
F80 – 10 Amp Red Universal Garage Door Opener/Anti-Intrusion Module
F81 – 20 Amp Yellow Trailer Tow Right Turn/Stop Lights
F82 – 10 Amp Red Steering Column Control Module/Cruise Control/DTV
F83 – 10 Amp Red Fuel Door
F84 – 15 Amp Blue Switch Bank/Instrument Cluster
F85 – 10 Amp Red Airbag Module
F86 – 10 Amp Red Airbag Module
F87 – 10 Amp Red Air Suspension — If Equipped
207
Page 287 of 368

MULTIMEDIA
CYBERSECURITY...........287
OFF ROAD PAGES — IF
EQUIPPED.................288
Off Road Pages Status Bar........288
Vehicle Dynamics..............289
Suspension..................289
Pitch And Roll — If Equipped......290
Accessory Gauges..............290
Selec-Terrain — If Equipped.......291
TIPS CONTROLS AND GENERAL
INFORMATION..............291
Steering Wheel Audio Controls......291
Reception Conditions............292
Care And Maintenance...........292
Anti-Theft Protection............292
UCONNECT 4 WITH 7-INCH DIS-
PLAY.....................292
Uconnect 4 At A Glance.........292
Drag & Drop Menu Bar...........294
Radio.....................295
Android Auto — If Equipped.......296Apple CarPlay Integration — If
Equipped...................297
Apps — If Equipped............298
UCONNECT 4C/4C NAV WITH
8.4-INCH DISPLAY...........299
Uconnect 4C/4C NAV At A Glance . . .299
Drag & Drop Menu Bar...........300
Radio.....................301
Android Auto — If Equipped.......302
Apple CarPlay Integration — If
Equipped...................306
Apps — If Equipped............308
UCONNECT SETTINGS.......308
IPOD/USB/MEDIA PLAYER CON-
TROL....................309
Audio Jack (AUX)..............309
USB Port...................310
Bluetooth Streaming Audio........310
UCONNECT REAR SEAT ENTER-
TAINMENT (RSE) SYSTEM — IF
EQUIPPED.................310
Getting Started...............311Dual Video Screen..............312
Blu-ray Disc Player.............312
Play Video Games..............315
NAVIGATION — IF EQUIPPED . . .316
Changing The Navigation Voice Prompt
Volume....................316
Finding Points Of Interest.........318
Finding A Place By Spelling The Name .318
One-Step Voice Destination Entry. . . .318
Setting Your Home Location........318
Home.....................318
Adding A Stop................320
Taking A Detour...............320
UCONNECT PHONE..........321
Uconnect Phone (Bluetooth Hands Free
Calling)....................321
Pairing (Wirelessly Connecting) Your Mobile
Phone To The Uconnect System.....323
Common Phone Commands
(Examples)..................326
Mute (Or Unmute) Microphone During
Call......................326
MULTIMEDIA
285
Page 293 of 368

Selec-Terrain — If Equipped
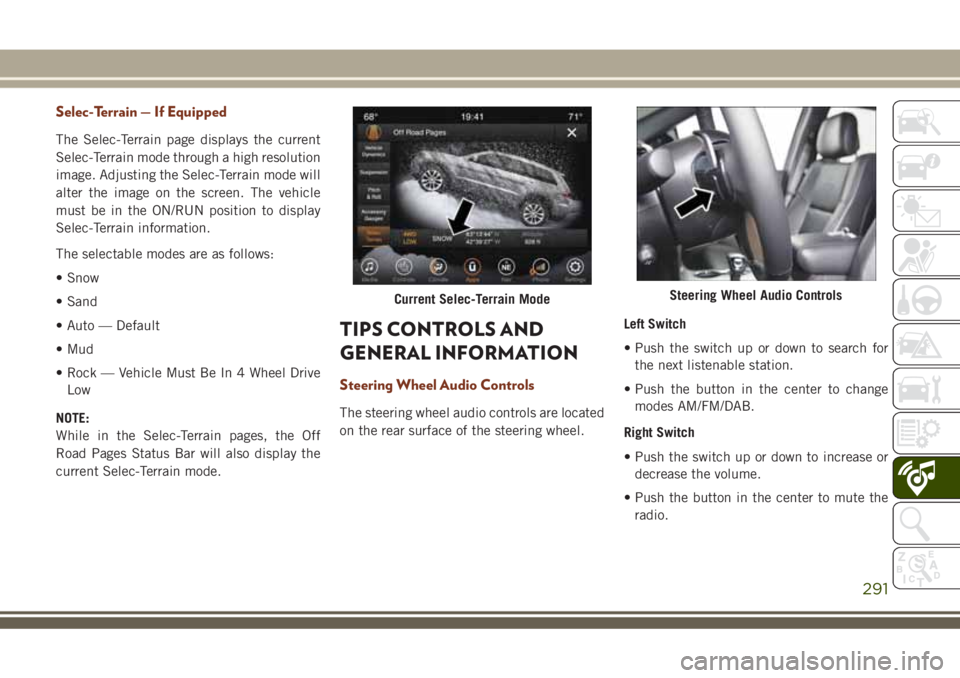
The Selec-Terrain page displays the current
Selec-Terrain mode through a high resolution
image. Adjusting the Selec-Terrain mode will
alter the image on the screen. The vehicle
must be in the ON/RUN position to display
Selec-Terrain information.
The selectable modes are as follows:
• Snow
• Sand
• Auto — Default
• Mud
• Rock — Vehicle Must Be In 4 Wheel Drive
Low
NOTE:
While in the Selec-Terrain pages, the Off
Road Pages Status Bar will also display the
current Selec-Terrain mode.
TIPS CONTROLS AND
GENERAL INFORMATION
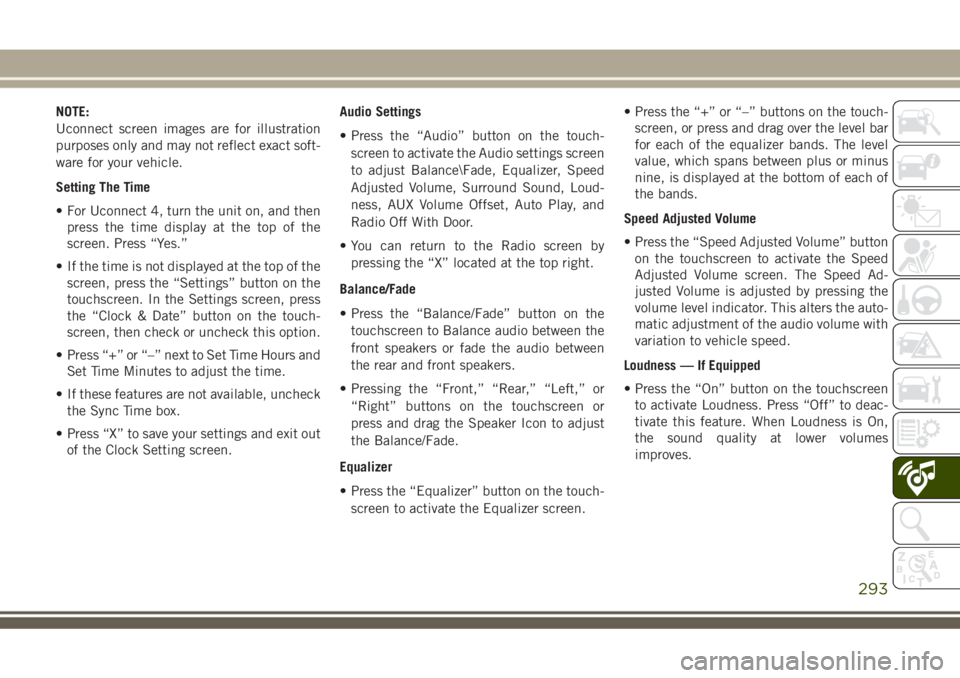
Steering Wheel Audio Controls
The steering wheel audio controls are located
on the rear surface of the steering wheel.Left Switch
• Push the switch up or down to search for
the next listenable station.
• Push the button in the center to change
modes AM/FM/DAB.
Right Switch
• Push the switch up or down to increase or
decrease the volume.
• Push the button in the center to mute the
radio.
Current Selec-Terrain ModeSteering Wheel Audio Controls
291
Page 295 of 368

NOTE:
Uconnect screen images are for illustration
purposes only and may not reflect exact soft-
ware for your vehicle.
Setting The Time
• For Uconnect 4, turn the unit on, and then
press the time display at the top of the
screen. Press “Yes.”
• If the time is not displayed at the top of the
screen, press the “Settings” button on the
touchscreen. In the Settings screen, press
the “Clock & Date” button on the touch-
screen, then check or uncheck this option.
• Press “+” or “–” next to Set Time Hours and
Set Time Minutes to adjust the time.
• If these features are not available, uncheck
the Sync Time box.
• Press “X” to save your settings and exit out
of the Clock Setting screen.Audio Settings
• Press the “Audio” button on the touch-
screen to activate the Audio settings screen
to adjust Balance\Fade, Equalizer, Speed
Adjusted Volume, Surround Sound, Loud-
ness, AUX Volume Offset, Auto Play, and
Radio Off With Door.
• You can return to the Radio screen by
pressing the “X” located at the top right.
Balance/Fade
• Press the “Balance/Fade” button on the
touchscreen to Balance audio between the
front speakers or fade the audio between
the rear and front speakers.
• Pressing the “Front,” “Rear,” “Left,” or
“Right” buttons on the touchscreen or
press and drag the Speaker Icon to adjust
the Balance/Fade.
Equalizer
• Press the “Equalizer” button on the touch-
screen to activate the Equalizer screen.• Press the “+” or “–” buttons on the touch-
screen, or press and drag over the level bar
for each of the equalizer bands. The level
value, which spans between plus or minus
nine, is displayed at the bottom of each of
the bands.
Speed Adjusted Volume
• Press the “Speed Adjusted Volume” button
on the touchscreen to activate the Speed
Adjusted Volume screen. The Speed Ad-
justed Volume is adjusted by pressing the
volume level indicator. This alters the auto-
matic adjustment of the audio volume with
variation to vehicle speed.
Loudness — If Equipped
• Press the “On” button on the touchscreen
to activate Loudness. Press “Off” to deac-
tivate this feature. When Loudness is On,
the sound quality at lower volumes
improves.
293
Page 296 of 368

AUX Volume Offset
• Press the “AUX Volume Offset” button on
the touchscreen to activate the AUX Vol-
ume Offset screen. The AUX Volume Offset
is adjusted by pressing of the “+” and “–”
buttons. This alters the AUX input audio
volume. The level value, which spans be-
tween plus or minus three, is displayed
above the adjustment bar.
Auto Play — If Equipped
• Press the “Auto Play” button on the touch-
screen to activate the Auto Play screen. The
Auto Play feature has two settings “On”
and “Off.” With Auto Play on, music begins
playing from a connected device, immedi-
ately after it is connected to the radio.
Auto On Radio — If Equipped
• The Radio automatically turns on when
vehicle is in run or will recall whether it was
on or off at last ignition off.Radio Off With Door — If Equipped
• Press the “Radio Off With Door” button on
the touchscreen to activate the Radio Off
With Door screen. The Radio Off With Door
feature, when activated, keeps the radio on
until the driver or passenger door is opened,
or when the Radio Off Delay selected time
has expired.
Drag & Drop Menu Bar
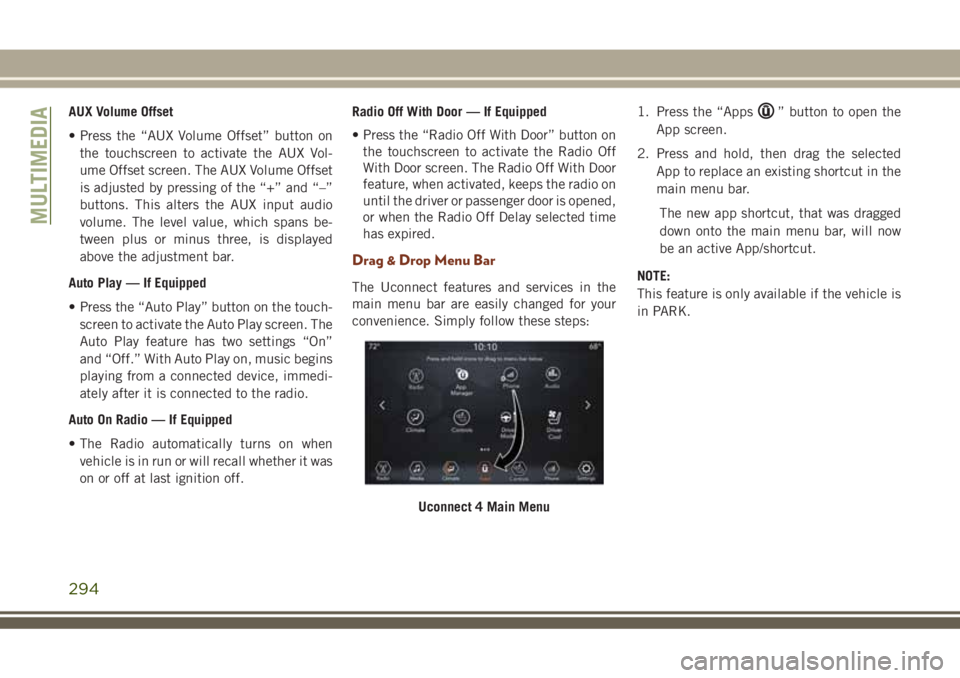
The Uconnect features and services in the
main menu bar are easily changed for your
convenience. Simply follow these steps:1. Press the “Apps
” button to open the
App screen.
2. Press and hold, then drag the selected
App to replace an existing shortcut in the
main menu bar.
The new app shortcut, that was dragged
down onto the main menu bar, will now
be an active App/shortcut.
NOTE:
This feature is only available if the vehicle is
in PARK.
Uconnect 4 Main Menu
MULTIMEDIA
294